What can I use on Linux for a Shapeoko Pro?

Carbide Create is a 2.5D CAD/CAM app:

https://carbide3d.com/carbidecreate/

which has an optional Pro mode which adds 3D modeling and toolpaths and an engraving toolpath:

https://carbide3d.com/carbidecreate/pro

Not sure why you’d need USB/IP — just connect the RPi to the machine and run Carbide Motion on it, then connect to the RPi over the network connection and control it using VNC or something similar.

But that’s just CC, right? Other CAM apps will be able to handle true 3D from something like an STL file, right?

3 reasons:

  1. The lag I often see on VNC drives me crazy. True, it’s functional and I can do what I need, but often there’s a lag. (I’m also looking at forwarding X, as I’ve done before, and seeing if that goes faster.)

  2. I’m doing this, now, with the Shapeoko. I’m also using a 3D printer and there are a few other devices that, in the long run, will be hooked up. If I can use USB/IP, then, after upgrade time, I can run everything on the Mac I’ll have in the shop, eliminating the issue of VNC or another remote desktop.

  3. It’s hard to find support on all 3 OSes (Windows, Mac, Linux). some support Linux and not Mac, but those are few. Most support Mac and not Linux. So if I can use USB/IP, I can run everything on the Mac and not have to worry about finding Linux supported software for every tool I hook up to the Pi.

Remember, my original design was to run USB-over-ethernet-cable to the ceiling connector, but I found out that won’t work since I used fiber for that line. So, in the long run, if the Pi can basically act as a USB hub and I can connect to everything on it with USB/IP from my Mac, that lets me go with my original plans.

(Note: USB/IP, in the original form, is for Windows and Linux, but there are a number of people who have extended this to support Mac and add features to it.)

I think you’ve got the point, yes.

However I’d think of Carbide Create as a 2D CAM package more than 2.5D, as it’s mostly just able to repeat 2D toolpaths at different depths. You’re still limited to 2D features.

If you look at a more complete package like Fusion 360, it’s able to make much better use of 2.5D toolpaths: it will automatically generate different toolpaths at different depths.

Each depth is still a 2D toolpath but since you have a different toolpath at each level, you can generate more flexible geometry. Think of topological contour lines. They’re all 2D but they’re at different heights. Combine them and you can model terrain.

Yes, it’s a limitation of Carbide Create, not the machine.

Usually, yes. If you were remoting to a Windows machine, I’d strongly recommend Parsec and if you were remoting to a Linux machine I’d recommend Xpra. Both of those options are basically zero perceptible lag for me.

Apparently Parsec has a Mac preview so maybe worth a look.

If you’re mainly making cosmetic objects with no tolerances, fits or assembly, like statutes or something, that might be fine. If you’re going to do anything mechanical though, I’d strongly recommend you move both your CAD and CAM to Fusion 360.

Blender is a fantastic tool for artists but it’s neither intended nor suited for mechanical design or manufacturing.

If you’re not aware of the difference, the short of it is: Blender is a tool for making your artistic vision come to life. It’s about allowing you to make things that look the way you want. A CAD package is a tool for designing mechanical objects that meet the design requirements.

If you need a part that has even a single important measurement associated with it (e.g. the distance between two holes or the size of a PCB that will be held inside your object), you probably want CAD, not Blender.

I’d still recommend sticking the Pi on the Shapeoko rather than relying on a long USB cable. The shorter, the less prone to interference and therefore the better.

+1. I think at this point USB/IP might just be lodged in your head @Tango. With cncjs or Carbide Create + VNC, you should be set already.

And actually, on further thought, I see a problem here that I assumed was clear but maybe wasn’t: You need an interface next to the Shapeoko.

It’s essential to be able to interact with the machine controller while you’re standing at the machine. It’s not good enough to have the computer running the controller running on the other side of the room, unless you have some way of interacting with it while you’re standing next to the Shapeoko.

This is essential for tons of reasons:

  • You want to be actively supervising the machine from the very instant it starts a job. If the spindle doesn’t start or the machine starts plunging where it shouldn’t, you need to be able to react quickly and shut it down.

  • You want to be able to move the machine manually while you move stuff around or use your eyes. For example for touching off stock or aligning stuff.

  • So you can play with feed override while you watch the cut.

There are more but I can’t think of more off the top of my head.

For much the same reasons, you want the machine controlling the Shapeoko to be directly connected to it with a USB cable.

I’d really very strongly recommend that for your setup, you get a screen of some kind for the Raspberry Pi and directly wire it to the Shapeoko with USB. There are cheap touchscreens which work well and are super convenient, or you can use an old monitor (or the cheapest shittiest one you can find).

1 Like

Correct. Carbide Create is a 2.5D CAD/CAM app, there are other 2.5D CAD/CAM apps (Vectric Cut2D comes to mind), and there are 3D CAD tools which will make 3D STL files, and 3D CAM applications such as MeshCAM, PyCAM, &c. which will make G-Code for 3D.

I’m thinking about other points you’ve made, but just this one for now - since I have to get out and do a few things right now.

What about if I’m using CNCjs on the Pi and using my browser, in a tablet, to interact with it?

I have set the workstation up so I can see the Shapeoko. While I’m not right there, I can observe it easily from the workstation. I’d more likely be using a tablet with CNCjs at this point, though.

While I can’t speak to CNCjs, I will note that CM4 had a hybrid architecture where there was a back-end running and connected to the machine over USB, while the graphical front-end connected to that using network communication — it was possible to connect to the back-end using any web browser which could access the machine’s IP on that port.

Given that it’s possible to send a packet to Europe and get a reply faster than a computer can change the colour of a pixel so that a person can see that change, it shouldn’t be an issue.

That should work just fine, though I’d be concerned about wifi disconnects.

One reason I might sound overly crazy about the connection method is that a lot of folks on this forum have had issues with things like EMI causing disconnects. The more distant your control mechanism is from that USB cable and the longer that cable is, the more prone you are to problems like that.

It should be close enough that you can have one hand inside the Shapeoko and the other hand on its controls. You need this for things like touching off with a dowel pin in the spindle (slowly move the Shapeoko closer to your stock and rotate the pin by hand, stop when you start to feel friction).

1 Like

Could you go more into this? Just to be sure, you mean Carbide Motion 4, right?

I checked the downloads and that has CM5 at this point. Is this feature only for 4 and was dropped?

So if I have that on the Pi, then I can control it from a browser just like with CNCjs is supposed to work?

The feature was specific to v4.

For the Raspberry Pi running CM5 you would have to control the Pi using VNC or some similar remote control software.

Thanks for clarifying!

While I’m still not sure and have to finish assembling my system, I suspect I’ll probably want to go with CNCjs. One big reason is that I can control it from a tablet easily that way.

I’m also setting up my 3D printer, too. I like to ask these questions before I get to the stage where I need the answers so I don’t get things put together then wait until I can find out about the next stage. I try to keep ahead of where I am. Sometimes that also helps me make decisions on how to set things up or changes to make along the way.

1 Like

While there are technical means to give yourself distance from an operating Shapeoko, they are somewhat unimportant.

This is not a 3D printer, and it is not safe to leave it to do its work unattended. You need to be in the same room when it is running, so having your interface next to the machine is probably the best and easiest solution.

1 Like

A point on distance: While my workstation is going to be behind what amounts to a shower curtain to protect it from dust, and while it’s a fair distance for the cables to go from there, through the wall, over the ceiling, and to my Shapeoko, in terms of steps, it’s only one LONG stride away. So it’s not like I’m setting things up far off. It’s more the geometry and that I’m not about to run cables along a floor or anything like that. I’ve had a messy shop before, several times, when I had to squeeze things in and have had accidents from tripping or trying to get around things, so the big distance issue is getting the cables from A to B.

2 Likes

Clarity obtained :slight_smile:

For what it’s worth - I run cncjs on my pi with no issues. You can access it via browser on your laptop, phone, tablet, etc. My pi is connected to my Shapeoko by USB. When you load a file, it is sent to the pi in whole. If you lose internet it doesn’t matter, cncjs is sending the gcode from the pi through USB at that point, not your browser. You can refresh your browser, use multiple devices, whatever. You’re just looking at a web page.

One thing thing to note, if your browser hangs and loses communication, which has happened to me, especially if your computer goes to sleep, you won’t be able to quickly gain control again if something goes haywire. Make sure you have a e-stop switch. Even if you have control, pausing with (any) software inserts gcode which will be behind anything already buffered on the grbl device, meaning there will be a delay.

tl;dr - I love cncjs on my raspberry pi :blush:

1 Like

I take it this could be just a big red button I press to stop - but how do I wire it in? In other words, put it between what and what?

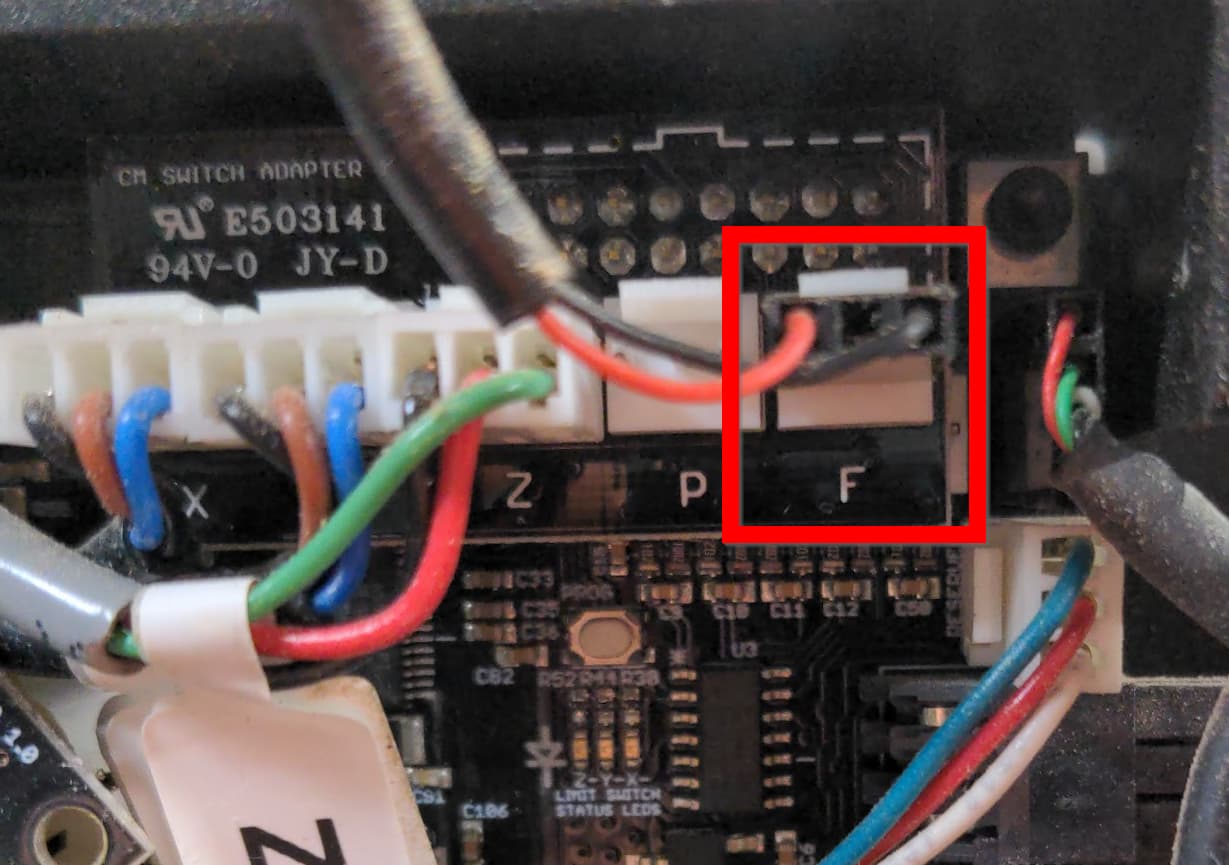
I’m sure this will depend on your board, mine is a 2.4e. On the riser board for the limit switches, there is one labeled “F”. This is technically a feed hold, pauses the run, raises the Z axis, not a true e-stop. But serves the purpose for me. Shorting the two outer pins will initiate a feed hold.

This also triggers a pause in the cncjs program - when you release the switch you’ll have to click resume in cncjs.

This post shows my estop switch setup about half way down, and also talks a little about using cncjs (but is mainly about setting up my SuperPID).

Since then I switched to running cncjs on a pi. If you decide to use cncjs, here’s a cool trick I discovered for setting up some quick macro buttons:

I’ve tried the phone interface, but honestly a little small and hard to hit the right “button” when you’re not looking at the screen. I have an old laptop running Pop_OS! that I use for the browser interface and a small bluetooth keyboard to send job commands. The tactile keys make it much easier.

Another cool cncjs feature - setup a streaming webcam through the same pi, you can display it in your cncjs browser window. When doing long multi-hour jobs, It’s a great way to keep an eye on what’s happening in the garage while I’m on conference calls. :wink:

There are two options here:

  • Feed-hold as described by @dandangerous
  • Emergency Stop which kills power to the machine, the spindle/trim router, and the vacuum — in the event of an emergency, you want everything to stop moving
1 Like

There are two categories of event here and I think it’s important to distinguish them:

  • Feed hold: Use this when you want to politely ask the machine to stop. If it’s in the middle of a job and you’d like to clean away the chips if it’s not too much trouble, you use the feed hold.

  • E-stop: Use this when you’re making the machine stop whether it likes it or not. If someone foolishly stuck a limb into the machine while it was running and the spindle is currently in the process of removing some fingers, you use the E-stop. If the machine is about to cause a fire, you use the E-stop. If the machine is running but its controls are not responding, you use the E-stop.

In my opinion, the E-stop is essential, the feed hold is optional.

There was a big thread on E-stop a little while ago which I think is a good start. The important thing is that when something goes wrong, the E-stop can be used instantly, without thinking, and it should do whatever needs to be done to ensure the machine cannot continue to operate.

1 Like

This topic was automatically closed after 30 days. New replies are no longer allowed.