What did you cut on your Shapeoko/ Nomad today?

Had some scrap and saw a similar thing done with leather so I thought I would try. These are for holding your book open. Stick you thumb through and place it in the center of the pages. One is finished with poly and the other was left unfinished. Seems like a really good way to use up really small pieces of scrap.

10 Likes

If you want bling prime it white and use silver or your choice of mica powder mixed in epoxy. Although I do want to see a solid brass version.

Agreed.

Too bad so many don’t know what a book is.

3 Likes

Hey @DrPete , sorry for the long delay answering. Yes, 60 degree v-carve for the swords, skulls and text.

More fun with inlay. Made a small wedding gift for friends who just got married this weekend. Failed a couple of times because it’s hard to keep the long string of letters exactly where they need to be. I added a chamfer to the letters and that helped them go in much smoother. Made a fridge magnet too with the 1st success of letters before putting the inlay in the tray.


15 Likes

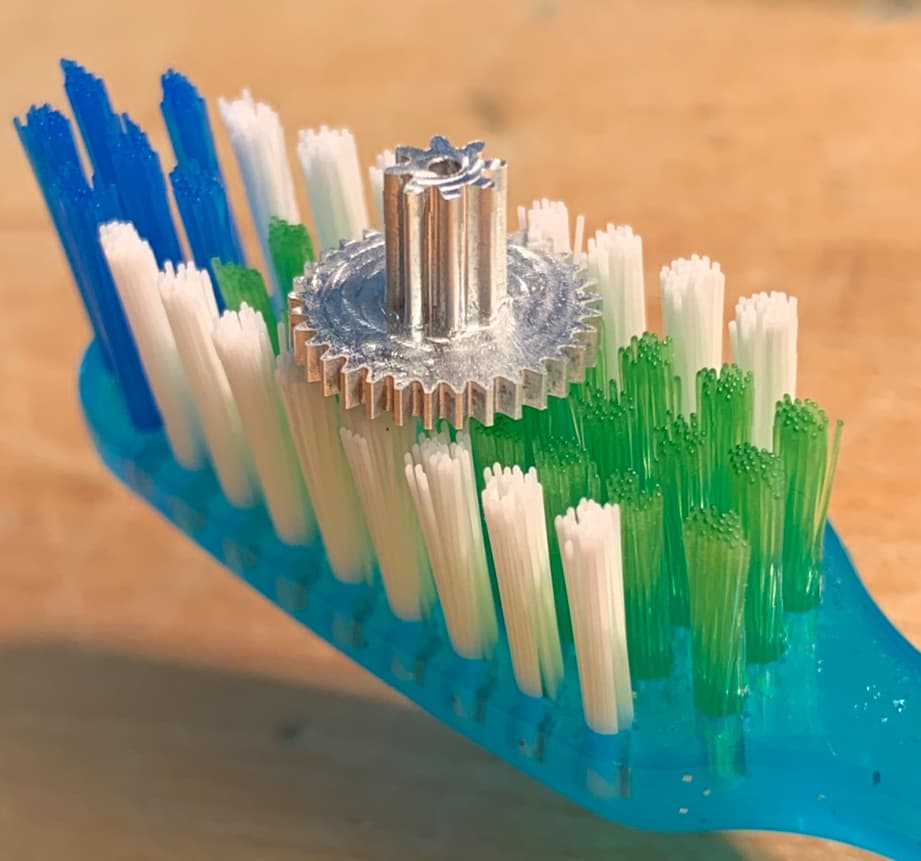
Finally got this part to come out correctly :slightly_smiling_face: This is a duplex gear that has 0.3M and 0.4M gear teeth. The teeth were cut with a 0.4 x 5mm endmill and 0.3 x 1.5mm endmill, which is about the same diameter as a single bristle of the toothbrush, which measures about 0.25mm. Material is 7075 aluminum. Cut on my Nomad 3.

31 Likes

Nice fish; where did you find the pattern?

Don Barr fmr. ET1(SS)

1 Like

Wanted to extend a shout-out to @Goshawk29 for his inspiring this ornament from his post here


Finished using a 1mm tapered ballnose using a .004 stepover = no sanding :laughing:
Could’ve used a smaller bit for the lettering though.

12 Likes

About 6 months ago my 97 year old aunt passed away. Here daughter has been cleaning out her house. She gave me a 5x7 picture of my sister’s graduation in 1962. So the frame was rather crusty so I made a new one out of oak. I vcarved her name and 1962 into it and will send it to her for Christmas.

Here are the other components. I have ordered some turn buttons to hold the back in place. There is a back and a kick stand. The ribbon is from a cigar box and I will glue it in place to keep the kick stand in place. Some final sanding, painting the vcarve text and finishing. Santa is busy in my shop.

The whole thing was cut on my Shapeoko 3 HDZ.

I used the Groovee Jenny 60 degree Vee Bit and I am impressed by the smooth cut it give. It is a down cut vee bit.

Edit: Here is the finished project with the picture installed.

15 Likes

Hey Don, i got the file from ETSY. I am a surface guy but stationed on a sub base so made those for a sub guy in the office.

Heres what i made recent. I must say, its a great feeling when you know your machine is dialed in!


21 Likes

The inlay work on the names is awesome. What did bit did you use for that?

Thanks! I used 4 down cut square endmills and 1 ball endmill for the letters. Not sure that was the most efficient way to go about it but that’s how I did it. I used a 1/16" square for the removing most of the mass from the stock I had. Then down to 1/32" square for most of the letters, 0.024" square then on to 0.015" square. I used the 1/32 ball to chamfer the letters allow them to slip into position in the tray easier. I used ‘rest machining’ for all 4 of the square end mills so that as I used the smaller tool it would only continue to cut where the larger endmill left off and couldn’t reach due to it’s diameter. I used fusion 360 for the design and the manufacturing. Took about 25 minutes to cut the maple inlay letters.

3 Likes

What wood is this cut on?.. Looks like a soft wood that’s not pine!!

Poplar…my first choice for boxes (for my tool storage)

2 Likes

Nice job! Curious on a few things here…

  • What DOC and feed rate did you use to get there?
  • Do you find 7075 to work any / much differently than 6061?

Cut the first part of this year’s xmas puzzle. Simple little thumbscrew/handle with a reverse thread. Cut out of copper. The plan is to give this and a few other copper parts a red/purple patina with sodium sulfide.


After a quick beadblast and now it looks amazing.

24 Likes

I will be interested to see how the patination turns out.

I have used Ammonia to give a blueish patina and Copper 2 Sulphate (both hot & cold applied) to achieve a green patina, I have yet to try sodium sulphide.

For the both small end mills I used 0.03mm step over, 0.1mm depth of cut, and 400mm/s feed rate.
I cut the gear at first in 6061 and then again in 7075. I broke two end mills getting the speeds and feeds right in the 7075. I didn’t break enough to really say how much harder 7075 was exactly but it was not too bad. Maximum material removal rate in roughing with a 2mm single flute end mill was only 0.5cc/min.

I should have asked before… how did you hold the work? Did you just cut top down, and leave an onion skin? I’m finding workholding to be as much of a challenge as design in most cases.