[WIP] Tiny lapping machine

I do a lot of work with small pieces of brass. Most of these are either punched sheet or lathe cut blanks, neither of which produces a particularly flat part…

Awhile back I started looking into lapping machines for flattening faces in a semi automated fashion. (Note: not lapidary machines for cutting gems, that’s a different beast)
The only problem with a lapping machine is the price. Absurdly expensive for even a small one and even a small one is huge for my needs. I’m working with sub 15mm diameter pieces usually…a 12” lap master is overkill. Though I’d pick one up in a heartbeat if the price was right :stuck_out_tongue_winking_eye:

What makes them so expensive? Well, they’re pretty darn precise machines.
The spinning platter needs to be pretty darn flat as that is the surface you are transferring to the workpiece.
The spindle for that lap needs to have very little error motion (at least axially, I don’t think radial error motion matters as much…but I’m no expert so :man_shrugging:)
There are some built in features such as speed control for the motors and pumps for the abrasive slurry that are probably not too difficult to produce but they’re not incredibly common either. So maybe that contributes to price.

Regardless of why they are expensive, I just can’t justify dropping the cash on one. So I decided I’ll just make my own. I suppose this is documentation of that journey. Maybe it’ll even get finished some day. (Sorry in advance to the mods for the inevitable requests to reopen this thread :beers:)


Here is my thought process on constrains for this diy lapping machine:

  • an incredibly flat surface to use as the lap
  • a bearing assembly with very accurate motion
  • cheap
  • easy to get our hands on
  • relatively small

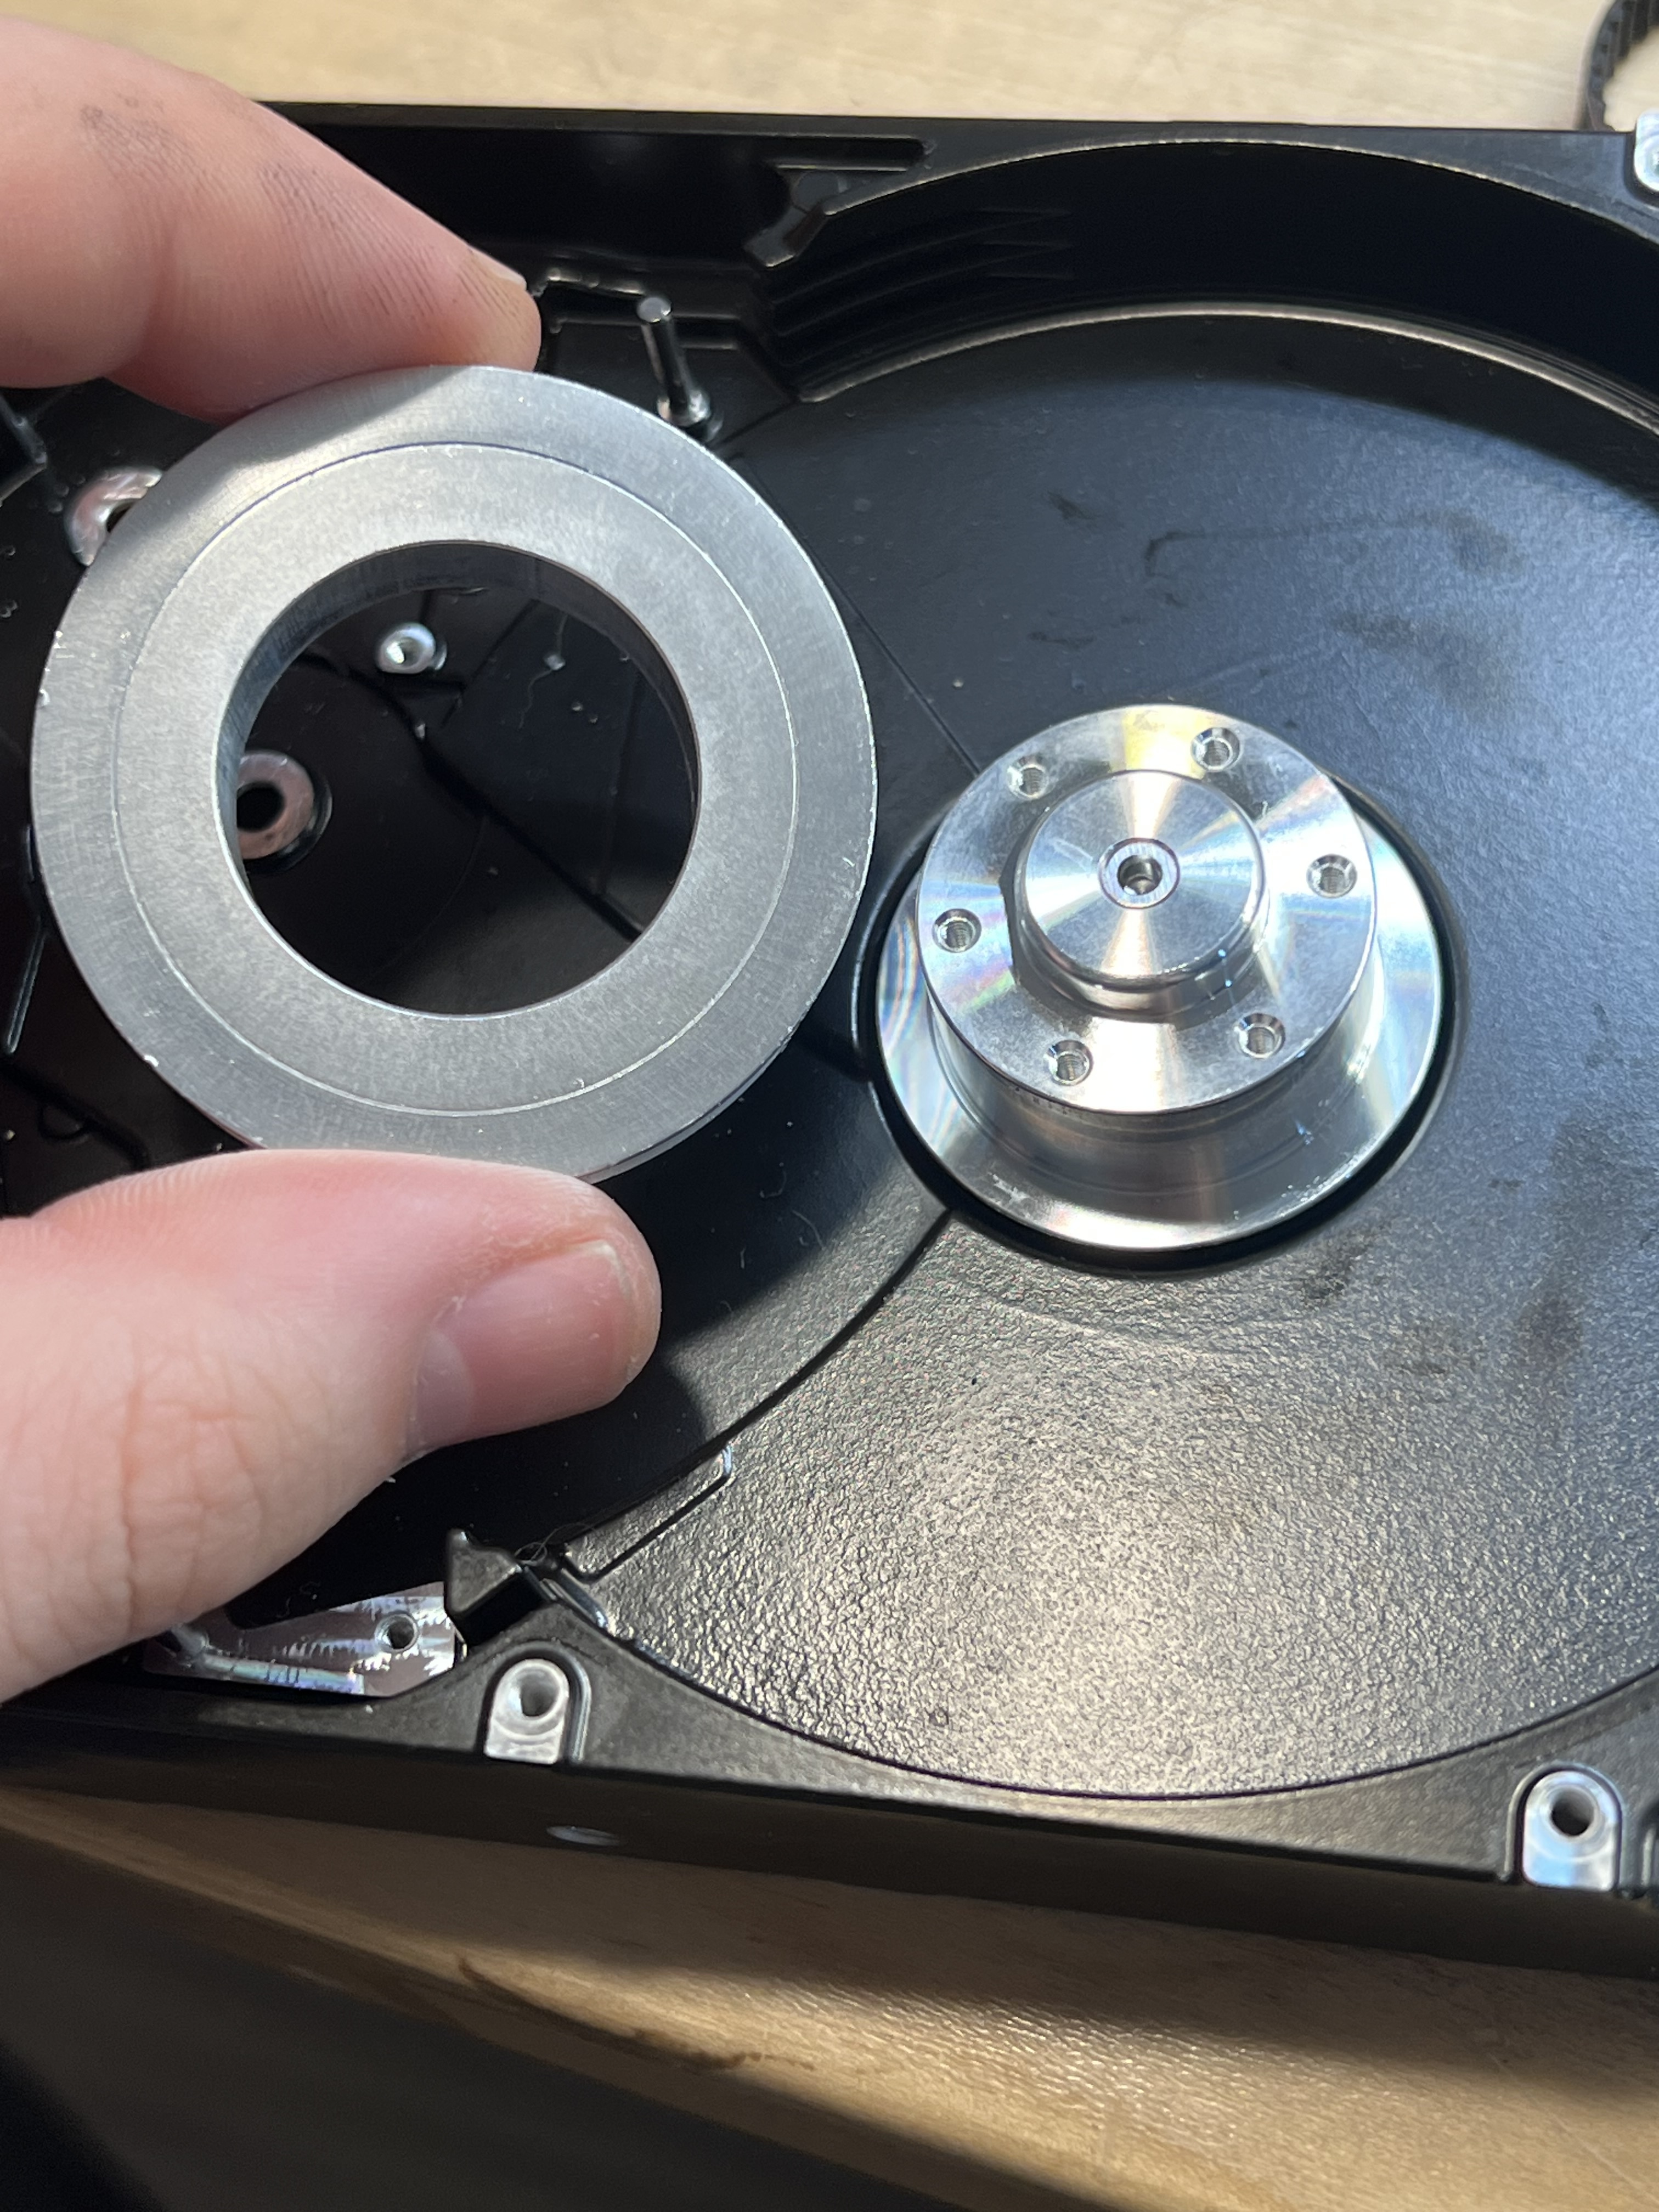
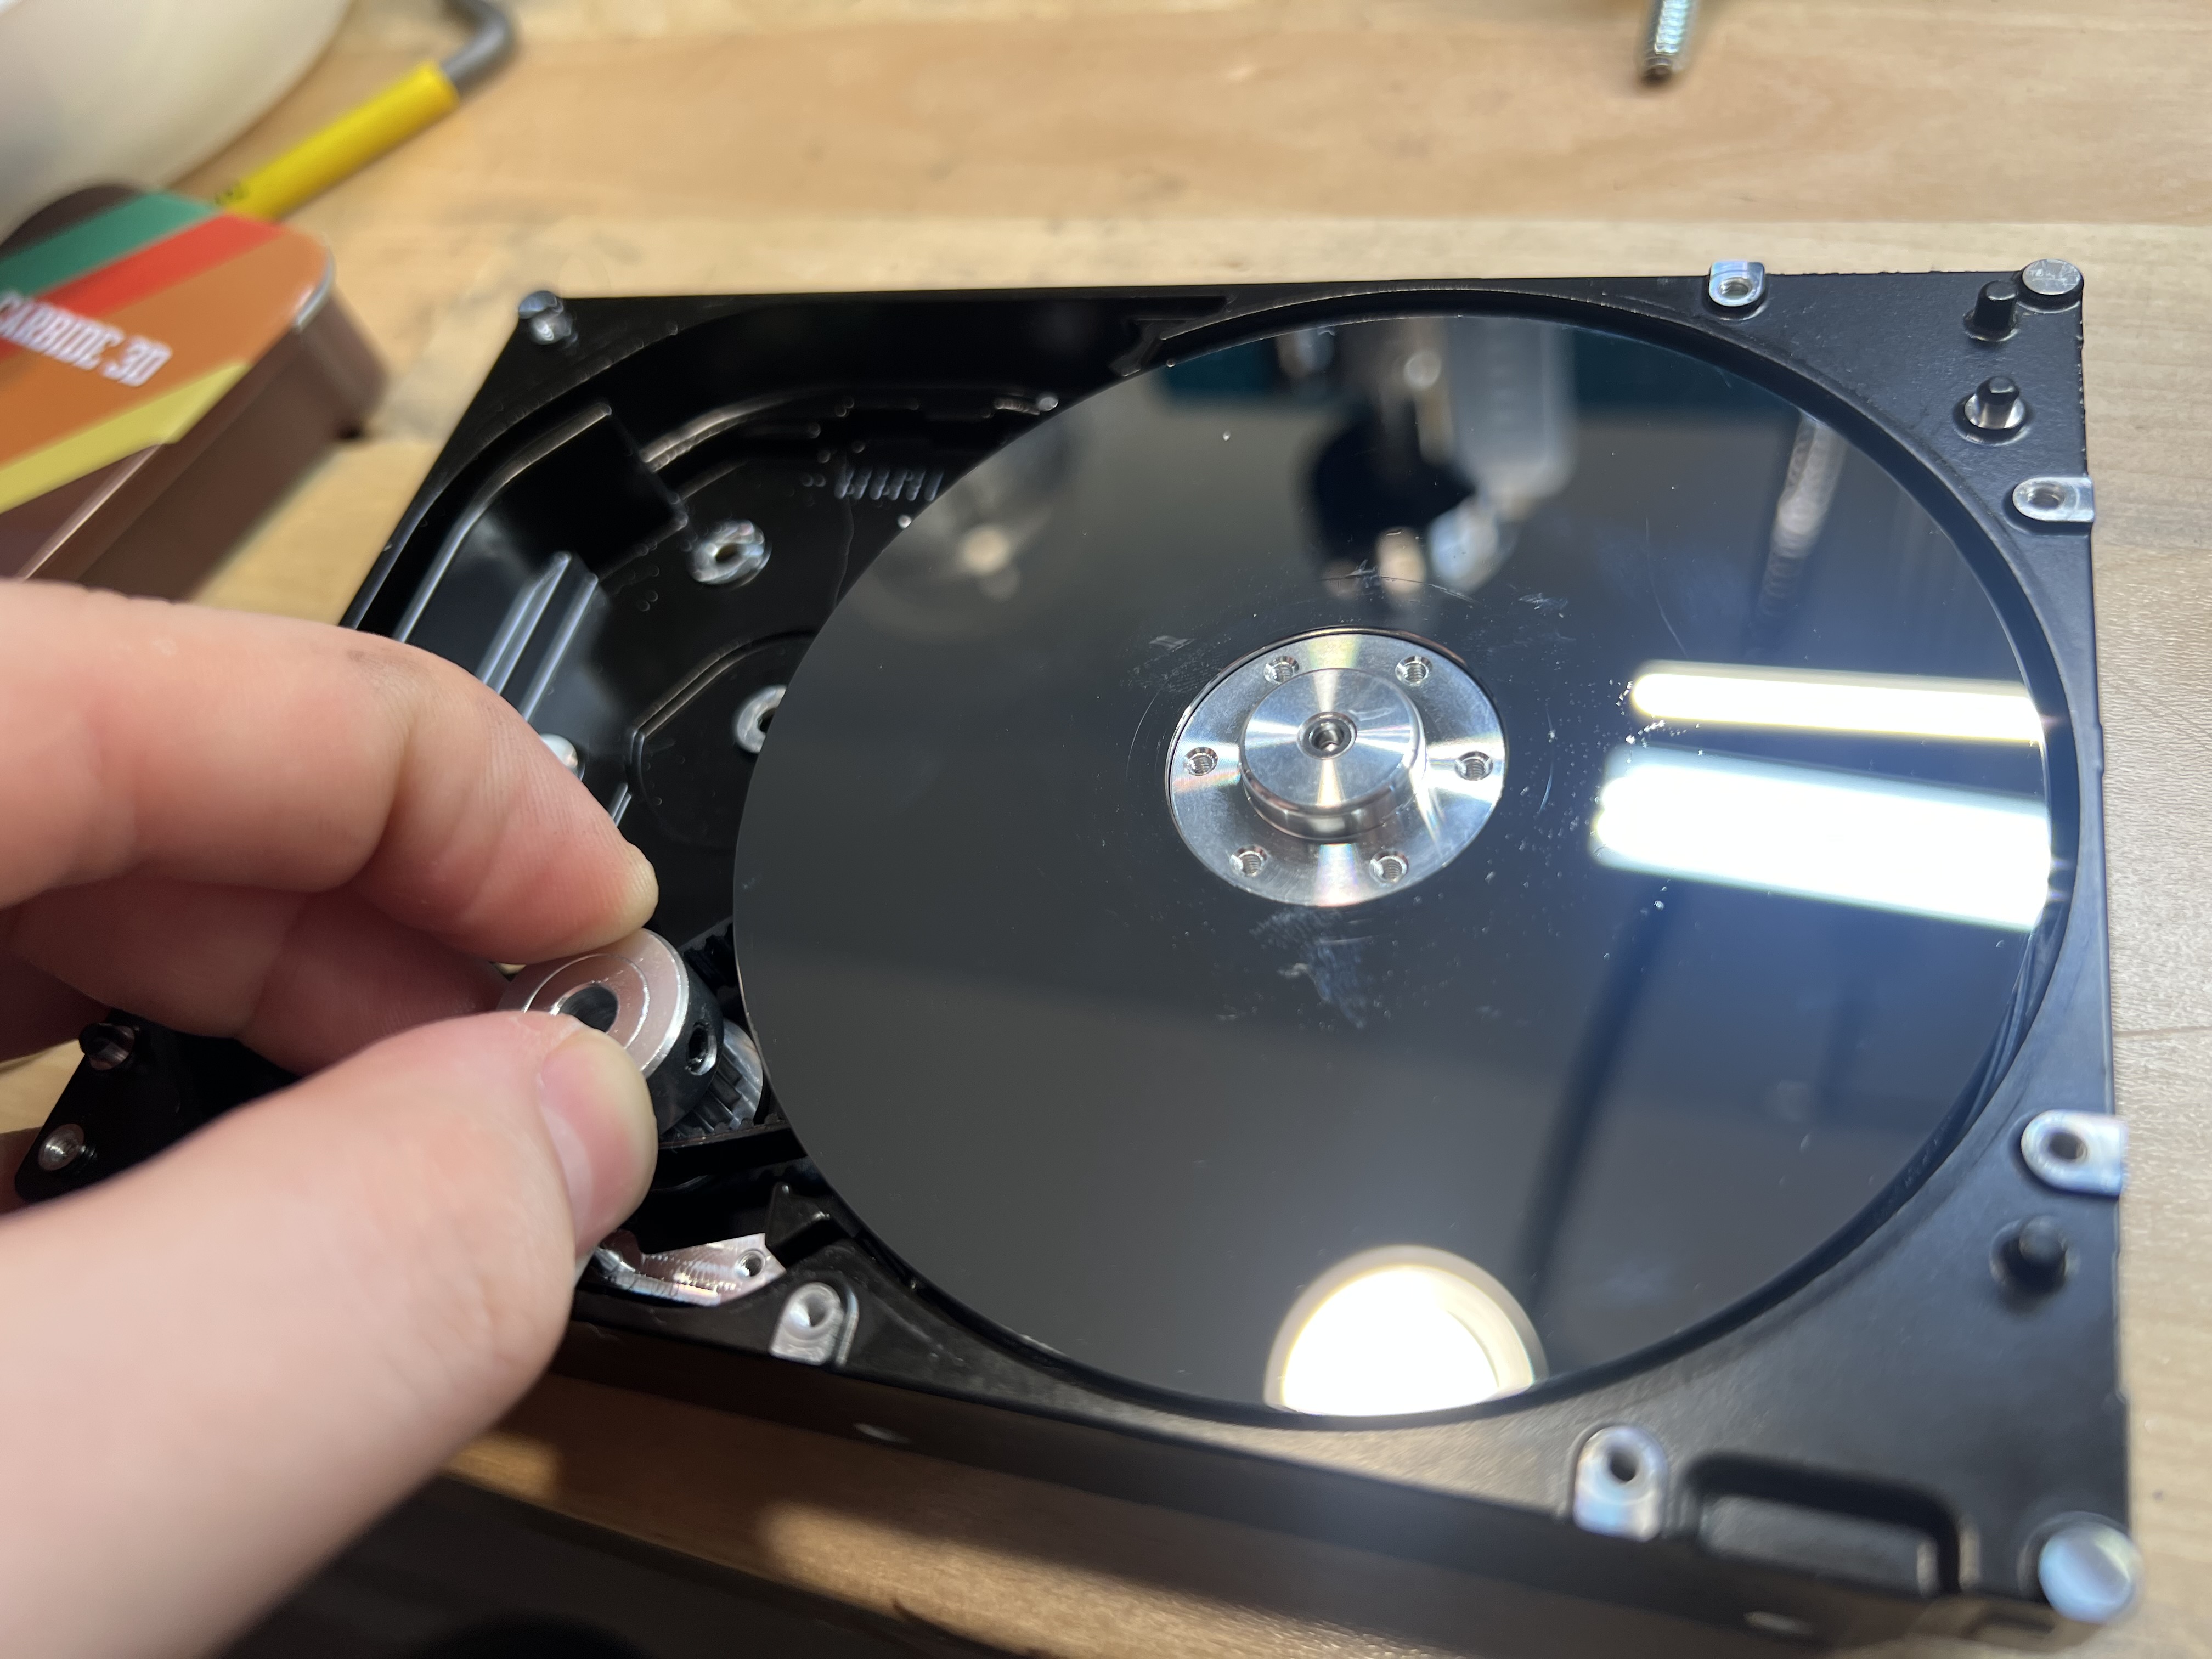
These constrains led me to the 3.5” HDD.
The platters of a hard drive can be aluminum or glass/ceramic. We want aluminum platters. These can be charged with lapping compound to get a good cutting and rolling abrasive action.
The platters are just absurdly flat, probably the flattest commercially produced mass manufactured product in human history.
There are generally multiple platters per HDD which is a nice bonus.
The only problem is that they may have some heavy metals sputtered onto the surface. Platinum and cobalt seem to be common so care must be taken if they are to be used safely.

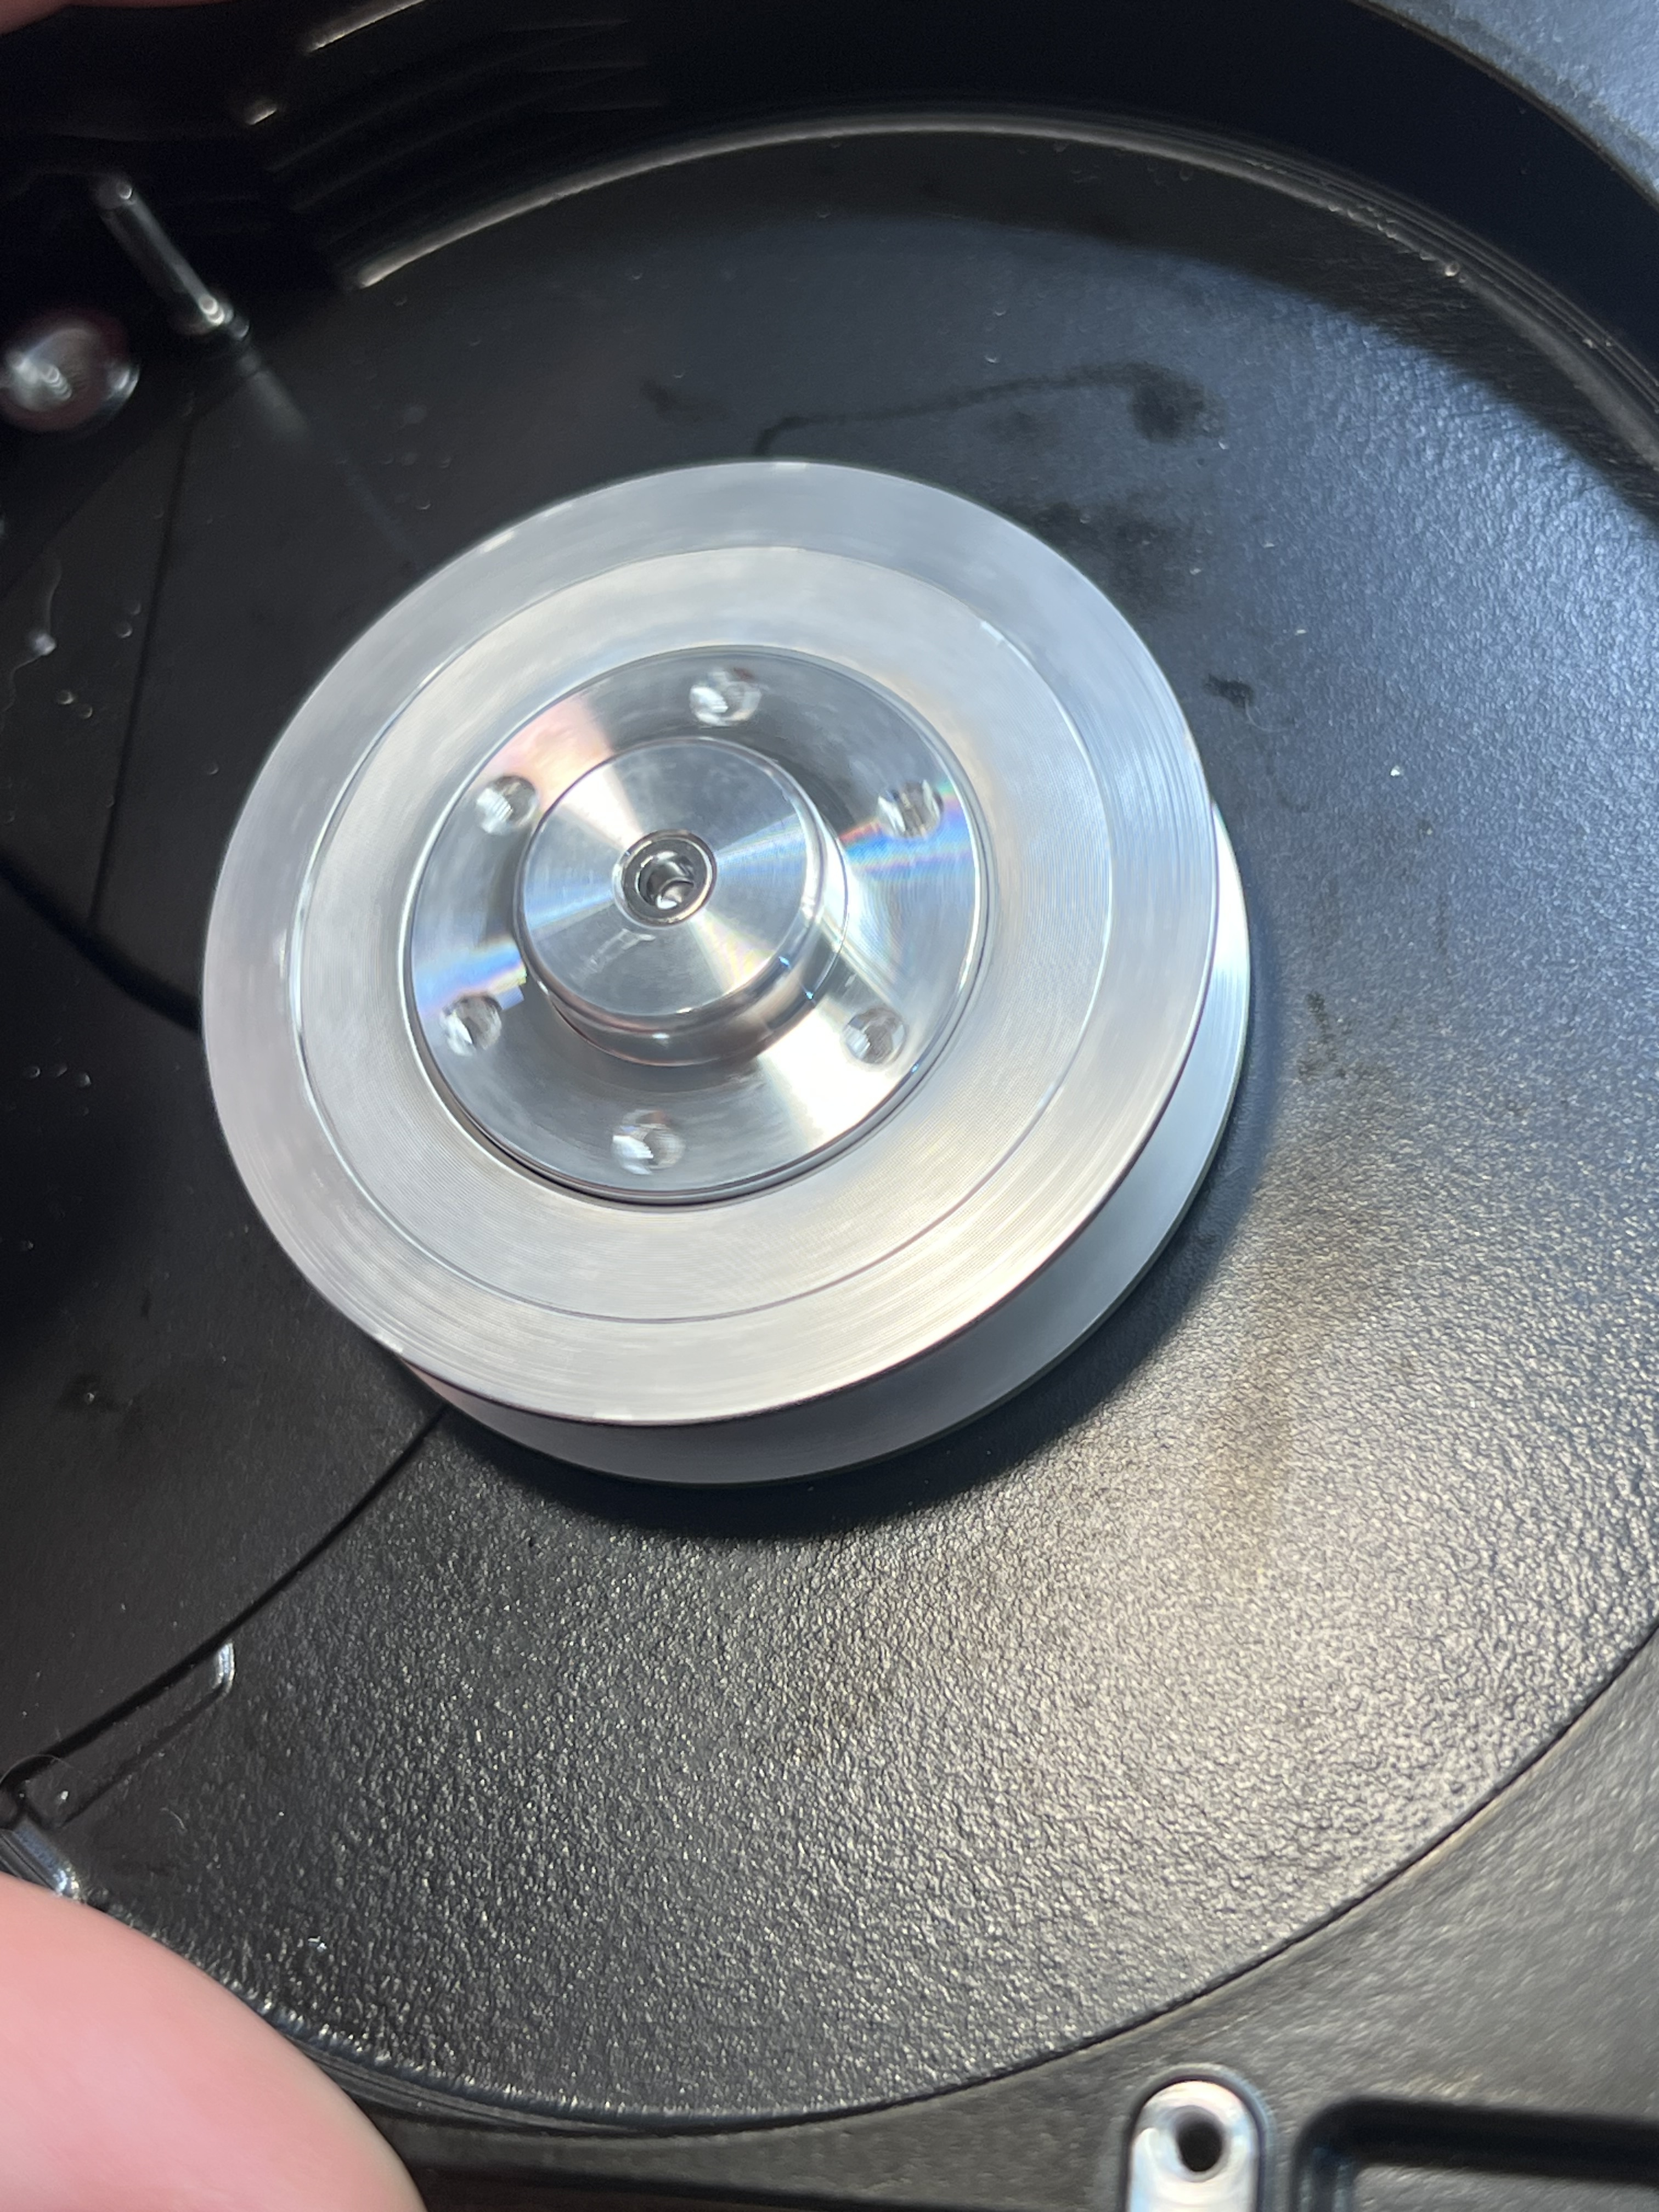
Cool, that’s the laps figured out, what about the spindle?
Well that’s already answered by the HDD as well! The brushless motor assembly is very precise and fit for purpose to drive the platters we already plan on using. BUT that motor doesn’t have nearly the torque needed for our relatively modest requirements. They generally spin at many thousands of rpm and we’re looking for the high tens or low hundreds of rpm.
Still, I think it’ll make for an excellent stack up if we can drive it with a belt or pulley system.

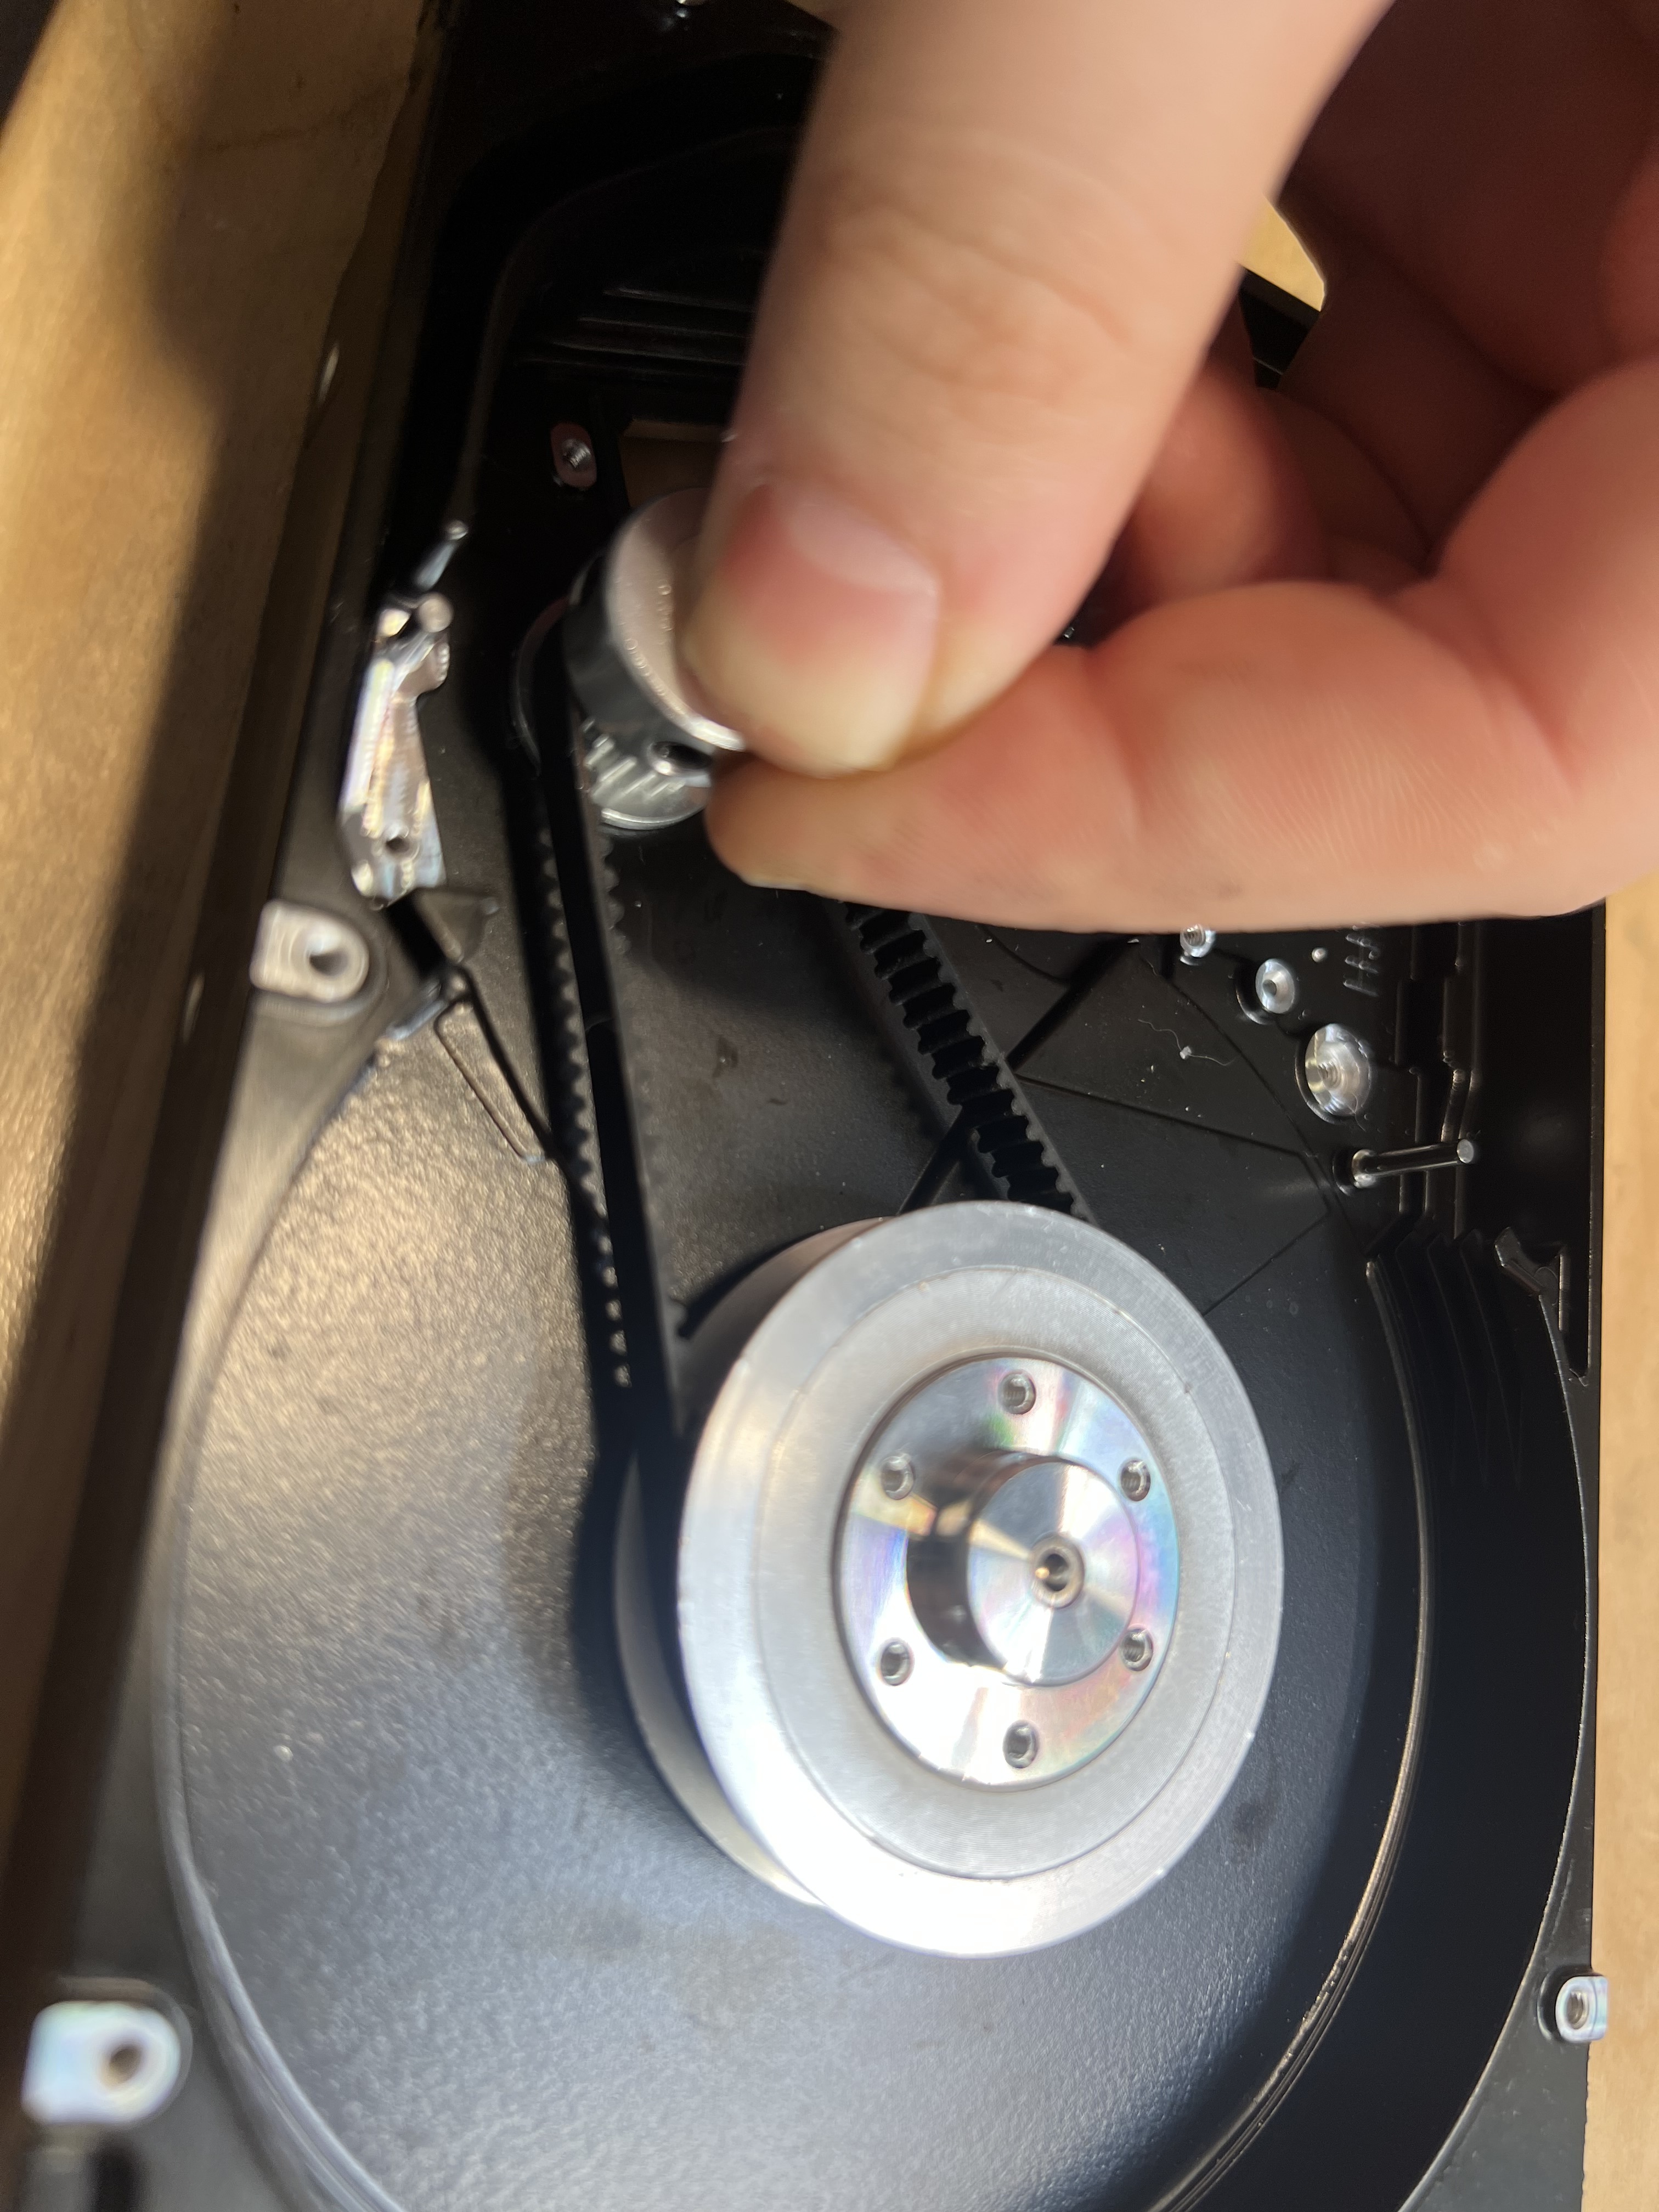
I spent a bit of time mocking up a test bed and boring out a gear to fit the HDD shaft. It looks promising so far:

Another benefit of using HDDs is that they’re dirt cheap. Don’t go and buy a new one, the broken ones on eBay are usually discarded and sold as scrap because of logical issues. The mechanics of the drives are almost always perfect. So consider it an opportunity to upcycle :yum:

That’s it for now. Just wanted to get the idea out there before I move on for the day.
As always, let me know what you think. There’s a lot more to do on this little project but if I’m headed down the wrong path, I’d rather know sooner than later :wink:

8 Likes

Tyler, two comments.

  1. That’s a 5.25" drive, isn’t it?
  2. I’m bummed I can only hit the “like” button once…

Freaking awesome idea and concept.

[I guess that’s three comments… :slight_smile: ]

Makes me want a time machine to go back to my first job out of college. I was working for HP’s printer division in Boise ID, in the same building as Disk Memory Division. An 8" drive was a small one at the time…

I haven’t torn into an HDD for years, but it seems to me your #1 concern will be sealing the shaft/bearings against the abrasive slurry.

2 Likes

It’s a 3.5” drive but now that you mentioned it, I don’t know why they’re called 3.5” drives. Nothing about them is 3.5” :man_shrugging:

No need to go back in time, I’m betting the drives today are a hell of a lot cheaper than they were when you were in Boise :laughing:

You’re absolutely right about sealing the bearings, I’ve thought about it but haven’t landed on a good solution quite yet.
I’m hoping that we can get away with a standard gasket considering it’s low rpm and actively cooled via the slurry itself. So no heat to deal with.
If I can’t find anything fit for purpose, my best guess is a custom delrin sheath around the bottom of the bearing. If it comes to a thin taper against the wall of the spindle it should do ok.
Worst case, the drives were saved from the landfill anyway…maybe I’ll just consider them consumables :melting_face:

(And I’ve also wished I could like a post multiple times, glad to see I’m in good company :grin:)

There is (or at least used to be–I’m not able to Google right now) a company called Bal-Seal that makes high-tech lip seals–in the lab equipment job we used them for high-pressure liquid chromatography pumps. Stuff like spring-loaded Tefzel and stuff. Very inert but we were pumping high-purity solvents and not liquid with abrasives swimming around in it.

You are indeed right–my calibrated eyeballs are off today. I finally measured the platter vs. your thumb on the screen to get a rough comparison…

I remember 8" floppy drives from the early dedicated word processors, then 5.25", then the 3.5" in the hard shells. It’s taking a little getting used to PC’s with only SSD’s in them but very cool.

1 Like

All you need is to 3D print out a TPU seal to slide down over the shaft and out to the edges of the ID of the housing!! :upside_down_face:

2 Likes

My concern would be getting grit lodged in the seal and abrading the shaft…

I’m thinking attach a circular drip lip on the underside of the platter near the edge (so the slurry doesn’t wick inwards), and have a circumferential drip tray under the edge of the platter to catch the slurry and lead it back to the pump inlet. That way the shaft itself could have a simple seal like you suggest, Tim.

1 Like

These sound like pretty reasonable solutions. Reminiscent of what pottery wheel folks came up with ages ago and it’s been working well for them. I’ll give it a shot with a simple seal and some intentional redirection of the slurry.

1 Like

For personal computers, drive sizing was based on the dimensions of floppy drives (so one had 8", 5.25", 3.5") and for hard drives, the sizes were matched to hard drive units which would fit in a matching bay, so a 3.5" hard drive would fit in the same drive bay which would accommodate a 3.5" micro-floppy drive.

The even smaller 2.5" and 1.8" drives were proportionally scaled down dimensions from the 3.5" drives — when HP first tried to make their “Kittyhawk” 1.8" drives, they were turned down by every drive manufacturer then extent as being too small to be made, so an engineer thought about contacting watch manufacturers — Citizen agreed, which led to their involvement in personal computers (I still have some ribbons from a printer which they made).

2 Likes

My first PC, a Northgate 286, had a 40MB :astonished: 5.25" HD, and matching-size 1.2MB high-density floppy drive… (this is in Unsupported so I don’t feel too bad heading down this side road… :innocent:)

1 Like

So I won’t bother applying for a patent on the concept… :wink:

2 Likes

What your want is a metalographic polishing wheel. You can get diamond films to get really flat surfaces. 3D print a little holder with three replaceable screws to establish a parallel surface. There are mounting waxes you can use to bond the piece to the holder.

1 Like

Alumina would also work

Small update, I got around to measuring the spacers used between platters. As expected, they’re incredibly flat and parallel with exceptional consistency ring to ring.
I’m thinking they could make for decent conditioning rings :thinking:

Though if I end up going with lapping films I suppose conditioning doesn’t matter all too much. It’s coming along, slowly but surely :slightly_smiling_face:

2 Likes

Tyler,
I don’t know why this thread has fascinated me, but the one thing I keep scratching my head about is are you trying to get the blanks flat or high polish? Do you have other dimensional restrictions? (i.e. targeting a specific thickness and diameter) Lapping can make surfaces optically flat (usually spec’d by lamba/10 etc where lambda is the wavelength of light of interest).
You can get a pretty good high polish on things without going all the way down to lapping grits. Brass is soft so you will have to worrying about gumming things up.
If it is just the distortion at the edge as the coupon is stamped out of the sheet, couldn’t you just put it in a press between to hardened flats to get it mostly back to flat, and then take it the final way on some wet dry sand paper on some plate glass (or machinists flat). it is not hard to put a mirror finish on chisel and plane blades and those are much harder than brass.
Another approach is get thicker stock and do a light facing cut. ( I was the machine shop TA in graduate school for a while)

I guess the bottom line is what is the application? And what kind of volume of parts to expect to need to process?

John

1 Like

Glad to hear it caught your interest, whatever the reason :slightly_smiling_face:

The approach is mostly simple curiosity and exploration. I want to see if it can be done and how it can be done :slightly_smiling_face:

Flatness and to a lesser extent parallelism are the things I’m after most, part thickness being consistent would be nice to have but isn’t as critical.
The tokens I’m thinking of producing would be in a large enough quantity that manually pressing them flat again would be onerous. I’m thinking maybe 50 tokens per “set” but it’s all just guess work for now.
The tokens have some milling done, then they are laser engraved, and finally post processed (most likely just brought to a high polish)

Flatness on at least one side would be nice for seating into the fixtures nicely. Then the less flat upwards facing side gets faced anyway making it roughly flat, parallel, and consistent in thickness.
With decent fixturing, an entire set can be nested in one setup.

So step one would be roughly flattening the coins in a semi-automated fashion. Then I’d do all the “stuff” and finally they would get a high polish, again in a semi-automated fashion.
The drives and platters are cheap enough and small enough that I could conceive of a little cartridge based shelf system that could be wall mounted above my finishing sink/station
It would also facilitate multiple grits being set up, reducing the need to recharge or swap platters.

This is all just theory crafting and it fits into a bigger picture but it’s hard to put the grand plan into words. I do want to get to a point where the lapping actually matters someday instead of just being a general interest but that’s a ways off…and I think folks are more likely to engage if it’s broken up into chunks anyway :sweat_smile:


Ok, one last reason I’m doing this instead of just getting a press or a ready made metallographic machine is…space constraints. Apparently making things work in a small space has become a past time of mine :melting_face:
My current “shop” is just two rooms that combine for a total ~120 square feet. I can do a lot in this space but I’m always looking to do more, this makes for some interesting solutions to uncommon problems.
For example, the smallest pressure pot I could find was like a whole cubic foot! I can’t dedicate that much of my shop to a pressure pot. I made one that’s officially pressure rated to several hundred psi with off the shelf parts. It’s so small it can be pressurized to 60psi by hand in under a minute with a palm sized bike tire pump. Why? That’s another story :yum:

Hopefully that answers your head scratcher, if it doesn’t though feel free to continue asking questions :grin:


And before anyone asks, I’m not in a cell…I just started my hobbies living in a shared 500ft studio in Manhattan. We’ve since moved and the current ~120 square foot space is actually much larger than the previous ~16 square foot “shop” :rofl:

1 Like

This topic was automatically closed after 30 days. New replies are no longer allowed.