What I was trying to say in my last post is you would need an extra long end mill to get a through cut in the stock spoil boards, (when they are in their installed position) and if your drilling INTO aluminum with the Z-carriage that far extended in the -Z direction AND had that much bit hanging out my assumption would be you would have a pretty tough time making clean holes and threads? Thoughts?
Mount it on top of your current wasteboard to drill the holes?
1 Like
Yes, I suppose just would’t be as perfectly square to the machine.
1 Like
If your machine is well trammed, I think that if you are careful on placing your stock, you should be square or very very close and it would certainly be more square than drilling them by hand. By moving the spindle to the maximum positions from W to E and N to S, you can align reference points on your stock to ensure the stock is square with the movement of your spindle.
1 Like
Yup - IMO having perfectly perpendicular holes is far less important than having clean holes of the correct diameter for the manual tapping process.
Drilling will cause radial and axial torque on the spindle. The machine forces that result from both components are independent of drill Z-axis “stick-out”. The forces, which are dependent on the fixed X and Y axis “stick-outs”, can be reduced by increasing the speed and reducing the feed rate.
Rather than putting threaded inserts into the epoxy, you could glue bolts into your form, heads down, so that a small section of the threads would stick out of the top of the epoxy. The sacrificial wasteboard (or first of two wasteboards) could be held down with recessed nuts.
2 Likes
Or T-nuts? Then recessed or flat head aluminum screws could be used to secure the waste-board.
The only issue I see is finding a way to keep epoxy out of the interior of the t-nuts as you pour. You would also have to use very specific length screws, since there would be no void past the t-nut.
Screws coated with epoxy release/barrier of some sort?
1 Like
While I don’t think you would get good results by encasing T-nuts in Epoxy, it would be too hard to place and maintain then in a precise position. However, if there was a way to keep them in position, I would fill them with wax to ensure no epoxy goes inside and can be removed after the epoxy has set.
1 Like
OOPs - I missed that. I assumed the T-nuts (which are available in different lengths and types) would be on the bottom of the base board (like they are commonly used). I guess you have the option of imbedding them anywhere in the pour though. Epoxy release coated bolts/screws in/thru them would allow them to be positioned like your inverted bolts.
This thread is making me consider this (aluminum base) more seriously. I was just wondering, if I’m going to always use a spoilboard anyway, why not just mount the aluminum base UNDER the frame? Wouldn’t that give the advantages of strength and rigidity with minimal deflection? I don’t know enough to why I shouldn’t do this.
Thoughts?
I made a spoilboard smaller than the actual base, so I can use some of the threaded holes around the edges if I need to for… well… stuff (I don’t use them much but… well I could)
This is my current setup on the XL:
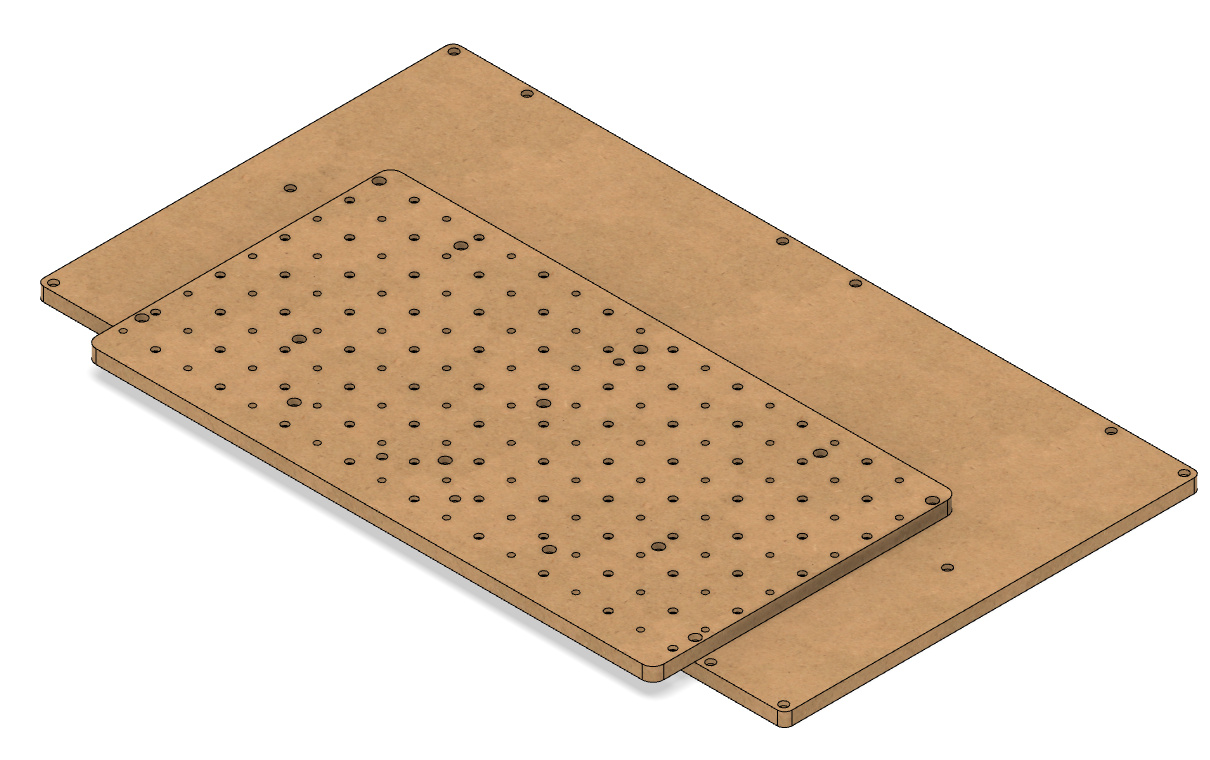
Alternating holes for 5mm threaded inserts and 8mm dowel pins. The dowels I use for alignment frequently. The 5mm threaded inserts are mostly my constant effort to destroy my SuckIt. I use tape and superglue for almost everything.
3 Likes
This topic was automatically closed 30 days after the last reply. New replies are no longer allowed.