I used three different file projects , waste board,cam clamps, fixed fence . All three made with 3/4" mdf. After importing in each file I adjusted the actual wood thickness to .800 because the wood measured .770. I thought by giving design that info it might fix my issue because the first project didn’t get cut all the way through.
But this didn’t help.
Z axis belt is guitar string tight.
Z axis eccentric nuts are tight
End mill .250 " is tight in collett
I use the carbide create touch probe to zero the z axis .
Is it possible that these predone files are over riding my edit to actual stock thickness ?? I do click save after I adjusted actual stock thickness before I go to tool path page??
This could not have helped, only the “max depth” of the toolpath matters. To which value did you set that ? If you want to be sure to cut through, set that max depth to something slightly larger than the actual stock thickness. How much material was left at the bottom of the cut ? Was it the same thickness everywhere along the path ?
If you can share your design file, and possibly your g-code file, we could check them. This will tell us for sure whether the problem is mechanical (somehow) or is in the consistency between the design file and the stock MDF
Where in carbide create do you see setting for max depth of tool path?
No part of mdf was cut all the way
I used files from myerswoodshop for these 3 projects. The only thing I did after first job didn’t cut all way thru was to tell design tab the stock was .800 then pressed save
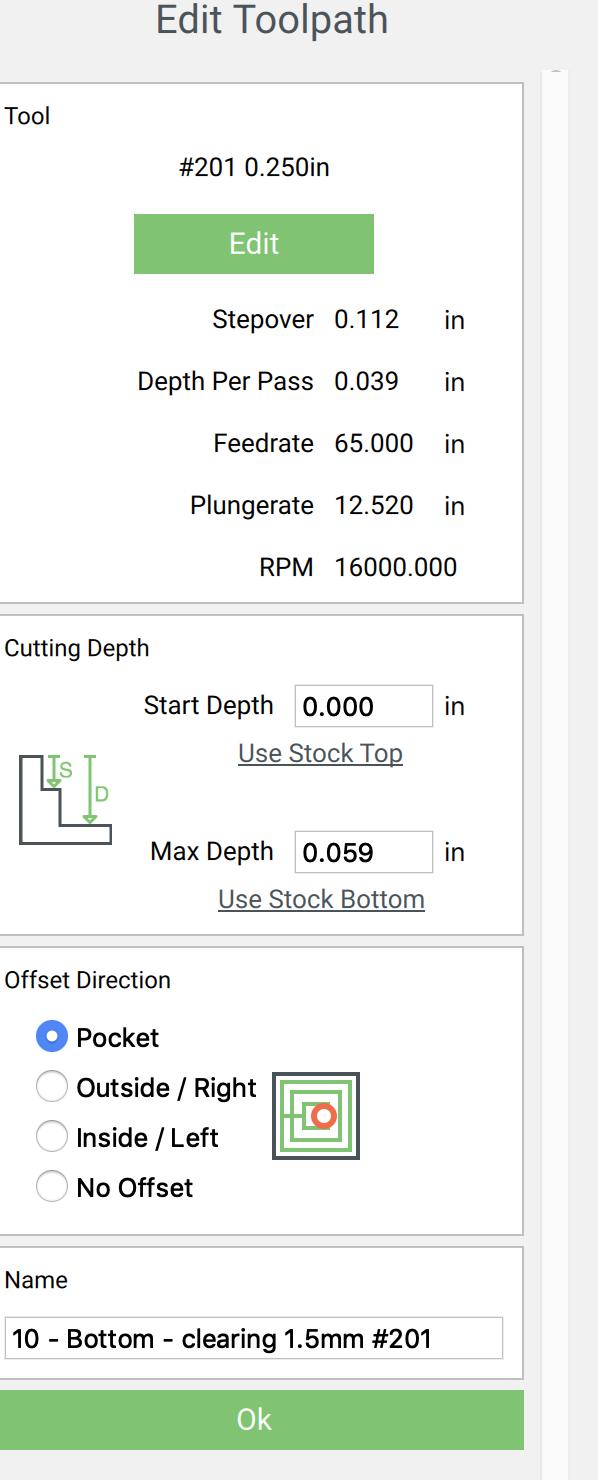
You have to open the toolpath settings. If you look at cutting depth halfway down the menu, you see max depth. I encourage you to watch the instructions video on how to create a project.
Hi Tim,
As @luc.onthego said you absolutely positively need to watch the Carbide Create tutorial videos (or Myers woodshop CC series on youtube if you prefer) to understand which parameter does what and where to adjust them, because even though reusing someone else’s project file is great to have a starting point, there is always that tiny detail that is different somewhere that will make it wrong for your specific case. And stock thickness is a prime example.
So, in your case:
if you measured your actual stock thickness to be 0.770", set the “Stock thickness” in CC to exactly that value.
double-click on the existing toolpath and
check that the selected endmill is the one you are actually using (I guess #201)
set the Max Depth to 0.780 there: the extra 0.01" should cause to overcut the profile just a little bit, to make sure you are going all the way through everywhere (assuming the machine is reasonable trammed and level)
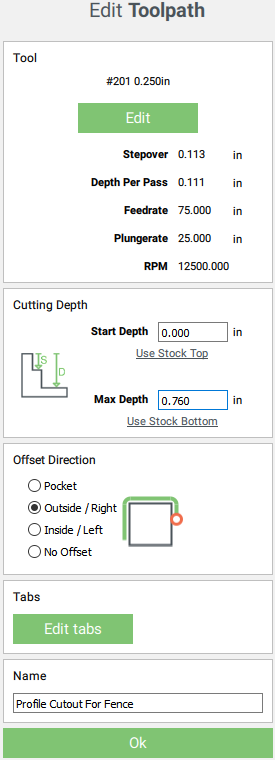
For example for Myers’s clamp project, the “Profile Cutout for Fence” toolpath is initially like this:
See how he set max depth to 0.76, that’s because he was using a 0.75 thick MDF and added the extra 0.01" to go through. Chances are this is why you are not cutting all the way through, since your MDF appears to be 0.770. Change that to 0.780" and you should be fine.