I’ve recently acquired a CNC and am just starting out with it.
I’m using a Shapeoko V5 Pro with a BitSetter. I’m encountering an issue that I can’t seem to figure out and would appreciate any help.
Here’s what’s happening:
I’ve already set the correct bit in my router.
I initialize the machine.
I load de project
Then, I go to the Jog screen to adjust the zeros.
After that, I start my project.
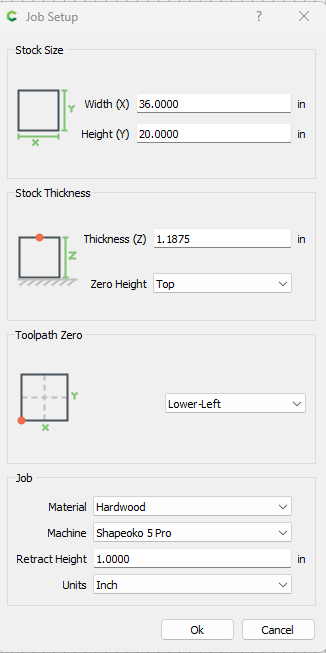
However, every time the machine runs, the Z-axis plunges too deep at each pass. I’ve specified in the project that the max depth should be 0.25 inches and the depth per pass is set to 0.0625 inches. But for some reason, by the end of the job, it has cut all the way down to 0.75 inches.
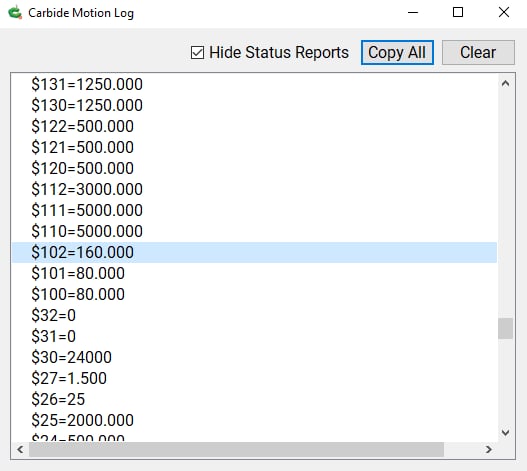
I’ve read on some forums that this issue might be related to the $102 value. I’ll attach a screenshot of the log showing my current values.
The origin is set above the piece, at the lower left corner of the stock.
Additionally, I’ve set the zero relative to the stock just like in the video. I positioned the tool at the zero point of my project and then pressed Zero All.
Thank you for the suggestion! I actually already performed the test, and the Z-axis movement was correct. The bit was 6mm above the surface as expected.
I dont have an SO5 but I think they come with the HDZ. If you pick the z-plus in configuration the pockets will be deeper than intended. The reason is the HDZ has more steps per MM than a Z-Plus so go through your configuration and make sure you picked the correct Z.
Thank you for the insight! I’m not sure where I can check this setting. I’ve looked through Carbide Motion, but I couldn’t find anything related to selecting the Z-axis type. Could you point me in the right direction?
Thank you for the clarification! Now it’s clear regarding the Z-axis and the $102 setting. I appreciate your help! I will now look for the problem elsewhere.
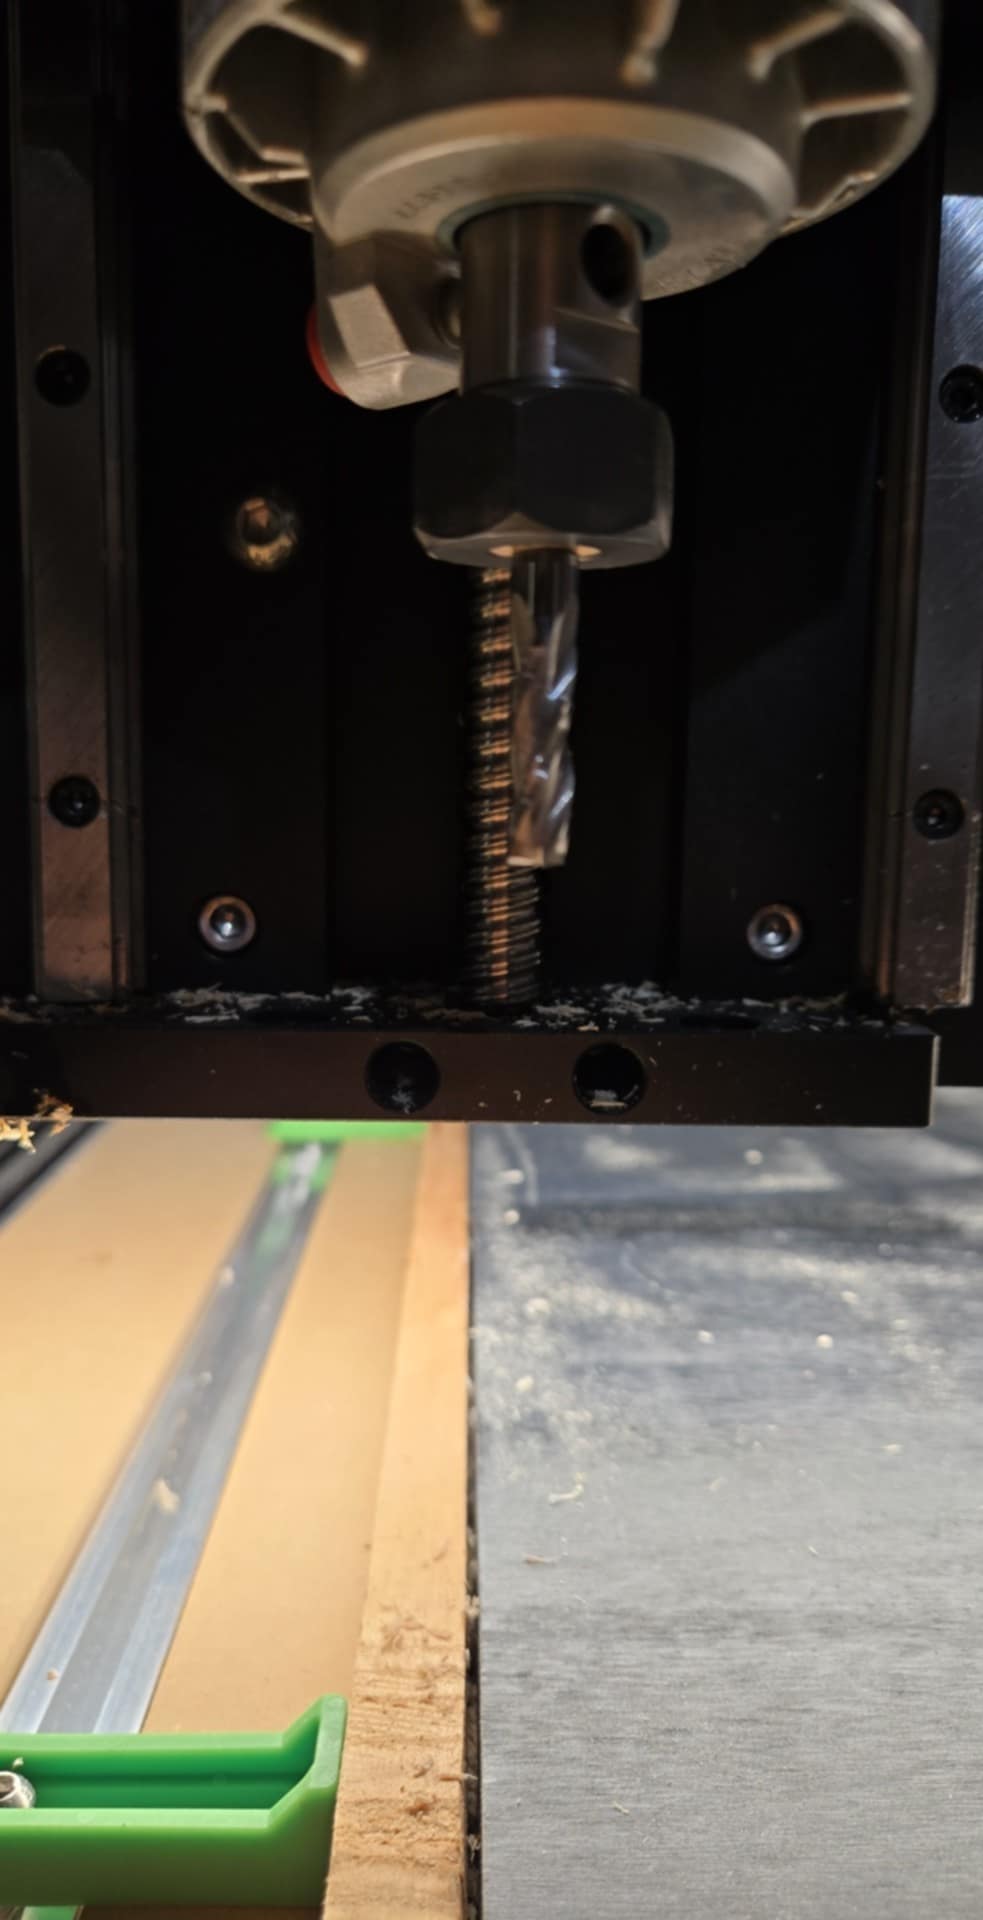
Is you bit pulling out of the collet?
Upcut bits have a tendency to pull themselves deeper into the cut if they are not held tight enough in the collet. Be sure the collet and cavity in the router shaft are clean and the bit is inserted the full depth of the collet. Grab a sharpie and mark the bit at the point just below the collet. If it pulls out you’ll see the mark lower than where it was.
Hit zero z once before actually zeroing z. So once in a position that doesn’t matter and once more for real. I do not understand this but it’s the only way to actually get my z to zero correctly.
I had the same problem and carbide Support recommended that I take the Shock off the Spindle and try it. Problem went away. They sent me a new shock. In the meantime, I had to do a z zero only after I did the x - Y zero and it worked. Move off the substrate and do a Rapid to Z zero to make sure before you start a Run. Hope this helps… AlexTKO
Have you found a solution to this problem? I’m having the same issue with the Shapeoko 5 Pro with 80mm VFD. In testing to find out why it was plunging too deep, I set Z zero on wasteboard, Jogged Z up to top then when I did a rapid to Z zero it plunged pretty deeply into the wasteboard (was using a vee bit in the collet)
I also see this. In my case typically after I do my initial (after machine turn-on and initialization) zeroing, including bit setter cycle, and then double check the Z height using the plunge 1 inch above current XY it is significantly too low (I keep a 1-2-3 block handy just for this purpose). I have not measured how much too low it is, but maybe 1/4 or 3/8 of an inch. I then rezero Z, and it’s perfect every time. Annoying, but now that I know that zeroing Z needs to be done twice (and only Z, never XY), it’s not a big deal.
Listen to Will and create a ticket through their support. Might simply be a loose bit walking out, or you may be losing steps on your rapid retracts from a binding issue in the Z. I suggest you check z- motion by hand with the machine off. If it feels like you’re lifting more than 10lbs, there may be an issue (that can assuredly be remedied). I see you’re running a makita router. Your router diameter may be a tad smaller than 65mm, and clamping the 65mm mount too small will bow your z-plate. To check, simply loosen the 2 bolts that clamp your router and lift the Z again. If it’s much easier, you may might benefit from adding a shim between your router and mount to reduce how far it has to clamp. Hope this helps. C3D will be of more assistance.