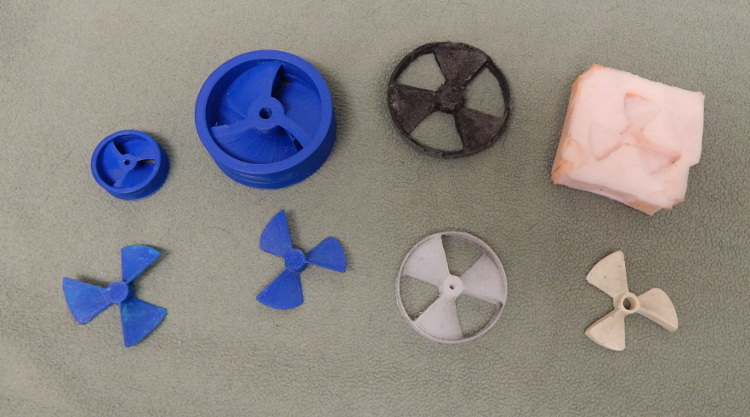
I’ve mentioned before that I don’t want to put a clown shoe suck device on my S03 and I stumbled across a creature called a “Bitfan” at another machine’s website (this was after someone on this forum brought one to my attention). The other machine company provided a downloadable stl file for 3D printing so that’s where I started. In the pix below, you can see some history.
The lower two fans without the outside cylinder in the lower left were printed on my university’s 3D printer. For some reason, it only printed the blades. When I pointed that out, they downloaded the stl themselves and printed the two versions in the upper left. Both of those would really need to be cut down. So I imported the stl into fusion 360 and cut my own after enlarging it from 1 inch to two inches. That’s the black one in the top center. I chose HDMW plastic. It did not do well on the S03…it was all fuzz when finished. I should have taken a photo of it because you wouldn’t have known what it was. Anyway, I took one of the 3D printed fan blades and made a silicone mold (upper right) and cast the one in the lower right. It’s actually very acceptable. Then I bought a plastic cutting board and recut the fan in plastic, lower center,
So this just slips on over the bit and blows at the speed of the router or spindle. Do I have to worry about it falling off the bit? Not really because it’s pushing air down and the opposite force to that is to push the fan up against the chuck. It does a reasonably good job of keeping the chips and sawdust off the work and depositing them all over the shop. I’m not sure that I notice any difference between just the blades and the blades and cylinder. They’re not the best pieces of CNC work you’ll see, I’ll admit. I’m sure that someone with even a little skill could make it a lot cleaner.
With my dust shoe which is around the router which has a fan in it blowing down into the dust shoe , I think I am using the fan in the router to clear out the kerfs and dispense the chips into the air so the circulating air flow pattern caused by the “tornado” design of my dust shoe drags the chips into the suction tube of my dust collector. I have the makita router and the circumferance of my dust shoe is as small as I can make it at this point which I hope enforces the circulating pattern of the air flow. How’s that for explaining the router blows down and the dust shoe sucks around. SO I think I am using both a fan and a dust shoe… Jude
My kerfs do clog up but that isn’t the router fan’s fault, it’s more my inexperience finding the proper cutting speed and feed and the correct type of cutter bit. But when I do hit the right combination, it does seem to help. I do wonder about the “extra” forces on an spindle bearings and such from an added fan blade. I think that the manufacturer’s "engineer their products to their maximums which include the “lowest bid supplier” of their parts which tend to steer me towards thinking that any “extra” force added will be detrimental to the router. Just my opinion from having worked in an industry that depends on a “lowest bid” wins attitude. Accountants and lawyers not engineers are actually responsible for most of design deficiencies and “profitable” manufacturing capabilities. IMO, Jude
my current enclosure is not pretty, but it was extremely easy and cheap to make. it’s constructed with pvc pipe and fittings, then paneled with pink foam board. before i was able to add doors, i used a visqueen drape over the front. if i were making it today i would probably go with blue or silver foam insulation board and lighter pvc but it goes a long way towards keeping the mess confined to the machine area.
All are based on the same principle, blowing dust with inverted fan blades.
Unfortunately, none of those fit Carbide’s machines, they are either too big or too small.
While I do not hate the idea of having a fan attached to the end mill instead of the collet nut, I think going the 3D printed route (I built my own damn 3D printer) could induce wobble and in the end, produce inferior parts.
At any rate, I’d wish for Precise Bits to create such a collet nut + fan combo. Their collet and nuts are very nicely made.
If you find a production item (not 3D printed), I’d order it in a heart beat.
I have no problem using it on my S03 with a 611. I milled my fans with the S03 and I’m happy with the final result. I used the first fan I made when I made the others… I started working on a collet nut version, and it was a trivial remodel. I haven’t cut it yet. Maybe tomorrow.
Doing the model work was easy; the CAM stuff took me longer. This where I am now. If you could improve it, I’d really like that because I am trying to learn. Here is a link to the Fusion 360 file. http://a360.co/2vwLIvN
A couple of notes about the collet fan file. Ignore the stuff in the center. That’s part of the brep and I can’t figure out how to get rid of it. It doesn’t get milled so it’s flotsam. The fan is 2 inches in diameter, which means the blades are only a 1/2 inch. That may not be enough to generate enough wind. The fan is only 3/8 of an inch deep, but that’s because I adapted the file I had for a fan to fit on the bits. It could easily get fatter and probably go out to 2 1/2 inches. I have not run this through the S03 yet.
I’ll have to rework your drawing. I use PreciseBits.com collets and nut.
I found them to produce a whole less runout than the stock DeWalt/Porter Cable nut.
I do wonder if one were to start from a 25mm thick fan, and add a shroud around the blades if that would work.
I have to admit, I was puzzled by the parts in the middle.
I will contact PreciseBits.com and inquire about the actual dimensions of the nut and the position and size of the notches on the nut, Its because it is not made like the stock nut, it has no flats. If I cannot get the necessary information, I’d have to go the reverse engineering route
Anyhow, if I get anywhere with this, I’ll post back my findings.
It is beyond my skill level to create anything more than I have. I’ve tried to design my own fan without much success. It’s because I just don’t know how to use the tools that F360 provides. I opted for modifying an existing STL of a fan. Even then, I didn’t even consider turning the fan over and milling the backside to make the blades thinner. At some point, I deemed that it was good enough for me at this point in time. A one inch deep fan would be a real challenge.
I couldn’t find a fan where the blades were canted in the correct direction. All of the PC fans I’ve found won’t work because my router (DeWalt) spins clockwise. Computer fans spinning clockwise will draw air up rather than push it down. The 50 mm fan I found on Grabcad (by Alex Dokter) is the wrong direction. If you’re looking down at the fan we need, the edge at the top is to the right of the trailing edge at the bottom left.
I don’t know. I think a mirror image should work. Flipping it over won’t. I originally thought it would but it doesn’t fix the issue. I didn’t know this about fans until I started doing that.