1/4" upcut feeds & speeds

Starting the first real cuts on my Shapeoko 4 XXL. I’ve been reading/watching a ton on feeds & speeds and hoping for clarity. The 201 end mill is preset for soft wood at 75ipm .06"doc at 18k rpm. What I’ve read leads me to think 250ipm .25"doc at 11k will be better for chipload. Anyone have tips for this?

I know nothing beats experience and plan to let it rip tomorrow. Just hoping to avoid problems if possible

There is a lengthy discussion at:

and the community (well, @Julien ) has put together:

and there is a series of videos:

I’ll those out.

Thanks for the links!

The tricky part about feeds and speeds is that there are many recommendations out there, but often they are given in a specific (or implicit) usage context that may not apply for our machines. The feeds and speeds for a one-ton industrial CNC will not be the same as the achievable feeds and speeds for a desktop CNC.

The preset for #201 is softwood has a chipload of 75 / (3 flutes x 18k RPM) = 0.0013"
which a safe starting point (at the end of the day, you can’t go wrong if you pick 0.001" as the magic number for a starting point chipload). And 0.06" is 25% of the endmill diameter, which tends to be a good safe value too for our machines.

Now 250ipm at 11k with the same #201 endmill is a chipload of 250 / (3 x 11k) = 0.0075", a value that is way above the “usual” recommended range of chiploads on a SO4. You may be able to pull it off at a low depth of cut, but if you also rip at a depth per pass of 100% the endmill diameter, this becomes a extremely aggressive cut and definitely not something you want for your first cuts.

So, start with the preset, get comfortable, then gradually increase feedrate and depth of cut, the machine and your common sense will tell you when you have start to push it too far.

2 Likes

For a specific testing technique see:

@TDA who works for that company may be able to expand on that and has made many informative and helpful posts here.

I wouldn’t have the guts to try a cut that aggressive, but sure wish I could get some popcorn and watch. I’d stay closer to the defaults for first cuts, then get more aggressive based on experience.

2 Likes

I see my error. The numbers I came up with were based on a bit with 2 flutes not 3 flutes. Glad I posted here before doing the cuts really aggressive.

Usual preface, I’m with PreciseBits so while I try to only post general information take everything I say with the understanding that I have a bias.

I’ll just get these out of the way up front. All of this is dependent on tool geometry, material, runout etc.

That said I’ll try to summarize some of the things. Short version, (and functionally what Julien was saying) is that you will be deflection limited (bending). So what it come down to is cutting forces. More or less cutting forces are cubic material removed per flute, per rotation. So any increase in chipload (feed), stepover, or pass depth is increasing our cutting force. Although there is a bias for tools with a helix (flute twist).

One of the things we do with the sweet spot test listed above with production testing is run the first test at something extremely forgiving in pass depth (1/8-1/4 tool diameter). This will help take the forces down so you can evaluate the cut performance alone. You can then repeat the test at the selected feed at different depths to determine when the forces get too high.

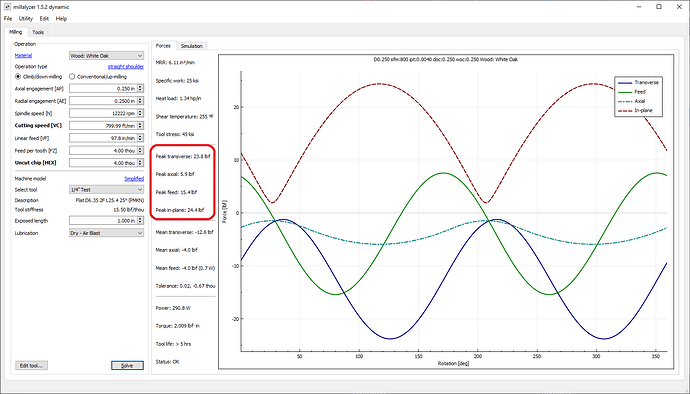
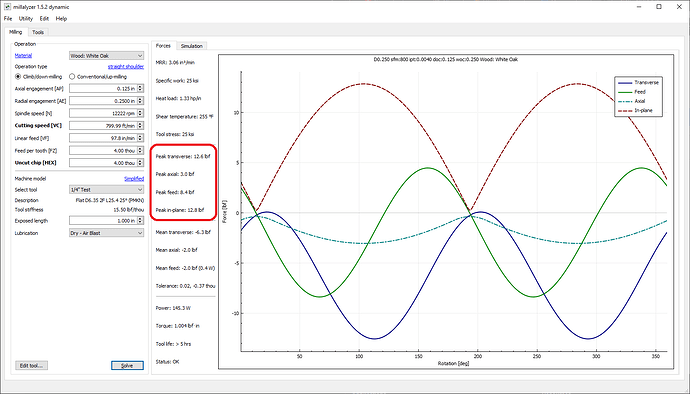
Internally any machine that uses V-wheels I try to limit to around 20ft-lb. That’s not a perfect number but a decent starting point. To demonstrate the above I’m going to use Millalyzer (Link) for these calculations. It doesn’t come close to accounting for everything but gives a good general idea and is mostly accessible to everyone. For all of the below I’m using a “generic geometry” endmill and it’s 1/4", 2 flute, 800SFM (12,222RPM), in white oak.

0.125" deep, 0.004" chipload (97.8IPM), slotting.

Here our peak forces are around 12lbf so we are probably okay.

Same cut but 0.250" deep.

Now we have crossed into ~24lbs and are probably going to run into issues.

Again, any increase or decrease in the chipload (feed), stepover, or pass depth will change the forces. So it becomes trade offs.

Also again, all of these are dependent on multiple variable like tool geometry, material, runout, or in the case of wood even it’s water content. So your best bet is testing so you know what is working on YOUR machine with YOUR material, and YOUR tool.

One last thing.

Instead of looking at feeds and flutes it will be much more beneficial to break everything down by chiploads. Chipload is what all feeds and speeds are trying to get to. To get the chipload from a feed and speed (feed / flutes / RPM). Like for like that will mean that any feed on a 2 flute will need to be 1.5x feed for the 3 flute and would produce the same cutting forces (again like for like).

Hope that’s useful. Let me know if there’s something I can help with.
2 Likes

2 things:

  1. You are generally better off running at a higher RPM and accept a lower chipload because routers and VFD spindles will have a bit more torque at higher RPMs. If you really think chipload makes a difference, trade off depth of cut for feedrate. Those are your two main levers you can pull to control the force on your spindle.

  2. You really shouldn’t be sweating this. There is a very large margin for error in these kinds of things. Especially in wood. Yeah, certain values might be “optimal” but if this quest is taking up more than 15-20 minutes of your time, you’re losing valuable opportunity to just learn at your machine.

Does a woodworker try to push wood through a table saw at a specific RPM? Do you calibrate your forearms so that you push material through a router table at the perfect feedrate? No. It’s really not that big a deal. You will learn what makes the machine happy, and results in good cuts. There will be mistakes along the way regardless, but we all get better the more we do it. And things could even change depending on the species of wood, the particular cut from a single tree, the level of detail you’re trying to achieve. There’s no magic number or formula for every situation. Don’t let the stress about this, get in the way of having fun.

3 Likes

When going through this I missed that these were going to be your first cuts. Take Winston’s advise and at least for now don’t worry about it. Or take my whole post as a peek into the rabbit hole you can spiral into.

I’ll repeat what I posted in that huge thread Will linked earlier.

If you’re reading this and find it overwhelming and think that you’re never going to be able to cut anything, don’t. For the most part if you are using decent tools, of a decent size, in soft material, the margins are so big that you don’t need to worry too much. Can you get better tool life and cut quality with the above properly used, different geometries, or better runout? Yes, but it’s better to be cutting, producing, and learning than to get paralyzed by the “optimal” or “perfect”. If you are looking at smaller tooling, hard or finicky materials, then you might need to learn some of this or it might at least help to understand why things change the way they do.

2 Likes