1st Time - Material comes loose

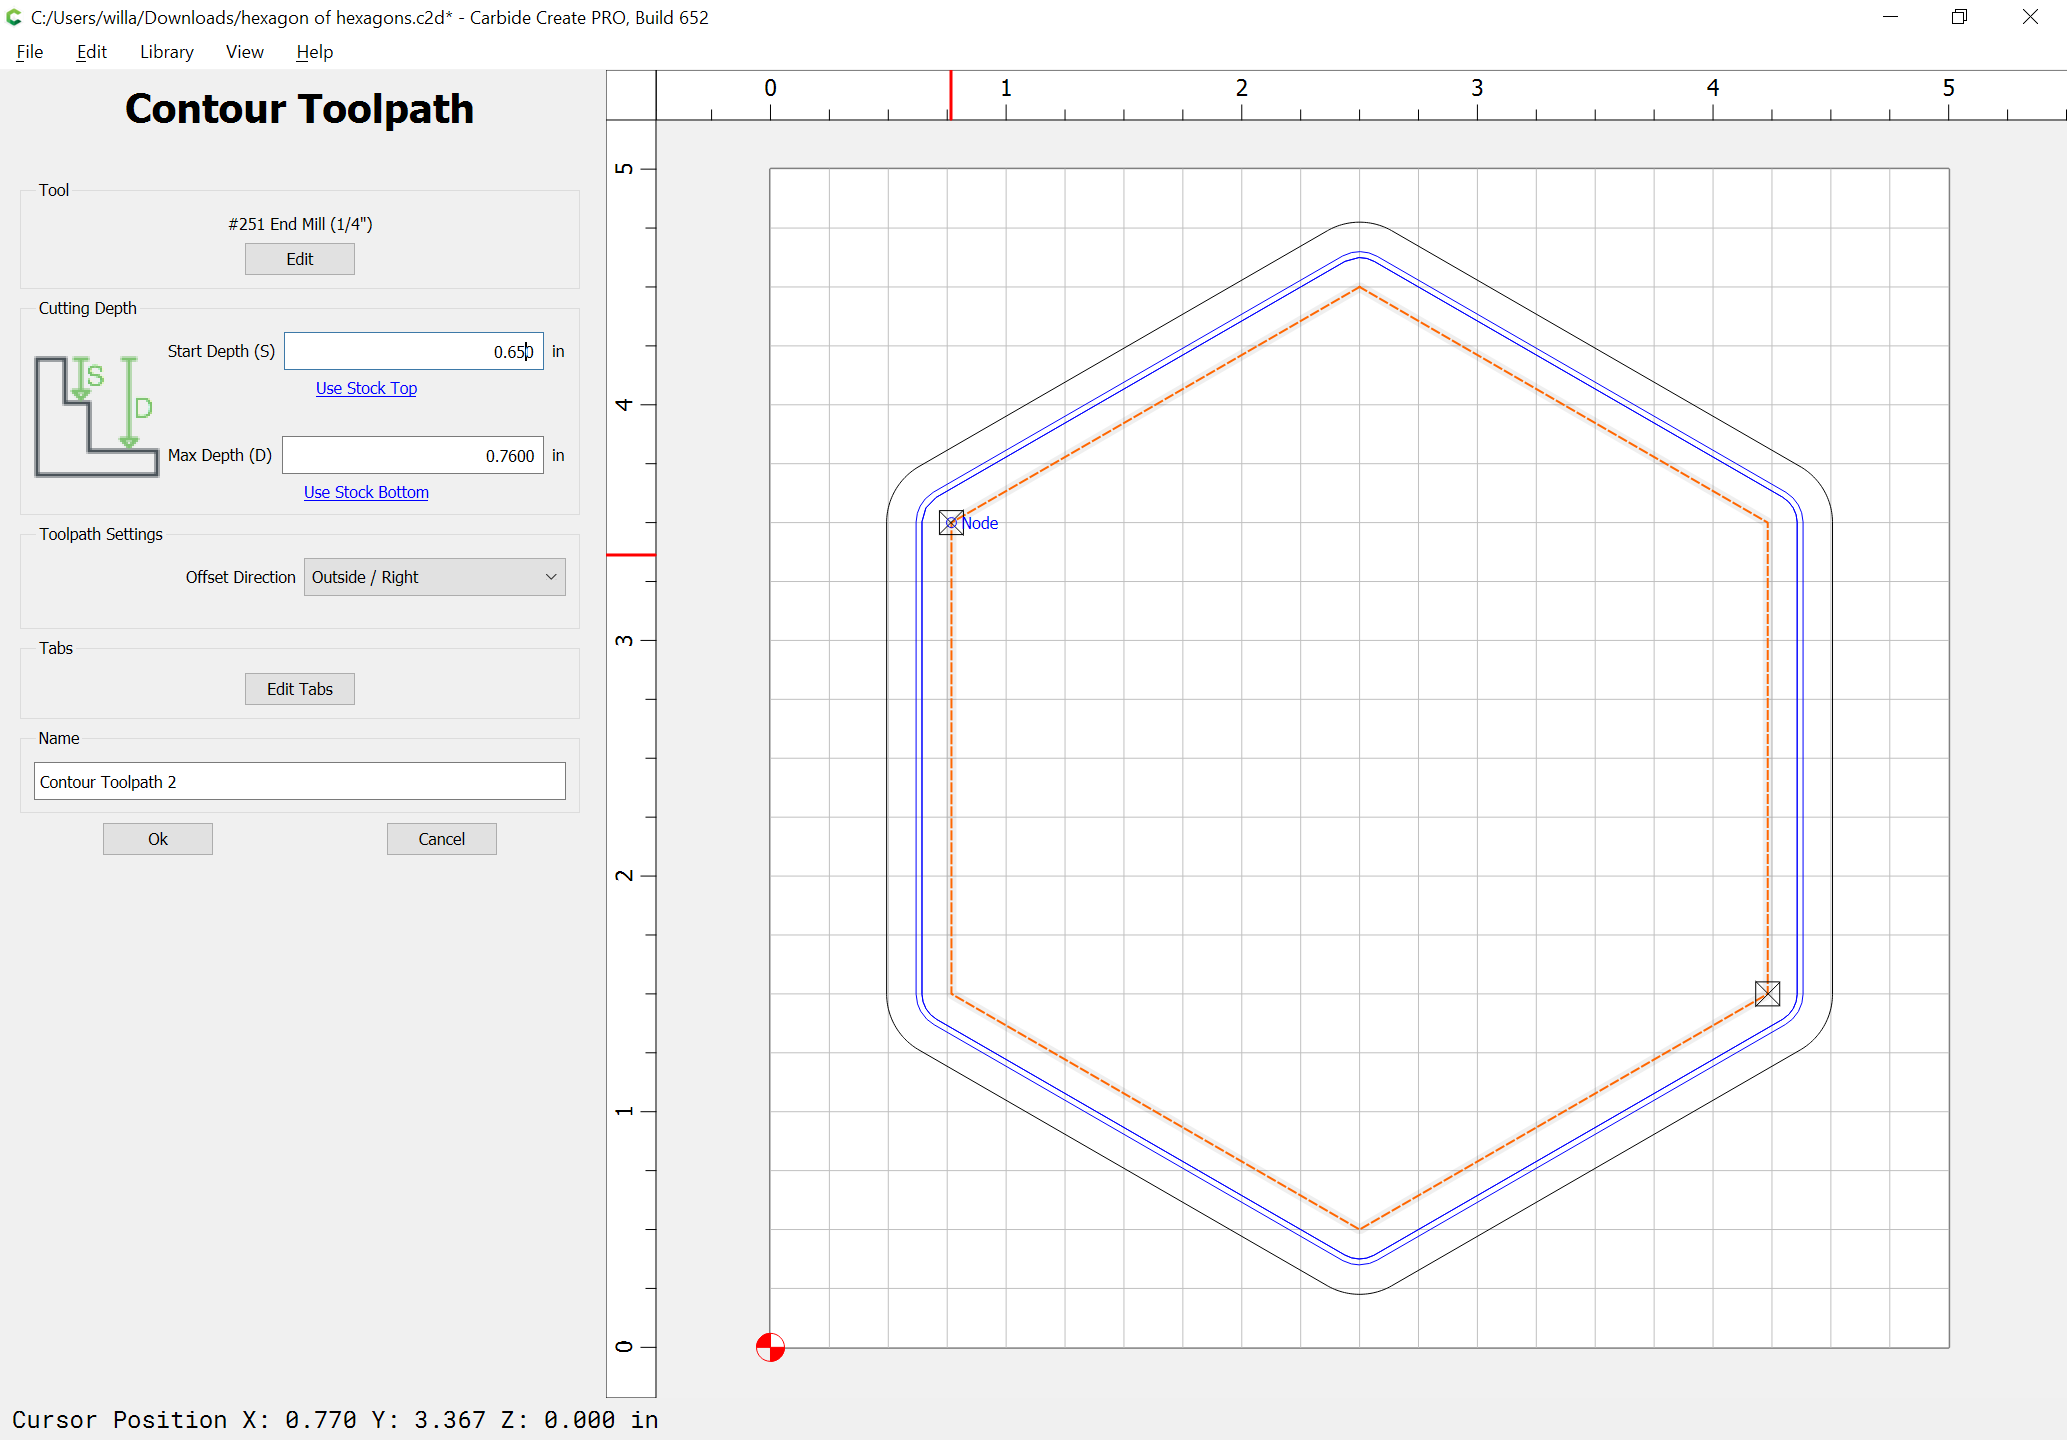
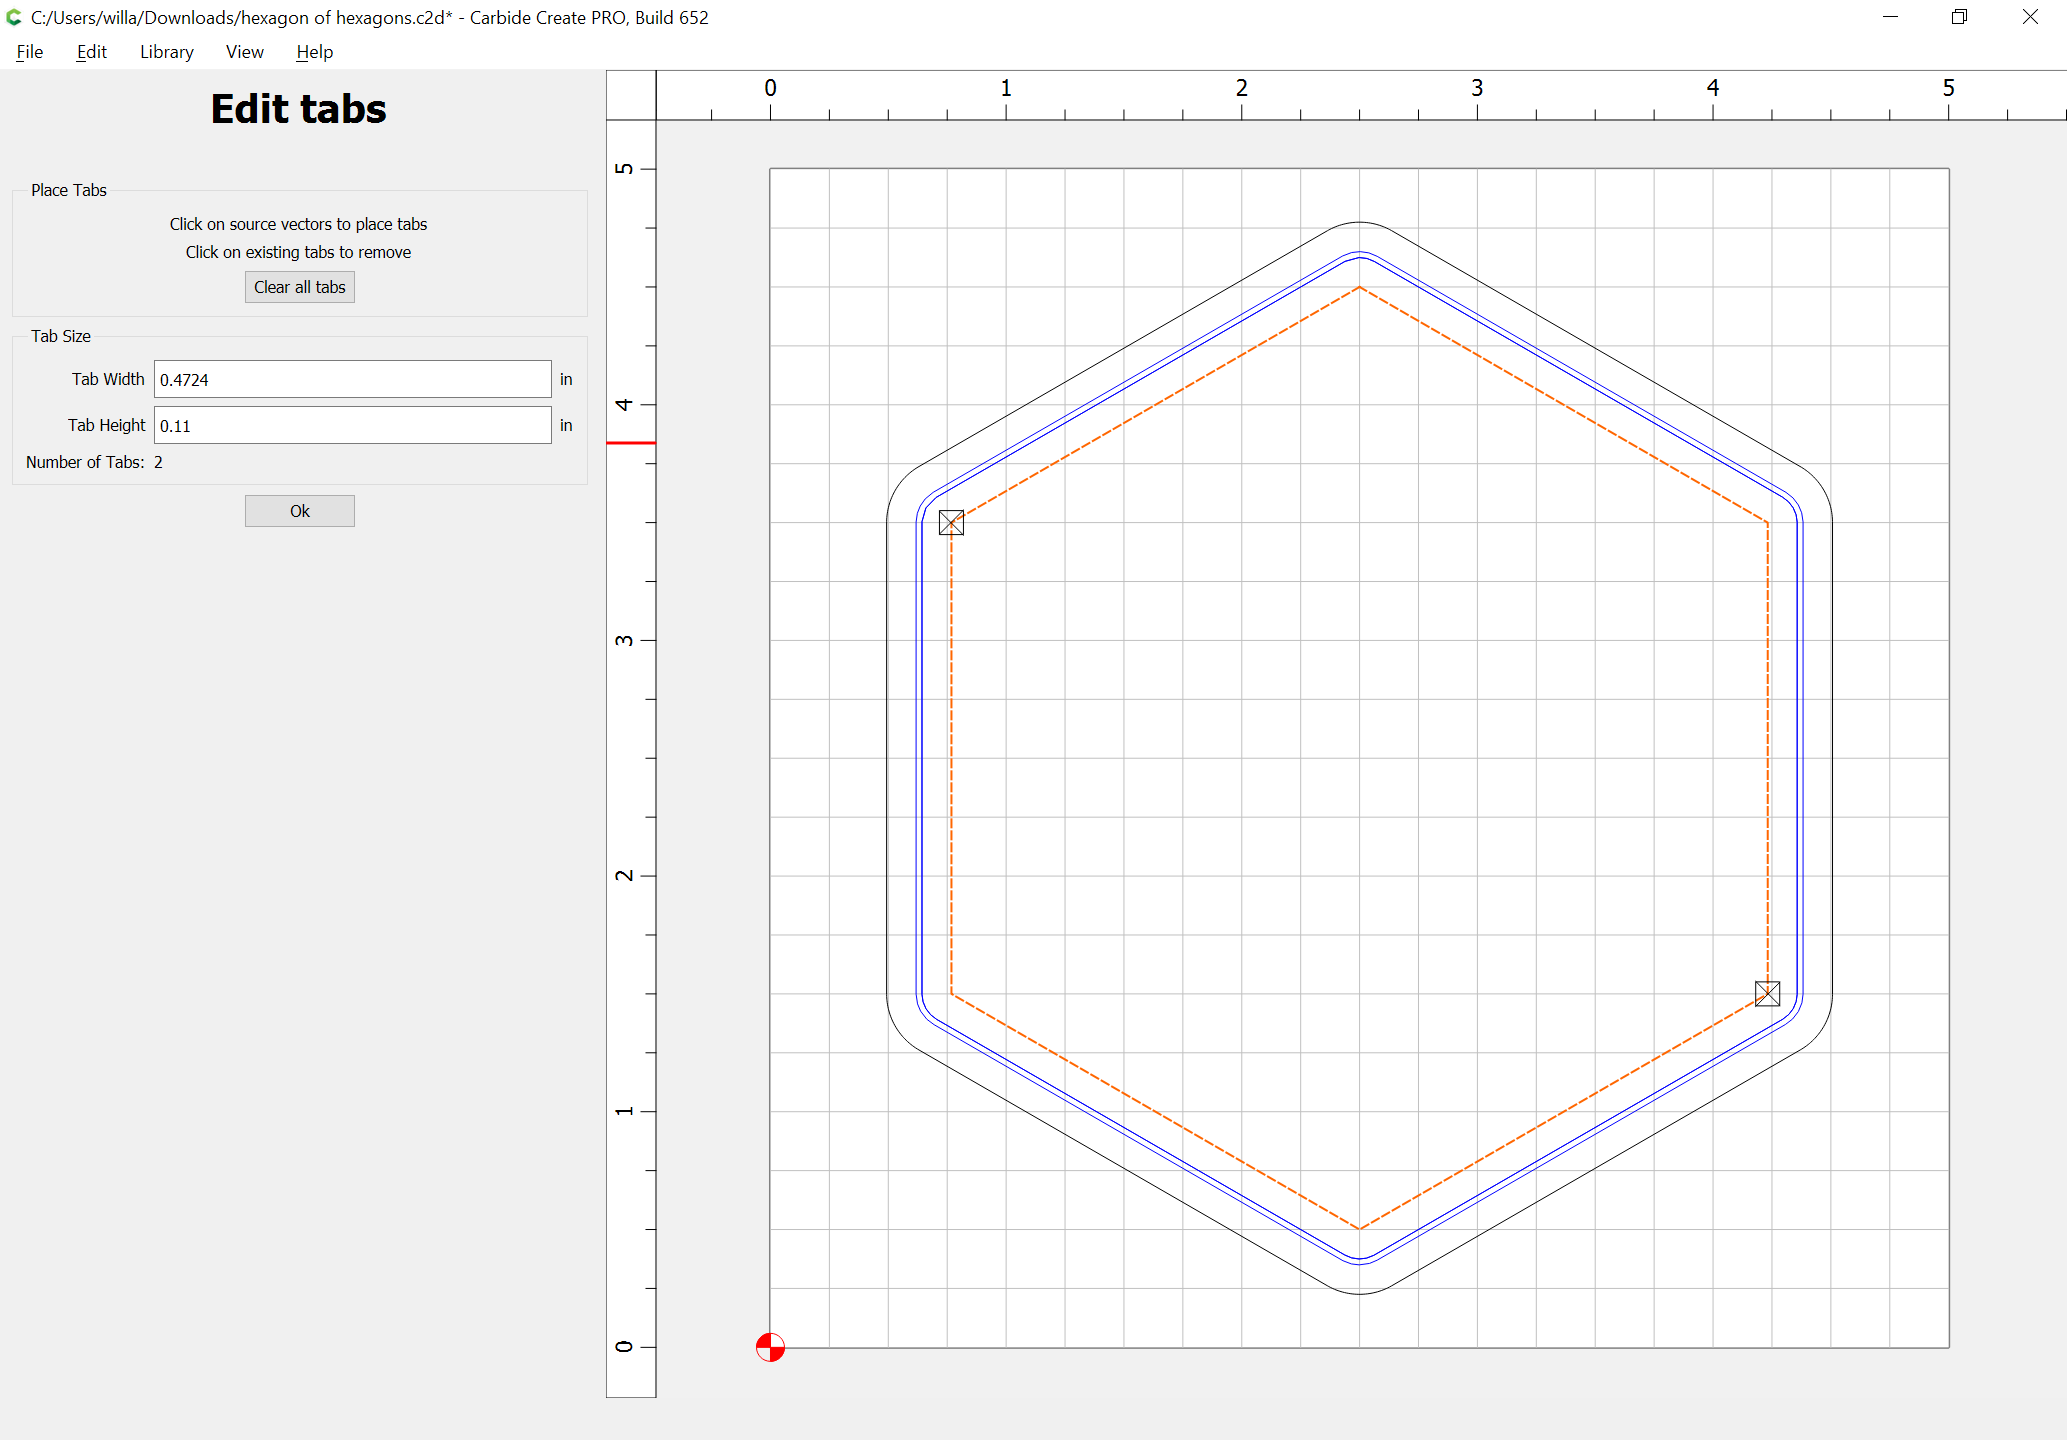
I have a Shapeoko 3 XXL (Or is that a 3 Pro? Can’t keep track of that kind of thing.) I’m trying to make the endmill holder in the tutorials. I save using the 102 tool (1/4") for last, since that cuts out the finished product from the surrounding wood. I tried this once, without the T-Tracks, but it didn’t work and I figured I’d be safer if I went on and installed them before trying anything else. It was easy and quick to install them. With each rail and each board, I pushed down and to the left to make sure they didn’t stick up and were tight against the left size. (Also worth noting that I put levelers on the table legs to make sure the tale was level as well as using levelers on the Shapeoko to be sure the bed was level and checked to make sure everything was square.)

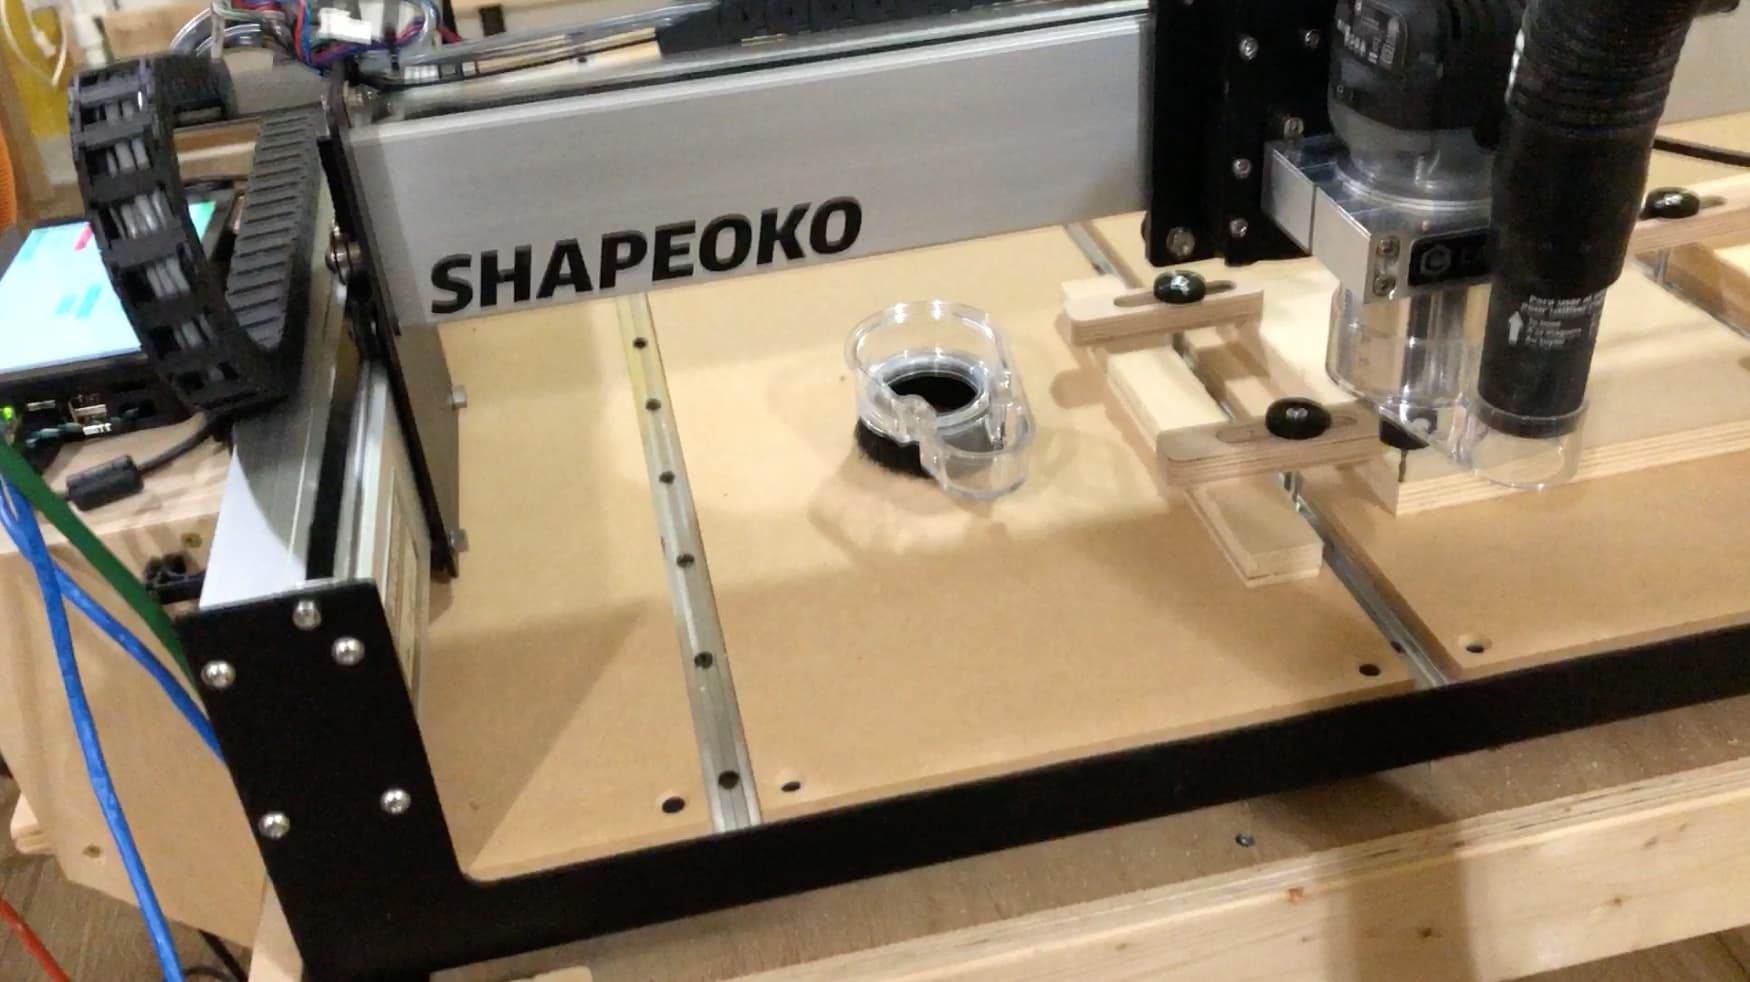
When I was ready to try a 2nd time, I clamped down my material. I also put the Sweepie on (I know the bottom part is off in the photo below.)


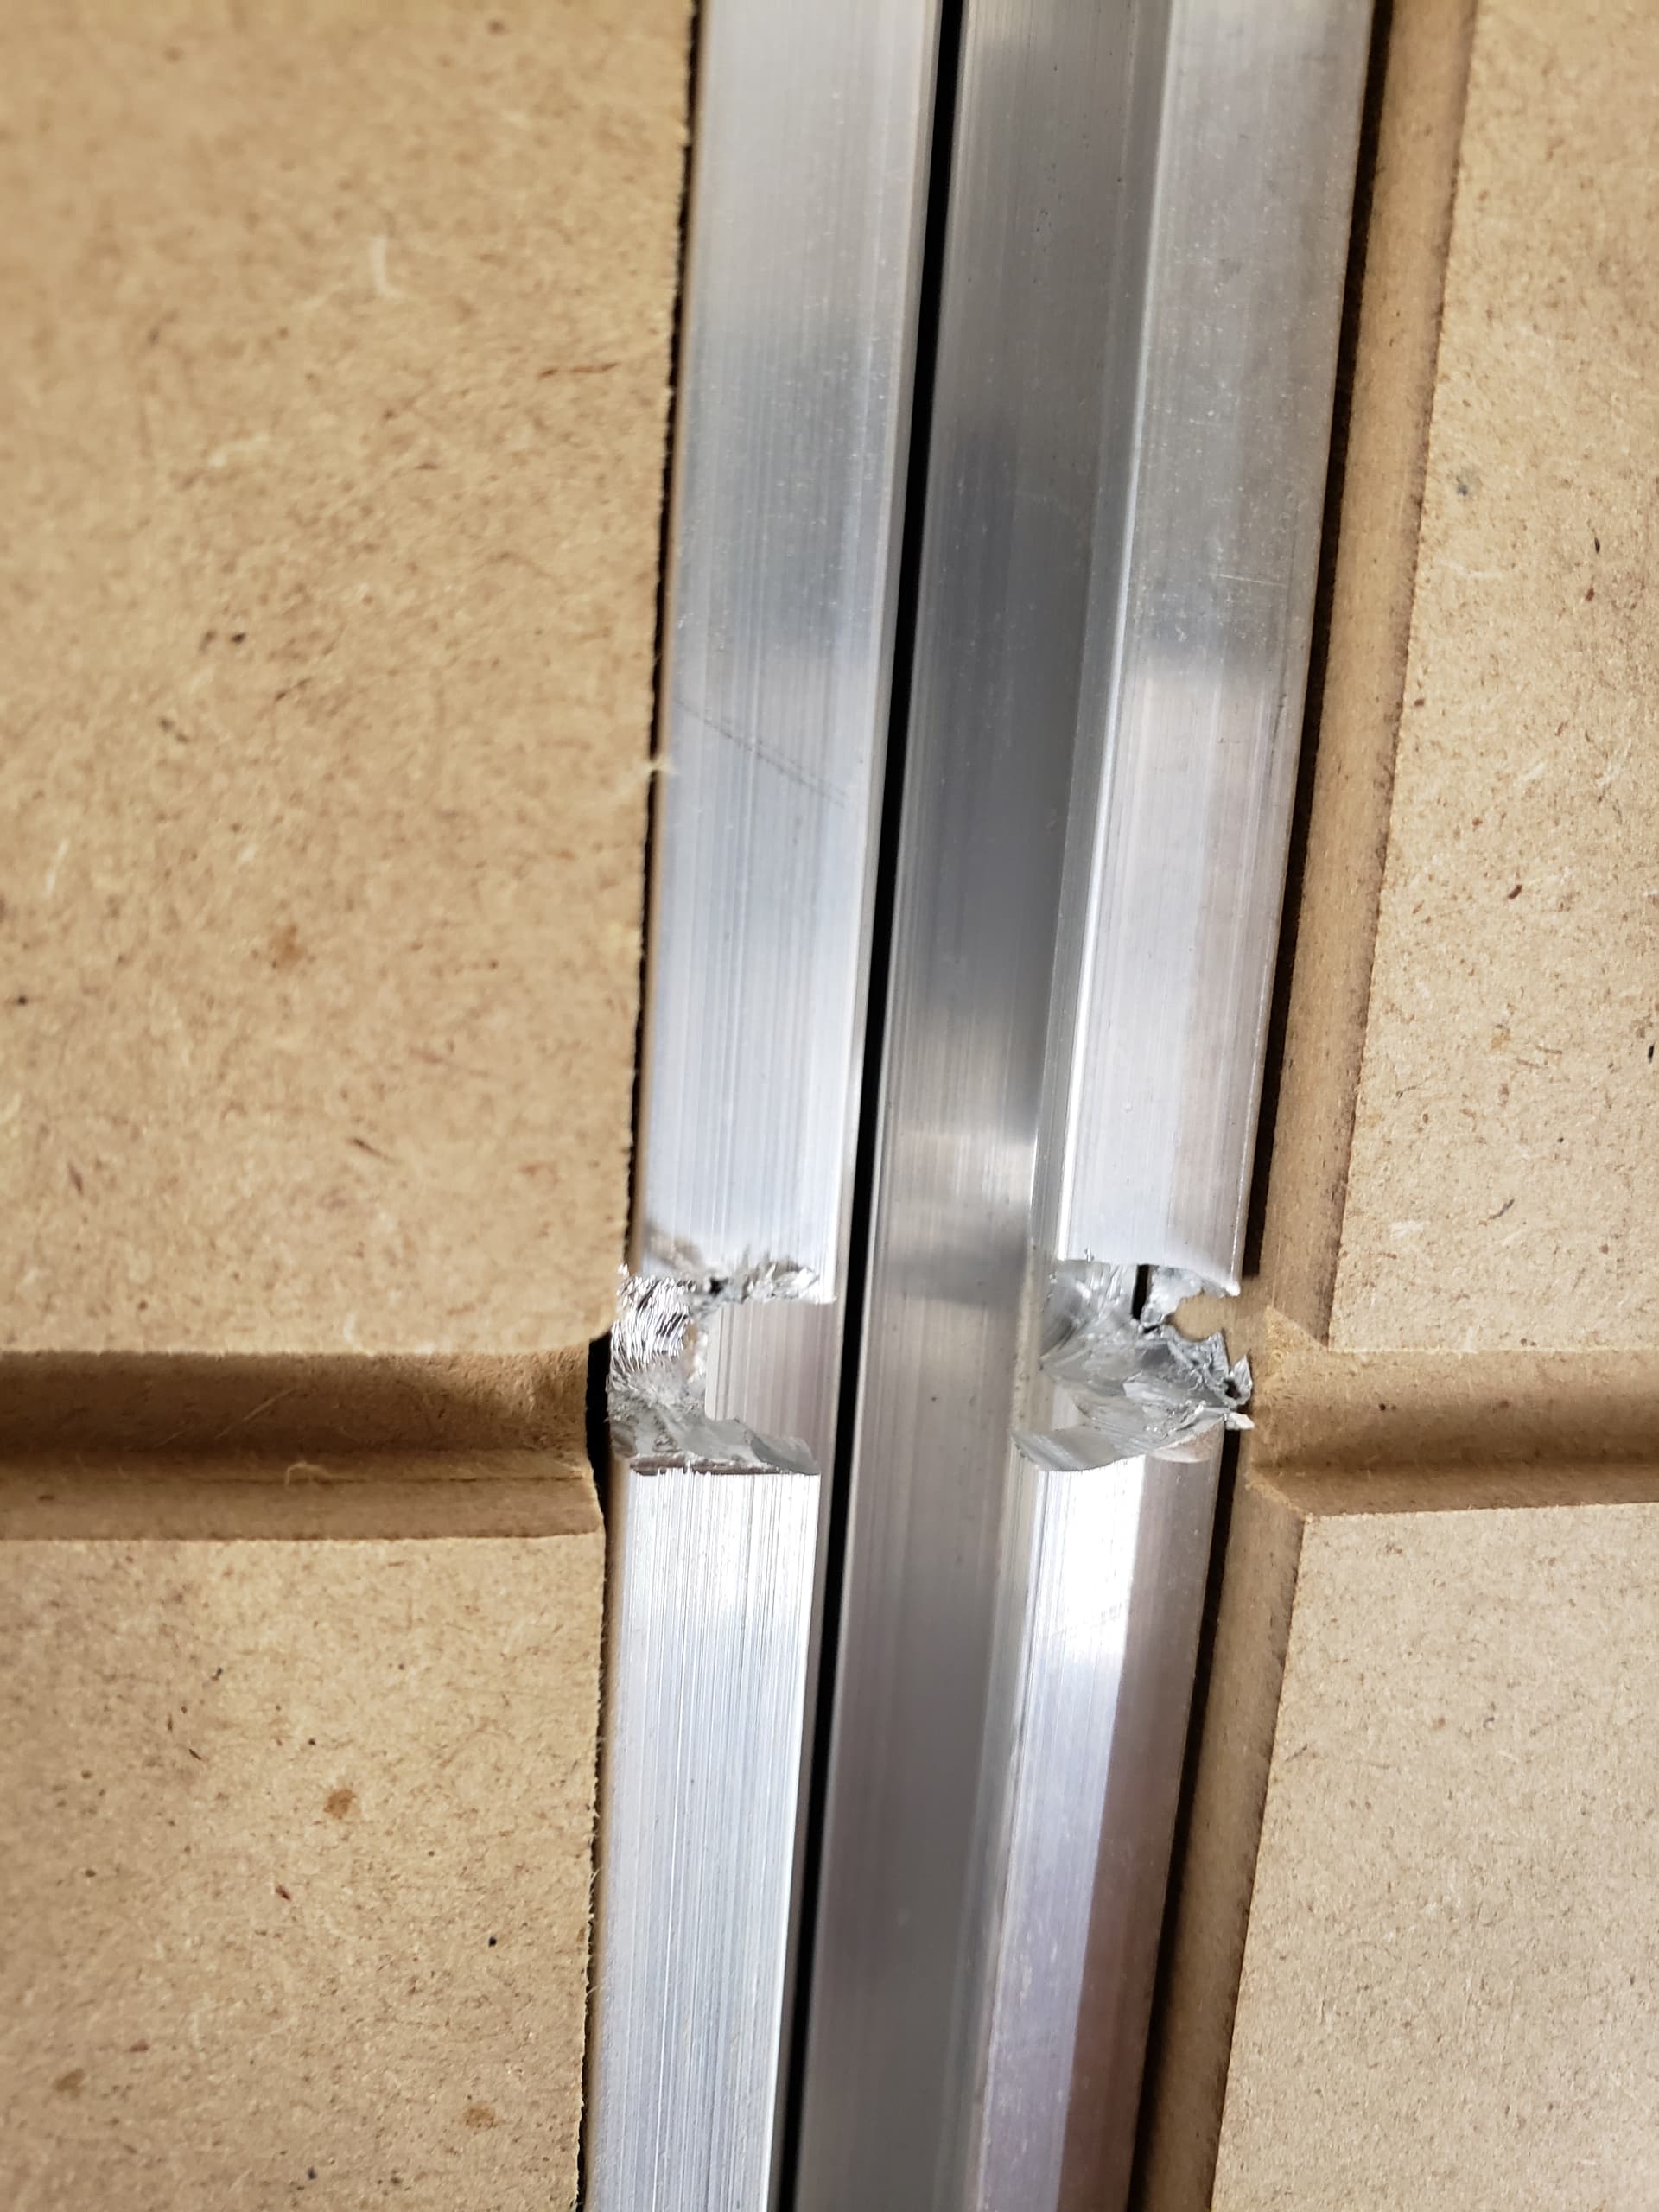
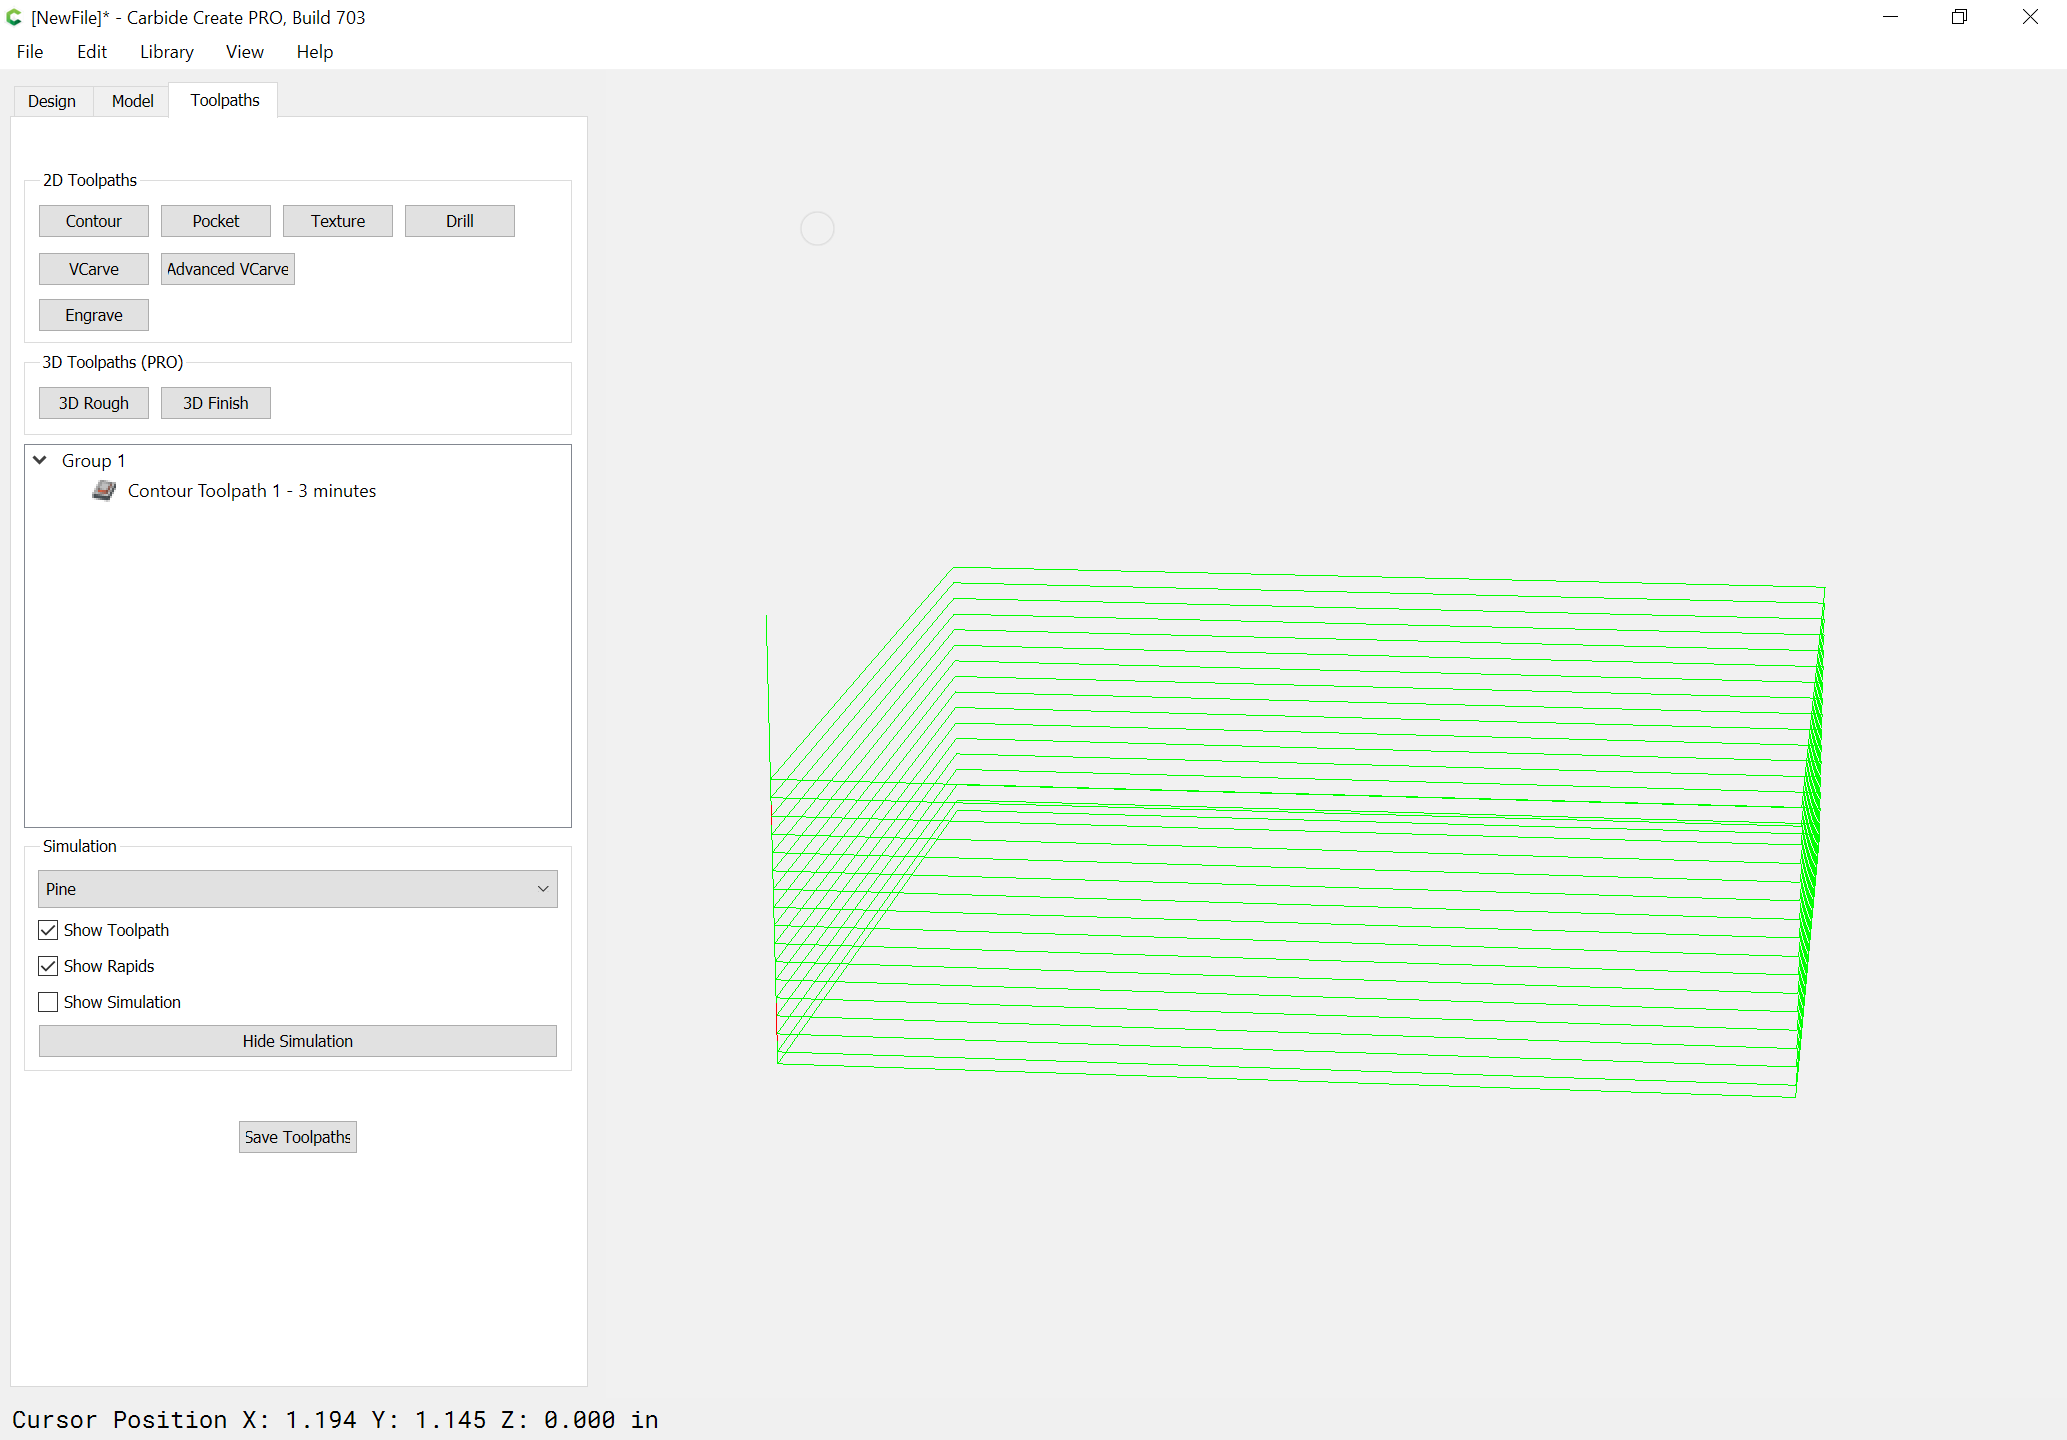
I had no problem getting through the first two files, using the 1/8" endmill and the 60° endmill to etch the lines. (Well, one glitch - I mention that at the end, in case it matters.) Everything was fine until, in the last step, the router started making a “top” corner and ran into issues, as you can see in the photo below. I had to use my emergency cutoff switch. The endmill came out of the router and put a hole in the fill board between the T-Tracks.


I suspect that the problem on this test was that the wood piece I had down on the other side of the clamp was just a little thicker than the material I was cutting on and that might have lead to a loose hold on my material on that side.

I changed to using wood of the same thickness of the material all the way around, on all clamps. I did make a mistake of positioning my material, and that led to a mess due to the grain on the surface level of the plywood splintering and coming up. That’s my bad, I know what I did, so no need to worry about that.

This time the router made it around the edge of the work once, but when it got to the same place as before, on the 2nd time around (last time it happened on the 2st time around), the same thing happened. The material came loose and everything went bad from there.


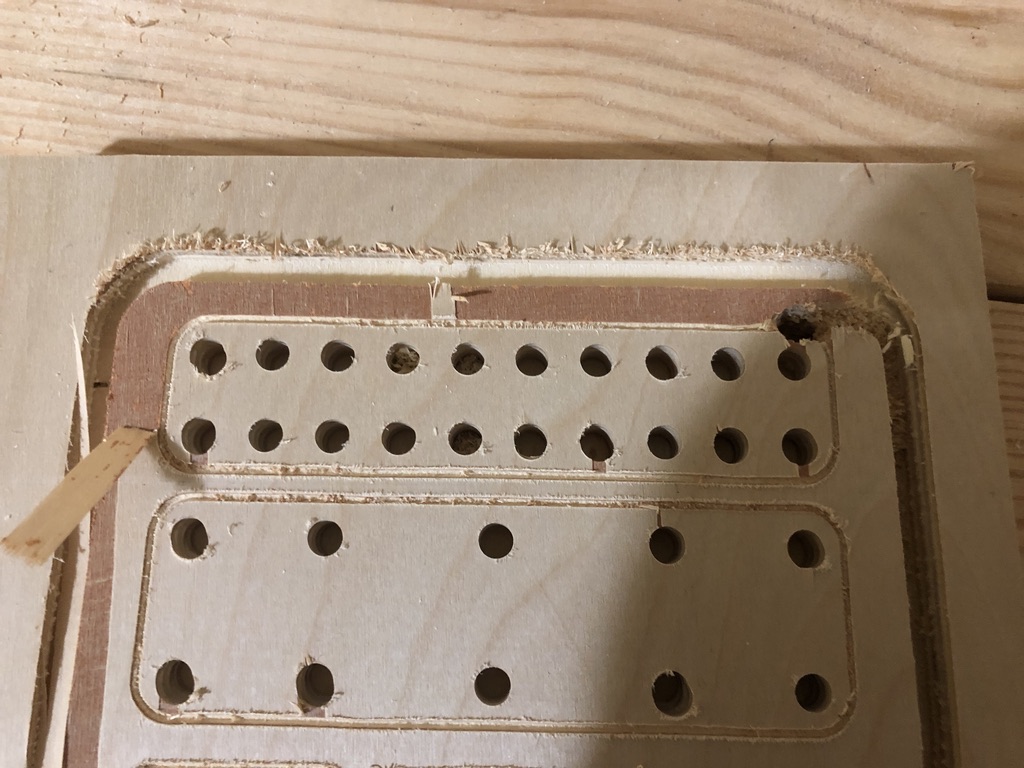
You can see that, once again, it went off track and drilled an extra hole in my project and made another hole down into the fill board. So the same thing happened in the same place both times. The difference is that the 2nd time, it had already gone around once.

I’m wondering if it could be related to another issue. When I first used the 302 endmill to draw the lines on the surface, I re-zeroed the Z-Axis, since I knew the endmill tips were not all at the same height. You can see the result I got:


The lines etched in on the left, but not on the right. I know this means the distance from the tool to the board are not consistent. I checked if it was clamped down and that the fill board was all the way down. I have not yet checked to be sure everything on the Shapeoko is still squared off. To fix it, I just rezeroed a few 1/100 of a MM lower and ran that file again. It looked fine and I could swear that I could not see a difference in depth in those lines when I inspected them later.

I’m wondering if this issue could be connected with the big issue - maybe something’s not level and that’s creating a problem? I question that, though, since it looks like the lines aren’t etched in other places, so I’m thinking the board (which has been in my shop for a few years) might have a slight warp to it that I can’t see. I’m not overly worried about this issue, but thought it best to mention it in case it has something to do with the bigger issue.

Hi @Tango,

(that’s a 3 XXL, the Pro has linear rails instead of V-wheels)

So that would be the root cause: if the endmill is not nice and tight in the router, and it starts to slip, then all bets are off. You were using an upcut endmill, and while cutting they create a force that tends to pull the stock upwards…or pull the endmill downwards, whichever gives first. This may be due to not tightening the collet nut enough, or having dirt stuck in the collet, or a faulty collet, or using inappropriate (too deep) depth per pass during the cut.

So you had both the endmill slipping out of the collet AND the stock coming loose ?
Did the endmill slip in the collet the second time too ? If so, you may “just” need to eliminate the endmill slipping problem. When an endmill slips and starts cutting too deep like it did here, the machine will start pushing hard against the stock, and if the workholding is not great it will move the stock, but all of this shouldn’t be happening in the first place if the endmill stayed put in the collet, so you need to fix that first.

As you identified, this is typical of shallow vcarving when the stock surface is not quite parallel to the machine axes. Things to mitigate that effect include:

  • surfacing the MDF between your T-tracks, to provide a reference surface that is parallel to the machine’s XY plane.
  • surfacing the top of the stock before running the job, when your project allows. This is by far the most efficient way to get rid of uneven surface depth issues. But of course, sometimes it’s not possible (typically with plywood, when surfacing the top may partially remove the top layer).
  • when surfacing the top of the stock is not possible, the next best tip is to use spacers/cards and place them below the corners of the stock to artificially level out the surface (assuming it’s flat…which is not always the case, or at least you should not assume so). There are videos floating out there to explain this better than I can, but if It take your pic as an example, it’s quite clear that the bottom right part of the stock is slightly lower than the upper left part, and therefore does not get cut. Place one or two playing cards under the lower right corner of your stock, re-fasten the clamps, and retry: chances are this time the vcarve will cut the lower right part just fine. The downside with this method is that it takes a little time to adjust the corners to reach perfect levelness. You don’t need to run cuts though, you can touch off on each corner and check the absolute Z value in CC interface, and adjust until you get similar values in each corner.

Oh, and it’s very unlikely that this secondary issue has anything to do with your primary issue (bit slipping)

1 Like

Thanks! I lose track of things like model numbers sometimes and my invoice wasn’t clear on that point.

It’s hard for me to tell if the endmill came out first or the board got pulled up first. Sounds to me like you have enough experience to narrow that one down, though. I tightened the nut as much as I could, especially the last time, after the endmill had already come out once. I would think, since I’m using a tutorial, that it’s not too deep a cut. I’m using one of the collets that came with the system, but I realize that could still be bad. I can check it and try again.

In general, where is a good place to get a good collet for this? If I can find the mat Lowe’s or HD, would they be good enough? I’m hoping I don’t have to order one from too far away! (I’m thinking it’s much more likely it’s the collet than dirt. I’ve been checking things when I put everything together.

Yes, the endmill came out both times. So would it have started cutting too deep as it was coming out of the collet? If that’s the case, I’d lay odds that’s what happened.

On the other issue, since I’m still just testing and working things out, considering the cost of wood today, I figured that was a good chance to use some scrap wood. I’m not concerned, in the long run, about that issue, since, from what you’re saying, I should be able to stop tat if I’m trying to do something that looks good by using better material or taking other steps you mention.

This is the most likely explanation I think.
If you tightened normally (with a set of wrenches, monkey tight not gorilla tight), and the endmill still slipped (using normal/conservative cutting depths) then it may be a defective collet. I suggest you get in touch with support@carbide3d.com and troubleshoot that issue with them. The standard collet delivered with the machine should work, with no slipping. You may later want to invest in a set of high-precision collets (either C3D’s or a third party like Elaire), but this is more related to optimizing router runout/precision, it is not related to slipping (which should never happen).

1 Like

What is really obvious in your 2nd photo is that you are trying to cut too much in one pass. You are probably losing steps.

You have to cut in multiple passes so you don’t overload your machine.

1 Like

Another thing to do to help keep a cut from overtaxing the machine is to minimize “tooling engagement” which is how much of the tool is involved in a cut.

If you have the machine lower the tool and begin cutting — that will result in a slot and is a “slotting cut” which has 100% tooling engagement, the worst possible cut to make on the machine and the most difficult. Continuing this and going deeper, say to cut out a profile just exacerbates the situation and repeats w/ an increasing amount of the tool involved in the cut.

To avoid this rather than:

Go back to the Design tab:

and choose “Offset Vectors”:

offsetting to the outside by endmill diameter plus 10% or more:

Then cut as a pocket down to tab depth or the penultimate pass:

and then finish the cut w/ an outer profile contour which starts at the bottom of the pocket and finishes the cut and which if need be has tabs:

This sounds like what happened to me on my first cut with my machine. I tightenrd the bit with the wrenches that came with the router motor. Tightened the bit down like i do in my Makita trum router. On my second to last pass, the endmill worked its way down the collet and and the last pass, it drove into the table. I would definitely suggest going with a good set of wrenches when you tighten bits in. I used a good set on the next endmill and cut the same program 3 more times out of the same material along with some plywood parts and didnt have a problem.


1 Like

I tightened it by putting a thicker allen wrench through the hole in the top of the router shaft and holding that in place while using one of the wrenches that came with the whole kit. It fits perfectly on the nut that holds the collet in place. I’ve been tightening it somewhere between (as @Julien said) “monkey tight” and “gorilla tight.” Basically as tight as I can make it without excessive strain.

I had one collet that came with the machine (I think it’s 1/4") and a pack of 2 carefully wrapped up collets that came either with the machine or with the end mill set I bought. They are 1/4" and 1/8" collets ad labelled “Precision collets.” I don’t know how precision that is.

I’m using the endmill holder in the Carbide3D tutorial that I linked to in my first post on this thread. The 2nd time it went bad it was on the 2nd pass for cutting through the board and it looks like it was going to make at least 1 more pass. If it was too deep a cut, I think that’s a serious concern since it’s from one of Carbide’s own tutorials. Either they were sloppy with their work and have created a project in their tutorials that’s more than a Shapeoko can handle or my device is unable to handle something a normal Shapeoko can.

I’m not saying that to be contrarian or argumentative, but I find it quite odd that I’m having problems with a file from the tutorial section.

First, I think what I said in reply to @CrookedWoodTex applies here.

But, beyond that, this is quite helpful. This is “Job 1” just to make sure I can make something with my Shapeoko. While I’ve looked over Carbide Create, I haven’t started exploring it yet. This helps me with one major issue I knew I was going to have to understand and that’s how deep to cut at once when making deeper recesses or cutting all the way through. This is something I’m going to be saving and looking through later, as well as now, when it’s time for me to design my own projects.

Shouldn’t I be able to count on a file in the Carbide3D tutorials to be adjusted properly for that issue, though?

I put an allen wrench through the hole in the shaft, right up next to where the shaft goes into the body of the router and I used their wrench, the flat one that totally surrounds the nut, and tightened it as tightly as I could. I would think, even without it being a really good wrench, that should do it, but I can try a better wrench. Do you know, off the top of your head, what size to use? If not, I’ll be able to check.

Don’t bother w/ the stock collet — use the two precision collets.

You should also source a pair of good quality wrenches (low profile 13mm and 22mm stubby for the Standard Carbide Compact Router) for changing tools.

We have no idea what files are going to be used for, so don’t clutter them up w/ additional geometry which not every user would need.

1 Like

You are going to run across lots of “files” that can be cut with a CNC. Ultimately, you have to be the one to evaluate those files for your machine. No matter where they came from. You’ll also learn plenty by doing that, too. :smiley:

Okay, no problem. Will do that. Thanks for the sizes.

But shouldn’t I be able to count on a file in the Shapeoko tutorial section to work for a Shapeoko without modification? (I’m printing it without modifying it.) I would think, if anything, when making a tutorial file, they’d air on the side of caution.

I get that I’m going to be learning that, but, again, since it’s in the Shapeoko tutorial section, shouldn’t it work on a stock Shapeoko? I get if I got it from Cutrocket or some other site, but from Carbide3D in the tutorial section for the very CNC I’m using?

Something to add, which I think backs up what @Julien said about the collet.

Today I was in the shop and looked at my 2nd trail (the 2nd photo in the original post) and I put a piece of paper on the slot it was cutting when it went bad. I put wood behind the paper and drew a line on it using the top of the wood as a ruler. This is what I got:

There is a significant difference in depth from when it turned the corner to cut that one side of the slot and at the end, where it went bad. It goes down at an angle. That makes me think it’s either the G-code itself that does that or that the end mill is sliding down.

So is that something Carbide Create would do when generating the G-code, or would it cut one layer at a time? How hard is it to check G-code to see what it’s supposed to do?

I would put my bet on the end mill is sliding down - if the design is to cut at a given depth, the G-code will instruct the machine to hold Z as constant while moving X/Y. If the end mill is fastened, I would check if the spindle is fastened, too.

1 Like

I tightened the spindle as tight as I could and this happened 2 different times. I’ve got a new collet on the way - one I could get delivered in a few days. If that doesn’t work, I’ll probably order precision collets. I’m also getting some good wrenches to use instead of the simple flat ones from Carbide3D.

I don’t know the G-code, but I’m betting, since it was cutting out a rectangle, it was cutting at one depth all the way around, then going down more at the start point and that it is NOT going down on a slope.

Carbide Create doesn’t do ramping in cuts, or cut at angles except for 3D toolpaths, so this was mechanical.

You can verify how many passes are being taken using the 3D preview — just turn off the view of the stock material for a clear view:

CC can’t generate that kind of ramping toolpath, so basically “no”.

This is quite easy and a very useful habit. I like using ncviewer.com, other folks use CAMotics, and there are a variety of other gcode viewers you can use in case of doubt

Hi Everyone

Here are a few thoughts and suggestions.

Router bits in any router or CNC machine of any size generally do not come out when installed the proper way.

Here are several things that can cause a router bit to come lose while being used.

The most common one is the bit is installed too deep in the router as in it is pushed up until it bottoms out on the router shaft, this can happen on the longer bits like the 1/4 inch bits that are longer. in this case you can tighten the bit up and it feels tight and when in use heat from the router and the bit when cutting expand the materials and the bit is the item that is easy to push and it will drop and then be lose.

There can be a slight buildup of sawdust on the collet and nut and this can also cause the bit to slip.

In each case there may be marks on the bit shaft and inside the collet

Checking your wiring, connectors and motors

On another note you could try jogging the machine manually with the router off and listen to the sounds of the motors and verify that the motion is smooth and not skipping or sounding different. you could also do this in the program you are running by setting up your machine and material as if you are cutting the program and when you get to the point after zeroing the bit and it is ready to be turned on remove the bit and material, don’t start the router, start the program as if you are doing the project. This will be better on a single bit project so you don’t need any bit changes.This will run the program and be using all the axis motions and then you can listen to the sounds of the machine.

If the movement does something funny you can hear the motor sounds change and maybe see the movement change.

This will test the wiring connections and if there is an open circuit in the wiring at any point in the program you will hear a change in the motor sounds. Open circuits can also build up heat such as a bad connection in the harness connector. If the pins in the connector are pushed out and only the tips of the pins are touching this will build up heat and then the circuit can open. You can use a temp gun to check the connectors and see if any are warmer than the others.

Pushed out pins can move inside the connector when the machine is moving and can also cause an open circuit and make the machine cut funny and be off the program.

Anthony

I called C3D for support on this on Monday and had to leave a message. Did the same on Tuesday. Still nothing from them and I’d like to talk to them about it.

I have a new 1/4" collet coming in today. I’ll try that and, when doing so, also pay attention to how I put the end mill in and fasten it. I’m cleaning everything out to make sure it’s not dirt or sawdust. I have two “real” wrenches coming in tomorrow and the next day. I may wait until they’re here to do a new test.

Also, since @avetrano mentioned how far in the end mill is, that brings up another issue, which I’ll probably post on another thread. I have a Sweepie with a shop vac hose attached. I use this same shop for 3D printing, so I’m trying to keep sawdust down to a minimum. (Once I have been using the Shapeoko for a while and know my workflow, I’m going to make a frame and cover it, but I like the idea of sucking up the sawdust and keeping the workspace clean.) I’m not sure how far out, below the plastic on the Sweepie that the end mill should protrude.

I don’t think the Sweepie is the problem, since it’s pretty clear, now, that the end mill is sliding down.

Good. That helps narrow this issue down - so if there’s a ramp, as you said, it’s mechanical.

Ah! I did see the tabs in Carbide Motion. (I’m running it with a 7" touch screen on a Raspberry Pi, but I can also see it from a Linux desktop nearby using VNC. My goal has been to first make sure it can produce something (just out of excitement!) and I had not looked through the tabs but I remember them indicating views, so, in the future, I know I can look at those on the desktop, where I have a bigger display. I’ll start going over all that from now on.

Thanks - extra confirmation it’s mechanical. So it’s likely either the collet or the person putting the end mill in. Errors with either can be rather easily addressed!

I’ll be looking through those now that I know such a thing exists. I’m sure I can find one that will work on my iMac and on Linux. (My study, where I do most of my computer work, has an iMac. I have a Linux workstation in the shop, along with the Pi and touch screen for Carbide Motion.)

Considering I’m totally new to this, that makes sense.

Interesting and counter-intuitive. While I didn’t put it all the way up as far as it could go, I did put it far up. Any thoughts on about how much of the end mill should go up into the collet?

While the Shapeoko has been running, I’ve stood over it and have not heard much in terms of changes in machine sounds until it goes wonky. Or the sound may have changed just before and that may have alerted me - sometimes it’s hard to remember sequence when things happen quickly. I’ve also had my phone camera going during some of my test runs and have reviewed those videos and not heard a change.

But since it sloped down on that leg of the cut, it’s also possible the sound changed gradually in a way I couldn’t notice.

Wiring - that’s my first “goto” for when things go wrong. If I assemble something, I triple-check the wiring and whenever I have doubts - any doubts - I check again!

Hi Hal

If you think there is something going on with the movement of the machine try my suggestion of running the program without the router on as above. This will allow you to hear the X,Y and Z motors as if you are cutting a project. you can clearly hear these motors and if there is any wiring or power issues you will hear a change (wonky) in the noise it makes. You will never hear all the sounds these motors make with the router on. The motors will have a different sound when cutting straight lines and the sound will be totally different when cutting curves. Think of it like this, you have X and Y moving to cut a curve and the Z is moving normally while cutting it then needs to move up out of the cut and then move to the retract height you have set. Lets say it goes wonky for what is a few degrees movement and this creates your issue. you will not hear or see the motor skip while the router is running. You will be able to hear the change in sound when running a program and not having the router running.

Bit depth is usually 1.5 times the length of the diameter or if indicated on the bit there may be a min and max depth lines marked on the bit. A general rule is to bottom the bit in the collet as far as it will go and then pull it out 1/16 - 1/8 and remember as you tighten the collet nut you are also pushing the collet in deeper.

I use the sweepie also. depending on the thickness of the material and how deep I am cutting I try to allow for as much air flow as possible. The carbide router and many other routers have a fan that blows down and out from the router. This helps with cooling and the addition flow from the vac increases it.

Hope this helps

Anthony

Oh - I see what you’re saying. Okay. I have a BitRunner installed, but I can pull the plug and keep it out of the way for now.

So, as a general rule of thumb, a 1/4" bit can usually go 3/8" down, but that might change depending on the bit.

Just checking you mean 1/16" - 1/8". Not something like 1/16 the diameter or anything like that. (I know it can be a bit annoying, but due to a perception issue, I often repeat things or ask to clarify that I am clear on details like that. If I don’t, I sometimes interpret things incorrectly.)

When you’re talking about airflow, is that space under the brush? I was thinking, when I got used to everything, to have the brush come close to the surface material. It looks like I didn’t have to have it too high for the vac to not pick up any sawdust at all.