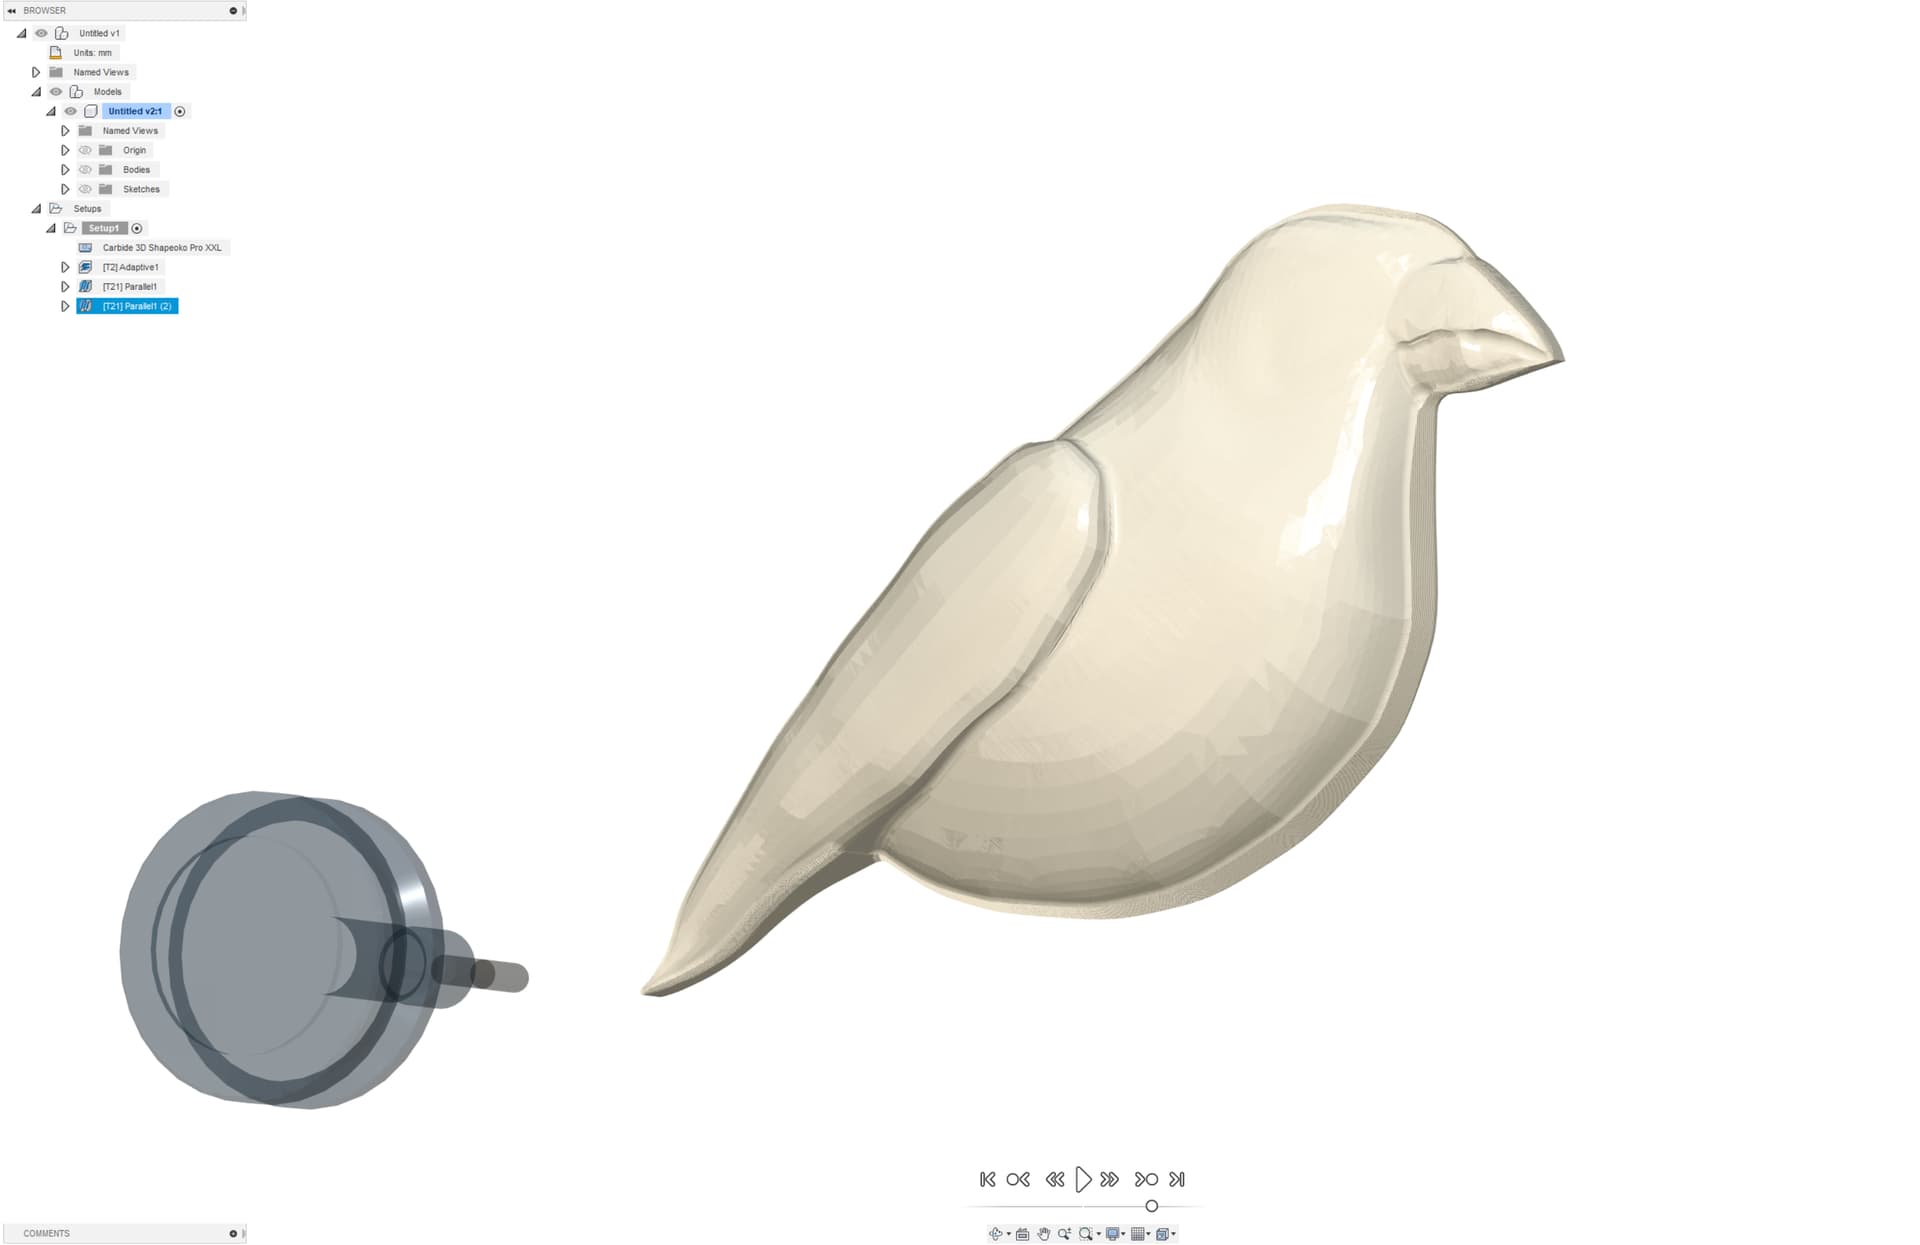
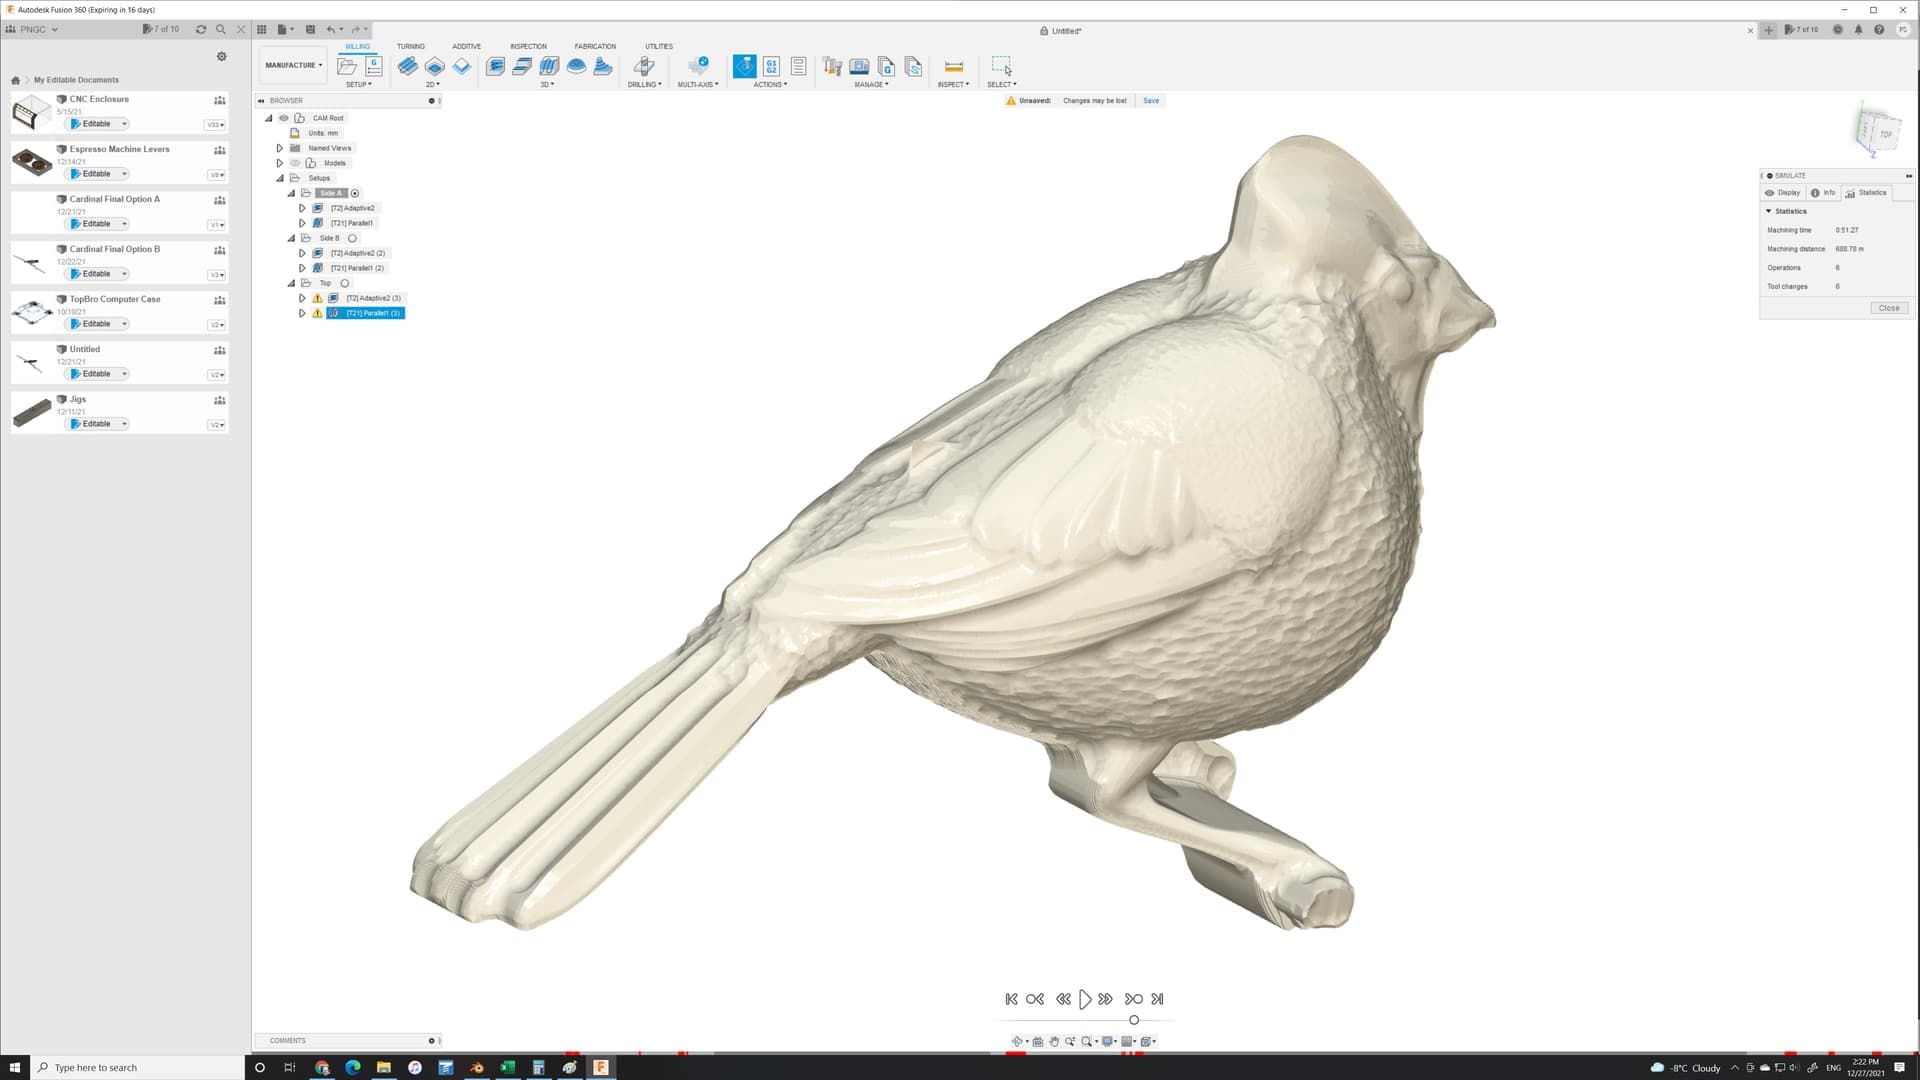
As I get more projects under my belt I now wanted to start getting into some 3D milling projects so my wife asked that I make her mother a carving of a Cardinal with a saying. That said instead of looking for a ready made 3D model I decided to dive in head first using Blender to make my own 3D models. It’s been a bit of a struggle but with persistence I’m starting to get a hang of it. Before getting too far along I decided to import the mesh into Fusion and see how the toolpaths work out. That said in this example I have 3 toolpaths. I start with an adaptive clear followed by 2 parallel passes at 45deg and 135deg. That said I noticed along the edges near the bottom edge/floor the parallel toolpath does not go all the way to the floor. I think it’s because this is where the model may start to wrap back around under the body/wing so was wondering if anyone had any advice on how to clean this up?
can you share the f3d? There are a few parameters you can usually tweak to “overcut”
I’m guessing your are not allowing your tool to go past your selected contours. Because you have a ball mill, you’ll end up with the “fillet” at the bottom.
I don’t have anything to look at in front of me, but in the second tab where you select the profiles, you can enter offsets to the contour and possibly select other limitations (tool center on boundary, tool within boundary, etc). I would just select tool center on boundary and then give an offset of slightly over 1/2 tool diameter. That will expand your work envelope to cover everything the ball mill can reach. But you’ll still have a “fillet” at the bottom of the profile though. I guess you can clean up with regular endmill, on a router table, or by hand.
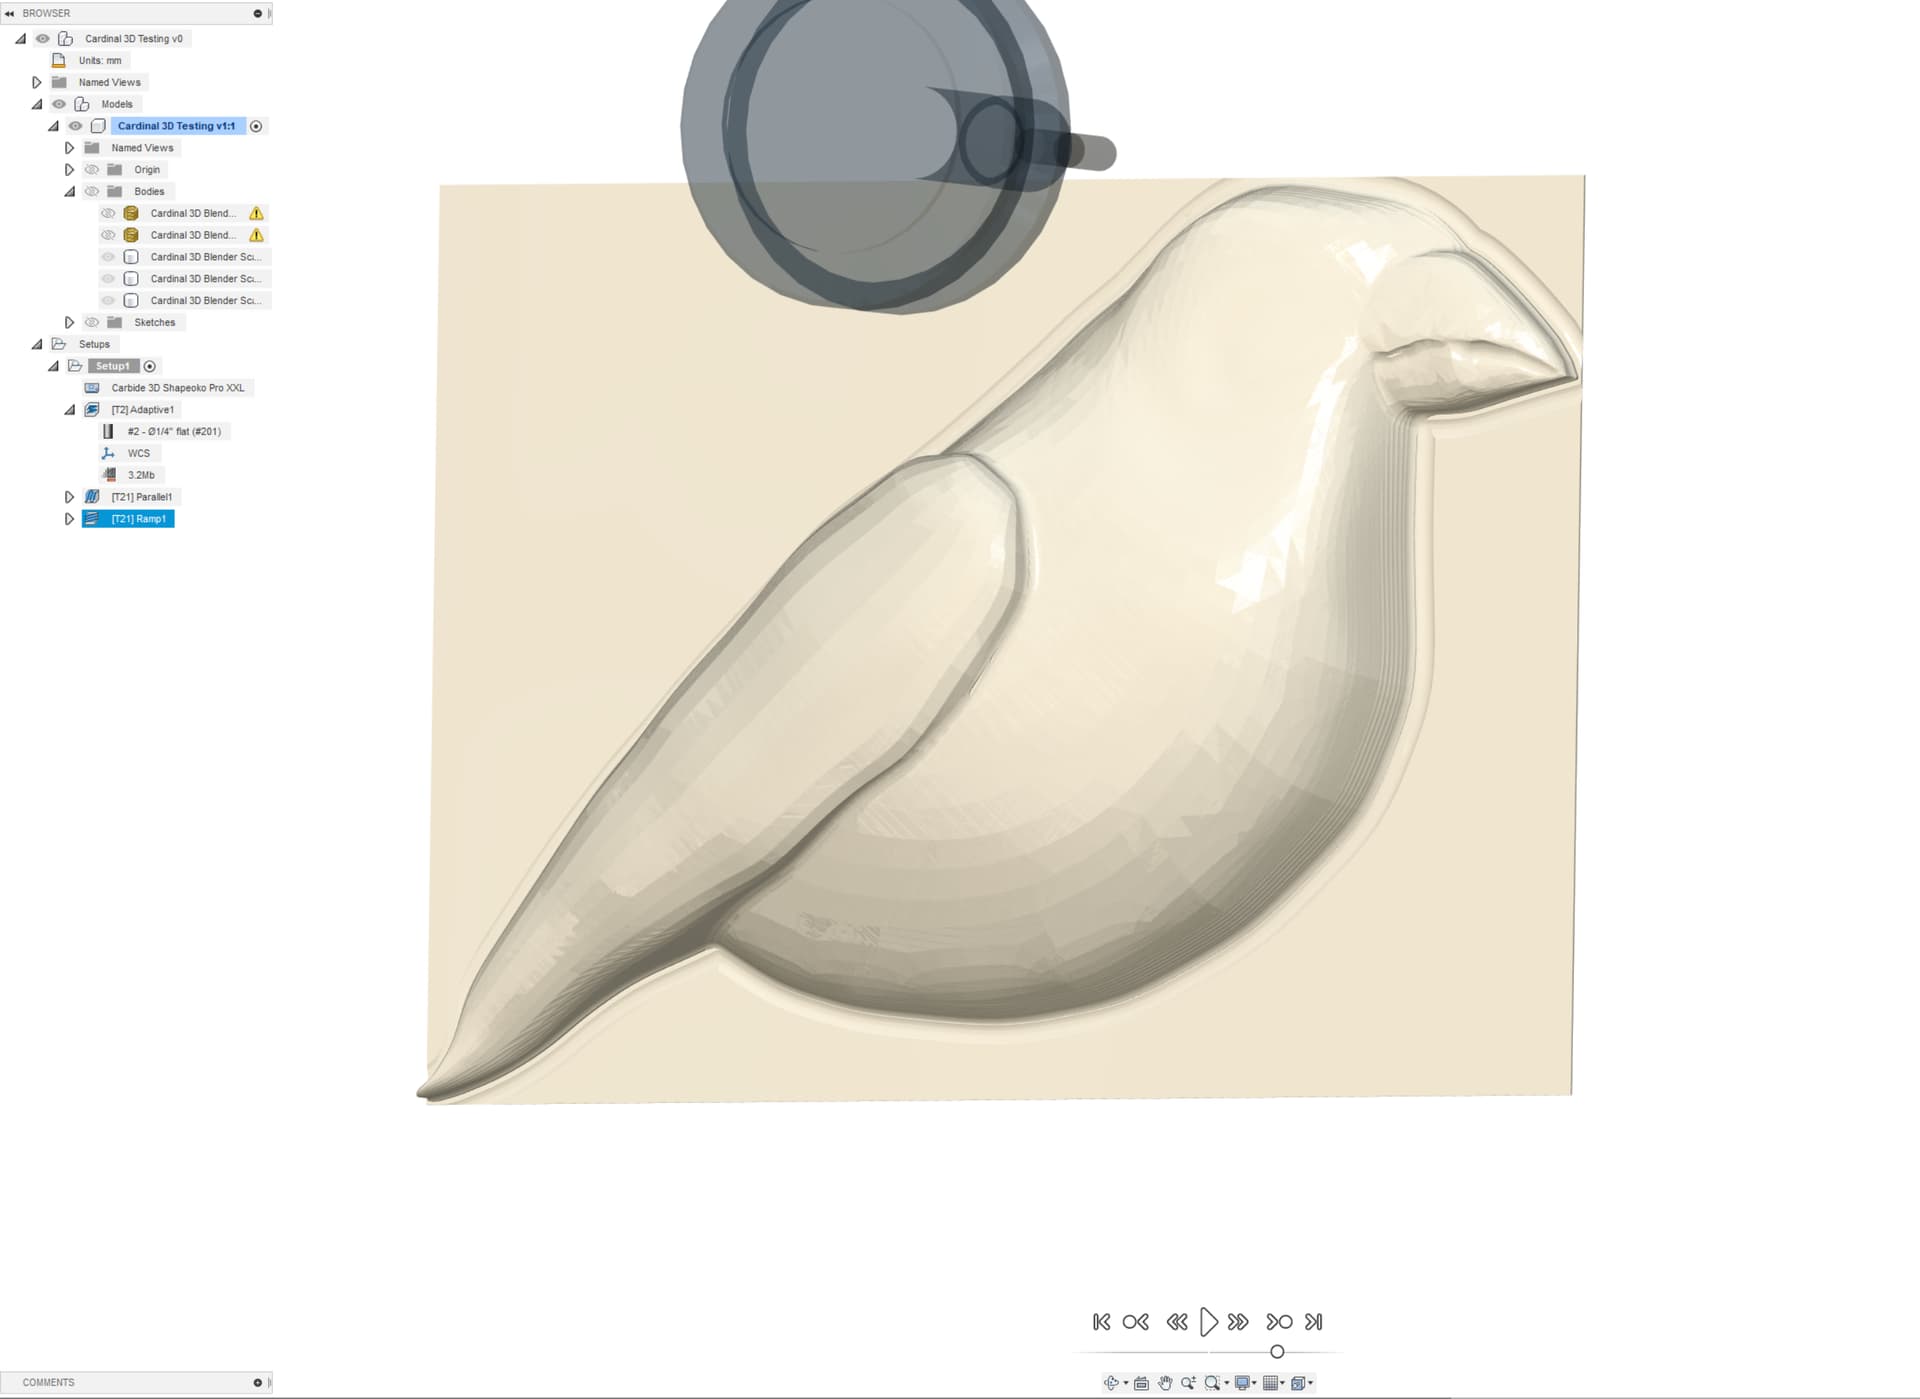
The Ramp toolpath cleaned up the remaining material that the parallel pass did not get too. I’ll try playing with those settings you mentioned.
@Julien looks like the f3d file extension cannot be uploaded and to allowing others to download using the shared link from the autodesk website is a subscription feature so no go there. I’d have to drop it on a Google Drive but I think I figured it out somewhat and I wouldn’t want you to waste any time on this as it was just a test. Just wanted to make sure I can import the Blender 3 mesh into Fusion and actually get toolpaths on it to carve it out… without crashing my system.
Edit: that said I would share the final files once completed the 3D model if interested. Now time to go transform this pigeon into a cardinal.
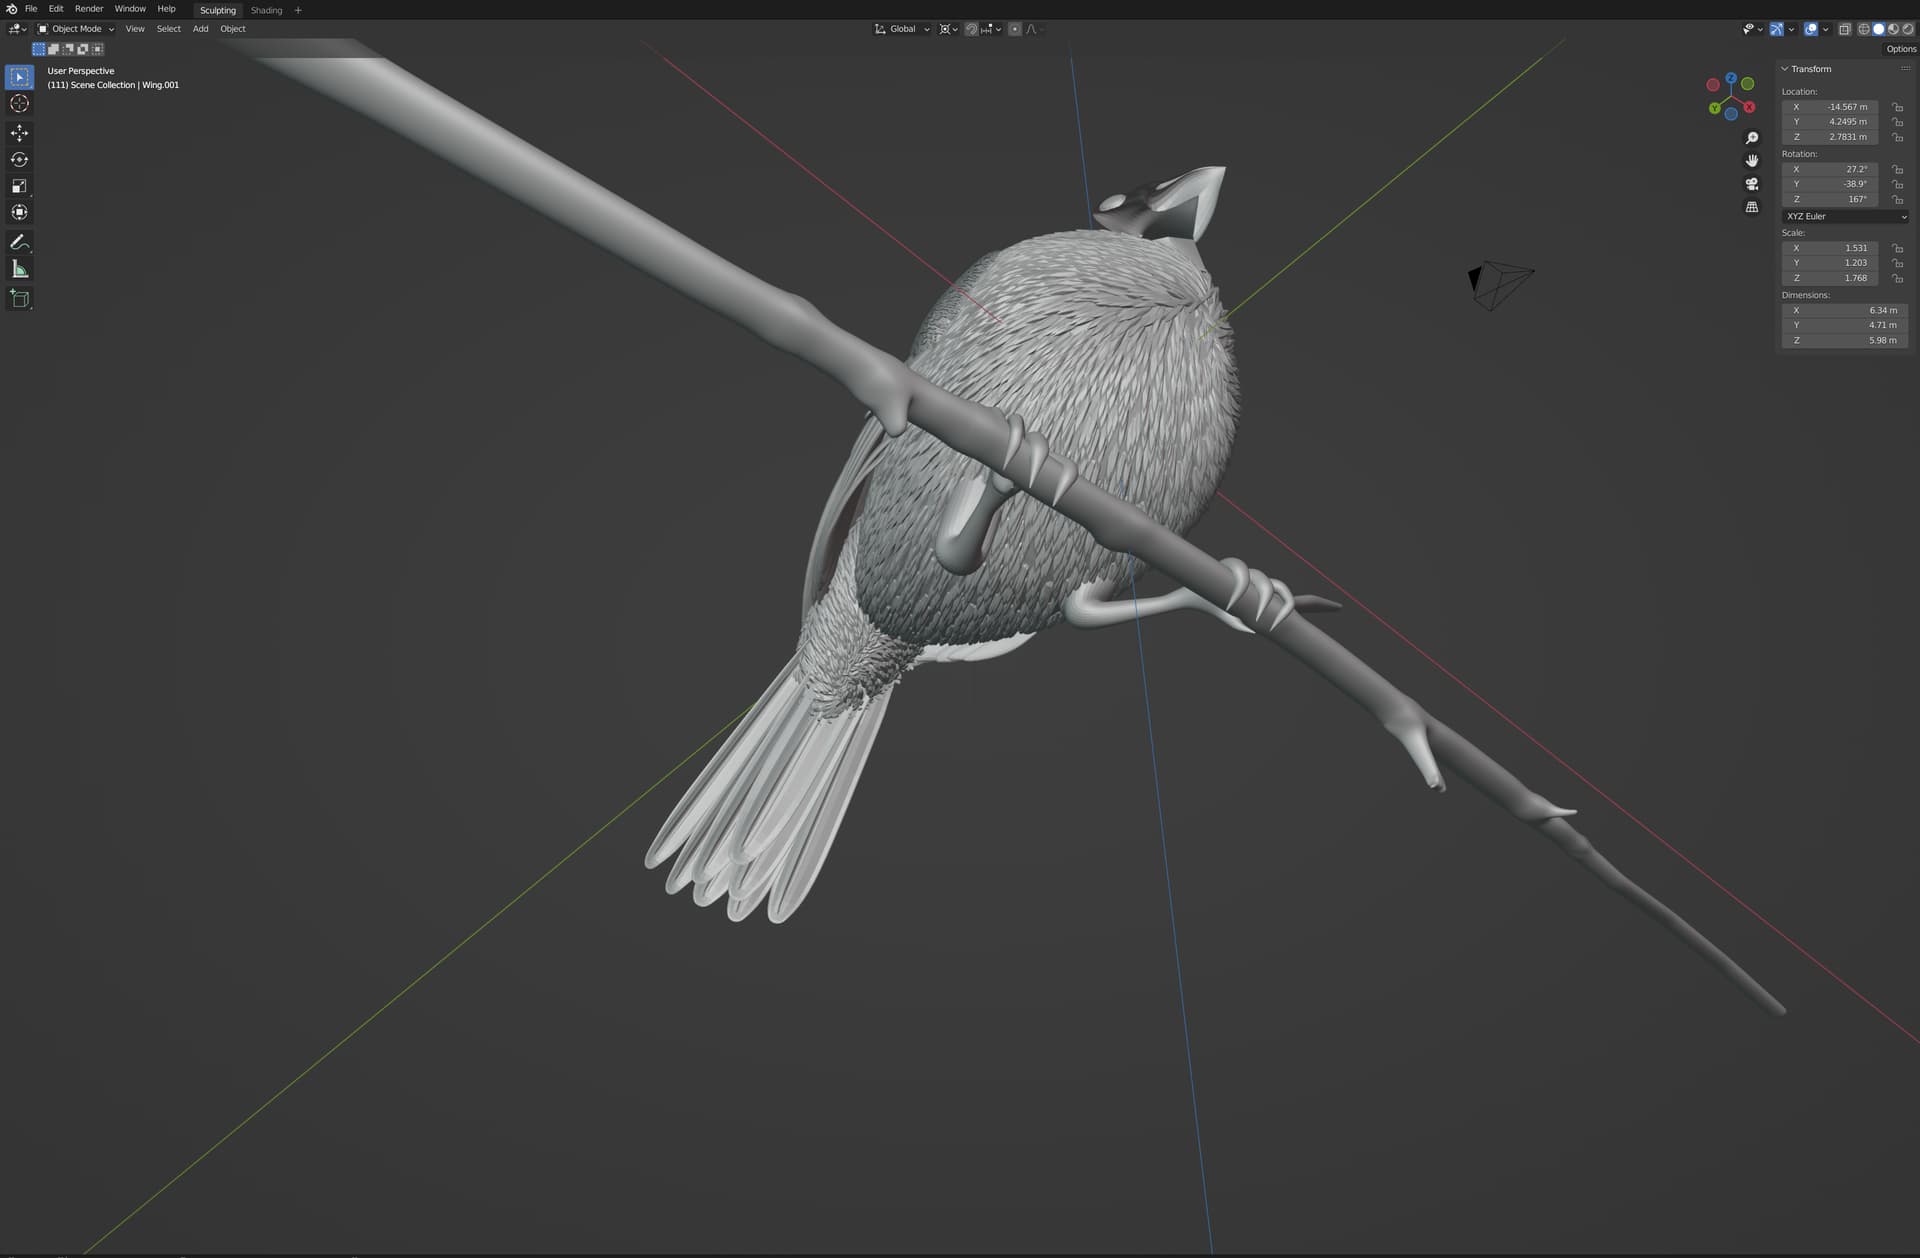
It’s starting to look a little more like a Cardinal now. Here’s the Viewport in Blender software

Since I’m generating a 3D model with full 360deg view I’m actually thinking of scaling the scene on 1 axis to flatten the bird branch to mill into 1" of stock or I may go a little thicker if needed so there would be a front and back.
Fusion Simulation Front View
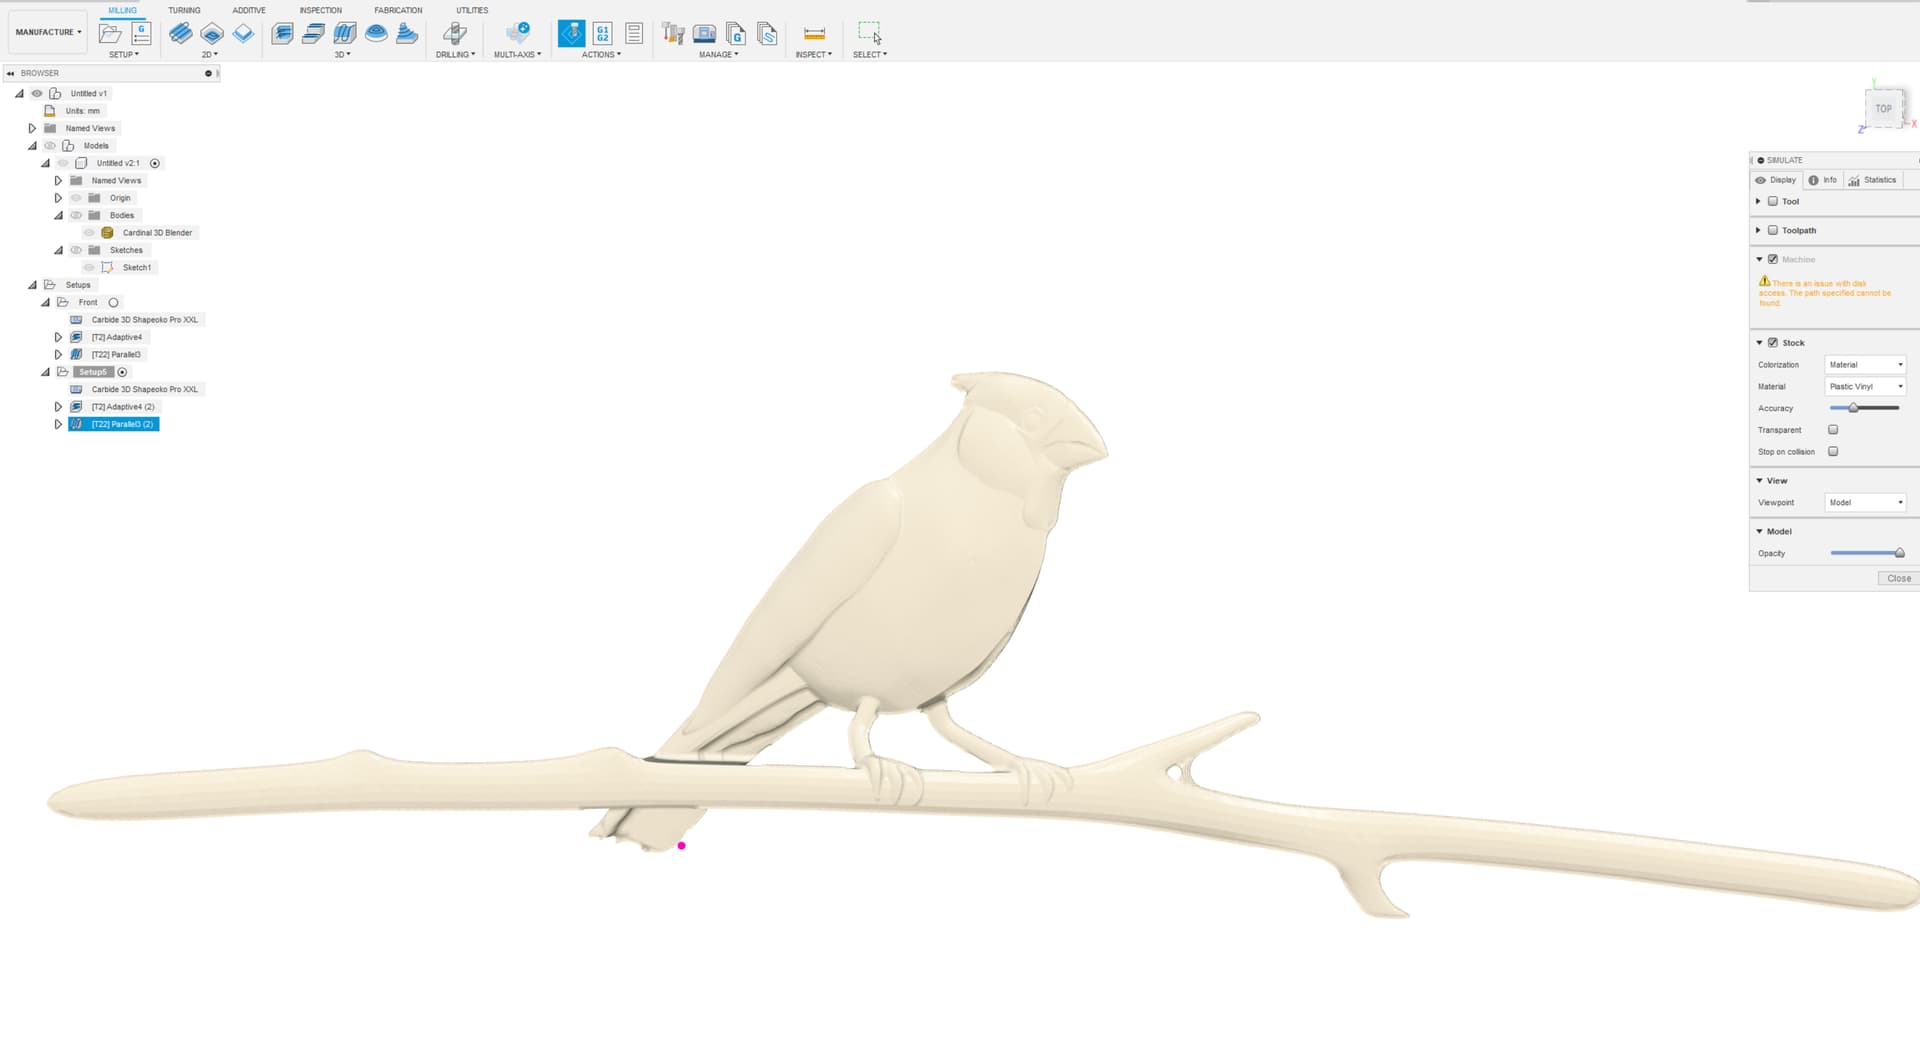
Fusion Simulation Back View

Not sure how this will turn out but worth a shot 
Just wanted to say, I keep being impressed how fast you learn…anything new.
How long did it take overall to learn Blender from scratch to that cardinal ? (asking for a friend )
Extremely interested in the Blender software and how the mesh interfaces with Fusion 360.
If your going to take the plunge down this rabbit hole it’s one of those skills that translate well between various software packages so if you’ve messed around with editing meshes (ie. in CAD like Fusion → editing forms, etc…) you have a jump start on it as the fundamentals are the same and its more about learning Blenders shortcut keys and tools. You’d want to learn the shortcut keys otherwise you’ll spend 80% of the time moving your cursor around clicking stuff and that will get old fast. I’ve also picked up some keyboard time using game map editors in the past so modifying terrain maps (meshes) etc… has definitely helped me get a jump on this. That said I installed Blender 5 days ago and spent a few blocks of 4 to 5 hours learning (maybe about 24 hours worth) some of the functionality to get to this point. It’s basically that 80/20 rule where 80% of the time you are going to use 20% of the functionality (tools, capability, etc…). At first I just jumped in clicking and trial and error but that wasn’t the best approach and was getting nowhere fast. I’d say the best way is to find one of the many yourtube series for beginners and follow along to get a first project done or at least see how they approach a project and apply those learned skills to your project. I followed along one where they are making a donut and coffee and it’s divided into 4 levels of mastery with 6 to 8 videos for each level. I’m currently at Level 1 part 6. Latter levels are applying shaders and mapping images to surfaces but likely will not need to get that far into it as I just need the mesh to bring to fusion. If you dive in have fun and get ready to memorizing shortcut keys… ![]()
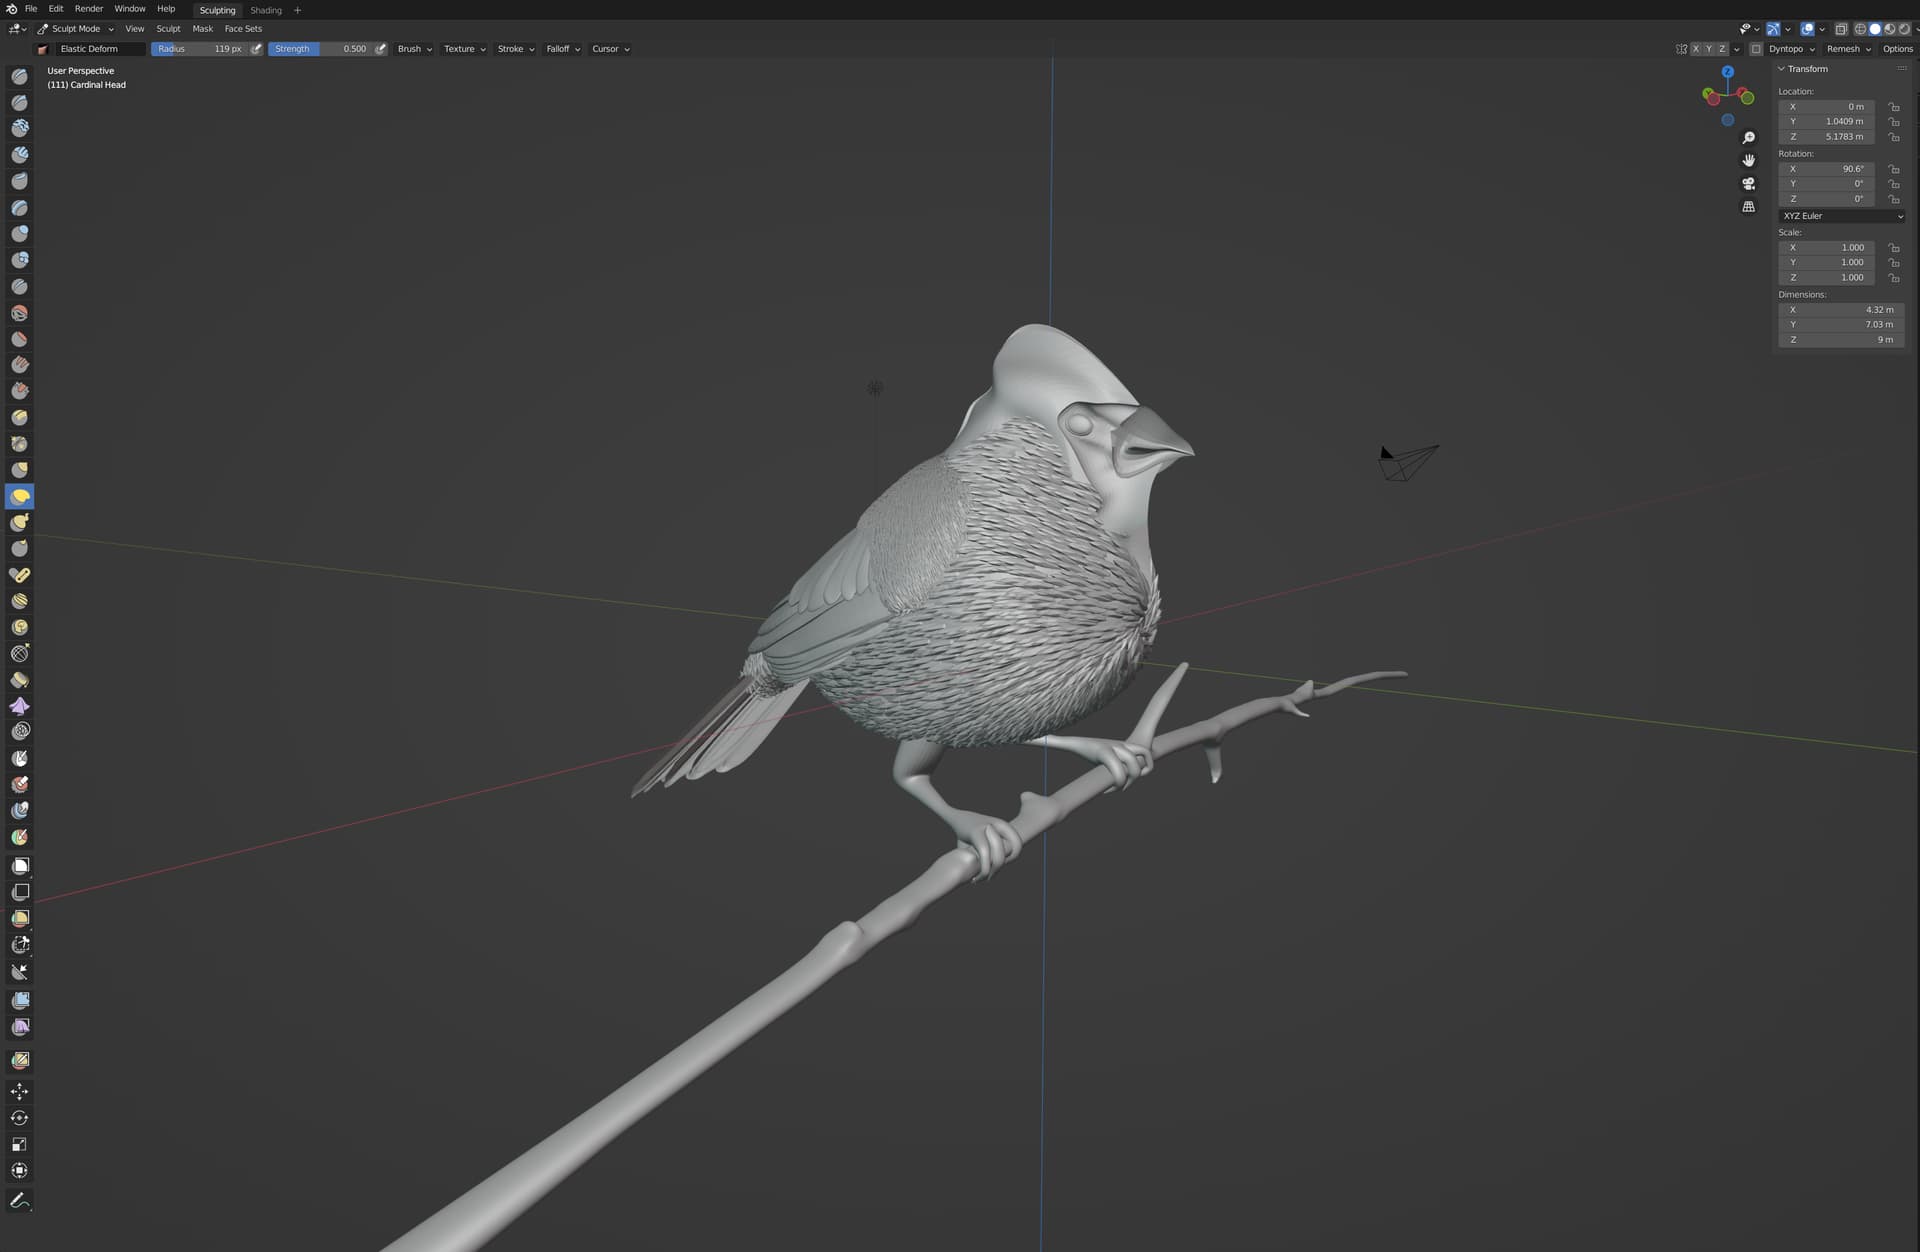
So there’s a steep learning curve to the Blender software but if your willing to dig in it’s quiet impressive what you can accomplish. Here are some screenshots of the Cardinal to date, still have the head to finish and then finally to Fusion 360 to attempt to get some toolpaths done to get onto the CNC. It’ll be interesting to see how the detail comes out in the end. I purposely left the body feathering detail rough and exaggerated as I’m expecting it to be smoothed out once carved out on the CNC. If anyone has any experience/suggestions on modeling strategies that work best when using 1/8" tooling I’d be happy to listen/learn before I start the job.
Top View
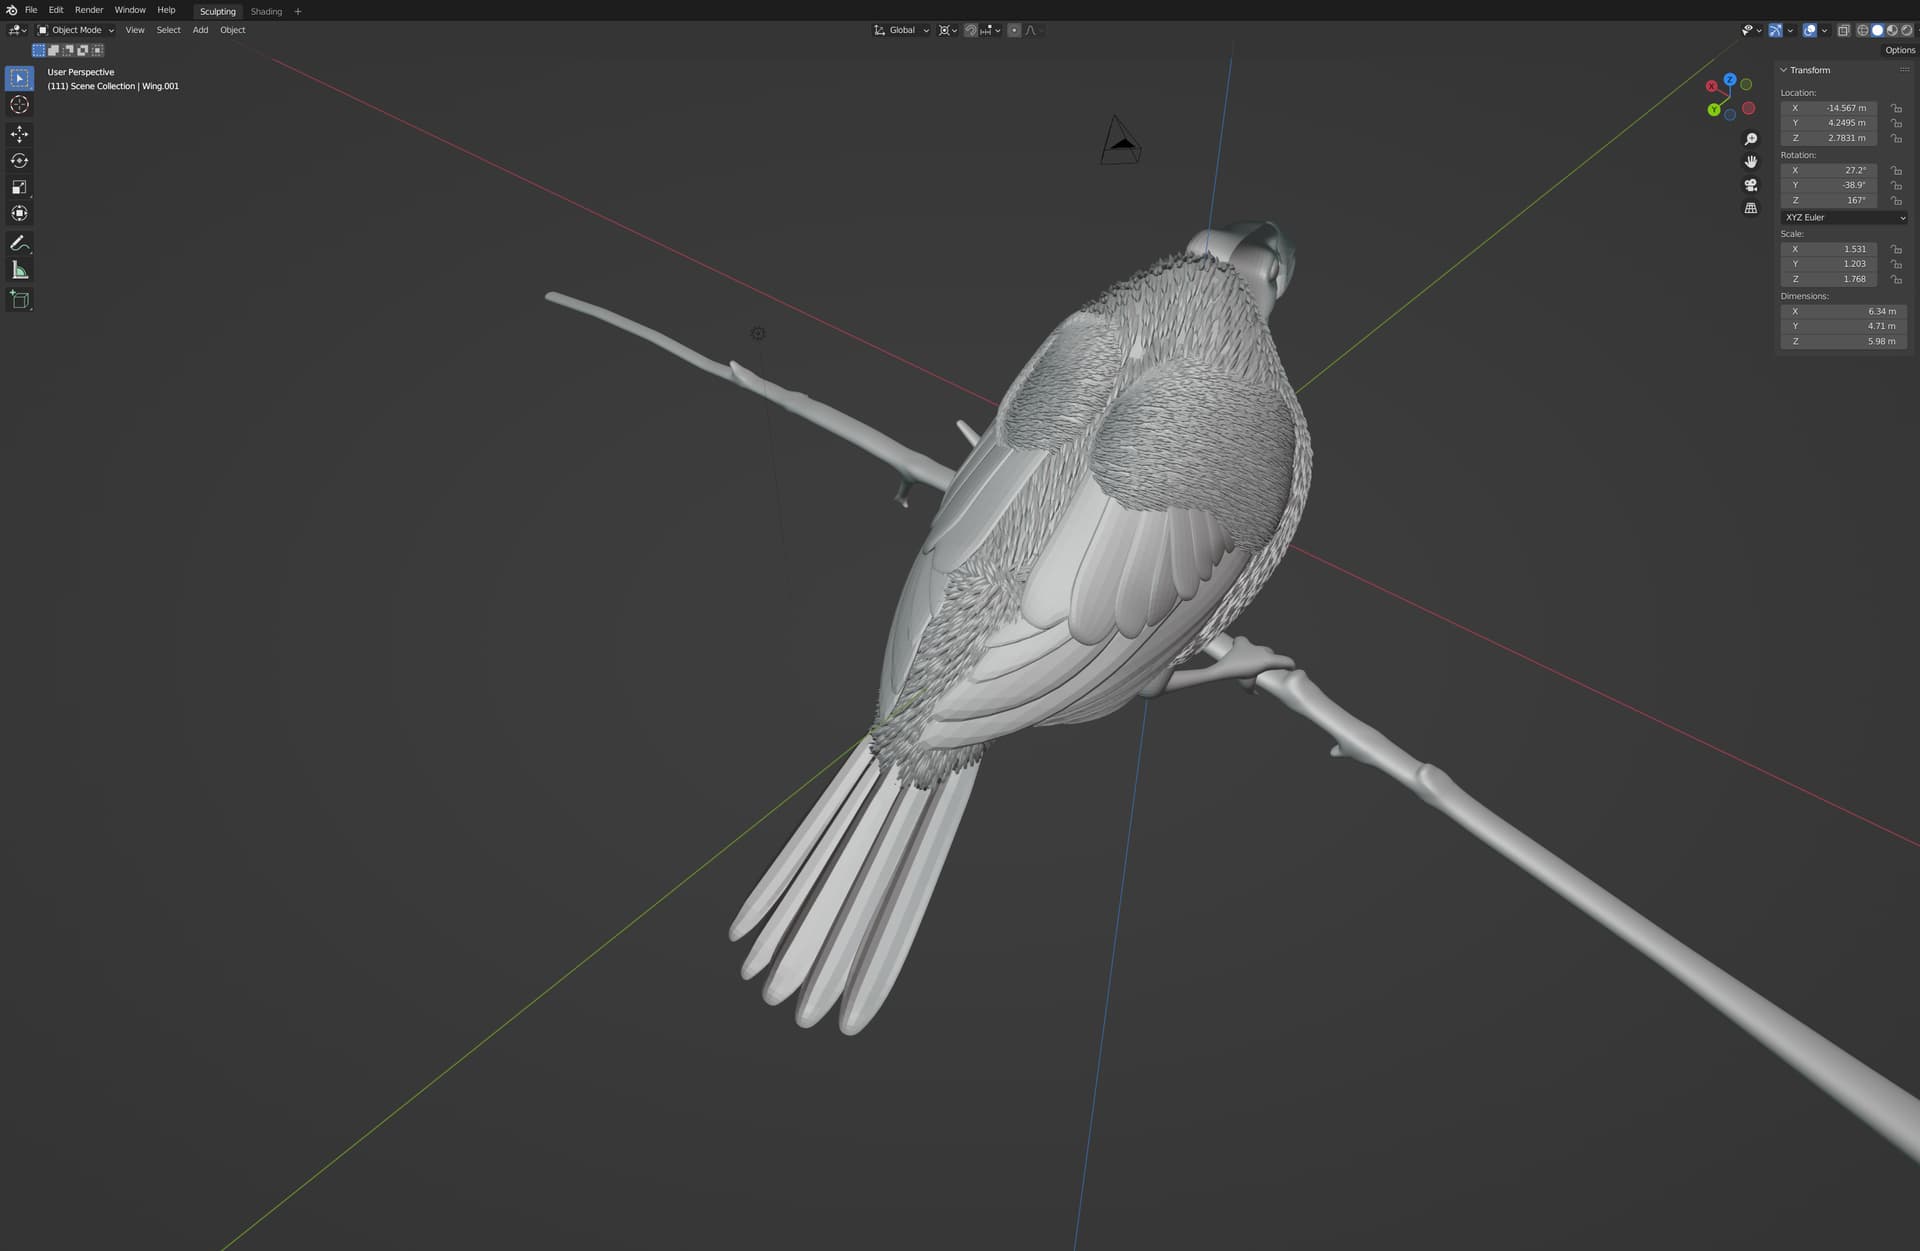
Bottom View
Head (Work in Progress but need to get some detail on it)
Edit: for those interested this is what the output from Fusion 360 simulation with the model dimensions as follows X: 147mm, Y: 114mm, and Z: 71mm. Toolpaths for now just to get an idea is the 1/4" flat endmill (3D adaptive) and a 1/8" ball endmill (3D parallel) with an approach from both sides and the top. Likely I would need to mill the legs/branch separately and assemble at the end.
This topic was automatically closed after 10 days. New replies are no longer allowed.