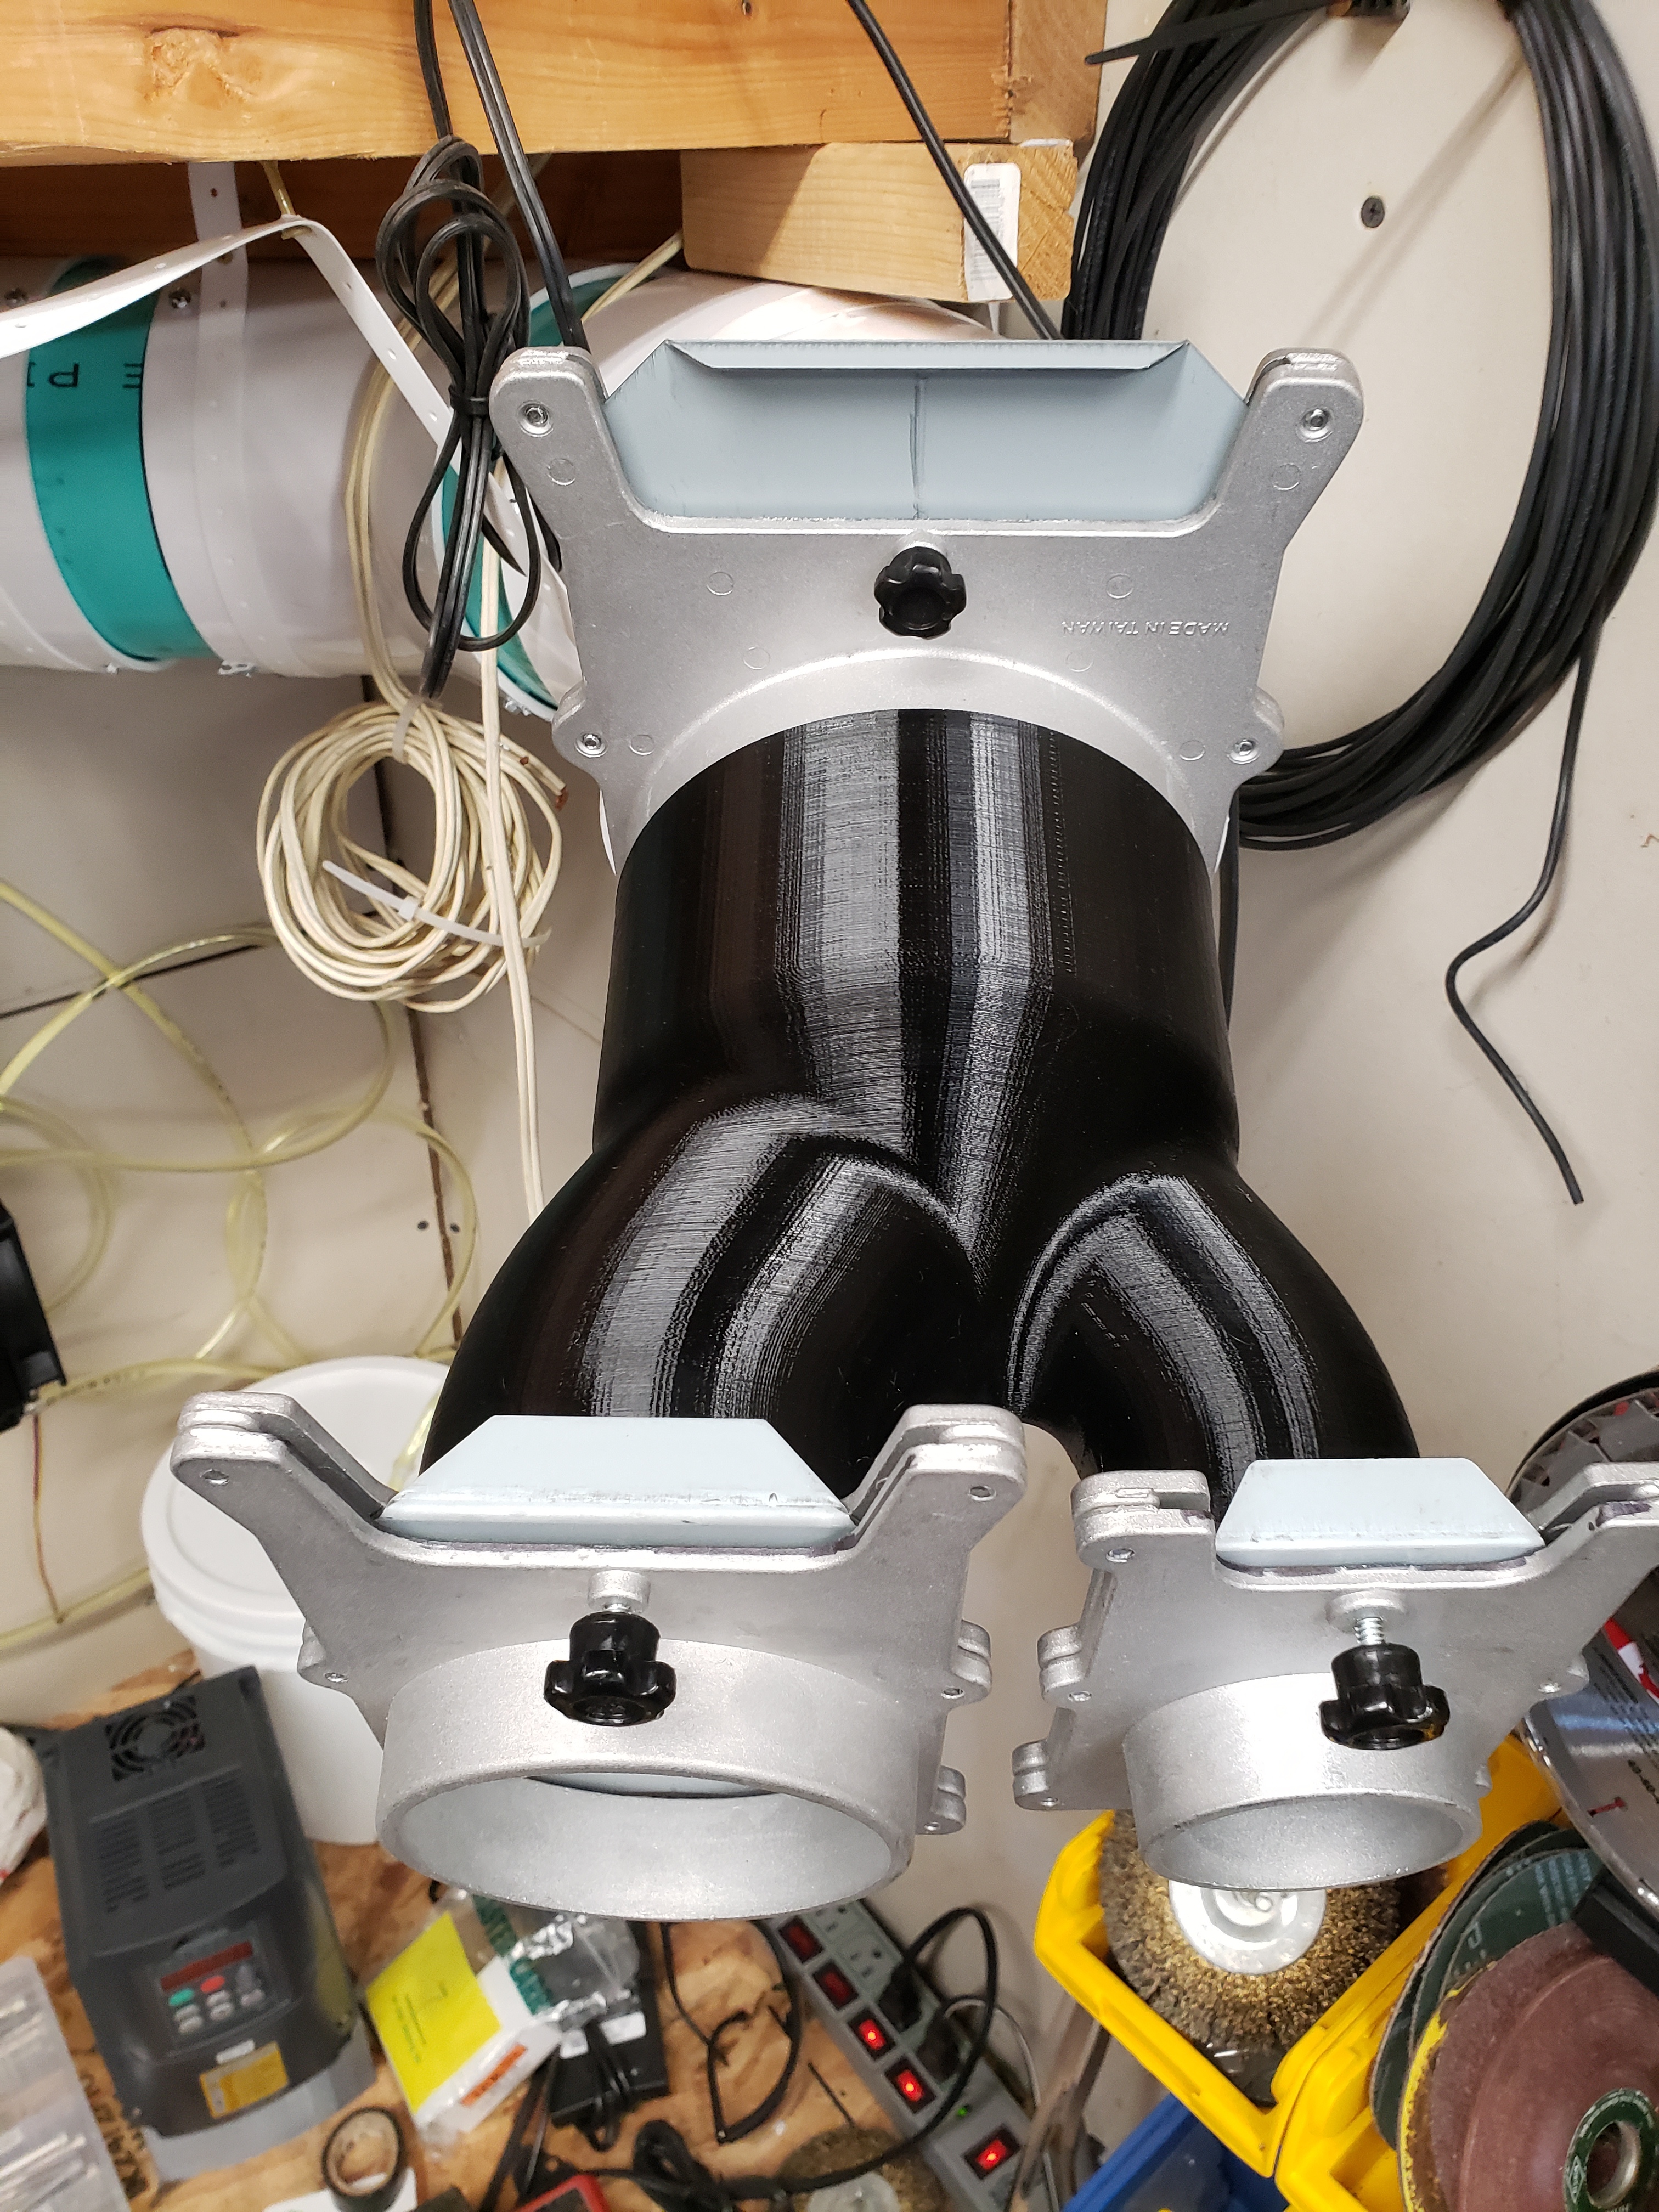
Because I like to over-complicate things and have everything do everything, I have made a bunch of adapters so I can go from anything to anything. I designed and printed adapters to go from 6in DWV pipe and adapters as well as 4in DWV pipe and adapters to 6in, 4in and 2.5in gate valves:
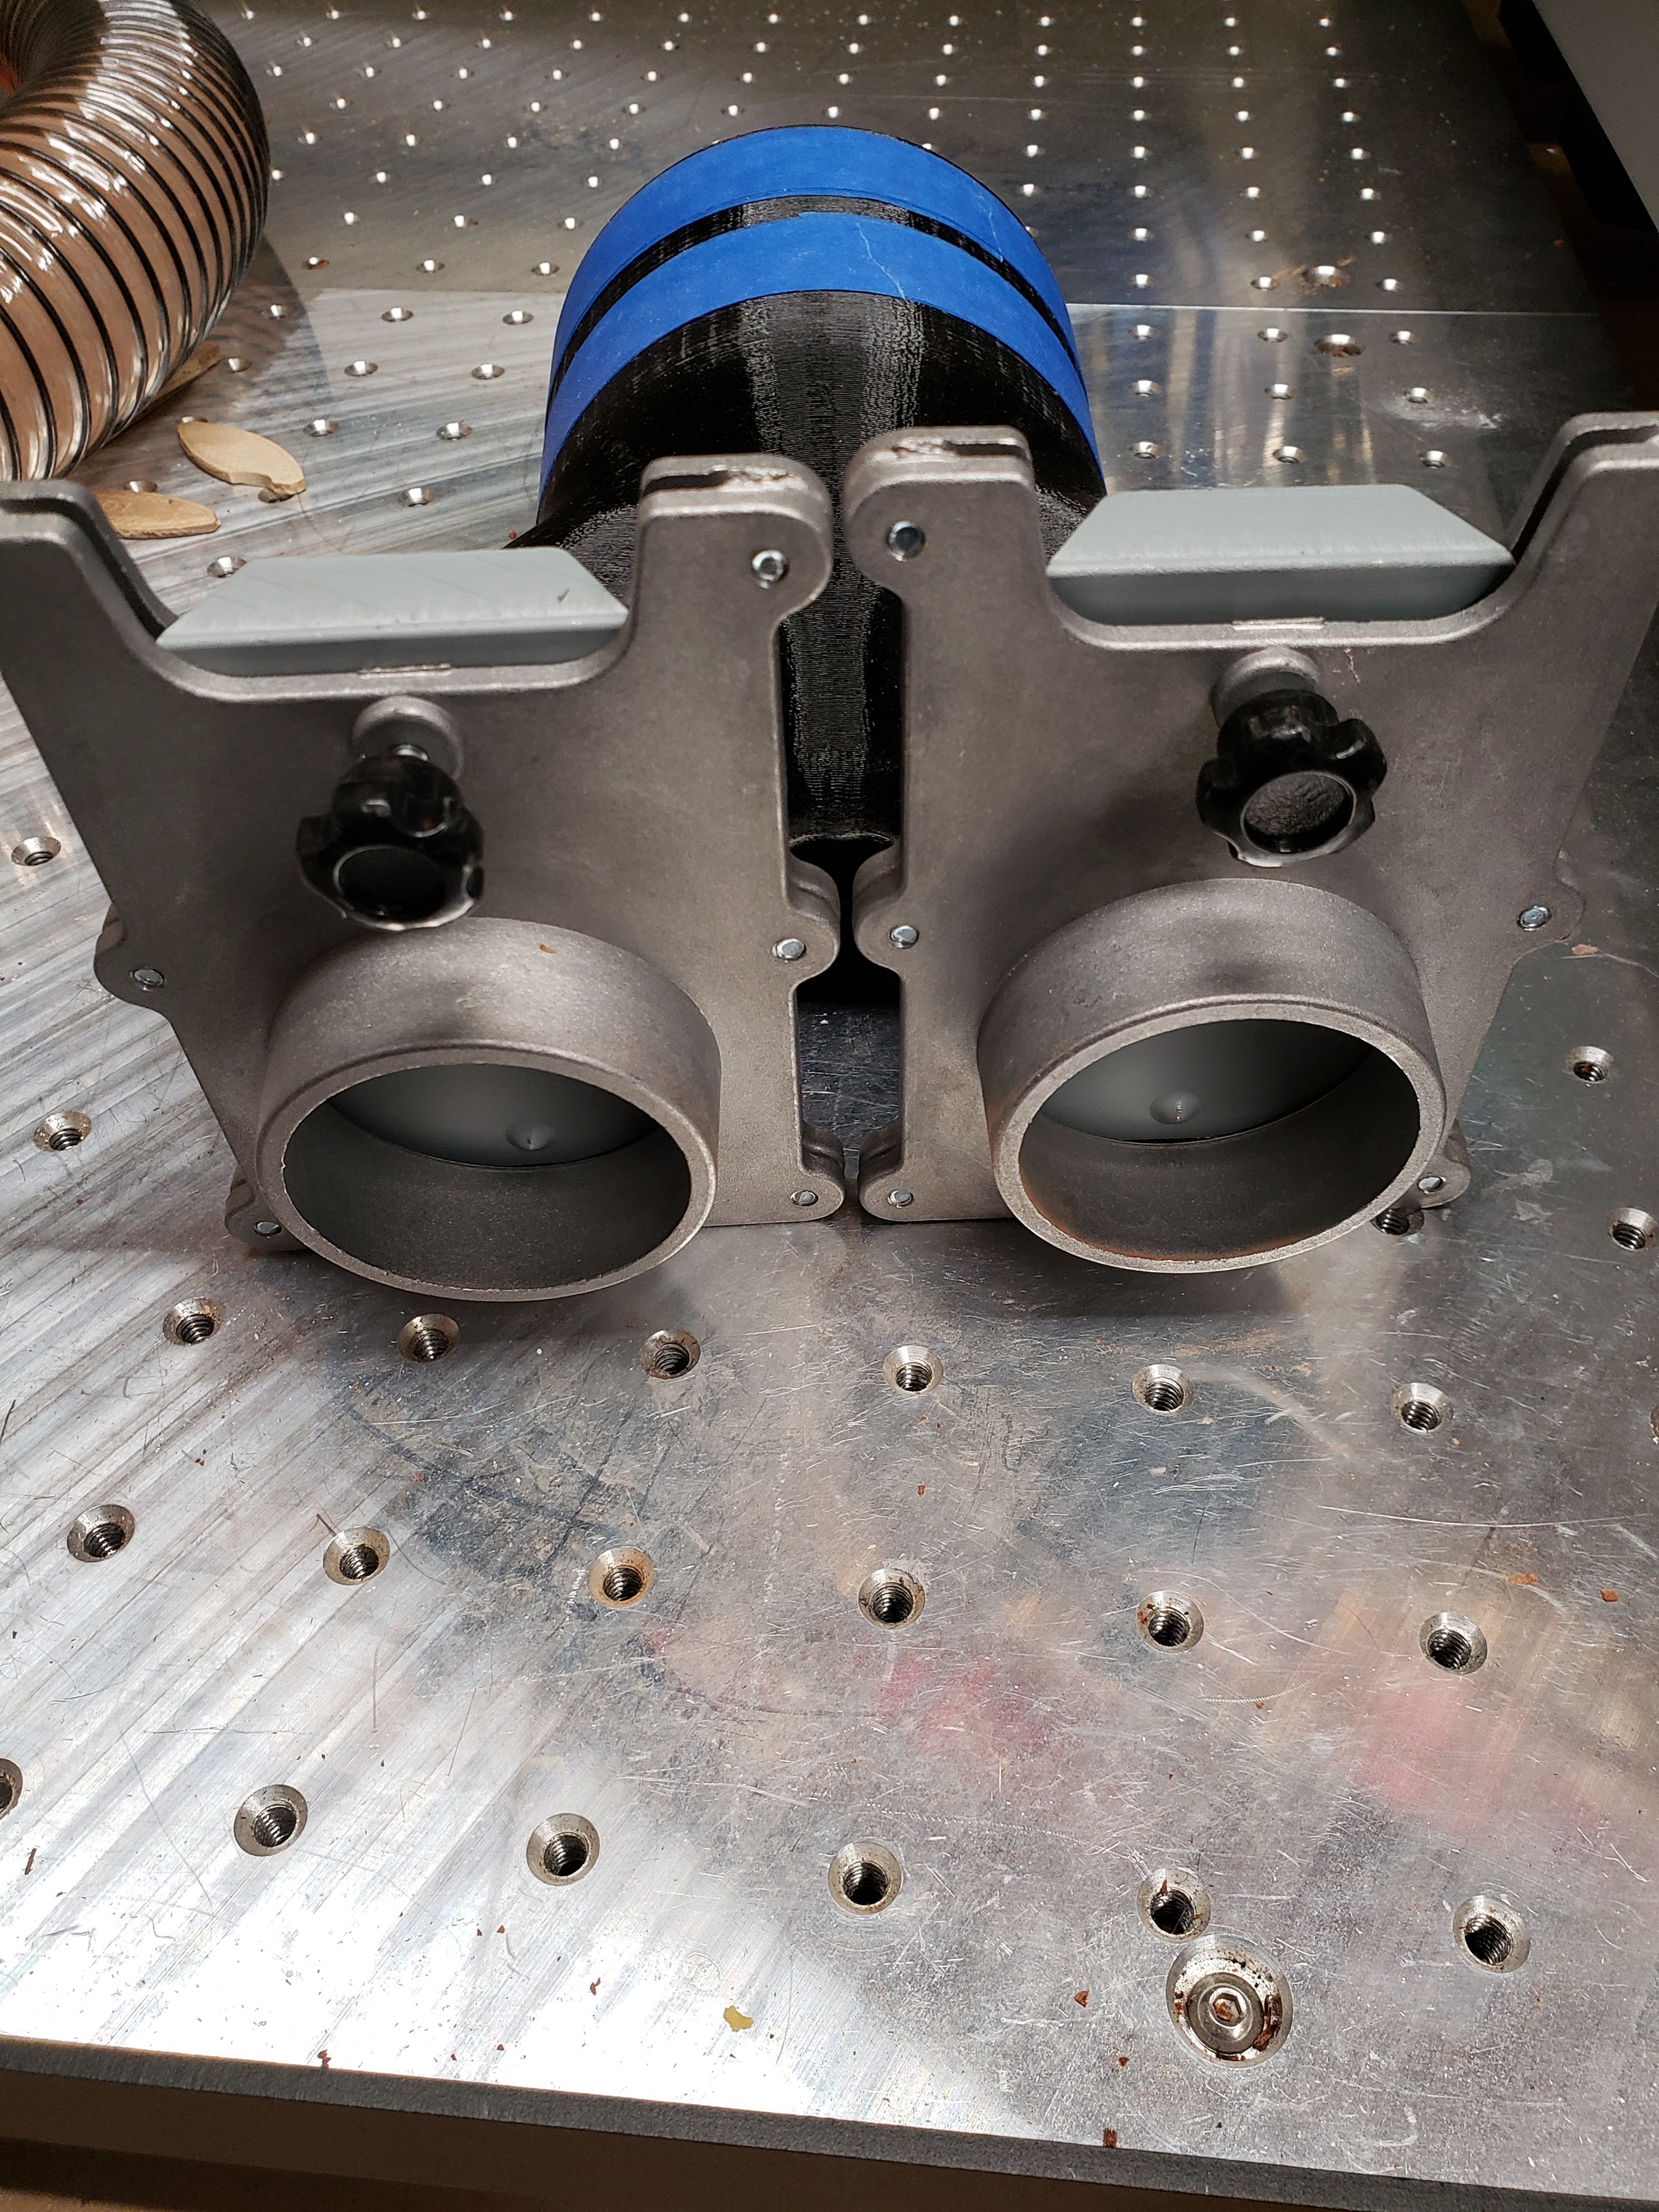
Also, designed and available, but not printed yet - an adapter that goes from a 4in gate valve to 2 - 2.5in gate valves. Basically the same as above, but it goes from the gate valve, not the 4in fitting.
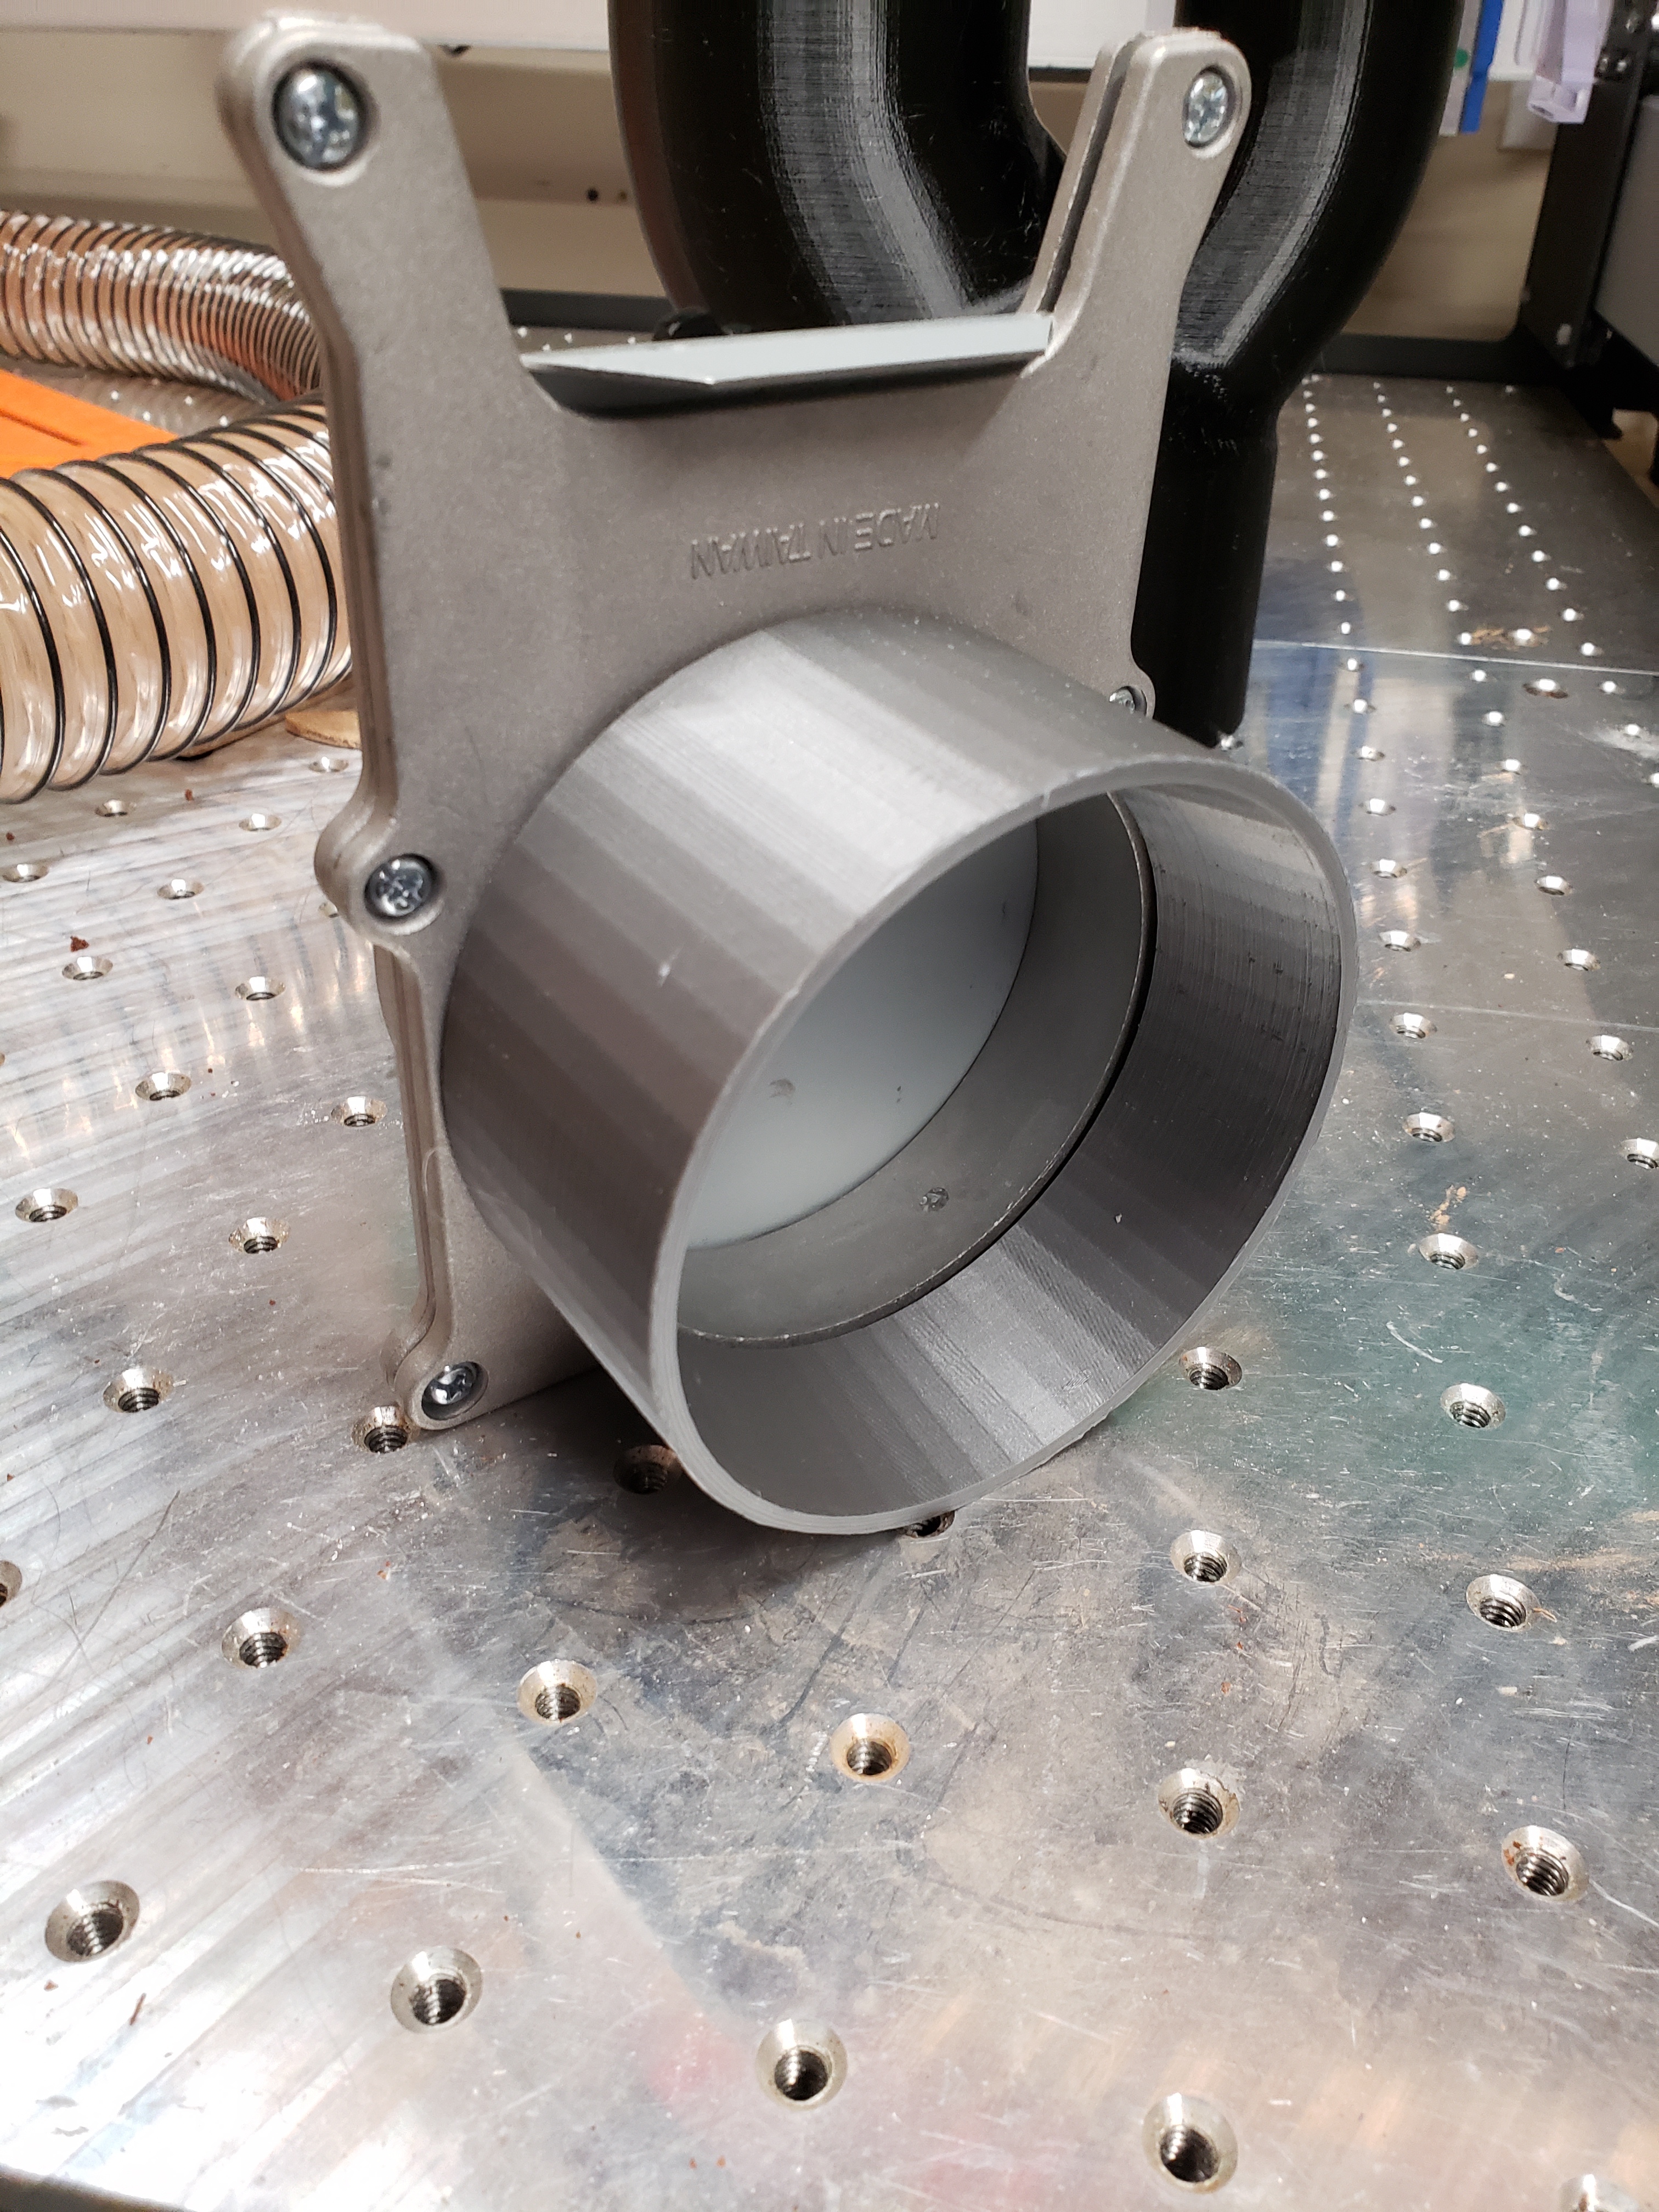
A sleeve to go from a 4in fitting to a 4in gate valve.
Also available, a 4in short extension long enough to put two 4in fittings together. I didn’t want to buy 10ft of 4in pipe for a 6in piece, so I designed one.
Yes! This is exactly why having an inexpensive 3D printer in the shop is well worth the money. I used my Ender 3 to print up some adapters to between my Dust Deputy, some 2-1/2" flex hose, and my shop vac. None of these three things made an airtight fit and there’s no way I was going to drop $20-40 for a couple of commercially produced adapters that may or may not get me the fit I want.
@MadHatter, I will look through your collection I dont have a 4/6in system yet but I’m about to install my ShopVac/Duststopper under the cabinet.
I need to connect the different pieces together and I would like to use hard pipes instead of flexible hoses but the different pipes and fittings are not standard, everyone is claiming to be let’s say 2in but some are ID, some are OD some are not even close. Hopefully, I will be able to find some connector that fits the different pipes and fittings I have and a blast gate in your collection.
Yeah, I ran into that a bit. That is why I like using the gate valves even when they seem quite redundant.
The valve flange fits into the ID of the DWV pipe, and with a good push will stay without any fasteners until you pull them out. And the flex hose fits over the flange nicely, and with these hose clamps, they are easy to put on and take off without any tools.
If you can’t find the adapters you need / want, let me know and we can work on getting the ID/OD of your mating ducts/tubes and get you the adapters you need designed.
That is my goal - to be able to adapt from / to whatever quickly and without tools. So I will end up with situations where I will have a 6in gate valve right upstream of a 4in gate valve, but that is so that the adapters just friction-fit and I can add/remove them with ease.
I used a Prusa i3 Mk3s and PETG at 100% infill. The walls are 0.10" (2.54mm) thick. The largest adapter - the 6in to 4in and 2in - took just under 40 hours. It needs support, but it is only a small 1in x 1in or so column to support the start of the saddle between the two spuds.
Do you get good dust extraction with your (Bosch?) random orbital sander using only your dust collector? What do you use for your CNC router (Shapeoko?)
This Bosch 5in RO sander is the first model of sander I have owned that had dust collection built in. Previously, I had 1/4 sheet palm sanders. Without using a vacuum, the Bosch will still collect dust in the little chamber you can attach to the sander, but there is still quite a bit of dust that will be floating around.
With a vacuum or DC hooked up to it, it does catch 90% or so of the dust created, but you still have some dust that is going to go places. You just don’t have hands and arms that look like you lightly dusted them with flour. Bottom line, I will not go back to a non-dust collecting sander. As far as comparing it to other dust collecting sanders, you’ll have to go look at reviews that compare them, but I think they are worth it.
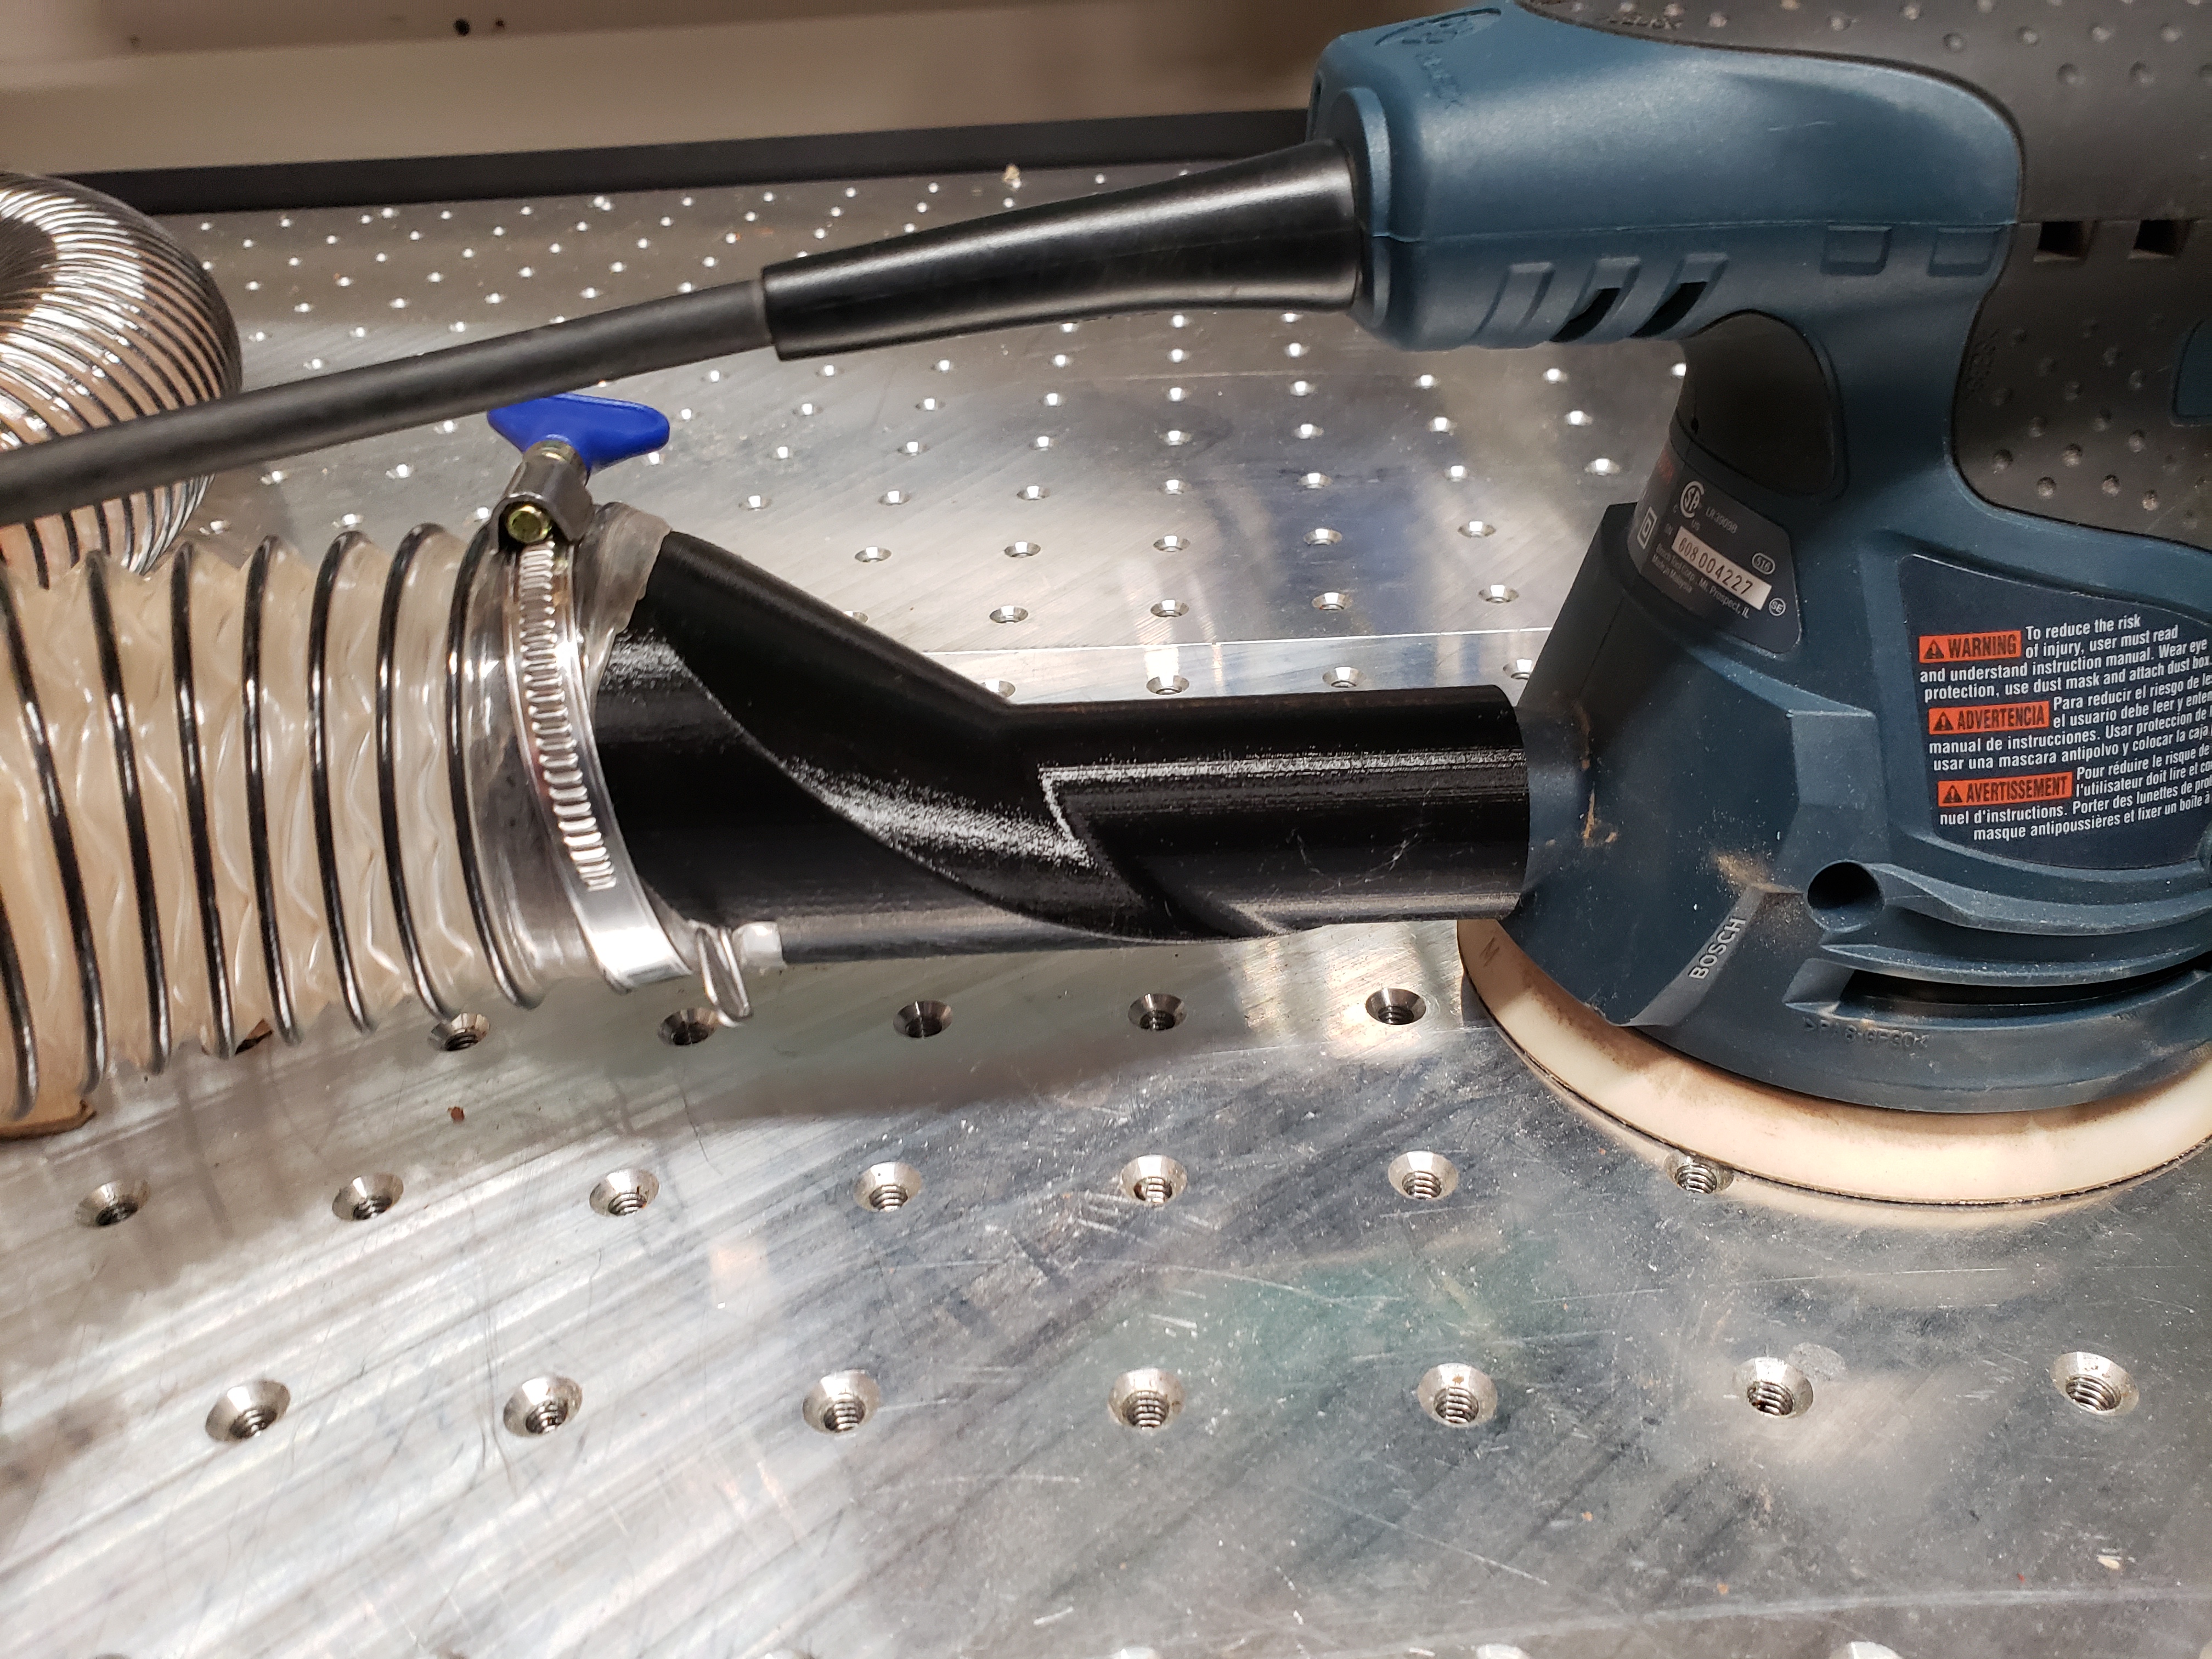
I am using a Suckit dust boot on my spindle. Right now, they only offer it in a 2.5in hose, but I want “More Power” - I mean, more air flow through the cutting area, so I am designing a shoe that will interface with the Suckit mounts I have on my HDZ, but has a 4in hose hookup.
2 Likes
Griff
(Well crap, my hypometric precursor device is blown…)
11
Too cool, thanks so much!
This post deserves a “sticky”. I wonder why this isn’t done in this forum? I’ve seen many clever mods over the past three years that just disappear unless I think to bookmark them.
@WillAdams maybe a “category” for mods? Or does that create the impression that the SO3 is not perfect out of the box?
IMO, you’d likely be better off using a shop vac with both your Suckit and sander because it would have approximately an order of magnitude more static pressure (albeit at an order of less airflow) than your dust collector. Effective dust collection doesn’t require massive airflow if the dust doesn’t get disbursed into a large air volume. The height of Suckets on the Shapeokos are independent of the height of their routers, so their brushes can initially be adjusted to contact the workpiece and minimize/prevent such dispersion. If the bristles are long enough and soft enough to maintain full contact with the workpiece throughout the milling process, 137 CFM from a shop vac should be more than enough to support all sources of dust and airflow into the dust shoe. The order of magnitude higher suction of shop vacs means that they’ll be significantly more effective at chip/dust containment and removal than dust collectors. You can also get HEPA filters for your shop vac for much less cost than one for your dust collector (assuming that you have filters.) That’s the Festool way. But, “the proof is in the pudding” - so try it.
I have found that PLA tends to get brittle in the western Washington humidity. Typically only on things that are 0.50" or thinner, but since I don’t want to have to reprint them because I pushed on it too hard and it broke, I figure I’ll use PETG. The part is thin enough (0.10" wall), that going from 25% to 100% infill with two perimeters only added a couple of hours, so why not?
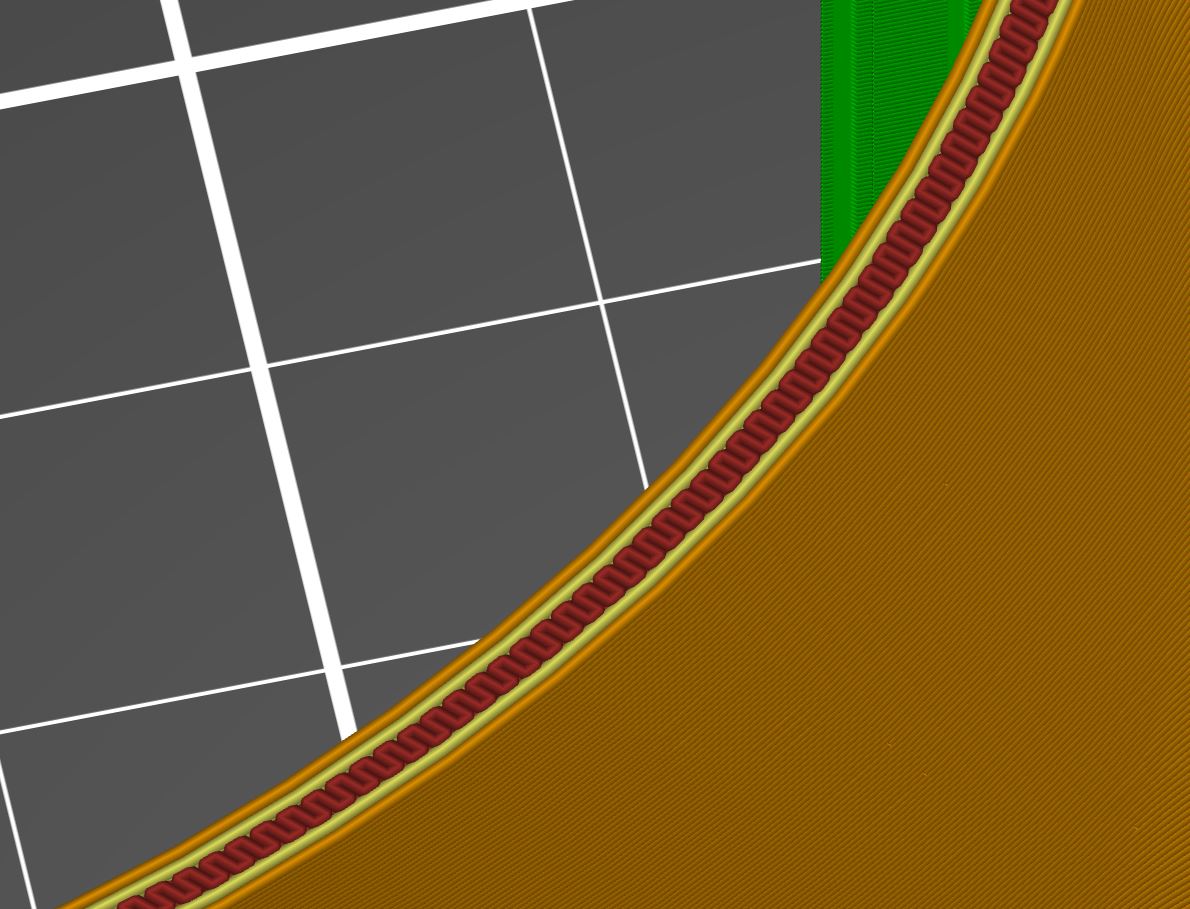
Here’s the part showing how little the fill is (brick reddish-brown squiggly line) after two perimeters.
I totally agree with you on both points, but I typically run my Suckit about 3/8" off the work piece since I am using such small bits, and working in a small area, I need to see if a bit breaks before it finished its 15 minute run. The 2.5" flex hose has such a huge pressure drop across it that given the max static pressure my DC fan can generate it is my limiting factor to the amount of air I can move. I have 6in rigid ducting to 4in rigid fittings to this 2.5in flex hose.
Bu upping to a 4in flex hose, I am decreasing the static pressure drop by (I can’t remember and I am not going to make up a number) something. I work in a environmental control lab, so I can hook up 5ft sections of 2.5in flex hose and 4in flex hose and measure the CFM vs static pressure using calibrated venturis.
I just know that the volume of air moved is tied to the square of the static pressure, so a small increase in pressure can lead to a large increase in volume moved.
As far as tying in a shop vac, I don’t have room in my shop for one, and to be quite honest, I think I am done using them for DC. I burned out two of them. They each lasted around a year. And they are loud. I went to a spindle and have my DC motor just on the other side of the wall of my shed so I can have a quiet(er) space to work. Even with earmuffs I was tired of the router and vacuum noise.
If anyone is interested, I will post the results of using 2.5in, 4in and maybe even 6in flex hose CFM vs static pressure and pressure drop. In my lab, I have 5, 10, 25, 75, 125 and 175HP VFD controlled fans, so I can definitely draw more than the average DC setup.
Bill Pentz claims " The only way to capture the fine dust as it is made is to start with hoods that block the fast moving air streams. His dust problem was simple. His big new over arm blade guard was wide open in front so launched the dust off the tip of the saw blade right out under his guard. A 3450 RPM blade speed with a 10" diameter blade creates a 102 miles an hour air stream. His saw pulleys increase the blade speed closer to 4000 RPM so the blade tips launched the dust even faster. A typical dust collector or cyclone only moves air at about 40 miles an hour. With the hot rod oversized impeller on his cyclone, he was got 60 mile per hour air speed which had zero chance of capturing the well over 100 mile an hour dust stream. To effectively control the fine dust as it is made we must have hoods that mechanically block all the fast moving air streams or there is zero chance of effectively capturing the fine dust before it escapes collection."
As shown below CNC routers can also generate high speed dust streams. Fortunately they don’t produce very much of that dust, so shop or other vacuums are well suited for use with them.
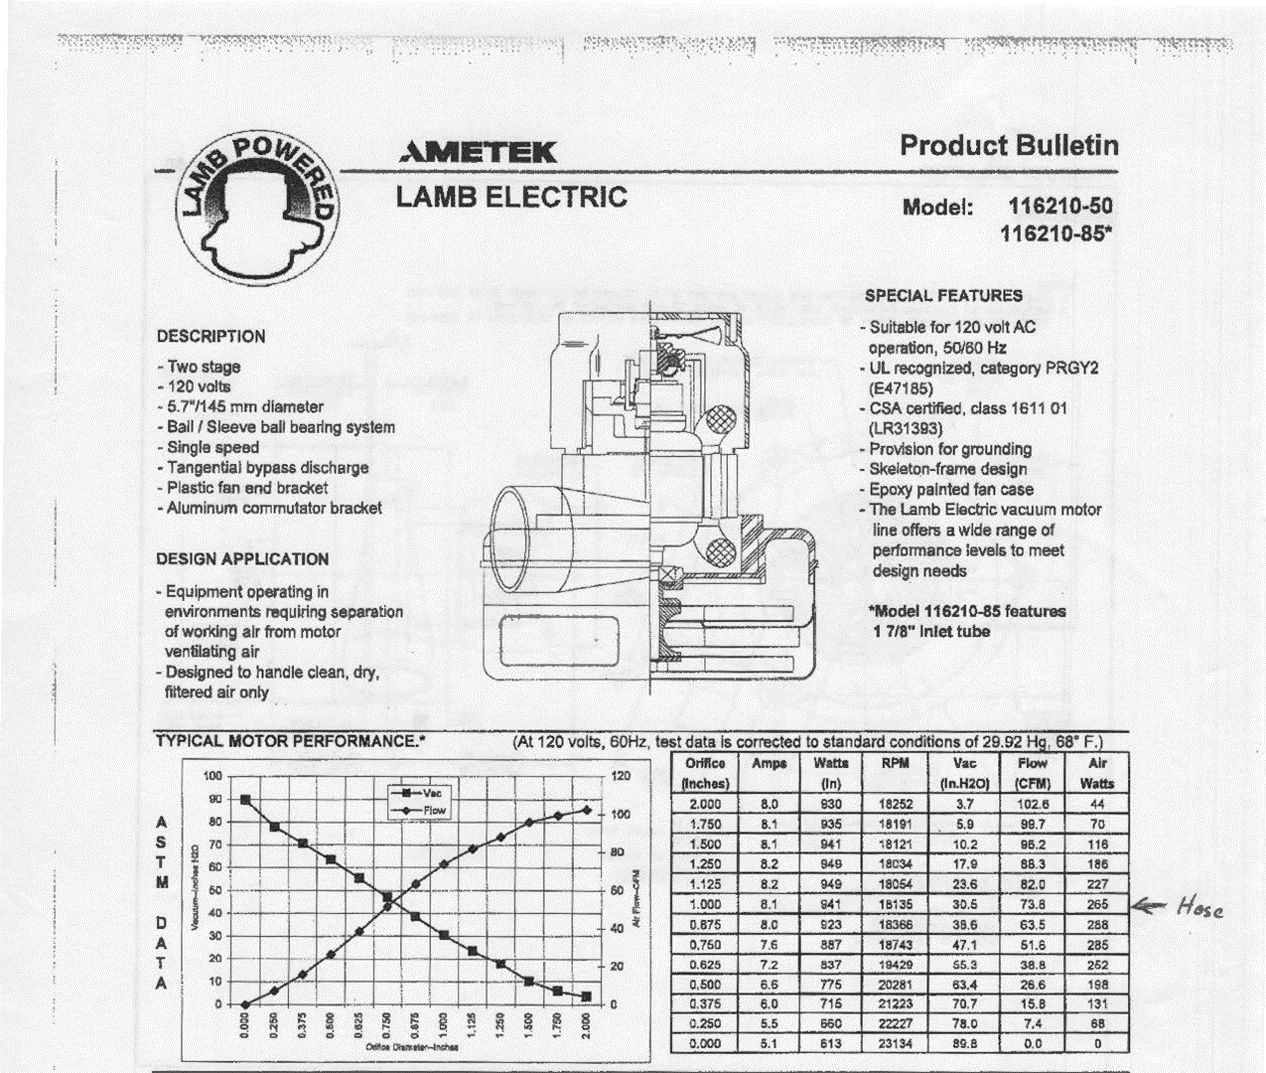
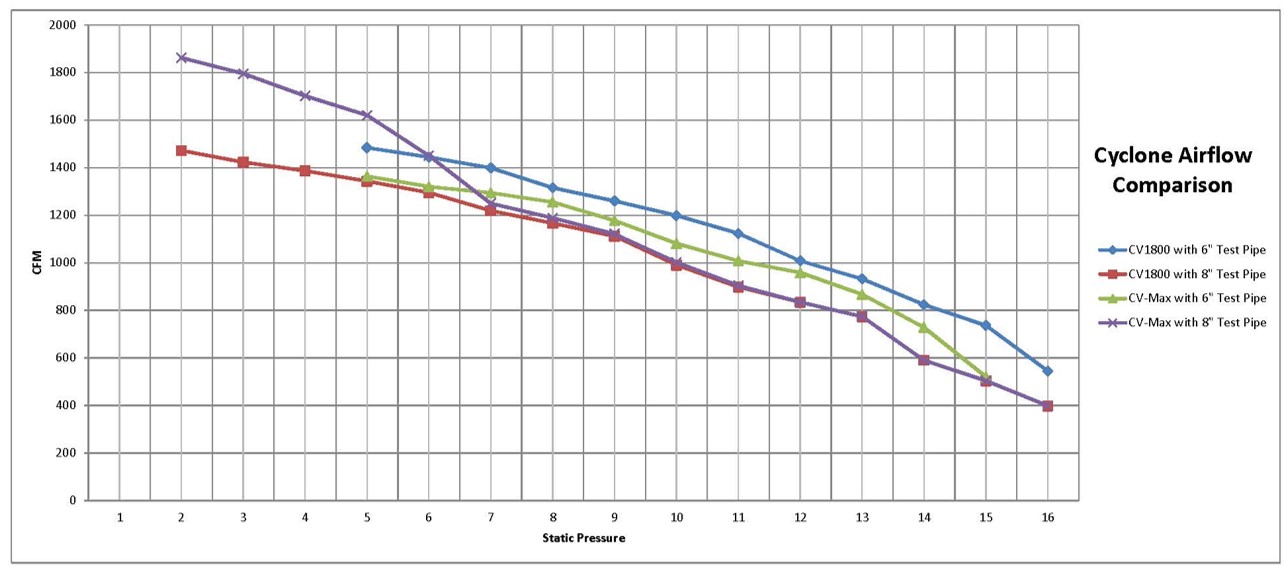
The following shows how my central vacuum’s 1" input, which can provide 13568 FPM (154 MPH) airflow at 74 CFM, compares to other vacuums and dust collectors.
Since my central vacuum uses two of the motors shown below in series, it has 12.38 in-WG more static pressure (suction) than the 48.62 in-WG pressure drop in the ductwork.
Thanks for the info. That’s some good stuff. I fell down a rabbit hole looking at what you posted and then looking at other info related to it and have come to the conclusion that I may know a bit about airflow, but I know almost nothing about dust collection. And it seems the more I learn, the more I find there is to learn.
I guess I’m going to have to find a way to keep my Suckit down against the wood. And maybe add on a gate on the back side where the slot is for the bit to pass through. No two ways about it - decreasing the pressure drop at the hose / increasing the airflow by going up to a 4in hose is NOT going to do what I was hoping it would do after reading the articles you posted.
I guess I’ll have to find a small USB camera to tuck in there to watch what’s going on inside the Suckit.
I am still going to finish and print the 4in dust shoe just because I have already started it.