I’ve been cutting some 1/4” plexi with a 1/8 single flute plexi bit and the chips aren’t quite clearing out. It’s not in a way that’s ruining the cut - the cut is pretty much still perfect at the end, but it’s annoying that the chips aren’t exiting through the dust collector behind the cut. Pictures of the chips are below. I cleared them out of the groove with an Allen key.
I’m sure minor adjustments to speed, feed, and/or dpp are all that’s needed. The chips pop out of the cut groove very easily and cleanly, so I think I’m close, but not quite on the target.
Cut stuff: .062 dpp, 35 ipm plunge, 75 ipm feed, 18k rpm. Tried speeding up and slowing down while the job was running but didn’t find the butter zone. Vac suction is very good. Advice?
But also, more broadly, if you’re a cnc veteran and willing to share a bit more of your wisdom and thought process, I’d be very interested to hear from you about what general indications/instincts tell you about what program changes you’d personally make 1st/2nd/3rd to attempt to dial in the best cut in a material that you haven’t worked with yet?
The feed rate, RPM etc. all seem reasonable for hard plastics, you’re at about 0.1mm per tooth which is fine.
Is that acrylic with an adhesive paper covering?
Is the acrylic fluff sticking to the paper at the top of the cut?
How’s the wall finish inside the cut?
Acrylic and many other plastics generate lots of static when being cut, a few fluffy bits that can be easily removed after the cut wouldn’t really worry me.
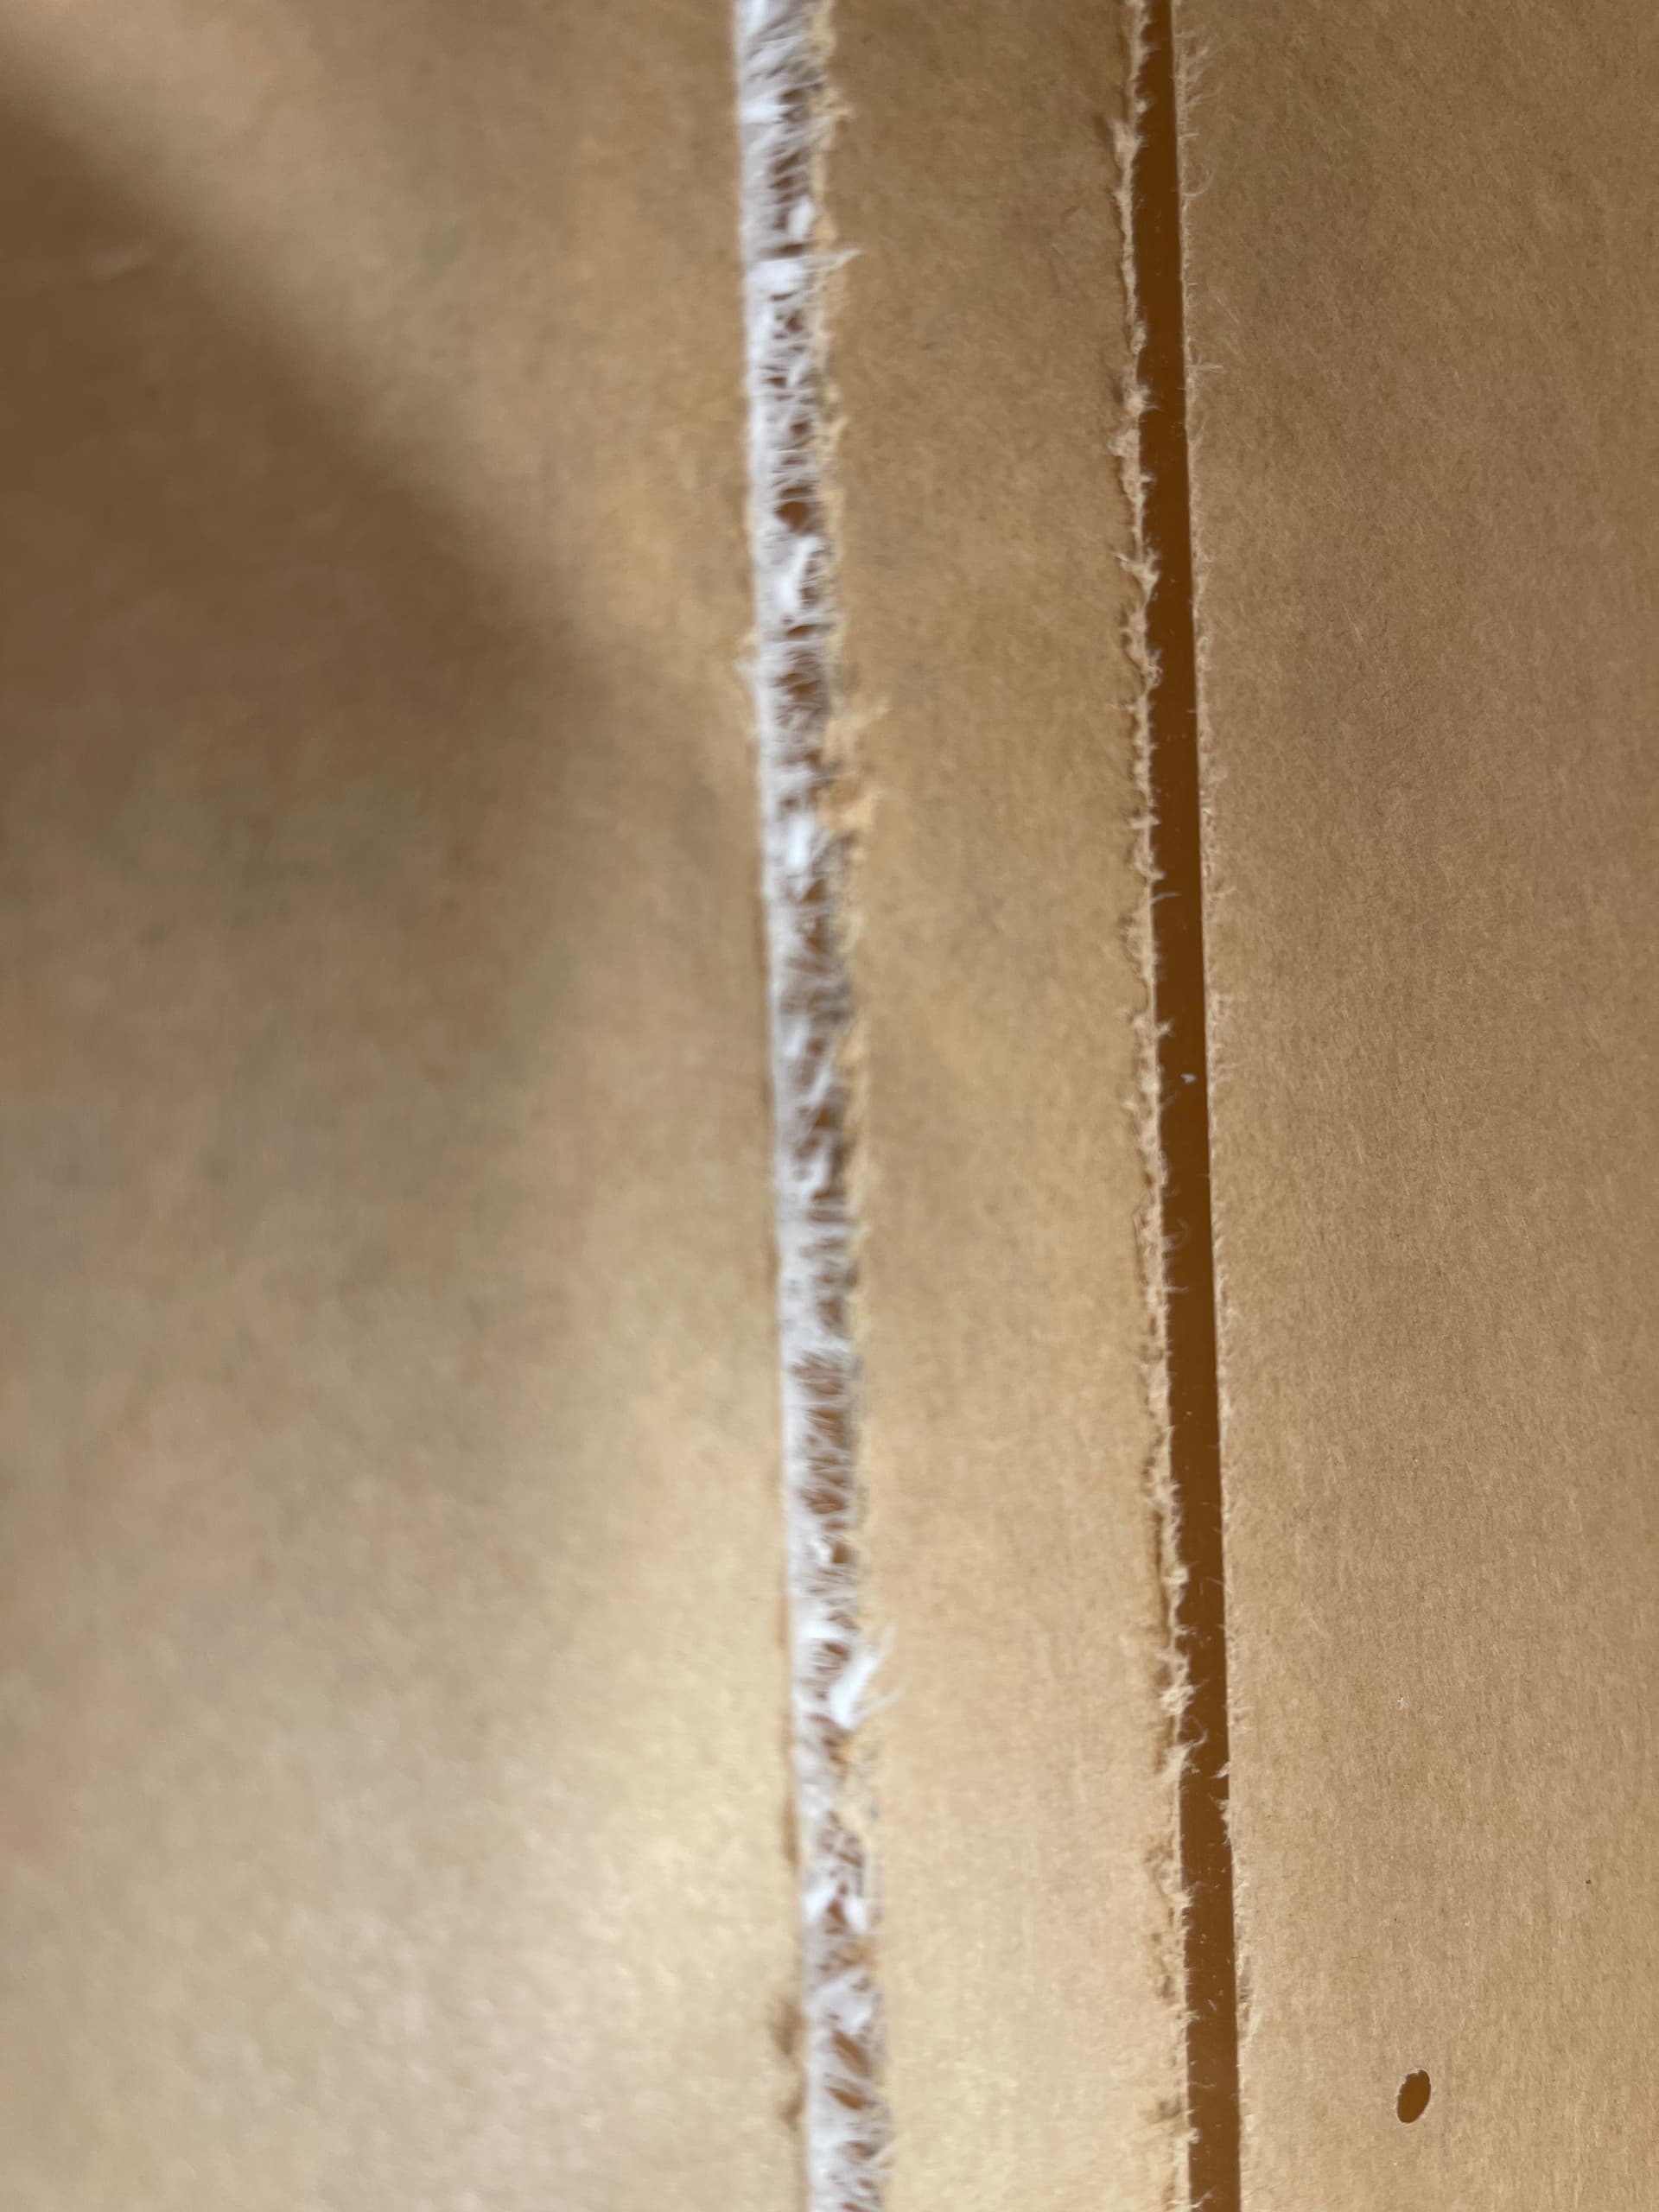
It does have a paper peel coat, but the chips aren’t sticking to the paper. Paper appears to be a nonissue. The chips seem to be slightly tacked/pinched/melted in the slot. Each individual chip is shaped like a drop, with a long hairy tail pointing up. the thick parts of the drops are crowded together in the bottom of the cut slot, as If they were people standing shoulder to shoulder in a tight crowd.
I hear what you’re saying about not worrying, and yes, the cut was clean at the end, so all is well on this project…
I’m really asking with a belief that if a machine is properly tuned, and if I am using the right tool for the job, there should be a butter zone… that I should be able to dial in some ideal combination of settings to get a near perfectly clean cut out of most materials. I’m also assuming that those far more experienced what me might have a sixth sense for this. If that’s a skill I can learn, I’d like to.
That’s a good point, my favorite acrylic cutter is an 8mm O flute and it flings chips across the room with a mach number.
Given the static buildup with Acrylic I’m not sure I’d expect to get a cut with no chips left in a narrow slot without an air blast or a coolant / lubricant to assist in blowing the chips out and cooling the cut slot.
This means heat. It’s partially melting the material, and that is preventing the chip from exiting the cut.
Your speeds & feeds sound right. You’re running about ~600 sfm & 0.004" ipt which is right in the wheelhouse for acrylic. And it looks like others are getting good results with these numbers.
Perhaps the cutter isn’t as sharp as it could be? Try cutting the same path with a brand new tool.?
You could try doing a 0.0005" finish pass on each side of the slot, conventional cut at the fastest feedrate you can get away with to clean up the remaining chips.
Another option is try to get rid of the heat. Air blast? I might even try pouring a bead of water or alcohol/water mix on the material over the slot before cutting.
But honestly, as Liam suggested, if the quality of the cut is good, wrestle with your OCD & don’t worry about it.
I agree, the plexi chips are definitely heating because they stick like they’re melted together.
It’s a brand new bit. It’s the Amana 51411-K bit, which is intended for this type of cut… the 1/4” version was the same type of bit.
I appreciate your and liam’s advice of using auxiliary methods to clear the chips, which are certainly reasonable options… but that’s also not really the question I’m asking. I wasn’t just looking for a quick way out of this project, I’m hoping to learn more about cuts in general and adjust my settings. The more I learn about chip loads and heat during cutting I’ve come to understand that there’s a lot of depth of knowledge that I just don’t have in my dumb monkey brain yet.
The techniques you’ve suggested for clearing the chips… while they for sure are effective, don’t feel like the simplest possible method. I’m approaching this challenge as an engineering puzzle, and It feels to me that immediately jumping to using a blower or lubricant for these cuts is analogous to adding a pile of heat sinks to a circuitboard assembly without first doing everything possible to address all causes of excess heat. Sure it works, but could there be a more elegant solution worth exploring first?
My thought is that the solution could be a slightly adjusted feed rate, or depth of cut…I could certainly experiment for hours, wasting time and material, to learn what I’m hoping to learn, but was hoping for this specific type of guidance.
And I’m willing to accept that perhaps the answer IS, simply… “No, Jon. There is no way to dial this in”, because the general consensus from experts is that acrylic will ALWAYS do this 100% of the time due to static charge.
But if that’s the case, that must also mean I’m already getting the most perfect cut possible already and that my speed and feeds aren’t simply in the ballpark… they’re already perfect and I can’t do any better.
I’m just having a hard time believing that to be the case. I’m certainly not that good. Also, I’m obviously getting heat so something about my cut settings is probably not ideal.
Anyway - so far, no has said that it’s not possible to get a clean cut, only that it’s not worth the time… but mastering the skill is worth the time IMO. Sorry if that seems OCD, but i like to understand why things are happening so I can do better at it in the future.
I’ve seen videos & pics of guys getting really nice cuts on acrylic with no melting, so I know it’s possible.
Generally, when the problem is heat conventional wisdom says slow down the spindle, and/or speed up the feedrate. I suspect you can’t slow the spindle any more, so upping the feed is all that’s left.
Did you try with a smaller DOC? Less surface area would logically mean less heat.
I can’t imagine the paper would cause much heat, but what about the adhesive? It could gum up on the flute & add to friction??? Try the cut on a piece with the paper removed, maybe.
Apologies if the “OCD” comment offended. I have it too! It was a ‘cheeky’ comment.
“We’re all in this together. Keep your stick on the ice.”
I cut cast acrylic around 125in/min on my 3HDZ. The chips stick, but definitely don’t look as melty as yours.
What machine are you running? Regardless, feed faster. Adjust the depth of cut to where you feel comfortable.
I cut a lot of acrylic on the table saw as well… Sticks to everything.
No offense was taken at all Tod. I appreciate the advice you’ve given.
I’m realizing, after the initial replies, that I buried the lead of my original intent for this thread, which was essentially: “what are the order of steps you take to dial thr he cleanest chip-clearing cut on new material”. You’ve given me some good guidance, thank you!
I thought of something else.
I don’t use any coolant or forced air, but I have noticed a difference with the air temperature. Cold acrylic in cold air evacuates chips easier than room temperature acrylic warm air.
Oh that’s interesting, I’m glad you mentioned it. Not a factor this time around as I’m northern hemisphere and it’s been plenty cold in my garage lately… but will keep this tip in mind when I’m cutting plastics in the summer heat. Thank you for that
My garage is plenty cold enough in Ohio. Except for every other day when it’s hot enough to melt acrylic. Sometimes we go from below freezing to melting and back within a few hours. I’m sure it’s the same over there Wayne!
It’s probably worth considering that the other parameters of the cut, rather than being a heatsink bodge after the fact are rather inherent properties of the process.
Feed rate, DoC, WoC, cutter RPM are four variables in a much larger set which control what is happening during the cut. If we attempt to find an ‘optimum’ point in the space for just these four parameters we have found a set of parameters which work, given some other set of unknown parameters which may or may not change between now and the next cut and when they do change, we won’t know that they did, or how to adjust our known parameters to account for this.
Other key elements in this sort of cut, which all take part in influencing the overall observed performance include
Composition of the acrylic, coarsely whether it is cast or extruded, these behave quite differently
Local air conditions, as Neil pointed out temperature which affects the behaviour of the acrylic at the edge of the cutter, this is a huge parameter, acrylic starts to go goopy at a pretty low temperature ( I think about 80C but Google it )
A related variable, humidity ratio which affects the rate of charge leakage over the surfaces and in the air, impacting static charge buildup
Geometry of the cutter, not just diameter but the helix angle, sharpness of the edge, the face and relief angles of the edge etc. For example, an uncoated cutter will likely be sharper, because it doesn’t have a coating to round over the edge
Rigidity of the machine (which varies with X, Y position on a Shapeoko) impacting how the cutter meets the material, whether resonances build up etc. This applies to the workholding as well as the machine
Whether the dust extraction is effectively scavenging the slot the cut is in or waiting for chips to be thrown out by the cutter, the geometry of the dust shoe, proximity to the surface, flow volume at whatever pressure drop you have in the extraction system all impact this, dust shoe on/off is not a particularly useful parameter here. Also, the dust boot will likely perform quite differently dependent upon the direction of the cut
Related, an air blast to cool and purge the cut slot of chips, keeping the cutter cool, workpiece cool and force evacuating chips trying to hang around and melt
Lubricants and coolants, many coolants are also partially conductive thus reducing static charge attraction, they also reduce friction between the cutter and workpiece, as well as cooling the workpiece, cutter and chips
I’d suggest that options to reduce the static charge, keep the cut cooler, blast chips out of the slot etc. are all known key input parameters to impact the chip melting and stringing behaviour you’re seeing, they’re also much more likely to improve the performance in a reliable way than changing your already pretty sensible feeds and speeds. If what you’re after is to search the solution space, it’s worth trying the other levers as well as the four that you can change in CAM.
I forgot to mention, looking at the chips is just as informative as looking at the cut. If you really want to see what’s going on try emptying your extraction and then checking the chips you get on a new cut.
It’s a bit like being a vet on a farm but it works
I don’t have the words how much I appreciate your post, Liam. Love the way you’ve explained this. Sincerest thanks.
If you don’t mind a couple follow ups about a couple of the variables you mention?:
The acrylic is extruded. Cast is just too expensive for my silly projects. Should I be taking steps to adjust for this? Does extruded prefer any specific settings?
The humidity & temperature variables,
I’m curious about how different materials generally react on the +/- scale… do you find that most materials react similarly, relative to whether the temperature/humidity is higher or lower than that material’s ideal working conditions, or is it starkly opposite for different materials? Like - do PVC, VC, and MDF for example, all exhibit similar changes at higher/lower temp/humid (even if at different overall temp/humidity ranges)? I’m not cutting anything particularly exotic, really just plywood, MDF, and acrylic.
And if it is relatively similar at different scales, - is there a similar relation to changes in speeds/feeds that you would make to accommodate?
(Sorry I feel like I’m struggling to clarify this question, let me know if it doesn’t make sense)
And on a related tangent… I have a project coming up that will be using some high-gloss Gizir boards - this is a 3/4” mdf sheet double-sided with a thick layer of gloss black pvc and a peel coat. I’ll do test cuts to make sure I’m not going to melt the pvc while attempting to keep the channel clear of dust… but can I ask how you’d approach a combination material like this?
Well first off, don’t mistake me for an expert, I am learning just enough to understand how much I don’t know.
Regarding the acrylic, my understanding is that extruded has built in stresses and other issues, similar to how rolled metals differ from cast and stress relieved metals. There’s some useful discussion here
Extruded is more like chewing gum and is just going to be trickier to machine without stringing, if your current cuts are leaving a decent finish after you scrape off the stringy stuff, I would stay close to those settings, having to do a little deburring or finishing is not unusual.
The stringing is due to material heating in contact with the cutter, what this doesn’t tell us is which of the many causes are present in this particular instance though
Cutter surface speed (RPM and diameter) too high imparting too much heat at the edge (more of a problem with metals)
Cutter feed rate too low, hanging around to heat up the stock locally (poor thermal conductivity in plastics makes this worse)
Chip evacuation poor due to low helix cutter, narrow slot or other mechanical constraint
Chip evacuation poor due to poor extraction (suction or air blast)
Chip evacuation poor due to static charge buildup (plastics)
Cut would prefer to be done slower overall with a conductive lubricant…
It’s possible to make up for some of these by changing others, e.g. you could try reducing the RPM and the DoC together with the same feed rate to reduce heating.
You could also try one of the anti-static sprays that are sold for ironing and similar uses to address static build up on the workpiece, properly grounding your dust extraction is also a good start if you’re going to do a lot of plastics. Remember you can’t ground an insulator, but you can accidentally make a capacitor
Regarding humidity, it is very dependent upon the material.
Wood changes dimension with water content and this combines with pre-existing stresses in the wood to make it warp and curl as it’s cut, or soon after it’s cut.
For plastics the humidity issue is about static charge dissipation, the humidity ratio (not relative humidity) is understood to be the dominant factor in allowing static charge to build up vs. bleeding it away.
I personally wouldn’t try to compensate for humidity with feeds or speeds (I may well be wrong for wood here). In plastics I’d rather deal with the static buildup than try to compensate with RPM.
There are some excellent charts and resources out there which explain how surface speed of the cutting face impacts the temperature of the cut as it’s happening and why certain RPMs are recommended for a given cutter diameter in metals and plastics, reading up on these effects starts to explain why some speeds are just ‘no’, where coolants are required to stay in the effective window where neither the workpiece nor the tool are destroyed etc.
It’s not a simple matter of cooler is better, HSS works by having tools which stay hard at temperatures where the workpiece has started to soften for example.
For hardwood, plywood and MDF, I try to store the wood somewhere reasonably dry and let it adjust to local conditions before feeding it to the CNC. Birch ply has been the least temperamental for me, followed by MDF which doesn’t like extremes of humidity and hardwoods like Sapele which wait for me to turn my back for 10 seconds and banana. Given the frequency with which I am caught out, I clearly know almost nothing about wood and humidity…
PVC is IMHO, unpleasant, if you let it get too hot (or cut it with a laser) it goes black and gives off Chlorine gas which is not good for your health, or tooling. I have also found the static buildup on PVC to mean that the chips stick like termites to everything, even with dust extraction on. It is however, reasonably soft and I’ve had decent cuts in it running larger O flute cutters and mid-RPM and high feed rates.
For the combo PVC and MDF I’d probably try a reasonably large cutter 1/4" min, preferably 8mm with a good upcut helix to rough through the MDF. MDF blunts everything it touches so this cutter will only be good for roughing pretty soon. The better you can get MDF abrasive fluff out of the cut the longer the carbide will last. The trick will be not cracking or chipping out the surface plastics, or rather figuring out enough stock to leave on the roughing cut.
I’d probably then come back with a decent quality compression cutter at full depth and small (say 0.25 to 0.5mm) stepover and high RPM & feed rate to clean up the edge. The less you have to take off with this good cutter the longer it will stay good. I’m not sure that a plastics cutter would last very long in MDF. It might be worth asking the folks at Precisebits or another specialist if there’s a good combo cutter for this material.
I would definitely experiment with some offcuts first though in this mixed material.
Helps a ton, Liam. Expert or not, your experience is greater than mine and certainly valuable to me and others. I appreciate that you took the time to share in detail. If not comfortable with the title of “Expert”, consider “Teacher”, a far nobler title anyway.
I have lots to digest and follow-up upon, but you’ve helped me get a much more balanced and rounded understanding than I had 24 hours ago. Exactly what I had hoped for. Thank you again!!