Aftermarket Digitizer

Greetings,

I will be purchasing a Shapeoko XXL CNC Router in June or July of this year

Application:

I would like to be able to sculpt a Bas relief Master pattern, the thicknesses could vary from 3/4 to 1/4 inches thick, overall size will vary, after I produce the Master Pattern I then need to digitize it.using the Shapeoko CNC Router which would be adapted with an aftermarket digitizer…From there I want to be able to take the digitized files that I create using the Shapeoko CNC Router of what I’ve sculpted in bas-relief and reproduce them in variety of sizes in wood or other materials…

Question: Does anybody have any experience using / adapting a Shapeoko to work with an aftermarket digitizer ?

Examples

http://larkencnc.com/probe.htm

Laser scanning, touch-scanning / digitizing
Scan 1000 Pro
Sensor-Scanner 3D for solid materials.
The scanning sensor by CNC-Step works with a precision of 0,05mm. In connection with software WIN PCNC you will be able to scan objects directly on the machine. Objects can be as large as the traverse path area of your machine with a depth of max. 30mm. All data can then be used to produce further prototypes.
with a precision of approx 0,03-0,05mm absolutely reliable for most applications. Since 10.2005 all our High-Z units are equipped with a connection plug. WIN PCNC supports the scanning device with ease and simplicity.

Thanks
I’ve heard a little about photogrammetry, in which multiple photographs are taken around an object, then software creates a point cloud representation of the object. That can then be imported into 3D modeling software to give you a (potentially) very accurate digital 3D representation of your original object. Might be worth looking into as an alternative to physical probing?

The community has collected a couple of links on physical probes: https://www.shapeoko.com/wiki/index.php/Upgrade_Overview#Touch_.2F_digitizer_Probe

More, and further details and actual operational notes would be welcome.

Thanks Tito,

I did some research and ran across this link below which pointed to some software … comparatively I have heard that hand held 3D scanner files usually requires a great deal of cleaning up before being usable…I would imagine that this would be similar … unfortunately editing the files is beyond my skill set… also I ran across this same topic in this link from 2013…https://www.shapeoko.com/forum/viewtopic.php?f=4&t=2144… unfortunately it did not gain any traction…

http://www.photogrammetry.com/links.htm

Textured 3D Model Extraction
• Autodesk 123D Catch
• PhotoModeler Scanner
• Acute 3D (technology used in Autodesk 123DC)

I appreciate your input… thank you

Regards.

Ed

Thank for all the links Will,

Here’s what happened …I asked Carbide 3D about a digitzing probe… they told me that Grbl g-code-parser does not support a digitizing probe and suggested scanning via third party… which is unfortunate because I think a Digitizing probe is logical offering /extension by way of features and options… I am a sculptor / model maker and would make good use of this if it were available… So from what I can gather I am out of luck unless somebody out there has a work around…To me a digitizing probe is essential to maximizing this great system…

I was also asking Carbide 3D for an auto zero option which is in development and not available… to assist Carbide 3D was kind enough to point me to http://triquetra-cnc.com/ for the zero plate option which is compatible with the Shapeoko, I am planning to purchase their auto zero touch plate called the Triquetra P3 ……I am hoping on an off chance that Triquetra will eventually develop a digitizer since they are offering the Auto Zero Touch Plate… I also asked them for some input on a digitizer probe and I am waiting for a response…

So in short there are plenty of digitizers out there … what I need is a work around with respect to the Grbl g-code-parser … comparatively, 3D scanners are expensive… so is getting it as a service. … As I also pointed out to Tito this issue came up in the forum in 2013… https://www.shapeoko.com/forum/viewtopic.php?f=4&t=2144 I wish / hope that this would again get some traction in this forum …

Thanks for responding …

Grbl / G-code support for G38 says it is supported: https://shapeoko.com/wiki/index.php/G-Code

Hi Will…

Well I have to say that certainly got me out of bed… it was around 5:00 am when I heard the e-mail on my phone … this is a really important issue as this feature is central to my process… …… today I will raise the issue again with Carbide 3D and see where this goes…

I want to thank you for providing the link to point to… I will keep you posted…

To expand upon my note — Carbide Motion doesn’t promise to support all of Grbl, let alone G-code, and that link should not be construed as promise that CM will expose that functionality (I believe it does, for the case of a Nomad using the tool length sensor).

If you want more than Carbide Motion offers you’ll need to use other tools. List of them here:

https://www.shapeoko.com/wiki/index.php/Communication_/_Control

Please remember that the wiki is a community-done thing, and while it’s in support of the Shapeoko machine/project, the only affiliation it has with Carbide 3D is that one of the partners, Edward Ford, owns the domain name and pays the bills and provided the initial content and impetus and the machine designs which the wiki is focused on &c.

@edzacly1, no worries. I have zero experience with photogrammetry but saw this which looked interesting.

Some members use a CAM package called Estlcam, which has support for digitizing surfaces and milling on those surfaces as opposed to an assumed flat surface. I haven’t tried this myself and do not know what all it might entail:

1 Like

Meg in support sent me over here to add whatever clarity I can.

GRBL G38

GRBL does support G38. (And if my memory is correct we submitted the patch to add it to GRBL right before the Nomad shipped)

Carbide Motion supports G38 as well

Auto Zero Probe

We’re finishing up the design for our “auto-zero” probe right now (we’ve cut about a dozen versions in the last week) and we just ordered material to make the first batch.

Once that’s in production, we’ll add additional M codes to Carbide Motion to handle the zeroing in a single command. We actually have most of the code in CM right now, we just need to tweak it for the final probe design.

Touch probes with Carbide Motion

You could hack a touch probe onto a Shapeoko but you’d need software to probe along a grid, or some other pattern, and then record a point cloud. Then you need to convert it to an STL to create a new toolpath. The hardware and firmware in the Shapeoko would handle this but Carbide Motion doesn’t.

Someone else could write this software but, at this point, I don’t think it would be us.

We own a commercial laser scanner and we’ve spent a lot of time with it. Based on experience, the use cases for 3D scanning are pretty limited, and it’s way less useful than many would expect. Your use case is perfect for 3D scanning but most other cases are not.

Supporting scanning in Carbide Motion would likely be setting us up for a huge support problem unless we were very careful in constraining the problem.

This post is not meant to try and talk you out of anything, just to layout what the hardware, firmware, and software capabilities are and what our point-of-view is on the whole topic.

3 Likes

Hi Tito…

That’s a great link thanks … it shifted my thinking about it as an application …I will definitely take a much closer look at this now…and will let you know what I find out…

As always much appreciated…

Regards,

Ed

Hi Matt,

I did check this out … It requires a conductive surface …Might work if I can find a way to metalize the surface of the sculpting polymer that I work with …

Worth poking at…

Thanks

The Estlcam contour mapping is intended to let you project an existing CAM project onto the “probed” contoured surface, and as I understand it you’re wanting to probe a handmade carving, and then replicate at scale and volume.

I don’t know of a way to export the contour results using this Estlcam feature into a usable map, model or file, but the notion of this operation intrigues me. There might be a way to save the contour results, but I’m not certain as I have yet to use this in any project (yet).

Hi Rob,

Ok I think I get it now… a bit of an unwieldy application, labor intensive to support with narrow market… and I understand where the limitation is …Thanks you saved me some time and effort by clarifying … I will go learn Z brush or Rhino or something or resort to some form of digital scanning.

As I told Meg I plan to buy your Shapeoko XXL unit in June or July by then the your zero probe will be launched …

Regards,

Ed

Hi Jim,

Correct with respect to my intent … with respect to your second point …I thought it was a bit of a stretch as well but an interesting one providing the file can be manipulated and the conductivity issue resolved… however may not be justifiable given my somewhat narrow application.

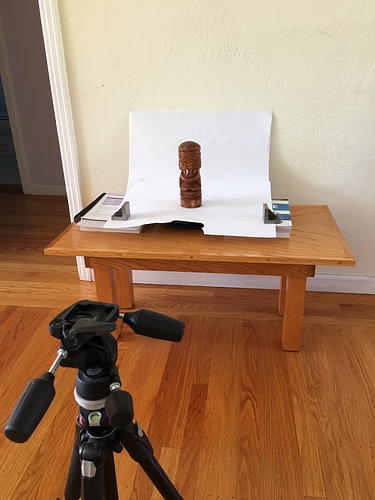
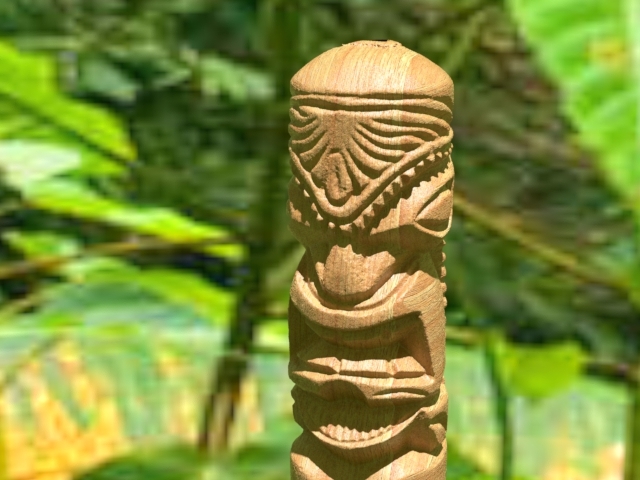
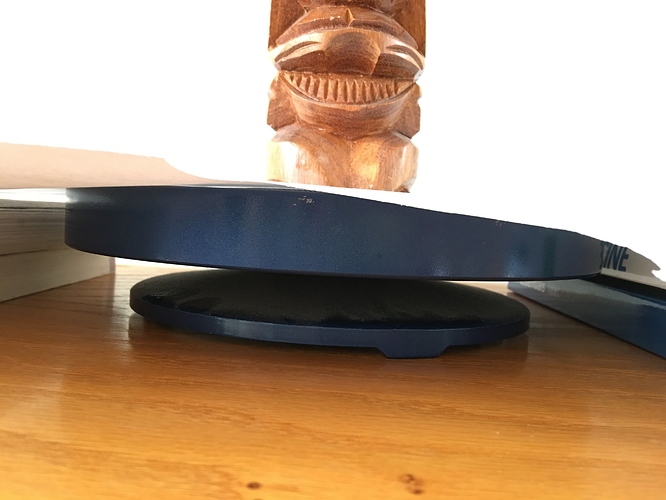
So I was curious and got a copy of PhotoScan. I shot a little tiki statue that I have–being carved and wooden, it seemed like the kind of thing @edzacly1 might be working on. I used just ordinary indirect daylight for lighting, at f16 and 1.5 second exposures (obviously with a tripod and remote shutter release). I was using a Nikon D200 with a 50 mm f1.4 lens. I then set my tiki on a Shimpo ceramics turntable under a sheet of white paper with a hole in it for the tiki, and another piece of white paper in the background. Like so:

And so:

I had the camera autofocus, then turned the focus to manual so the focus would be consistent in all photos. I took 38 photos (tiff format) rotating the turntable a little bit at a time.

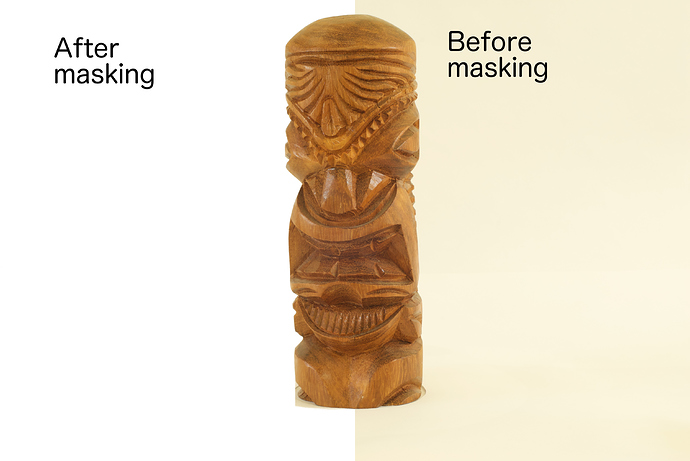
I then used Gimp (an open source cousin of Photoshop) to mask the photos, removing (almost) all but the tiki and saved the results as tiffs again:

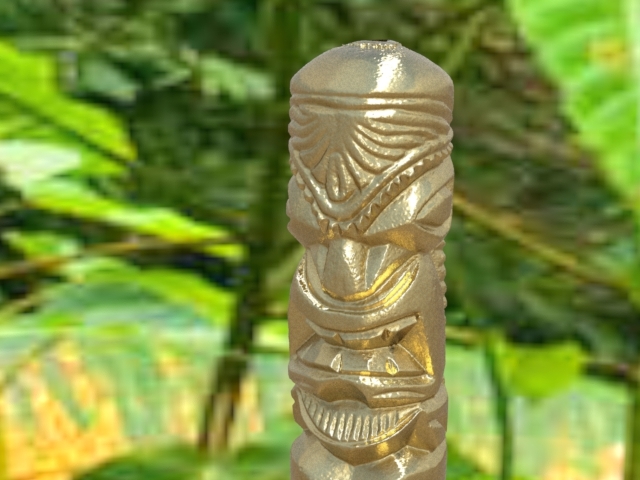
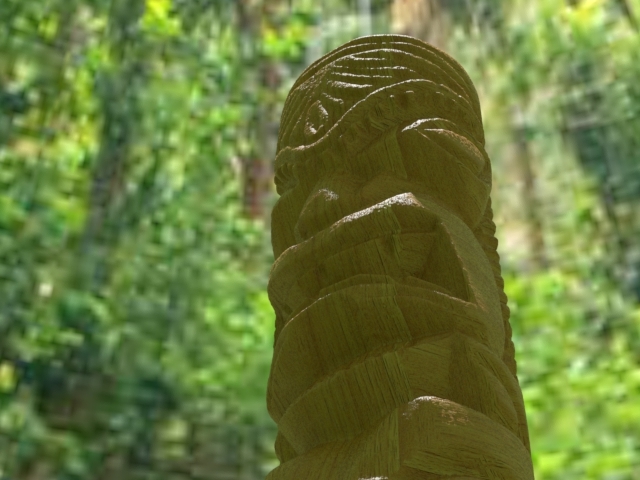
I then imported them into PhotoScan and after playing around with the settings ultimately ended up with an stl file and an obj file. The results I wanted took less than 2 hours of processing in Photoscan on my bottom of the line mac mini–add that to the hour it took me to do the masking. The model that Photoscan made from the photos (and the point cloud derived therefrom) was 2.5 mm tall when I imported it into MeshCam. Unfortunately, MeshCam was able to scale it only about 3x. So I took the stl into Evolve (what I use for my 3D modeling of parts to be milled) and scaled it 64x so that it was about 6-7 inches tall (a little smaller than life size, which is a bit over 8 inches). While I was in Evolve, I had some fun. I think maybe Dr. Jones would approve:

Or maybe more dramatic:

Or just plain wood:

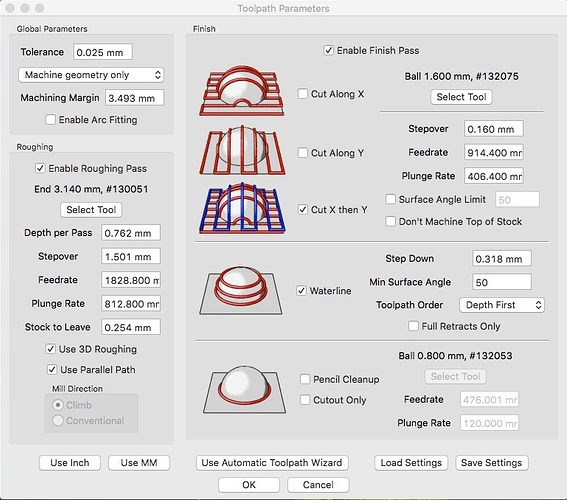
Finally, I tried importing again into MeshCam. I added tabs at the top and bottom, and used the following settings to generate gcode (using 1/8" square and 1/16" ball nose mills):

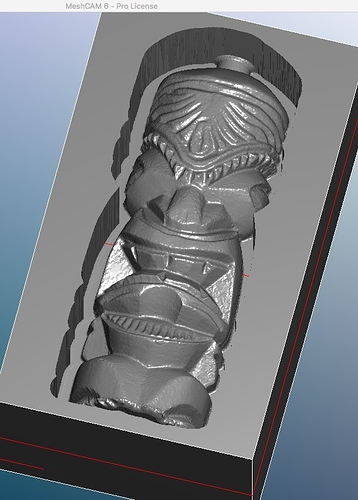
The predicted cutting time is something like 333 minutes. Here’s the simulated first side (I generated only one side):

This is for a blank that’s 101.6 x 177.8 x 60.0 mm (4" x 7" x 2.something"). I haven’t run this on my Nomad yet, but might try in a few weeks when I have a little more time. If anybody wants to have a go, here’s the gcode.

Rough:
tiki pine (4500 rpm) 1 rough.nc (1.0 MB)

Waterline:
tiki pine (4500 rpm) 2 waterline.nc (1.4 MB)

Parallel:
tiki pine (4500 rpm) 3 parallel.nc.zip (2.6 MB)

Note that the last one is zipped. Unfortunately, the original stl from Photoscan was 25 MB, and after scaling in Evolve it was 110 MB. So obviously I can’t post them here.

The proof, of course, is in the milling, which I haven’t done yet. But this seems like a pretty useful way of acquiring models for milling.

1 Like

Last time I looked at photoscan, the only option was the “pro” edition at a price so high it was totally out of reach. Now that there is a “standard” version, it’s within the realm of reason for the right project. Had totally forgotten this existed, so thanks for the reminder!

And if you have an academic affiliation (student, faculty, probably anything with an email address ending in edu), you can get it for $59. : - )

Hi Tito.

Go for it …Drama is good

Well I can see that you are driven by innate curiosity … I had to read this over a few times in order to visualize the process … Thank you for taking the time to demonstrate and document …honestly… I have to say given your excellent results that I had clearly underestimated it’s potential… that file looks ready to go…

From what I gather - Essentially the Shimpo ceramics turntable was sufficiently stable during each sequence of the 38 photos… once the 38 photos were loaded, the Agisoft PhotoScan is able to sequence / combine those 38 digital photos so as to create a composite 3D model as stl / obj file…. additionally the Agisoft PhotoScan is able to create a point cloud, with a processing time of 2 hrs or so … from there you Exported the stl file to Evolve in order to scale it up x 64 so as to retain the original dimensions / scale, from there to mesh cam for the gcode…

On review I would have to say: Impressive and very accessible…

On that note…due to your persistence and to your credit …I am in the middle of researching this process (see below) which might be applicable to Bas Relief (all my art will be Bas relief as opposed to 3D) - the process is noteworthy because:

  1. Has Support for Arduino UNO / grbl Controllers.
  2. Works with photos … as such it has the potential to cut down my development cycle dramatically as it could allow me to create pieces from stock or acquired images that I could then manulipate / stylize… :

https://www.picengrave.com/index.htm

CNC photo engraving solutions for spindle & laser diodes.
PicEngrave Pro 5 + Laser was developed for the
Hobbyist and Professional engravers and now has Support for Arduino UNO / grbl Controllers as well.

Their software will generate gcode for 3D laser engraving, or 3D spindle relief for grbl or Mach3, but it requires a depth map image…

Depth Map Image

https://en.wikipedia.org/wiki/Depth_map

In 3D computer graphics a depth map is an image or image channel that contains information relating to the distance of the surfaces of scene objects from a viewpoint. The term is related to and may be analogous to depth buffer, Z-buffer, Z-buffering and Z-depth.[1] The “Z” in these latter terms relates to a convention that the central axis of view of a camera is in the direction of the camera’s Z axis, and not to the absolute Z axis of a scene

Examples
https://www.google.ca/search?q=depth+map+image&rlz=1C1CHFX_enUS594US594&source=lnms&tbm=isch&sa=X&ved=0ahUKEwiIuNH_2LrTAhWK64MKHev9AnUQ_AUICCgB&biw=1920&bih=950&gws_rd=cr&ei=xLD8WNHCA-OGjwSui4bwBg#spf=1

Your Thoughts?

Again thank you for demonstrating and showing the how to…

Regards, Ed Zac