Aluminium base waste board question

Hi folks was about to pull the trigger on a new aluminium single piece for my Xxl, but have just had a crisis of confidence on my thinking.

So this base is a case of want over need as my machine, to me at least is well within tolerances I am happy with. So getting this to be honest mainly because I got a good price in these dire times, and because well it will look amazing.

I think I am over thinking this, but will I need to constantly re surface the MDF spoilboard as I do now because of the MDF shifting, expanding and all the things we know MDF loves to do as a spoilboard for us stock SO3 users.

Or will it be the case that the aluminium base will not only add more ridigity , it will also mean less need to re surface as there will be little to no flex?

Anyone able to shed light on my thinking / quite possibly flawed concers

Cheers
Jon

4 Likes

Hey Jon,

I think you ought to consider a different material for your wasteboard other than MDF if you’re having issues with large temperature/humidity swings. I know @julien has an HDPE wasteboard atop his Al baseboard and @Luke goes with an aluminum wasteboard atop his aluminum baseboard.

4 Likes

Yeah now you see I was worried because people say that the HDPE can be a bit slippy with locking pieces down @Julien / other do you experience this?

What do you plan to use for workholding?

It may well be that thinner sheets (6-12mm) of something like Valcromat or High Density Fibreboard as a spoilboard on top of your aluminium base which allow for you to cut through the workpiece without hitting the Aluminium might work?

If you’re using vices or other metal workholding OTOH then that won’t matter.

4 Likes

If I recall correctly, Julien subscribes to either the double sided tape method or was it the painters tape and CA glue, exclusively.

I guess it’s as Liam mentioned, it depends on what you typically use for work holding.

2 Likes

Jon,
I have the Ohio Diesel 1/2" aluminum spoilboards. I think it is about as good as it gets for a solid base but my XXL does sag in the middle even with the Aluminum board. It needs center supports to level it. I like mine very much though and would purchase it again. If you get one and need the sea of holes spoilboard I designed just let me know I will send the files with toolpaths.

Here is what I use. They work very well but good luck getting the middle ones on haha.

Strap adjustable supports

7 Likes

@Sherpa
Yep, what Brian said: HDPE is slippy…against other slippy material, but since I use tape&glue, the point is moot because the sticky side of the tape is not going to slip (not at the amount of lateral force I put on the pieces, and not at the dimensional accuracy I’m usually after)

Tape may not adhere (in the Z direction) as well to HDPE as it would to a more porous surface (MDF), but I have yet to have a case where I had the tape&glue give during the job (AND it was not because I got lazy and did not see that the bottom of my stock was not flat…that, I did)

I went to an HDPE wasteboard because I developed a strong dislike for MDF in general, and how it wears out/tears out quickly when prying pieces off the wasteboard (when using tape&glue, again), and I figured HDPE would also be much more stable over time (compared to MDF which soaks up humidity).

If I am being honest, I never quantified the gain in dimensional stability.

3 Likes

Even with the Aluminium, wow!

I just finished bolting the base of mine down to the table to take sag and flex out.

2 Likes

Too much weight and not enough second moment of inertia! :wink:

2 Likes

I have an aluminum base and typically use a HDPE waste board on top to be surfaced, this was mostly because first, I don’t want to surface my ~$400 base as it would continue to have to be resurfaced when doing maintenance/mods (requiring disassembly) and would just create a pocket in the base, interfering with work holding, secondly at the time I was experimenting with [misting] coolant.

It is, using the gator clamps, they like to slip outward when being clamped down, I end up putting some pieces of paper under the clamp riser to help them to grip the surface better. I also use something like a scotch brite pad to scuff up the surface a little when doing the tape & glue method.

5 Likes

With regards to HDPE’s dimensional stability, I’ve attached a worksheet. I’d suspect in most shop environments, such dimensional changes will likely be imperceptible. But I always take it into account in my installations.

5 Likes

Here’s my overcomplicated setup:

Stock wasteboard, with a MDF wasteboard w/ t-track on top. That gets surfaced square with the machine. I’ll eventually need to replace the MDF here. On top of that I use an aluminum or MDF “tooling board” that has holes for clamps and such in it and is known parallel (as I can make it anyway). When I use the aluminum one, I put HDF shims under work so a mistake doesn’t take another hunk out of my aluminum tooling board. I do lose working height with this setup, but that hasn’t been an issue for the projects I do, and I can easily go to the t-track level if I need some height.

Sort of overly complicated, but evolved over time.

4 Likes

Probably well supported underneath?

Both MDF and Melamine have really uniform thickness - they just need good support underneath.

@LiamN might be on to something. Now that I have had a little bit of time to play with some of the sheets of Valchromat/Forescolor I picked up weeks ago, I am a big fan of it over regular mdf and will be making a new waste board out of it with threaded inserts asap.

Something that would help me out is pictures.

I have received all of the boxes for my Shapeoko XL, and I have a pile of Amazon boxes from the various things you guys have suggested (dust collection etc). But I’m not letting myself build the Shapeoko it until I finish a work project, and I finish building an enclosure for the Shapeoko.

I think I understand the engineering behind building a firm/stable/flat base under the Shapeoko and how you just can’t take the feet off and let the Shapeoko lay directly on MDF due to the “layout cross straps” not having a flat bottom. And while I “think” I am following some of your solutions what I really need is to see what you did so cross straps are fully supporting the weight and are flat. And (I assume) the corners (now without feet) are still supported?

What I am picturing is custom surface that isn’t flat, but rather has grooves cut for the cross straps? This is where my mental image starts to go fuzzy.

Thanks in advance

1 Like

I just finished bolting my XXL down to the torsion box it sits on, which was flat enough for me to say “flat reference”. I used some spacers under the steel cross straps, but it did involve drilling some holes in the steel cross straps which would void a warranty…

I’ll grab some pics and screenshots of the CAD model tomorrow if that helps.

Edit - Should also add, this isn’t something you need to stop building your machine for, there’s plenty to do and learn before small movements in the wasteboard become a problem for you, getting it built, learning to use it, tram it etc. There’s plenty of time later to decide what aspects you want to improve and do that.

4 Likes

Hmm now this statement counters my argument for doing it in the first place, this thread and your feedback has given me much food for thought. Particularly my thinking on fire and forget when getting the new base, clearly I need to re visit this with a view to supporting the underside of the aluminium base… very interesting indeed

The Ohio Diesel aluminum plate is a 2 piece and relies on the Shapeoko straps (3ea) for rigidity. The Shapeoko straps will not support the heavy aluminum plate and you will suffer from sagging.

In my case, I removed the Shapeoko straps and used 2020 aluminum for the base in order to support the aluminum plate.

The Ohio Diesel plate is half inch thick whereas the Shapeoko design uses a 3/4 mdf board. To keep the Z distance the same, I used a 1/4" spacer to make up the difference.

If I were to redo it, I would out source a 1 piece aluminum plate, remove the straps, bolt the bed frame to the aluminum plate, use 20/20 cross beams to support the aluminum plate. Ditch the leveling feet. Add a mdf waste board and bolt it to the aluminum plate.

5 Likes

So,

Here’s what I ended up doing to my XXL.

Beware - warranty voiding drilling involved…

Carbide3D has a compromise to make between weight, manufacturing cost, shipping cost, difficulty of assembly etc. and outright rigidity. They also need to ship something that is maximally tolerant of being installed in unpredictable conditions. In the case of the XXL and me having a flat surface for installation, I think the compromise is large enough that it’s worth doing something extra as a user, but that’s my personal preference, first, here’s the basic steel and MDF structure of the XXL;

I’m choosing to name the various main parts here;

  1. Front and Rear Steel Support - hold the Aluminium rails
  2. Steel Straps - between the front & rear supports
  3. MDF Baseboard - the supplied MDF base that bolts to the steel
  4. Spoilboard - the extra MDF the customer adds on top of the baseboard

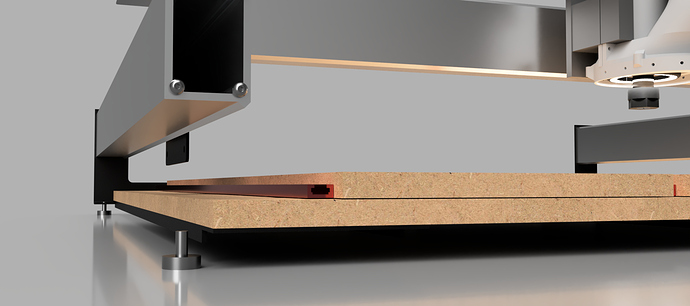
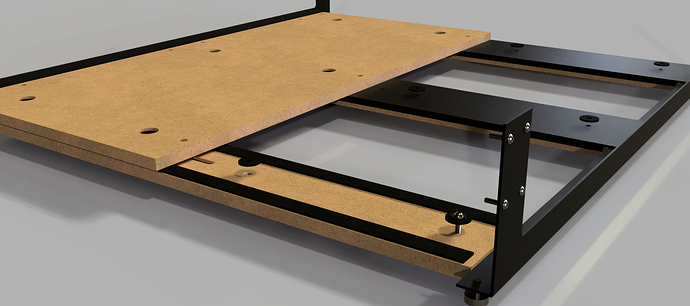
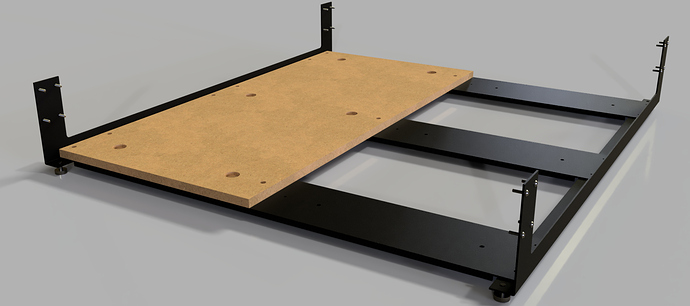
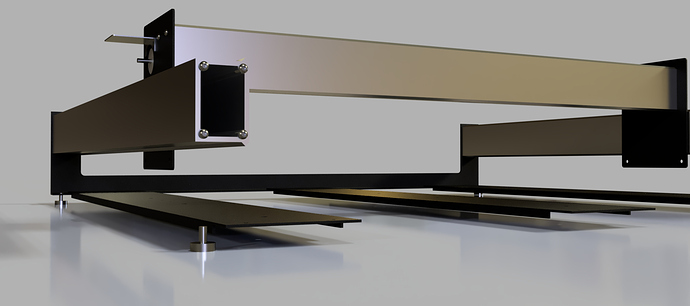
The steel is pretty thick and is folded to give some rigidity, the front and rear steel supports which hold the very stiff aluminium rails have a large fold which goes underneath the base, there are then tied together by a set of steel braces and the supplied MDF baseboard is bolted down to this assembly.

As Carbide has no idea what a customer is going to sit their machine on, they have quite sensibly provided four adjustable feet, one in each corner to allow the frame to be aligned with the rails parallel, and optionally level.

The problem on the XXL is that the sandwich of steel straps and MDF is simply not a very rigid beam, the folds at the edges of the steel straps are quite small and don’t provide much extra support, here’s the horizontal sandwich you end up with, steel strap, baseboard MDF and user spoilboard MDF. It seems OK until you start to notice flex and sag in the middle, the two parts the MDF baseboard is shipped in don’t help here;

There is visible and very measurable flex in the baseboard and therefore your working surface, it’s easy to distort it even if it is level by clamping workpieces to it and it sags over time too. Worse, it can vibrate and move during cutting.

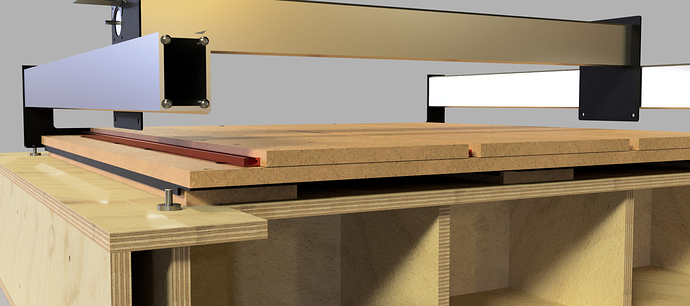
As the underside of the steel straps is folded edges and crinkly powder coat it’s not really a smooth surface to reference the machine from, so I decided to make simple plywood support shims to go the full length of the flat faces of the steel straps, with thin strips of rubber to provide compliance against the rough surface and absorb some vibration energy. To fix this in place I drilled through the MDF baseboard and the steel straps and put threaded inserts in my support table to make a rigid assembly;

It’s worth noting, I already had my machine well squared before committing to where the holes went and bolting things down.

All this got bolted down to the torsion box table I already had, which was sufficiently flat for my purposes to not need any significant adjustment of the machine;

Now that the machine forms it’s own torsion box assembly with the top plate of my table box, it is apparent that I massively over-built the table box and could have got away with something much thinner if I’d realised that I was joining the Shapeoko and the table into a single assembly earlier on.

Certainly for people who want their XXL to be portable, fold up to the wall etc. I’d consider the bolt it down approach.
7 Likes

fantastic info here thank you

1 Like