The project time for my Shapeoko 5 Pro 2x2 is mid April I am building a dedicated 10’x10’ climate control room out in my pole barn as that is the most room I can give up for the machine. I live in Florida and electronic do not do well in Florida heat. I am extending my wifi to cover barn. I will have AC out there. Is there anything else I need in this room that I should plan for?
Has anyone ran a Mac with the latest Ventura software? Do you know if your iPad can be setup as a mouse to control your your machine through Carbide Motion?
1 Like
Hi Warren
Here is what I would do
Power requirements.
Dedicated circuits for the following
5 Pro machine
5 Pro spindle
Dust collection
AC and Heat
Computer
Lighting and other outlets
Room
10 x 10 will work if you plan for larger projects
Set the machine just off one wall giving yourself room to pass on the wall side and do things you need to do.
Design an access door on the rear wall you can open when you project is longer then you work surface. this door will allow you to keep your machine stationary and not worry about checking level every time you move It. this door does not need to be big it just needs to be level with the work surface and slightly below and slightly taller than the working height.
Dust collection
Set it up on the wall and do an overhead flex dust hose in the center that will cover the work area and not bind or pull on the machine. A good option on this is to have the vac on an outside wall to keep noise down.
Get a dust separator and put it in line before the shop vac and where you can easily dump the chips when full.
Work table
Fixed or mobile kind of your choice based on how you work but if this is only for the 5 Pro I would go with fixed and at a height that is comfortable for you to reach and do what you need when using the machine. Generally 40-43 inches is a good height for counters but this changes if you are tall or short
Table needs to be sturdy.
Allow storage drawers for you tools and fastening equipment. Do large or small drawers again its what you needs are but I like large drawers because I tend to over collect tools and things. You can also design large drawers with two levels very easy. I have a 10 inch area on the side and 4 inches on the front of the table of my 4 pro. If I redesigned the table I would make the area in front larger by one inch and the area on the side larger by 5 - 6 inches I was limited by the size of my table and area the machine is placed.
Computer and power for the PC and other gadgets. Gadgets are the power supply and chargers for your phone and other hand held controls that you may use.
As stated above it will need its own circuit and the PC and other gadgets can be ran off a power strip on the side of the work table.
I have my PC mounted on a swing arm on the side of the table it can be set up to tick inside the table when not in use
AC and heat should be sized to the room a small mini split with a remote can be used but this may be an overkill however the footprint for a small one will be great for this room.
Room lighting
I like the 4 foot LED strip lights these are the ones I use
https://www.amazon.com/Barrina-Integrated-Fixture-Utility-Electric/dp/B07F2WMCP2?pd_rd_w=i0gKh&content-id=amzn1.sym.deffa092-2e99-4e9f-b814-0d71c40b24af&pf_rd_p=deffa092-2e99-4e9f-b814-0d71c40b24af&pf_rd_r=W0EJCA9XN349JEE9NH9C&pd_rd_wg=0J3Df&pd_rd_r=a43bf384-963b-4f40-876b-d56f56abf0cd&pd_rd_i=B07F2WMCP2&psc=1&ref_=pd_bap_d_grid_rp_0_30_t#customerReviews
These can be wired with a switch but you will need to get the plug adapter. I have 24 of these in my shop and 14 in my attic space you will not need a flashlight in my attic.
for a 10 x 10 room I would get the six pack of lights do two over the machine and four around the rest of the room.
Hope this helps and is not an overload for you
Anthony
1 Like
That’s rather open-ended — it depends on what sort of work you wish to do with your machine and how you wish to approach it and on what you already have in your shop — see below.
Do you mean Vectric? Vectric’s software is compiled for Windows only — in order to run it you either need to reboot using Boot Camp, or run Windows app using Parallels or WINE or some other emulation system. Yes, folks have done this/are doing this.
If you’re still running Ventura on a Mac, I’d have to ask how.
Yes, this can be done, but you have to have a Mac Min, small Windows computer, or a Raspberry Pi 4 controlling it, then you use VNC or some other remote software to control the computer running Carbide Motion using the tablet.
The below is copied from the old Shapeoko Wiki and is at:
https://old.reddit.com/r/shapeoko/wiki/gettingstarted
Further details are available at appropriate places in this and also see: Machine operating checklist and be sure to read Introduction - Shapeoko CNC A to Z and Getting Started with CNC [Book]
- eye and hearing protection: https://docs.carbide3d.com/shapeoko-faq/safety-gear-and-necessary-precautions-when-using-the-machine/
- Additional assembly tools: Flush cut pliers (or scissors — fingernail clippers can also be used to cut a short zip tie with a nicely rounded edge), Needle nose pliers, Tape measure or ruler, Level, Pencil; possibly also Easy-peel masking tape, such as blue painter’s tape (nothing that leaves a residue behind), Adjustable wrench, Flashlight
- a trim router (you can order with a machine, but Carbide 3D only has our Carbide Compact Router and the ER-11 version, but if you prefer you could get a Makita RT0701/0700, or if getting a machine w/ a 69mm spindle mount a DeWalt DWP611/D26200)
- better quality wrenches for tool changes, see tools - shapeoko
- Carbide Compact Router
- some endmills (one is included with the machine, but they’re consumables: Shapeoko Endmill Starter Pack - Carbide 3D ) If one is starting with just a 1/4" collet:
- three 2-flute 1/4" straight endmills (such as the #201 endmills from Carbide 3D — one will be included with the machine, a pack of two will fill one out with: 1 for initial experimentation/roughing, 1 for finishing passes, and 1 spare — if cutting wood or plywood a downcut endmill such as the #251 is recommended.
- two 2-flute 1/4" ball end endmills (such as the #202 endmills from Carbide 3D) — if one wishes to do 3D modeling or cut parts which have rounded profiles along the bottom (often a good idea in woodworking for increased strength)
- two 90 degree V-bits such as the #301 from Carbide 3D — if one wishes to do V-carving or cut joints which use this angle
- If you wish to do small-scale or precision work you may want a 1/8" precision collet (we sell one for the Carbide Compact Router (also works for the Makita): Precision Collets for Carbide Compact Router - Carbide 3D and is now bundled with units sold directly from Carbide 3D):
- five 2-flute 1/8" straight endmills (such as the #102 endmills from Carbide 3D
- two 2-flute 1/8" ball end endmills (such as the #101 .125" Ball Cutters from Carbide 3D)
- two smaller straight endmills (say 2 mm or so) (such as the #112 0.0625" endmills from Carbide 3D)
- Additions: *V-carving bits (say 30 and 60 degrees) — these are excellent if doing text
- you should already have a place to set the machine up (the Shapeoko is more suited for use in a shop environment) — note that you’ll want to have access to the front and back of the machine so that you can feed material in from end and out the other if working with oversized material (you can process an entire 4x8 sheet by cutting it into thirds and feeding it incrementally into an XL or XXL — an SO3 would require 1/6ths). See: Torsion Box for Shapeoko XXL and Instructions
- dust collection suited to the material which you are cutting (at least a shop vacuum — many of our customers rig up dust shoes and formal dust collection) — you’ll want to tie into existing dust collection if you have it — Carbide 3D offers https://shop.carbide3d.com/products/sweepy-dustboot which will fit many smaller shop vac / dust extractor hoses
- workholding (some way to hold the material in place — we have a T-track and clamp kit: https://shop.carbide3d.com/collections/accessories/products/t-track-table but many folks work up their own — we have a pair of tutorials: http://carbide3d.com/docs/tutorials/shapeoko-clamps/ and https://docs.carbide3d.com/tutorials/project-wasteboard/)
- calipers
- pendant option of some sort
- a game controller can be used: Using a Game Controller with CM513 and later
- the standard keyboard shortcuts allow a numeric keypad to be used as a pendant
- by remapping one can use a gamepad: A different sort of pendant
- Dedicated units are also available and one person used a Stream Deck: Carbide Motion DRO Pendant
- good quality square for assembly or positioning parts
- tools to break stock down — just a handsaw will allow one to purchase long boards, break them down in the lumber yard parking lot, and carry them home even in a small car
- tools to post-process stock (files, deburring tools, &c.)
and of course, material and designs to cut. It is recommended that folks start by drawing up a design (follow along in one of our tutorials: Your First Five CNC Projects and watch our videos: Getting Started with Carbide Create and read through: http://docs.carbide3d.com/assembly/carbidecreate/userguide/ ) and working up toolpaths all the way through 3D simulation — if that effort seems workable to you, you should be in a good place to get a machine.
Wow Anthony you have great ideas. I plan to have a move table where I can roll Pro out into the main area if i ever need to.
The vacuum will be mounted over the machine in the loft.
I planning on three dedicated lines one ac and lights.
One for computer and one for Pro and Spindle. I do have laptop but need to upgrade
I should clarify I have an IMac with a 27” screen and that has the latest software as of last Saturday. I will be using carbide’s software software first the free version and once I learn will upgrade to pro and eventually would like to use Fusion as Fusion also works on both Windows and Mac as does Carbide 3d software.
All good advice above ![]() .
.
This is my current state of evolution, 6 years in the making. Picture being worth a thousand words. Pretty messy atm but it’s comfortable for me.
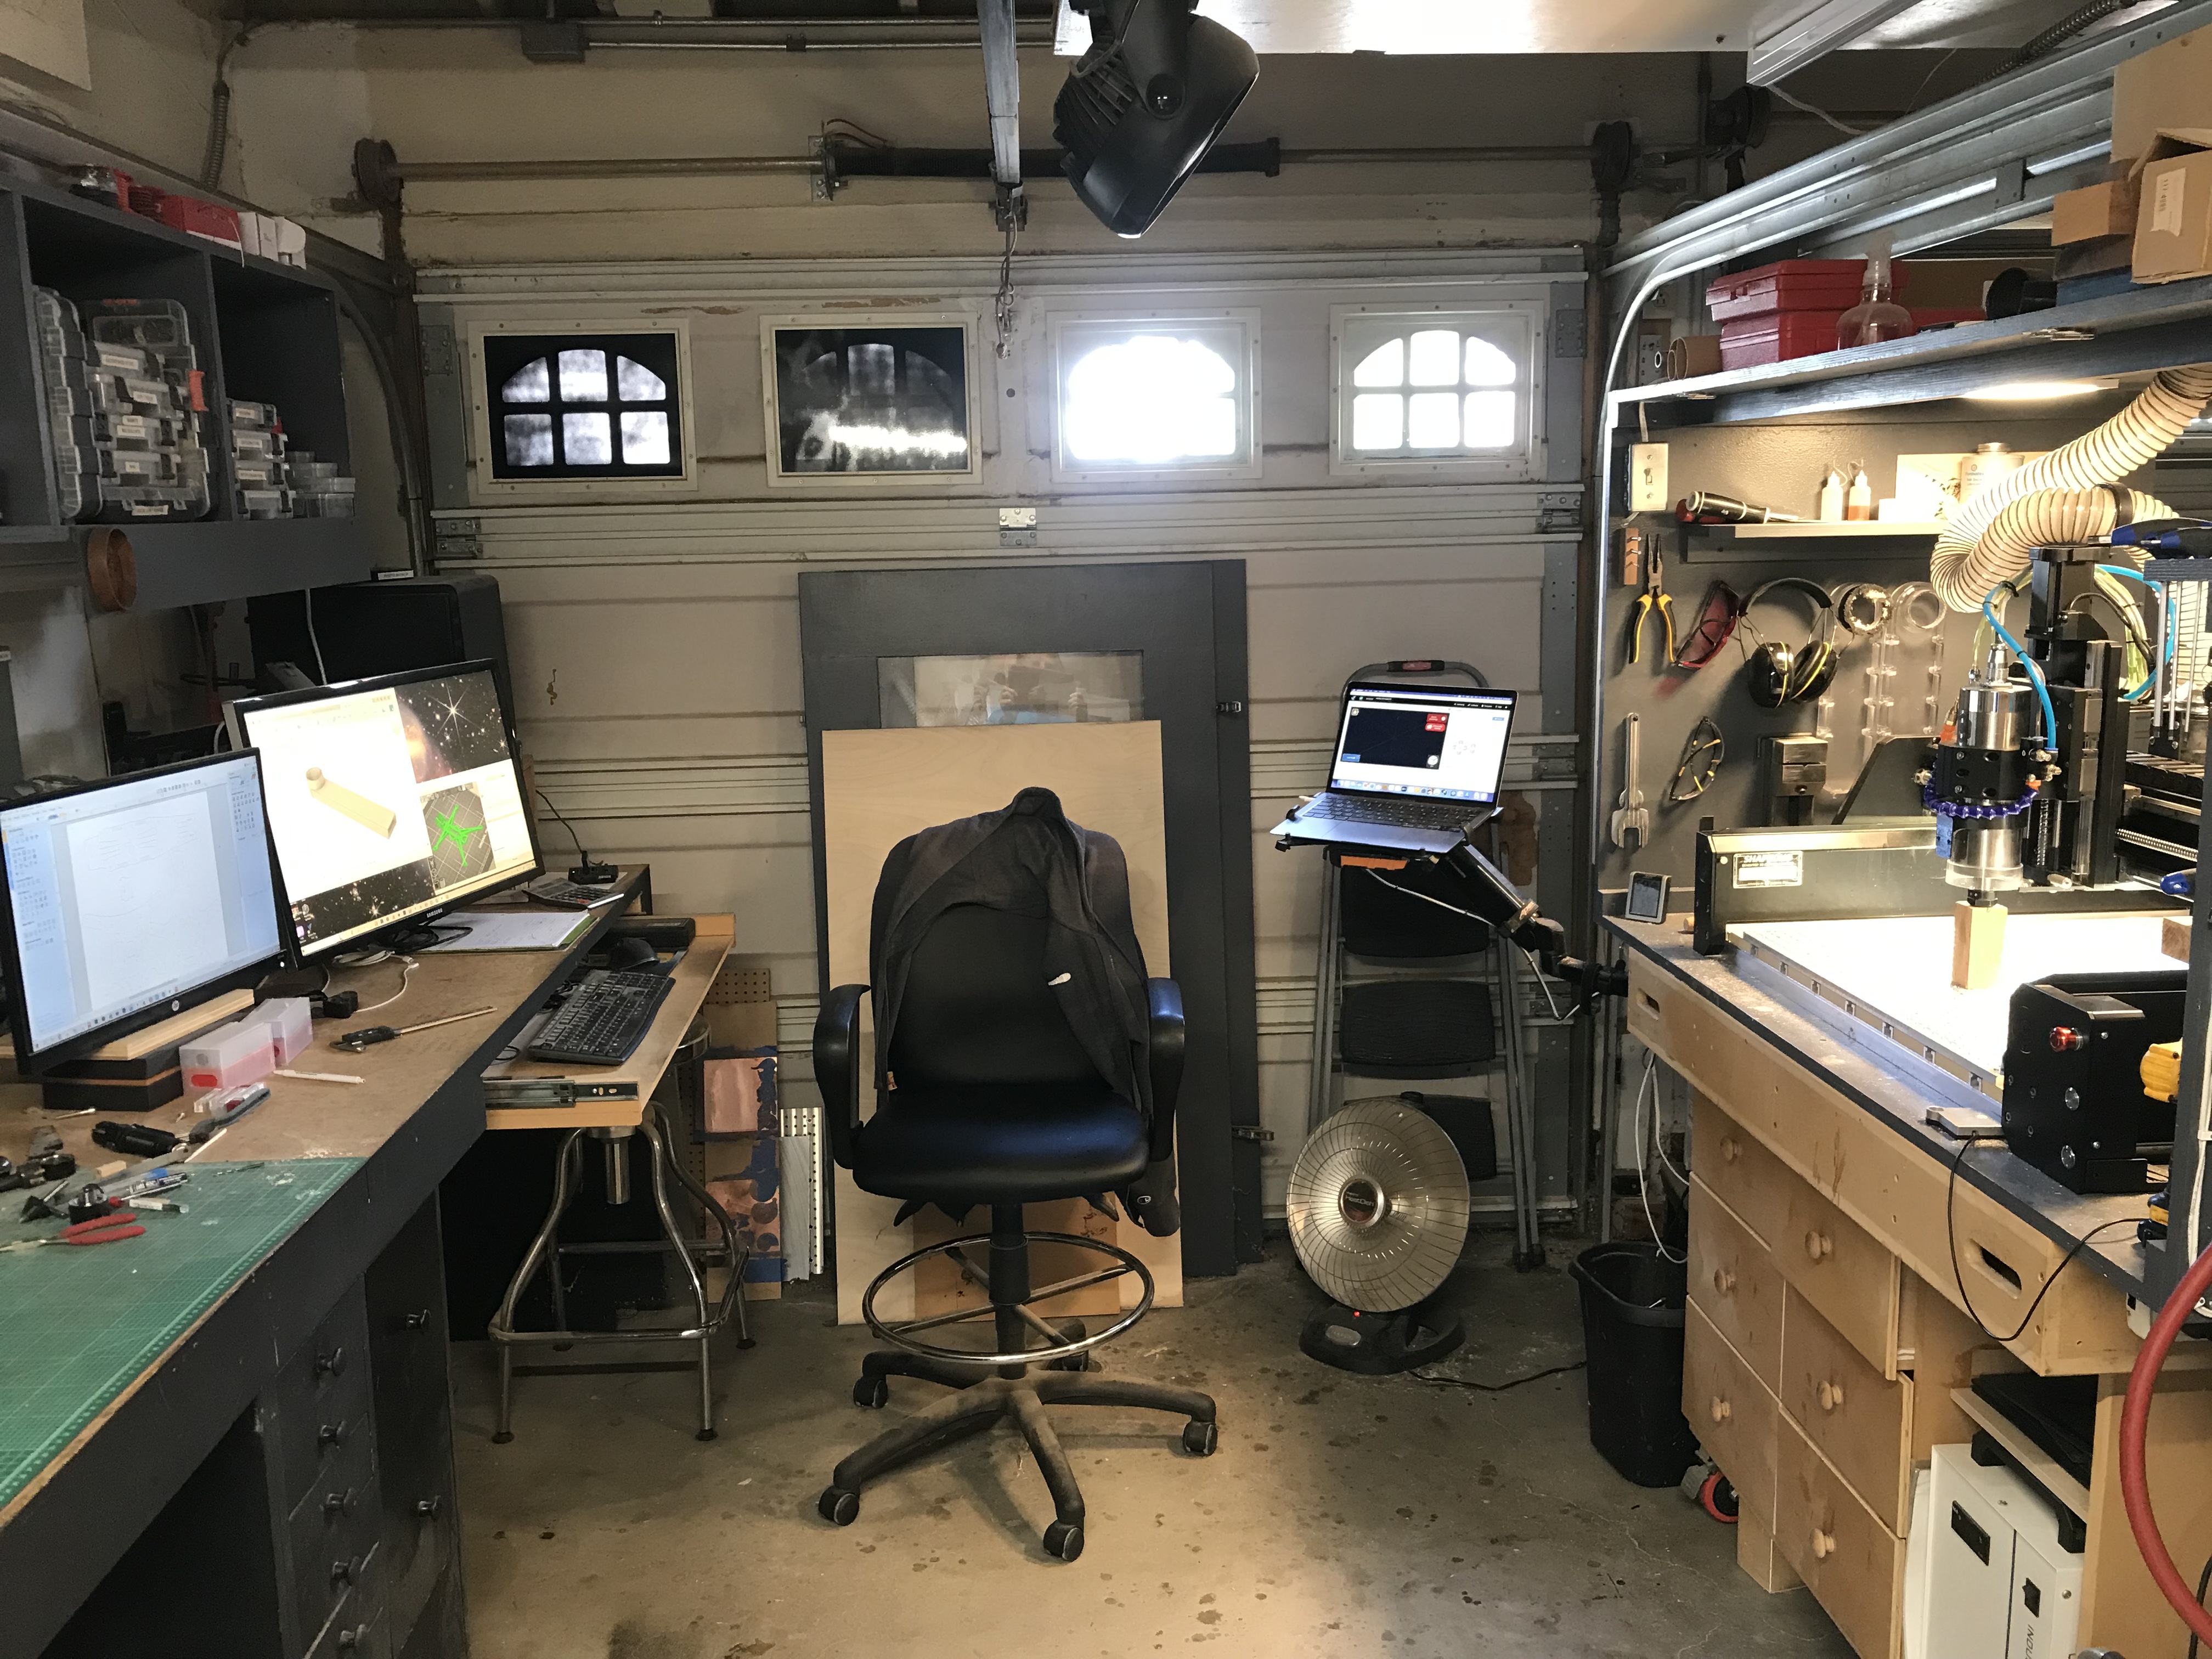
Hackintosh for design work and research on the left, background. MacBook Air to control the machine.
The base cabinet and torsion box were originally built for an SO3 standard. It evolved to an SO3 XL then to the HDM. It has wheels but is now up on blocks for additional stability for when the HDM gantry is running full tilt.
3 Likes
thanks for the image. it looks comfortable and I bet you know exactly where everything lies.
1 Like
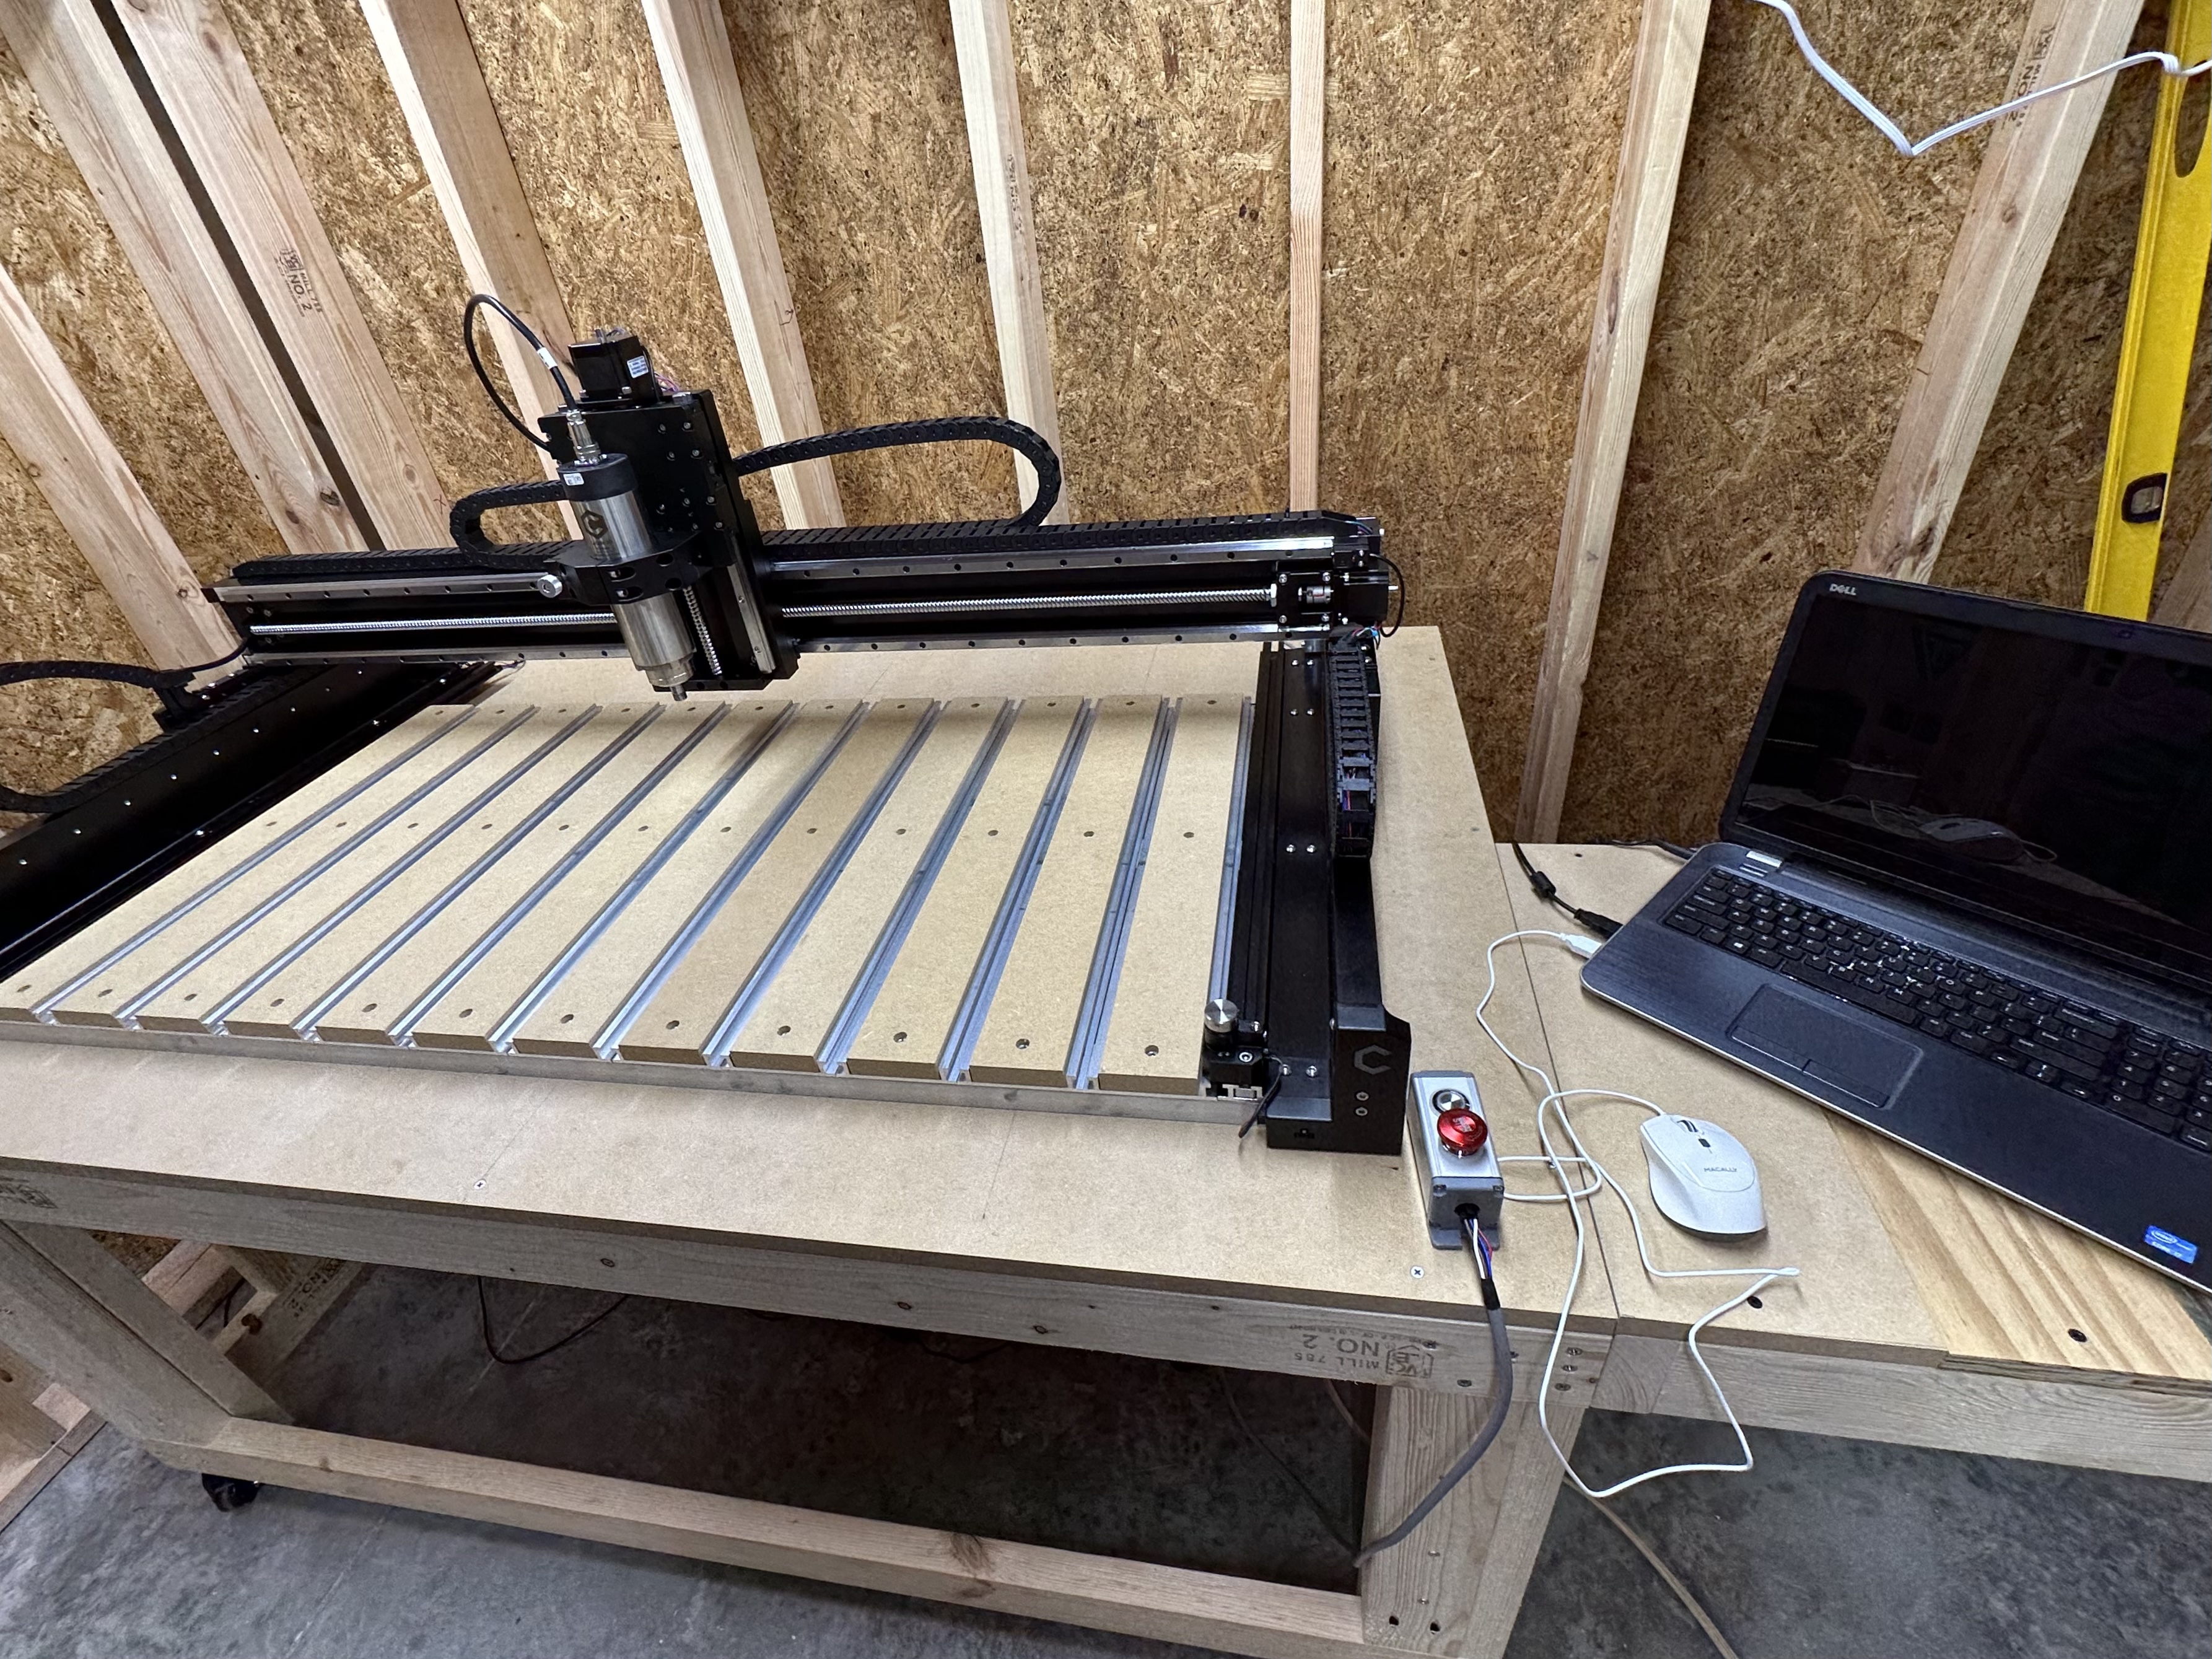
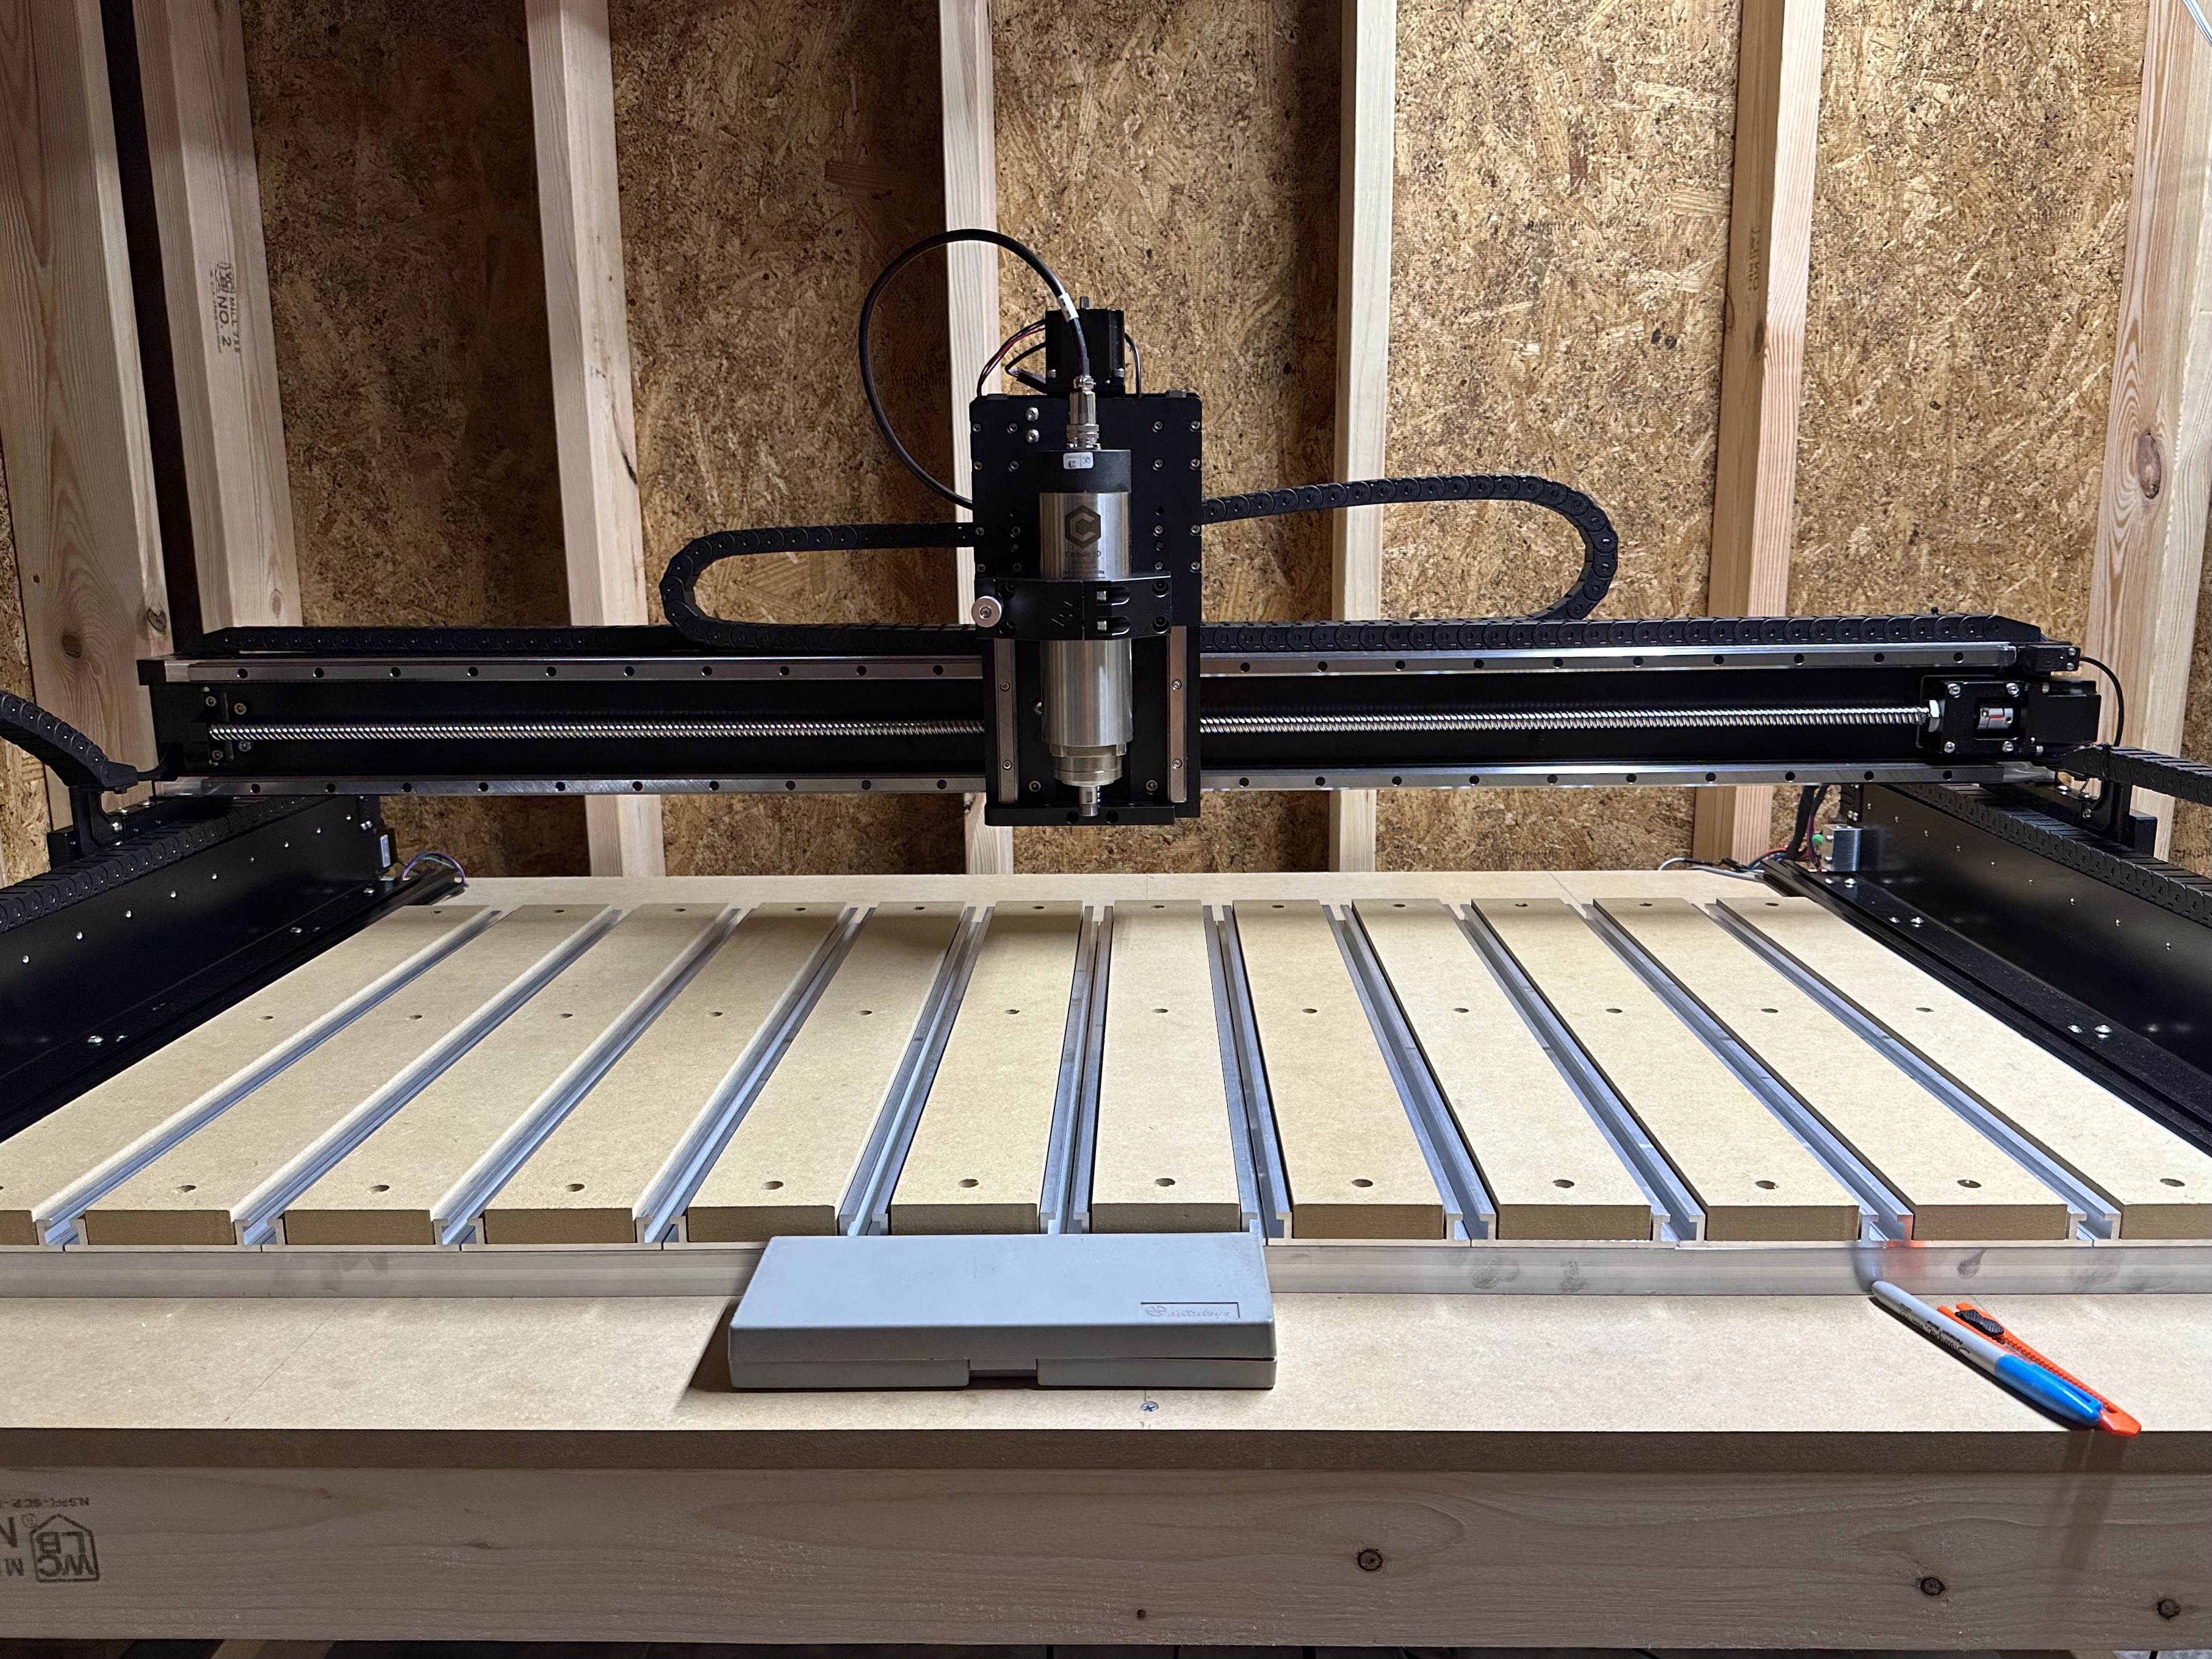
Machine stand built and machine put together, internet brought in and now it’s time to learn and find time to finish the room. Thanks everyone for all the suggestion.
3 Likes
This topic was automatically closed after 30 days. New replies are no longer allowed.