Some time ago I started an ambitious project of making a backgammon set. I did the triangles as vcarve inlays, built a box around it, carved a dice holder, and I’m working on veneering the outside with birds eye maple. I also carved all the game pieces with a two sided milling operation to get nice dents in the center of the pieces.
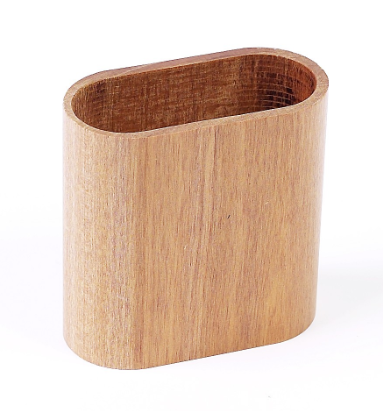
So a next step for me is to make a dice shaker like this:
I’m struggling to figure out how I can make this. Here are my thoughts:
Approach A - Carve this in one piece from the top town. This would require a really long endmill and even with my HDZ I calculated that my max height would be about 2.5 inches and I really would like it closer to 3 - 3.5 inches
Approach B - Carve several oval shapes and glue together. I don’t like this approach because grain orientation means I am either gluing end grain to end grain (to get face grain exterior) or having visible endgrain on the exterior which won’t look great
Approach C - Slice it in half from the top and make 2 3D parts (shaped like a C) to glue together. This may be way above my pay grade to design these, tool path them, and perform double-sided milling – I would think Fusion 360 would probably be a must.
Am I missing something? Can anyone help me come up with an approach that would work and produce a great final product?
I generally prefer to roll the dice with my hand, but I would probably take approach C to minimize the depth of cut required. Also, most dice cups I’ve seen had an internal lip at the top so the dice can’t just slide smoothly out of the cup.
For a shape this simple, I would model the inside and outside separately and cut pockets in the waste board for alignment.
Creative use of rabbets could make assembly self-aligning.
I’m still a bit reluctant to try these as 3D parts, but I do like your rabbiting idea to possibly apply to my approach B. It would require 2 sided milling, but a very simple 2.5D part design
@WillAdams – The reason for the shape is so it can fit easily inside the backgammon set when it is closed (the two halves will have a hinge and a clasp) I like the coopered idea…never really experimented with that. Would be a unique look the two ends of the ovals were coopered and the middle was flat.
I have seen v endmills from 15 deg - 90 deg. but if going for coopered approach would probably be easier on the table saw.
Given that the only table saw I’m likely to buy is:
we need to puzzle something else out.
I’ve been wondering if one couldn’t model the angle in Carbide Create Pro, then have the machine cut it out with a ball-nosed endmill — something else to look into when I have a chance.
When everyone has a hammer, then everything looks like a nail!
I would make that “cup” out of layers of common veneer. Perhaps use the Shapeoko to pocket out the shape of the cup in a solid material so the shape is right as you glue up the layers.
Agreed, or use a series of staggered holes for a dowels for registration — one future project is making a largish case using tiny pieces of wood cut on the Nomad…
I would make that in two halves, carving only the inside and some pocket for dowels to be used as registers when i glue the two halves together, then carve the outside as a two sided job.
I like that idea, but the CAD/CAM of those operations are intimidating to me. I’m assuming you would do that on Fusion360? I’ve been trying to get familiar with some of the 3D capabilities on VCarve Desktop, but I’m assuming something like this would require Aspire to do the modeling.
Cool rendering! I like the style but the problem with that design is it is either an end grain to end grain glue up or and end grain and face grain exterior (which I don’t really like the look due to the contrasting colors of the wood from face to end grain)