I’m sorry for being the newbie and still having a 100 questions. These bits seem to keep confusing me. I did a flag a couple weeks ago. I cut the stars out with a Foos Pro Carbide 60 degree v-groove bit, 1/4" bit and 1/4" cut width with 2 flutes. It did great. It cut the stars and did it in 2 passes. I saw that most everybody doing this were using the wider Amana 60 degree bits. So I bought both a 60 and 90 degree bit from tools today. I believe I entered the feed and speed info as recommended by manufacturer correctly. I set up to cut and zeroed out and started the program. As it moved to stars to begin cutting, it seemed a bit slower moving down than it did before with the Foos bit. It then started slowly going through the shape of the star as if it was making the cut, however it was 1/8" or so above my work piece the whole time it was moving. I stopped, checked everything, re zeroed, tried again and no change. The other difference I notice is on a different flag I designed, when I cut it last week it cut the logo in about 45 minutes to an hour. When I set it up to do again with this new amana bit, it said the time would be 2 hours and 45 minutes. So obviously something going on with the way I have programmed this bit in my opinion. I have the 45705 60 degree Amana v bit and the 45704 90 degree v bit. Trying to use the 60 degree for this particular project. What I am I doing incorrectly.
My first flag I cut with the foos bit, it was barely touching wood and when I asked I was told the angle was per side, and I had put 60 instead of 30 and when I changed to 30 it cut into wood and did great. I assume this new bit would be the same and is how I set this up. Thanks
Please review:
and
The router speed setting should match the feeds and speeds for your selection of endmill and material. Please see:
(there’s a row matching dial settings to RPMs at the bottom)
There’s an interactive version at: https://public.tableau.com/profile/willadams#!/vizhome/Carbide3DCNCFeedsandSpeeds/Sheet1?publish=yes
See https://www.youtube.com/watch?v=S9bceJxpqG0 for concepts on this and see the series #MaterialMonday: #MaterialMonday on YouTube for specifics.
You should test feeds and speeds in a piece of scrap using the technique at: https://precisebits.com/tutorials/calibrating_feeds_n_speeds.htm
Extensive discussion at for non V endmills at: Origin/consistency of chipload recommandations
I appreciate all this but maybe my question didn’t make since. I have cut this logo on my pine board in the past and it worked fine. I bought a new bit, different brand and different cutting width. I entered this bit into cc and entered the information based on the manufacturer recommendations. I home, zero all 3 axis and start the operation. The machine moves to the location of the stars and starts operating, but its not even going down to the wood and cutting anything. I have zeroed it touching the wood, but when I run the operation it is doing it all at about 1/8" above the piece of wood I am trying to cut. I’m trying to see what I have done that is causing it not to go all the way down to the wood and actually cut the wood. I entered the angle as 30 since it is a 60 degree bit, that is correct right? Other than that I don’t know what is causing it to not go down to the wood and be cutting. Thanks
Please provide the source .c2d file, generated G-Code, notes on how you defined any custom endmills, and a step-by-step description of how you are securing your stock and setting origin relative to it and we’ll do our best to help you puzzle things out.
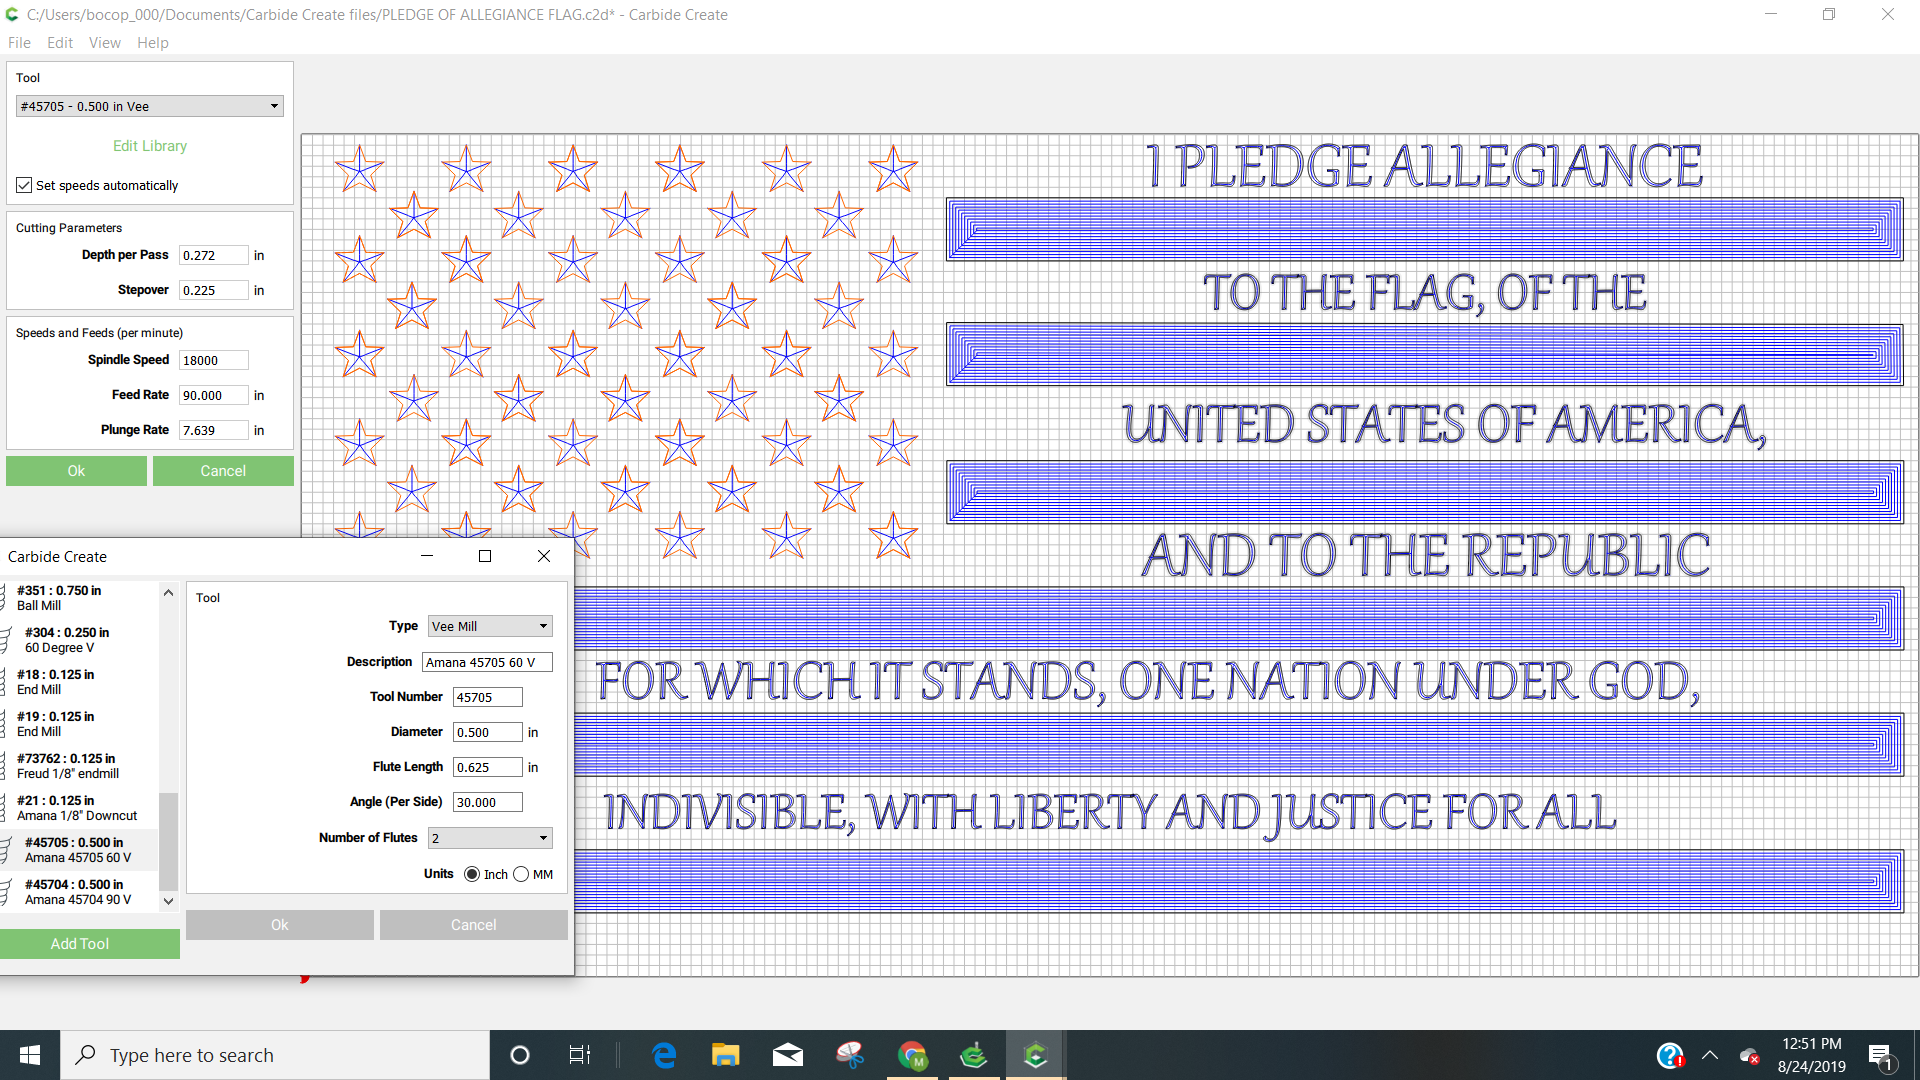
In my picture above it shows the bit and how I entered it with its values. I will attach the files. Securing the stock I am using tape and CA glue. I open CM, connect, upload the file, home, zero by moving the router and bit to lower left corner, center bit on the lower left corner, lower bit to the wood with a piece of paper under it until it just stops the paper, then I zero all three axis, done, then run.Stars and Pledge.nc (246.2 KB)
Stripes cut file.nc (10.4 KB)
Will not let me load c2d file. Says its too big
Please try zipping the .c2d
PLEDGE OF ALLEGIANCE FLAG.zip (1.5 MB)
Okay, you’re cutting the stripes with a 1/8" endmill before the V carving — reverse that order of operations.
How are you setting your zero between tool changes? Please see:
I’d suggest offsetting the path and doing a V carve to get sharp corners, then using a #201 to clear the balance — this would then allow you to do the V carving first for everything.
Just a question. Is the end_depth supposed to be .075in?
I cut the stripes earlier in the week. I took it off the machine today and painted the red and blue and then put it back on there to cut the stars and words. So the order can’t be changed and I don’t see how that matters if I zeroed everything. So as far as tool changes. The machine has sit since Tuesday when I cut the stripes, today I changed the bit, turned it back on, re zeroed and am now having this problem. So, still don’t think problem is solved. Again, i ran this same thing 2 weeks ago and the only difference was the bit used, and now this is happening.
That’s what I set the stock height to since it is 3/4" thick. Is there something else you are referring to?
How are you setting zero? If that’s not your problem, it’s mechanical.
I just noticed you have.075. I am .75 thickness. Is it the thickness you are talking about? Let me see if I set that wrong?
I do have .75, so my thickness is right. Where is end depth?
Posted that above, but I connect, home, move to my start point which is front left corner, center bit on the corner and lower bit to the wood with the paper technique between bit and wood. Set all zeroes. Same as I have done for previous projects.
The gcode you shared has the deepest part of the stars at about 9.5mm deep. If you’re setting zero correctly at the top of your workpiece and your stock isn’t warped, there must be something mechanical going on. Maybe capture a video from the moment you turn the machine on to the problem.
Check the usual suspects on the Z (stock?) axis : pulley set screws and belt tension.
Where do you see the 9.5 deep cut on the stars? When I look at the file it shows vcarve cuts with the bit. But I don’t see the 9.5mm deep. The c2d file contains the following data. Dosent that show that the end_depth cut is only .075in or 1.904 mm?
Machine: Shapeoko XXL
HEIGHT: 400.04999999999995 mm 15.75 in
WIDTH: 768.3499999999999 mm 30.25 in
MATERIAL: Soft
THICKNESS: 19.049999999999997 mm .75 in
RETRACT: 10.0076 mm .394 in
BUILD_NUM: 413
Pathname: Stripes
Tool Number: 21
Tool Diameter: 3.175
Tool Flutes: 2
Tool Length: 12.7mm .5in
Start_depth: 0mm 0in
End_Depth: -1.905mm -.075in
Stepdown: .889mm .035in
Stepover: 1.422mm .056in
Elements: 6
Pathname: Stars
Tool Number: 45705
Tool Diameter: 12.7
Tool Flutes: 2
Tool Length: 15.875mm .625in
Start_depth: 0mm 0in
End_Depth: -1.905mm -.075in
Stepdown: 6.909mm .272in
Stepover: 5.715mm .225in
Elements: 74
Pathname: Pledge
Tool Number: 45705
Tool Diameter: 12.7
Tool Flutes: 2
Tool Length: 15.875mm .625in
Start_depth: 0mm 0in
End_Depth: -1.905mm -.075in
Stepdown: 6.909mm .272in
Stepover: 5.715mm .225in
Elements: 6
Well, I saw somebody’s else posts about the same type thing and he said he tried again the next day and everything worked fine. I went out to the garage and tried again, cleared all zero and set again and it worked like a charm. I don’t know what it was. First time using this new 60 degree bit, don’t like how deep it went, I guess that’s what you are referring to in the G code? I’m gonna try the 90 degree and see how that does or maybe go back to the 1/4" wide bit I started with. But everybody I watch on line seems to be using the 60 and 90 bigger bits. So, for now it’s working. Thanks
I didn’t look at the c2d files. I just looked at the gcode. That tells me what the machine will do.
I’d assume “end Depth” is the maximum cut depth, but it doesn’t make sense on a V-carve toolpath (until Carbide Create allows a flat depth option). The V-bit will cut as deep as it needs to to fill the space. A larger angle bit will cut shallower.
You can do some math to create offsets and a flat depth by pocketing the inside.
From personal experience, I’ll tell you that you probably just forgot a step that you’ve done without issue 100 times before.