Boring vs Adaptive feeds and speeds in stainless?

I tried cutting stainless with my HDM using an adaptive toolpath cutting from the side which worked pretty well. It was slow but using IPA mist the cutter was kept cool and the surface finish was pretty good. Feeds and speeds were

1/8 Amazon 4flute ALTIN end mill. 8150 RPM, 1500mm/min, 0.127 Radial DOC, 4.3mm max step down.

I then tried to do an adaptive toolpath using the feeds and speeds to clear out a circular section in the middle of the stock. When it started to “bore”, the endmill turned red hot.
I then dropped it down to 450mm/min keeping all other settings the same, but the endmill still was getting bright red and eventually broke and got ground down to a stub.

I know my feeds and speeds are probably way wrong, but I don’t know where I should be starting. I assume that the endmill is overheating because the chips are too small and not clearing the heat? Can anyone suggest a starting point?

I also ordered some actual coolant for my mister so that should help a little too.

Here’s the video of the first adaptive toolpath:

Here’s the one where it went wrong. I tried pushing it to see what would happen but it pretty much obliterated the endmill.

There’s a couple of things immediately come to mind.

  1. I believe stainless work hardens when being machined so you need to keep a minimum chip thickness to avoid it turning into unobtainium and trashing the cutter. If you’re in Fusion there’s both the feed per tooth on the tool tab and pitch or ramp angle on the passes tab, are you going down into the hole fast enough to not work harden the bottom?
  1. When executing a bore or any similar narrow radius toolpath we have to compensate for the ‘effective feedrate’ of the outer edge of the cutter which is travelling in a circle of 1 x cutter diameter greater than the toolpath circle, in bore operations it’s pretty easy to accidentally feed the outer edge of the circle at 2-3x the feed rate you keyed in. There’s an excellent Haas video about this which was pointed out to me in this thread

Others with more experience may have a view on whether to drill first in a peck cycle to keep the hole cool.

3 Likes

Thanks for the reply, that makes a lot more sense now on why the bores for the smaller holes didn’t work out. I think I’m just going to manually drill those out.

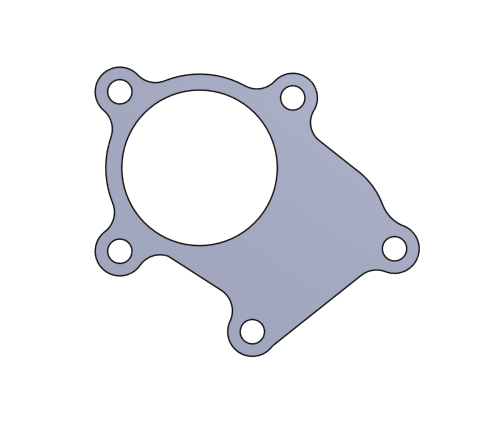
Heres the part I’m trying to cut:
image

I think I can predrill the center hole manually so that it doesn’t have to do the initial bore part of the adaptive toolpath to clear it out which should take care of that.

How should I approach doing the 2d contour around the entire part? I originally set it up to cut down layer by layer until I reached the bottom and cut out tabs, but all it seems to be doing is melting the endmill after a few passes. I could try to use the superglue and painters tape method and do an adaptive clear of all the surrounding stock, but that’s a lot of material removed

I think at this point we need somebody with experience on harder metals on the HDM. Maybe @TDA would have some insight on the feeds and speeds suitable for Stainless? Or perhaps @gmack from one of the load calculators?

Watching your videos I’m not sure if that’s the cutter or just re-cut stainless chips glowing in the cut. Steels tend to do that in the 500-800C sort of range whilst Tungsten Carbide won’t melt until nearly 3000C. At what temperature it will lose it’s edge and just start smooshing molten stainless around the slot is probably the better question. Certainly getting the cutting area that hot is not going to help with work hardening.

The cut seems to be forming long stringy goops of chips and ejecta ridges around the slot. If I was having trouble with that slot in some goopy Aluminium I’d probably do a stepover in Fusion (in a 2D contour you can do roughing passes with a stepover at each depth) which would mean that the cutter wasn’t constantly slotting.

The adaptive clearing on the edge has a fundamental advantage in chip clearance, they are just flung away by the cutter on the open side away from the workpiece.

Harvey do have some hints on feeds and speeds here Speeds and Feeds 101 - In The Loupe

I think starting your Stainless journey slotting at high RPM with a small cutter with lots of flutes and weak chip clearance may be something of a trial by fire though. Finding some toolpaths that are not full slotting (adaptive clear or widen the slot with a rouging stepover) might be a good way to start?

1 Like

I’m going to try some different feeds and speeds based on the Harvey Tool charts but also with some actual coolant and see if it works any better.
I think trying to find a way not to do a complete slot would help, considering that the stock is 3/8 thick.

1 Like

Usual preface, I’m with PreciseBits so while I try to only post general information take everything I say with the understanding that I have a bias.

Going to do my best here but have to be careful about the whole bias and marketing thing.

First here’s some critical data that we don’t have here (unless I missed it).

    Grade of stainless:
    This can change a lot in the chipload data for these tool. At a minimum stainless spans austenitic, ferritic, and martensitic (if we ignore duplex, which we are). These will change how you have to cut material as they have different hardening methods, composition, and specs (hardness, ductility, machinability, etc.).

    Tool geometry:
    4 flute AlTiN doesn’t really tell us a lot. Things like helix, rake, and relief start mattering more. Plus things like what’s it made out of. I’m going to assume a decent carbide and that we have at least decent geometry.

    Plunge method:
    I’m going to assume here that you are not straight plunging. If that’s correct, what’s your ramping angle? Without knowing the tool I’d probably stick to around 2-3°.

Okay the above aside let’s go through some of this.

My first guess would be that you lost either an edge or the tip. When that happens you have a MUCH larger surface impacting the material and generating heat in addition to basically putting runout in the bit unless all the flutes fail in the same way. Could also be from a lack of chip clearing functional causing the same thing over time. Might also be runout related as you could have some skinny cuts that way too.

They almost all harden in some way. Although, the method and number of methods change with the material.

Don’t know the color to temp for stainless. But, as soon as you hit a decent amount of yellow in mild steel you are at 1200c. Keep in mind we are almost certainly hitting higher temps than visible from the outside (especially with mist or air on it). Additionally, the failure method will first be from the cobalt binder not the carbide itself. You will probably not have any glowing by the time you are embrittling the tool due to cobalt leaching.

It should. I’d use an oil based fluid if possible as it provides more forgiveness.

So with all the unknowns here’s my quick crack at it. There’s a LOT of assumptions and picking a middle ground here. A big assumption being machine runout which is a whole other mess to tack onto this.

First I’d drop the surface speed to no more than 250SFM (7640 RPM for an 1/8"). Again, we don’t know the geometry or material so this is going to be my best middle of the road guess.

1500mm/m at 8150RPM works out to a chipload of 0.046mm (0.0018"). However, we are only taking a 0.127mm WOC so we have chip thinning (4% stepover). The real chip ends up being 0.018mm (0.00071"). This might be okay but with a generic tool and unknown material I’d probably drop this to around 0.013mm (0.0005") to start with.

If we keep the WOC of 0.127mm on an 1/8" tool we need to times our desired chipload by 2.55 to get the chipload for the feed calculation. So (feed = desired chipload * 2.55 * RPM * Number of flutes) e.g. at 7500 RPM it would be 0.013 * 2.55 * 7500 * 4 which will give us ~995mm/m.

Your stepdown I’d probably keep without knowing the tool geometry (Since it did fine on the side entry cuts). Ideally you want to keep the flutes engaged so your deflection is more consistent across the cut. However, it might be safer/better to decrease or increase it depending on the helix of the flutes.

The alternative to the above is to get rid of the chip thinning (at least a 50% stepover) and radically reduce your stepdown. This is a requirement for slotting as you no longer have any chip thinning.

Going to stop there for now. Hope that’s useful. Let me know if there’s something I can help with.

4 Likes

This topic was automatically closed 30 days after the last reply. New replies are no longer allowed.