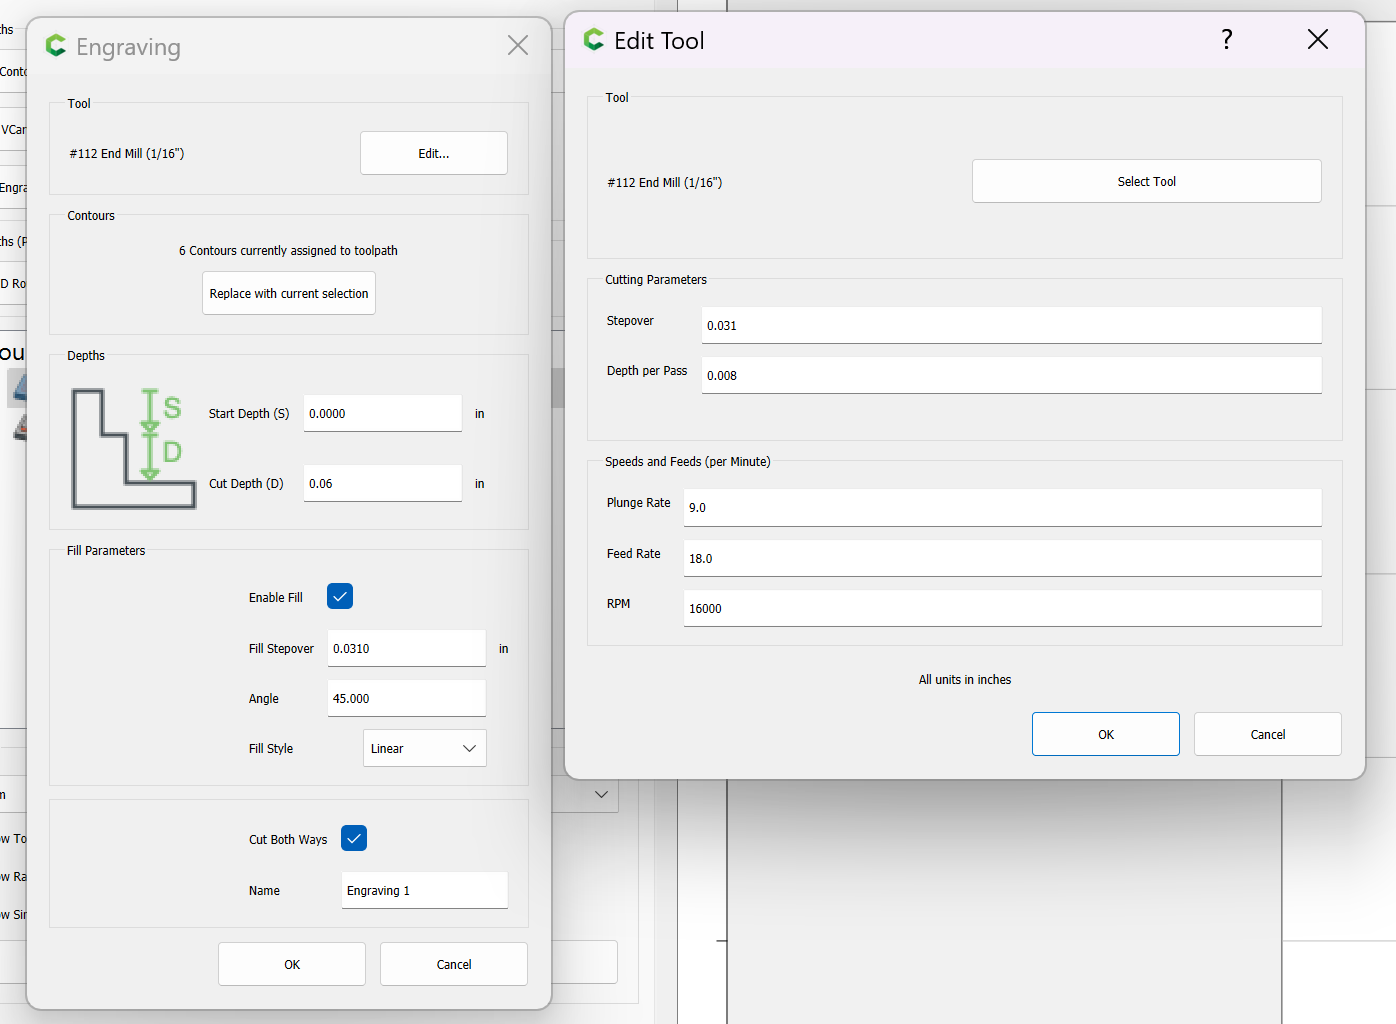
I’ve had my Shapako XXL now for about 3 years and have only ever done wood. I recently tried my luck at aluminum on a 6160 1/4 sheet doing some engraving. I used a #112 bit I purchased from Carbide 3D. I used the engraving - endmill #112 under aluminum stock feeds and speeds from the carbide pro software and the bit broke after about 2 seconds of plunging in. I used cutting tool lubricant and air to keep the cutting surface clean. I checked my zero height and location on the second time around, halved the feed rate and plunge rate hoping a more conservative approach would be ok. The second bit lasted about 2-3 minutes of cutting but then broke.
I’m open to any suggestions here but not too happy I just broke two bits, one of which was brand new and the other one maybe had 50 hours on it.
adjusting stepover so as to ensure a reasonable amount of material is being removed — I think this last is the problem in your case, and suspect @Ed.E has it aright
I see no reason why you couldn’t use an engraving path. You would need a separate path for each depth of cut, since the engraving path only makes one pass, and changing the max depth or depth of cut on the tool changes the other value to match. It also cuts ON the boundary, rather than tangent & inside, so you need to offset your boundary by the cutter radius.
It might be better to avoid plunging. Those cutter may not cut so well in the center, and once a little bit of aluminum melts & starts to jam up the flute, it keep rubbing & getting worse.
Try a path with ramping, or starting outside the material if possible.
Are you saying that if I utilize the engrave feature with aluminum and I was doing lettering (which is the application I was doing), the engrave feature doesn’t allow the router bit to retract up after finishing a letter before moving to the next? I could have sworn I’ve done lettering on wood with the engrave toolpath without issue. Or are you saying when I put my depth of cut at .06in it’s not going to do the .008in depth per pass, it’s going to immediately plunge in to .06? I suppose that would explain why the bit wouldn’t last very long. I was under the impression the engrave did passes to get to depth, but I never really did it that much wood to pay attention to that.
No gauling, clean snap of the bit right above the flute. Cleanly sheered on both right above the flue area. Didn’t take any pictures just chucked it without doing much inspection. I’m attempting to carve letters in aluminum here and get them deep enough to hold some epoxy in them. Pocket doesn’t work, my letters are too small. I have the font height at .5in, even if I increase to 1 inch, pocket still doesn’t work well. Contour makes the letters slop together and isn’t crisp on the simulation. Engrave tends to look the best with the cleanest letters but I run into this breaking bit problem.
I don’t have one but that was my next move to try and get one of those, it does a crisper version of the lettering when I simulate it, and I figured there was less chance of that snapping too based on it’s profile.
Aluminum stumps people because many think that because it is a soft metal, they can blast thru it really fast and not have an issue at all. All it takes is one little mishap and the tool will go bonkers and cut funny, leave nasty buildup, or break altogether. Aluminum gets hot fast but also can dissipate heat fast. If a really small endmill metals even the slights bit of that aluminum during a cut, it will add to an issue, which leads to tool breakage.
Contour cuts could work well as long as the cut width is not bigger then the total diameter of the tool being used. Also, cutting direct line with no offset would have the endmill cutting directly down the line you have made for each letter.
Keeping the endmill cool during a cut is the biggest key to running aluminum. Slow down your feed rate and decrease the depth of cut per pass would also help. Engraving only runs one pass and it sounds like you are overloading the little endmill by cutting too much at too fast in feed.
Aluminum and stainless steel are the two main metals I cut at the machine shop. Both types can be deceptive, but yet, I have ran drills thru stainless and cut many holes before having to resharpen the drill bit. I have also manually fed fast thru aluminum, or had to reduce feeds so much that I was like cutting stainless. It all depends on the composite of the material and the tool life.
Whilst increasing stepover will increase spindle load because the cutting edge is engaged for longer, bear in mind that most people use the term chipload to mean feed-per-tooth and stepover does not affect that. This could be confusing to beginners.