Community challenge #18: Unusual stock (closed)

Maybe this will help?

https://www.oreillyauto.com/flux-500.html

You may have to check the box to receive notification as to when it is back in stock.

1 Like

Ooooh…Caddyshack references!!! Nice!

1 Like

And Back to the Future!

1 Like

First project to sort of test the waters, as it were. I’ve wanted to do stone/marble something for a while. I know soap stone exists, and a few people have done that, but it’s soft…and also already been done.
So we have a family friend who had a dog pass not too long ago, and figured this would be a pretty neat/unique thing to give them. I went to Lowes and grabbed this marble tile piece for like $4, got a dog bone shape online, and did some fancy looking text for the dog’s name.

Here’s what I started with:


Using these tools (That I apparently got from amazon like 3 years ago https://smile.amazon.com/gp/product/B01NABXF9V/ref=ppx_yo_dt_b_search_asin_title?ie=UTF8&psc=1):

At first I was doing the vcarve on the text. Also was going to vacuum the dust:

Vacuum dust worked okay, but the bit was cutting terribly. Eventually I swapped over to the using a pipette to drop water in.

Things got SUPER MESSY


Still though, concept worked (mostly) and I got some decent brownie points from the wife which is always important. I’m going to take the machine apart and clean it (it needed it anyways), and then make a wasteboard thingie that I can submerge a part in for the next project. Main lesson learned here was water makes things go way smoother. Was running at ~30% aluminium speeds without water and the machine didn’t like it too much. With water it was comfortable at ~140% speed and didn’t sound awful. Neat thing with the water was that I could feed water infront of or behind the cut and the water would run towards the bit.

15 Likes

Marble! Great way to kickstart the challenge.
It seems like flooding/underwater milling is definitely the way to go for milling hard stone.
Last year we had a cool thread about milling concrete, the discussion starts around here. And surprisingly (for me), with diamond grit tools and lots of water, it does work. Which you have just proven again :+1:

6 Likes

Hi all,

it’s probably due to the fact that I’m German, but after producing wood chips when using the shapeoko for almost a year - that go to waste - this challenge opened my eyes: Potato chips are the better alternative.

Get a 6mm slice of a local potato.

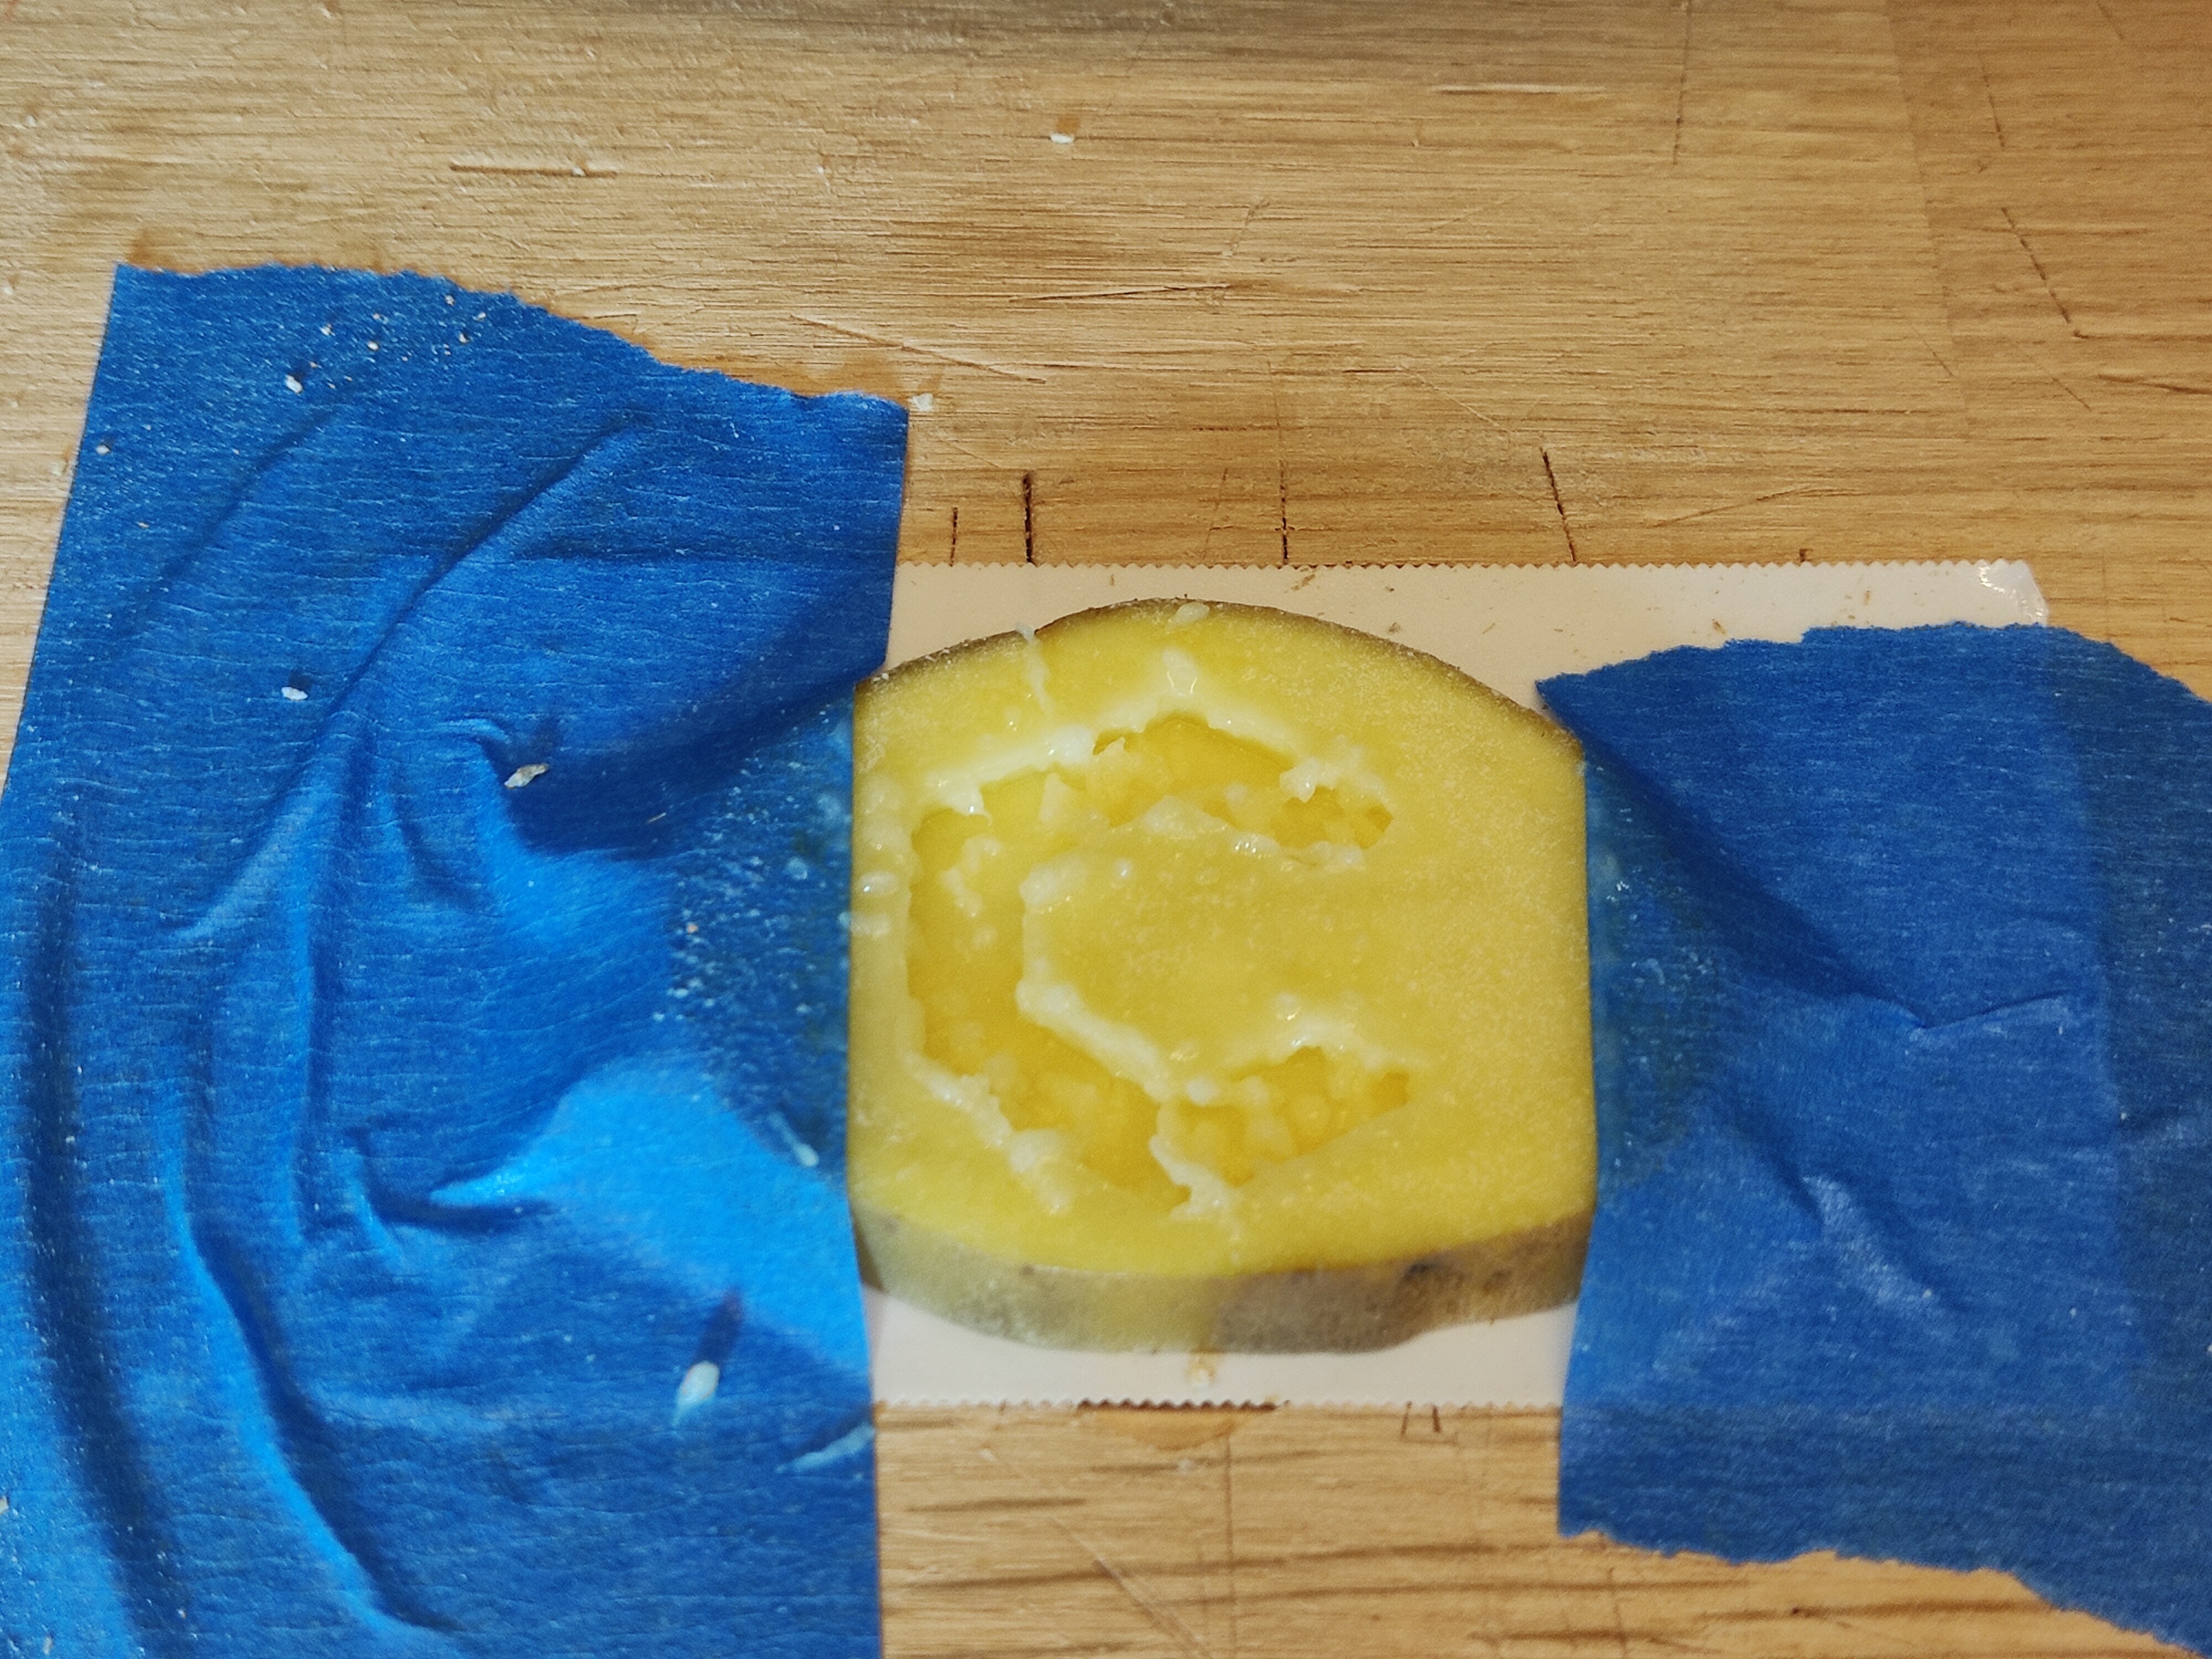
Engrave the Carbide logo with a 3mm end mill at a feedrate of 500mm/m and 14k RPM.

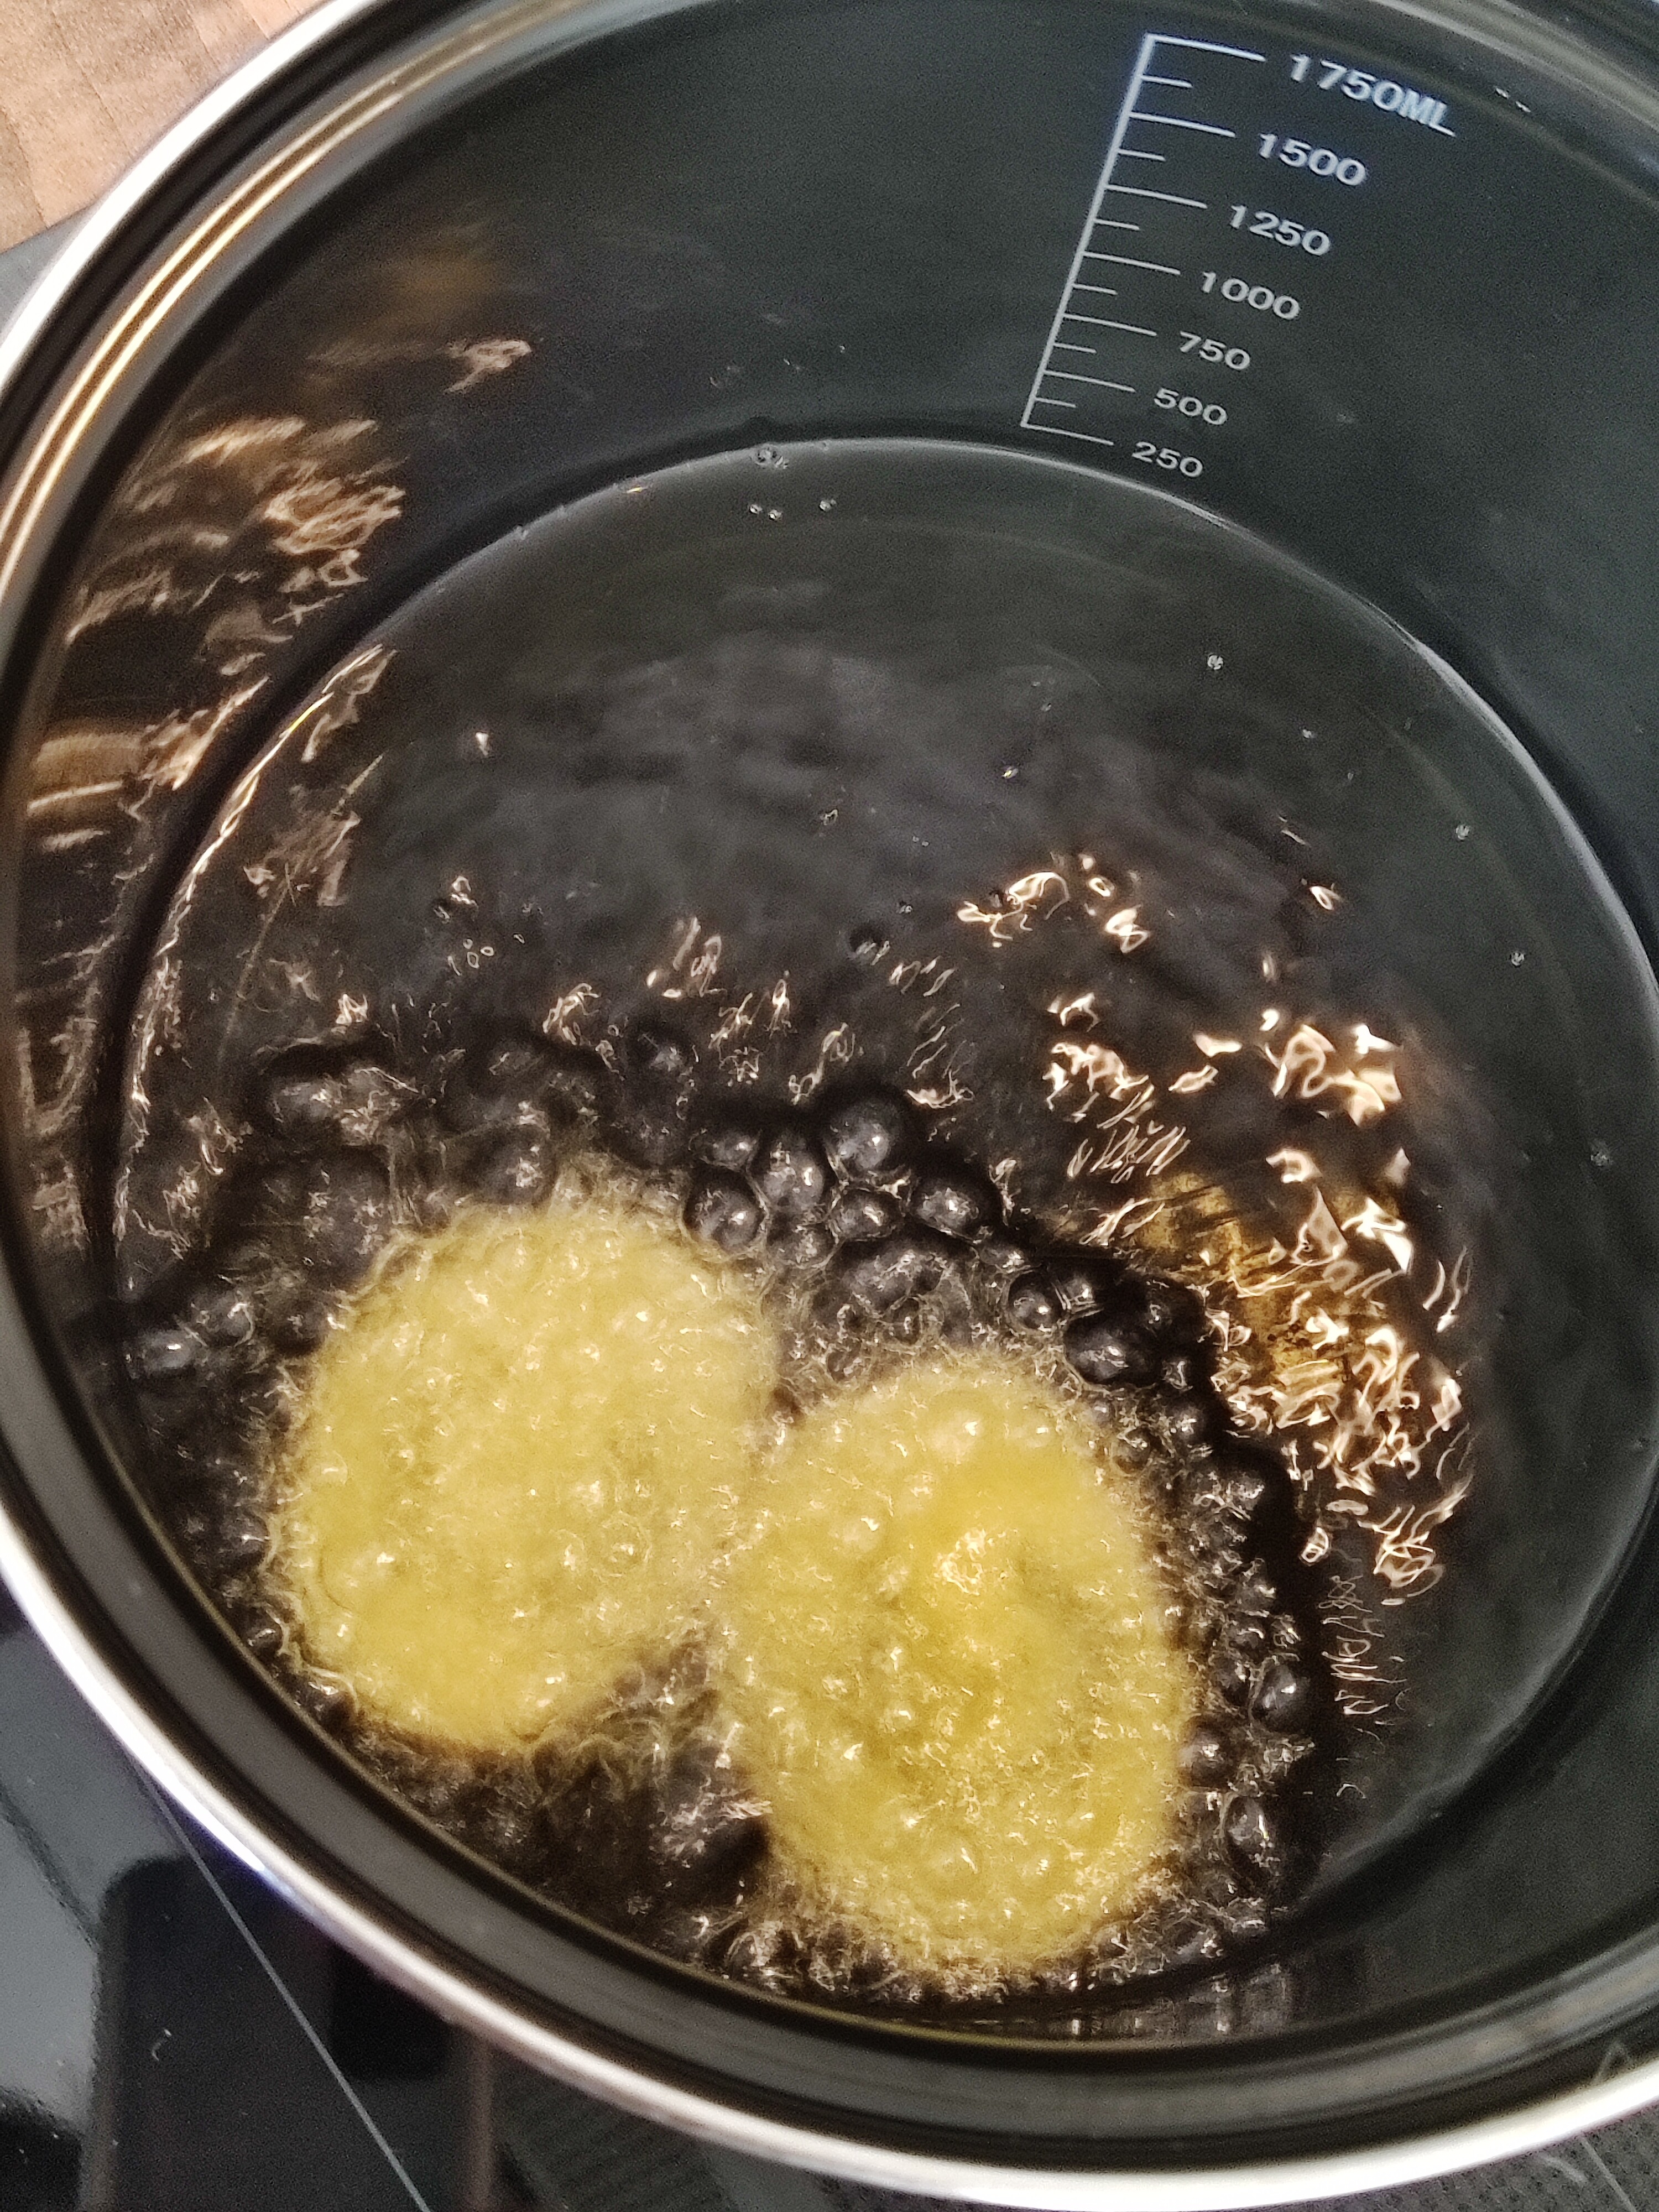
After rinsing thoroughly, put the chips in garlic-rosmary oil and fry for about a minute.

Apply salt and pepper.

Guten Appetit!
potato.c2d (2.9 MB)

25 Likes

That potato chip entry made my day :+1:
Also, thank you for proving that blue tape is the universal workholding strategy!

7 Likes

Potato feeds and speeds, food safe oil, workholding - this post has it all!

9 Likes

Hahahaha! I had been joking about doing this a few months ago. I’m glad you actually did it.

2 Likes

Oh hey. Not sure if anyone is looking for inspiration, but bantam tools podcast had someone on from project called Materiom. Might be something usable on their space.
website: https://materiom.org/
podcast episode: The Edge Podcast — The Edge Podcast, Liz Corbin: Expanding Our Materials Library

1 Like

Might as well just stop right now and send me the prizes. My stock? Air. I cut air all the time on my XXL. Not only that, I can cut the most complex shapes, even the bottom and overhangs without damaging the surface. You don’t need photos. Just hold out your hand and look at what you’re holding. Air. If you don’t like my air project, how about my stock being wasteboard? I’m always cutting into it by accident. It has the scars of many projects where Z was set wrong or even forgotten to be set after a bit change.

If nothing else, these two deserve recognition because of how universal they are. Any design or GCode file can be used and they will work on any machine using any software.

8 Likes

It’s probably a little too vague for this competition. For specifics, I specialize in cutting air guitar and air drums.

On second thought…You know, you could always actually submit an air cut but play music through the steppers…

1 Like

:joy:⠀⠀⠀⠀⠀⠀⠀⠀⠀⠀⠀⠀⠀⠀⠀

1 Like

In that case I have you beat. I regularly make dumb mistakes and cut into what should be my final piece:

Anyone need a tool holder with a lovely gouge out of the corner?

In this piece I “purposefully” left off the tabs from the contour cutout in order to make this organic notch in the corner.

Should go without saying this is not an actual submission. lol

2 Likes

Air is self-healing if you make a mistake, so there’s that feature, too.

5 Likes

Sounds like I’m going to need a machine with a LOT more Z travel to cut some really long hip waders…

2 Likes

When that happens to me, I just fill in the scars…with air.

2 Likes

If you guys are playing air instruments you gotta post videos:
Also relevant link:

3 Likes

You must be a ‘glass is always full’ kind of guy…full of air?

I’ve had my Nomad for a few years now, but was never active on the forums (even had to make an account to post this). Yet, while browsing for feeds and speeds a few weeks ago I noticed we have competitions, and who can resist those? That being said, my unusual stock are Secrid Wallets (they’re technically made of aluminium but no one ever said anything about unusual materials).

This project nucleated as a side effect of my at times inconvenient love for minimalism. Specifically, after having meticulously minimised the contents of my pockets to my phone and a Secrid Cardprotector as a wallet, I began to look for ways to expand the wallet’s functionality.

A standard Secrid Wallet
The best thing I could think of at the time was to stick a Tile item tracker on top and call it a day. This solution worked for about a year until the gen 1 slim tracker I had used died. To my dismay, I found out that flavour of tracker wasn’t being produced anymore, and its replacement was far too large to sit on the outside of the wallet. So I opted for the smaller, yet thicker, Tile Mate. However, having stuck it onto the wallet, the fat sides kept the thing getting stuck on my pocket, and it was too thick to comfortably keep in there for longer periods of time. So as the old saying goes: I can fix it, I have the technology! Having cracked open the tile, I saw it consisted of only three components: the main board, a button cell battery and a piezo beeper, so all I had to do was reverse-engineer the housing (which sadly no one on the internet had done for me yet) and integrate it into the outside of my wallet. With that done, I made a new design for the upper housing which would blend into the wallet, and then incorporate the lower housing into the wallet itself, reducing the thickness of the whole package.
The design for the upper housing.
The shape that needs to be cut into the wallet.
Since the walls of the wallet were only 1mm thick, I knew I didn’t have a whole lot of room to play with, so the deepest point of the relief was .8mm under the surface. This now meant I had to fixture the wallet accurately to tenths of a millimetre or risk piercing through the outer wall. So I instead decided to start machining the housing that would go on top of the wallet, to then be able to perfect the fit between the housing and the wallet by incrementally removing a bit of material while the wallet is still fixtured. The key to the whole operation was a 200x200x10mm piece of pre-ground aluminium, which basically served as a temporary wasteboard and fixturing plate. I started by machining the outside of the housing, and then machined its negative into the aluminium as a fixture and stuck the piece from op 1 down with hot glue. This then meant I could start op 2 from a known reference point and was able to recycle my coordinate system. To facilitate this I constructed the fixture to have the housing sit on the rounded sides, which meant I could offset the flat face a few millimetres down to leave space for the hot glue to expand when pushed down on, without getting on the reference faces but still providing the necessary adhesion. The whole thing went down without a hitch, except that fusion wasn’t playing along and generated the finishing scallop for op1 with half the cut starting from the top and moving down, and the other half starting from the bottom and moving up. As a result, half the housing is matte and the other is shiny, which isn’t a great look but the effort required to redo was too great at this point. Other than that the housing came out great:
You can see the shiny edge go matte.

All the components fit as expected, only the battery needed to be insulated a little so it wouldn’t short through the conductive case. Next, it was time to actually modify the wallet. To start I cut a fixture into the aluminium plate (took 4 hours!), and shaved it down using negative stock to leave and repeated test fits to reach the amount of play I wanted. Finally, I put the wallet in place, applied plenty of hot glue and let her rip.
ezgif-2-063d518cc220
I used my standard adaptive recipe for the cut, which in retrospect was too aggressive for the 1mm thick wallet, but any chatter marks were removed by the final contour cuts and overall the wallet cut way better than expected and left perfectly crisp edges.

With the board fitted, all that was left to do was to glue in the upper housing.


Overall, the project was a huge success: the thickness of the protrusion has been almost halved, the whole thing slides into my pocket without a problem and although there are some problems with finish, the tolerances are so tight you can hardly feel the transition between wallet and housing with your fingernail.

It was also a huge learning experience for me, not only because it’s the first time I ever successfully performed two sided machining. My main takeaways are:

  • Fixturing is key. For high levels of precision it is best to make a custom fixture for your part, and then have the operation the fixture is required for, use the same coordinate system as the operation which created the fixture. This eliminates any error introduced by jogging the machine to a new origin.
  • Pre-ground aluminium is the absolute best. It is hardy more expensive than the cast kind and makes your life 10x easier. You can do away with any facing ops while still being sure your cutter isn’t going to experience material before it is supposed to.
  • Getting the best fit is easiest if you just do a bunch of test cuts into waste material and slowly inch towards your desired tolerance.


This is what my aluminium plate looked like after the whole ordeal.

After that success, I wanted to do more! Given the length of this post, however, they will be described in less detail.

First, I like triangles (who doesn’t?) so I ordered a black wallet and cut a triangular tessellation into it, which produced great contrast as the bare aluminium really catches the light.


I started with an 1/8in cutter to rough out the centre of the triangles, and then a 1/32in cutter to do the corners. Sadly, it seems my 1/32in cutters were a little dull as they produced a noticeable burr where they cut. Here the main takeaway was to use the NC Pattern feature in fusion, so I could copy the tool path for one row, and wouldn’t have to select over 100 triangles individually.

My final wallet related project stems from my recent purchase of the new iPhone, and a following infatuation with MagSafe (the new kind that lets you stick things to the back of your phone) or rather the lack of proper accessories that use it. So I went on aliexpress and found a seller that just offered plain magnet arrays that could interface with the new phones. Even though the number of misspelt words on the listing outnumbered those that weren’t, the magnets worked perfectly. So my plan was to embed them in an acrylic housing, which can then in turn be embedded into one of these wallets. Using the fixtures I had made previously, and one new one to produce the acrylic housing, I mostly repeated the steps for the Tile wallet. Here’s the result:


Although it looks alright and works fine (my phone is taking these pictures so you’re going to have to trust that it sticks to it), it is the final product I am the least happy with for a number of reasons:

  • This particular wallet was not as level as the other ones, which means the acrylic ring protrudes on one side.
  • Acrylic was not a good choice of housing material, as I had to cut it to .3mm thick at the thinnest point (the material covering the magnets), since going any thinner would not have been wise given how brittle acrylic is. This meant I had to cut deeper into the wallet than I would otherwise have needed, and the magnetic attraction is diminished since the acrylic is separating the phone from the magnets more than is necessary. On top of that it scratches super easily, which quickly makes the glossy look fade.
  • At this thickness the acrylic becomes translucent enough for you to see the air bubbles in the adhesive used to stick the magnets down, which I find very unappealing.

Perhaps I will retry this particular project in the future, but use some sort of vinyl to cover the magnets.

If there is anything competition wise I forgot to include, or this post should be chopped up into three smaller ones, please let me know.

TL;DR:

I modified three wallets:
one has an embedded tile tracker, one has a triangle pattern cut into it (for weight savings I guess) and the last one has MagSafe magnets embedded in it so it can attach to my phone.

19 Likes