Community challenge #28: Return of challenges

Contests are back!
Community challenges were always a great way to see the creativity of the community. For me they’ve been great sources for inspiration, and also to show what people can do with the machines when I’m talking to either a new user, or someone who isn’t really familiar with CNC.

The theme for challenge #28 will be: “ Map/topography features ”.

You could do a topographical feature, a giant map, a compass sign, whatever! As long as it relates somewhat loosely to the idea of map or topography features. Get creative!

Go check out what people did in the previous map contest for inspiration (and other contests!): Community challenge #17: Maps (closed)

I just finished this project that I had a few issues with, but the person who got it was super happy.

I wish I had paid a bit more attention and some of the canyon didn’t get cut off on the bottom left. Also I should’ve used a deeper height value so that the canyon would be more pronounced. That would’ve increased machining time, but I’m not super concerned about that usually. Also I think I finished with a 1/8 ball, but should’ve maybe considered using a 1/16th instead.

Anyway, I can’t wait to see what you all come up with. Here are the Rules:

  • submit your entry in this thread
  • you can post multiple entries if you want
  • you must use your Shapeoko or Nomad
  • post pictures of the project and tell us about the process, the mistakes, lessons learned, etc.
  • include the design file. (I find this to be helpful for newer users).
  • Using inlay or tiling will give you +2 points to your vote count (limit one per project, so you don’t get +4 points for using tiling and inlay. Though I’d be impressed.)
  • Winner will be decided by voting. Jury prize will be decided by the Carbide 3d team.

Timeline:

  • Deadline is set to May 12th 2023, midnight PST
  • there will then be 7 days for voting.
    • voting will be open to legit community members only, and the jury reserves the right to remove votes from “outsiders”, and will also break any tie.

Here are the prizes for this Challenge:

  • First place: Josh’s cutter pack + set of Tiger claw clamps + Carbide Create Pro for a year
  • Second place: Josh’s cutter pack + Carbide Create Pro for a year
  • Jury prize: Josh’s cutter pack + Carbide Create Pro for a year
    We’ll likely include some Carbide3d swag for each winner as well.

Josh’s cutter pack includes:
#251 1/4 inch Downcut flat cutter
#201 1/4 inch flat cutter
#101 1/8 inch ball cutter
#111 1/16 inch ball cutter
#301 90° V-bit cutter
McEtcher

I may make edits, so check back occasionally. Good luck machining!

24 Likes

Do we have to use Carbide Create?

I don’t see any issues with using some other design software.
Give us a how you did it write up though if you use something else.

I should also note that you can get a free trial of carbide create Pro: Carbide Create Pro

1 Like

Here are some potentially useful/helpful resources:

https://elements.carbide3d.com/category/united_states_outlines/

https://elements.carbide3d.com/category/united_kingdom/uk_map_detailed.svg/

http://jthatch.com/Terrain2STL/

Also, in case someone wants to do Hawai’i (which is too large to be grabbed in a single go last I checked):

4 Likes

Here’s a previous project of mine - Hornby Island, BC, where my wife grew up.

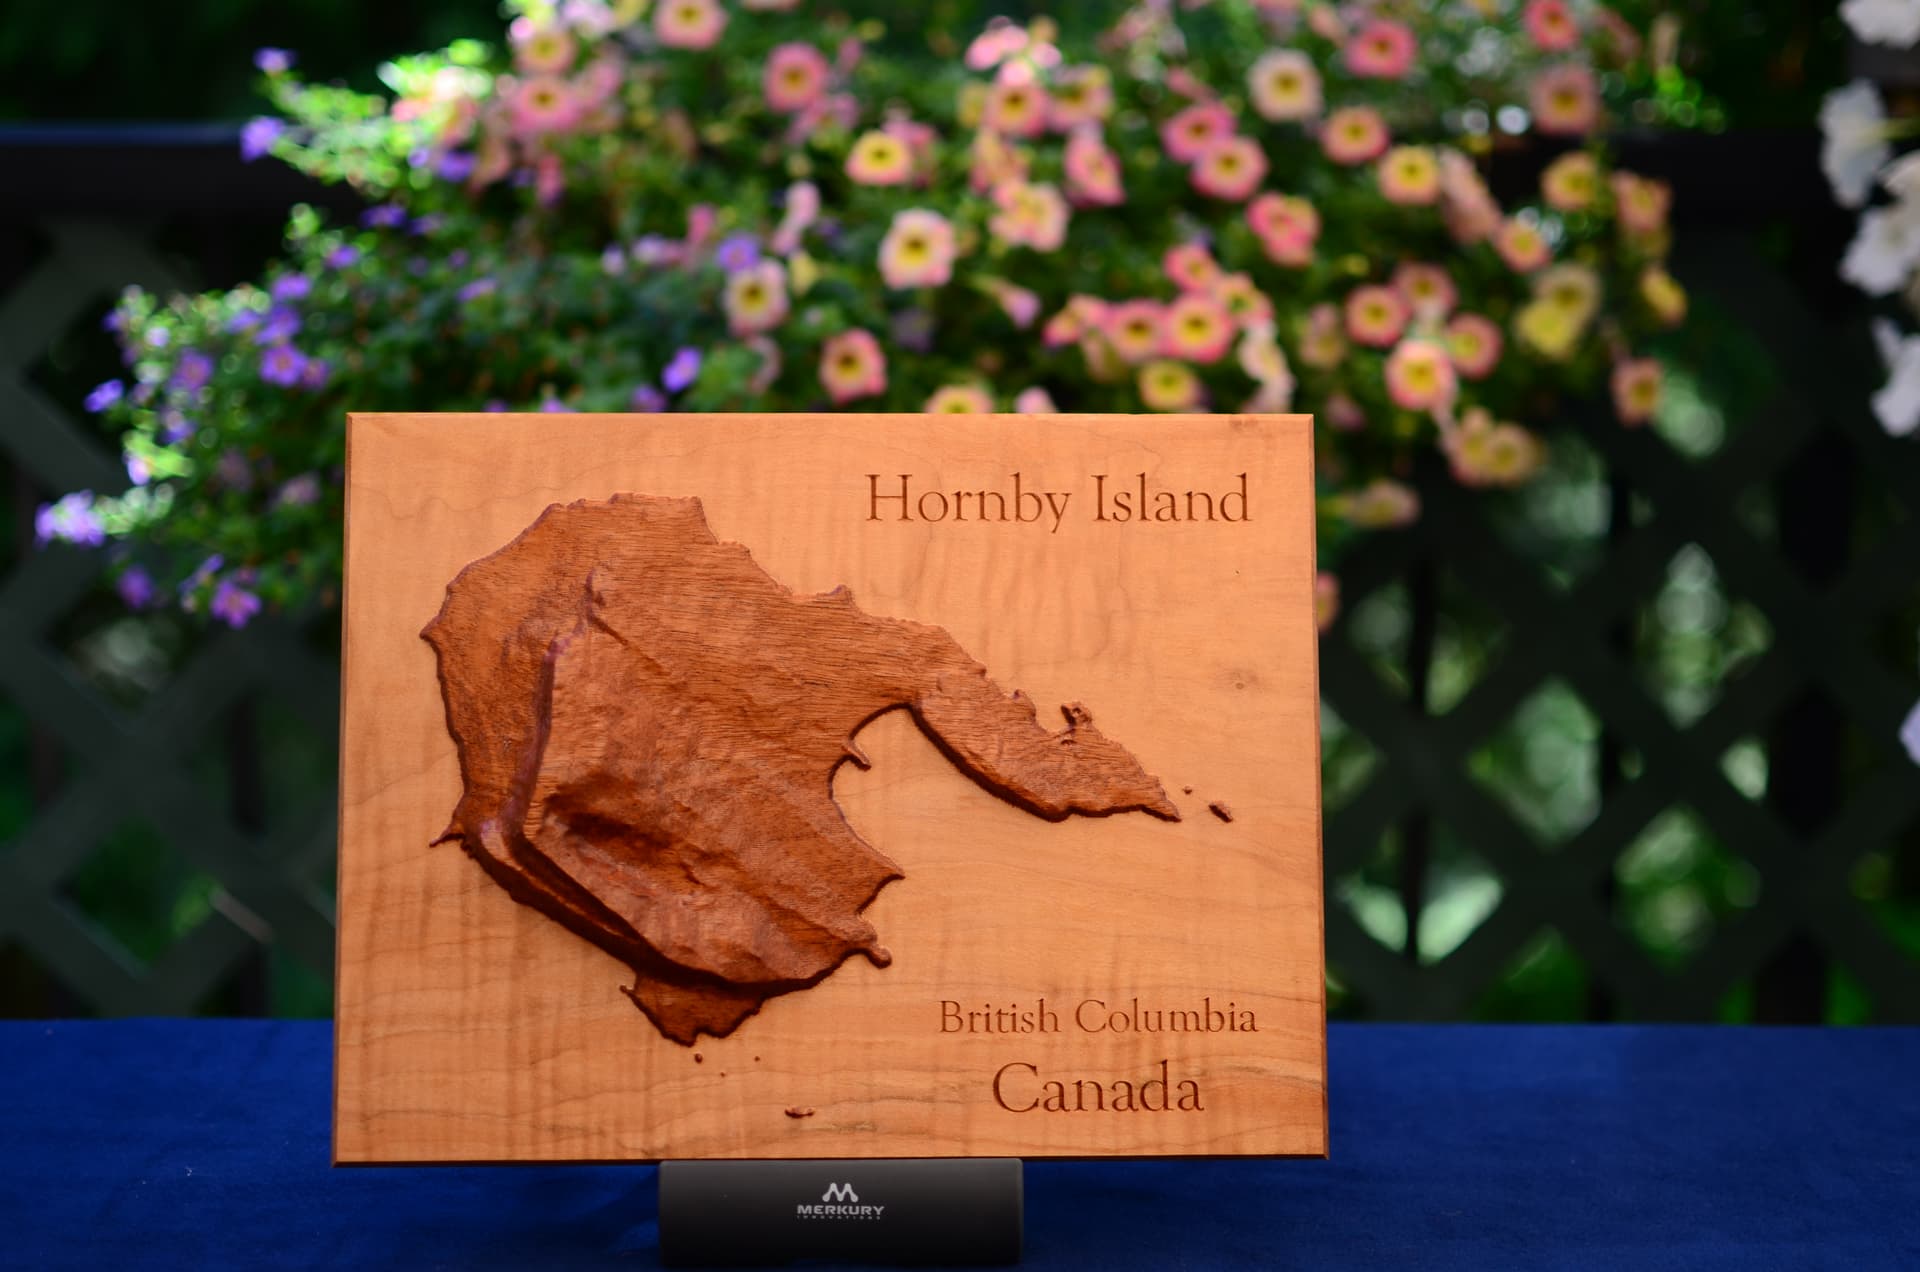
I made up a blank from two different kinds of woods - a mahogany-like wood on top, and a figured maple for the bottom. Then I set up the cut so that ocean level would just reveal the figured wood as the ocean.

All work on a S3 XL, lettering from CC, topography from ‘Touch Terrain’, the 3D paths generated from the ‘STL2NC’ web-page. No 3D modeling program used!

There’s really no design file for this project except for the lettering - the STL was directly converted to GCode.

I did a second one as well, but it failed - as the cut progressed, the wood warped so that the bottom layer wasn’t flat enough to look good as an ‘ocean’.

There’s a few more pcitures here:
https://www.facebook.com/media/set/?set=a.10158155826243457&type=3

13 Likes

Well there goes my weekend(s). Love the community challenges, stoked to see them come back :slight_smile:

7 Likes

Here is a slightly simpler topo map, this time of North Carolina. For this project, by far the most time consuming portion was finding / creating a good definition file for the outline of the state!

I started with an outline that was perhaps too detailed (particularly along the coast), then pulled it into Google Earth to simplify and export as a KML file.

Once I had that, I again used Touch Terrain to generate an STL, and STL2NC to generate the GCode. A simple CC design for the lettering finished it off.

6 Likes

Looking forward to this, now I have something to do on my shapeoko.

4 Likes

Just a couple weeks ago my wife was asking when these contests were coming back. She loves seeing what everyone else makes as well. This category is the perfect excuse to finally get around to milling some topographic ideas I have had on the back burner for a while now.

Looking forward to seeing some great projects!

2 Likes

Awesome! I happen to be in the middle of this exact type of project! Exciting stuff, glad to see challenges back! I am in!

Here is the link to my ongoing entry.

Community Challenge 28 Entry- Matching Topo Table Tops - Gallery - Carbide 3D Community Site

Hopefully something contained in there will help someone else entering this challenge. The topos are some of my favorite things to do. This one, clearly shows I am no woodworker. Hopefully time allows me to complete these before the end of the challenge.

3 Likes

Dumb question: tiling is gluing a ton of plates to create topography?

Toolpath tiling is a new(ish) feature in Carbide Create. It is generally used when machining a project that exceeds the available workspace on the machine by using fixed reference points to allow you to move the workpiece. I am new to it… still haven’t wrapped my head around it. Most people here could give a better description than that.

Screenshot 2023-04-22 180257

1 Like

Awesome. I’ve done that manually before. Is that in free CC or only pro?

Pro only. Haven’t used it yet but think ill test it tomorrow just to see how it does.

I hope to be able to participate in the contest, but I understand if I do not complete the project in time. I had surgery 2 weeks ago and am in the process of the 6+ week healing for a broken ankle. It has been rather difficult to get around the shop easily to build any projects with only walking on one leg. :frowning: This is all I have on it at the time and not sure when I will actually get it done under the current circumstance.

  • Tucson, AZ

I am working on a project for a customer that lives on Lake Texoma. The plan is to take a 18"x24"x1/2" sheet of plywood, engrave it at 0.1, paint the lake blue and paint everything else white or black, then frame it out with some hardwood trim (dark walnut something with some dark accents). I am thinking of adding some extra depth to the center of the lake with another pocket at 0.2" then painted with a darker blue.

I accept constitutive criticism well and treat it as a learning opportunity. I welcome the advice as I am still learning this trade.


Lake Texoma picture.c2d (743.2 KB)

8 Likes

Love it. Some blue epoxy works great in these as well! Get well… important to keep moving and take rehab serious. Get after it!

1 Like

Oh that’s a great idea! I’ve been wanting to try some colored epoxy.

You may lose the depth variation using epoxy unless you use a semi transparent pour or do multiple pours with the shallow first and the carve and pour the deeper. That may have too much of a defined edge to look natural.

If the color difference isn’t important to you then just cut it all the same depth and save some epoxy.

I have only begun my epoxy adventure so maybe there are other techniques to achieve the desired result.

2 Likes