On behalf of @Radiation for community challenge 28: let’s vote!
(gentle reminder: legit forum members only / friends don’t ask friends to create fake accounts to vote)
Guys these are some great projects. They show a lot of detail and patience. I personally learned some things I didn’t know how to do, or had never done before. Well done all.
that’s some high praise Michael. Is there something I can clarify for you. I didnt want to leave anything out but I also did the write up very late.
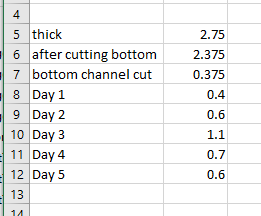
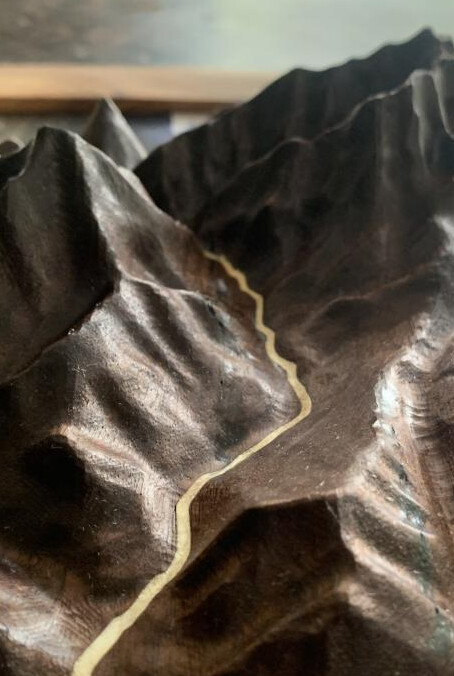
I think my favorite part of this project was physically looking through the scale representation of the peaks and valleys and seeing the elevation gains for each days paths. For example day 3 where we went through the pass was nearly three times the depth of cut as the first day for the path inlay. and I remember a hill on day one that made me second guess the idea of that hike. (In the end it was a wonderful experience, 4 nights in camping hammocks and eating food out of a bag)
Im still blown away.
I have questions but they are all due to my inexperience.
The path, how does the bit get into that position? Is it a longer bit? Did you have to remove the vac attachment?
I wont ask too much as im currently using the free version of cc so im not even sure what the capabilities are in Pro. I assume i would need pro to get into the mountain ‘depths’ and ‘wave’ style movement across the stock.
Whatever it is, its exciting to see that the machine is fully capable, so nothing should stop me from getting to that point with enough hard effort. Thats the inspiring part; i can see myself with your talent. Tricky part is, once you obtain that talent, reminding yourself you have talent. This is getting deeper then your path haha
because the block was nearly 3" thick, I had to use exclusively long reach endmills. the path was done from the back, so the stock was flipped over and the careful use of material holding to maintain the zero point, the path vectors were also flipped the same way. A little unconventional but it worked out.
and yes, I had to remove the vacuum boot attachment, it was a lot of manual vacuum work from time to time. the shop is still a mess though.
I had a lot of fun doing this project. First my computer died and I gave up doing the project. At 6 AM on the 12th I decided to try and fix my computer which amazingly I did. I worked solidly from 7 AM in the morning to 2:30 AM Eastern standard time on the 13th. That left me 30 minutes to upload the project. So I’m just glad I got to submit something.
What was really fun was trying to reduce a three hour cut cycle down to two hours. I literally sat there and change the feed read to cut faster on the non-delicate cuts and slowed down on the tricky parts.
Even more fun what is the 12 hour cure time on the epoxy? I got that down to three hours by making a hotbox that was 120°.
I put a pencil tip on the center of the A’s and e’s during the cut, to keep them from breaking
I burnt my hand three times doing the LED wiring on the back
And yes, I did have fun. Nothing like having a little sawdust in your food while you eat. Good fiber.
Resin makes for some long coffee breaks haha
It looks great, the effort is visible, people who know, know the time its takes
The next challenge ill be looking out for you !
Hmm. Bake some coasters in the oven to speed cure time?
I probably can’t get the oven low enough. I could put some in the grill with the gas turned off. Just having the lid down in South Ga should keep it nice an toasty. Is there a risk of curing too fast?
The smell from the off gasses VOC is not a thing you want in your house. It would, in my mind be comparable to putting fresh paint in the oven to cure. In theory its correct.
If you dont get into much resin and want a quick DIY, use a heating pad and place it under your project (coasters). Then cover them. A couple things resin likes when curing is heat and air movement. Not too much heat as the resin is undergoing a reaction that causes heat anyway, so using that heat by covering is helpful. But also a little air mixture is beneficial. A fan on low (resin will flow with a fan on high and potentially make a flat surface ‘tilted’ or wavy).
In my experience try to harbour the heat the best you can while still allowing a little air flow.
There is also, using a vacuum chamber, but that may be more then anyone wants to get into if resin isnt your thing.
Used a space heater, and some 2 inch foam board to make a kind of box. It worked well.
I have a camera watching it, so I can still work in another room. Lots of sawdust around. I also have a fire extinguisher in my shop.
I am going to try the vacuum thing. I “borrowed” my wife’s old pressure cooker pot. I’m going to try and stabilize some 6 inch oak cookies. I will put polyurethane in the pot with the cookie and pull vacuum with my AC vacuum pump. May go back-and-forth between adding pressure and vacuum a few times.
Only because im huge on safety…sometimes outward pressure and inward pressures on certain vessels can differ from eachother. May take great pressure pushing out, may not be designed to be imploded.
Stay safe
The Earth on this project was finished with 200ml of clear resin out of a pot at -30 InHg.
Just know that you need a lot of extra room for the resin to boil. A 250ml cup of 200ml resin will end up boiling over. Also, if you pull the resin out during the boil, you can capture some cool effets with lots of bubbles. The Moon in this pic, i used boiling resin because i wanted the rough effect it can cause and air bubble craters.
+1 for the plywood layers on Mt Roger. There were a few other really good ones, but my step-dad was stationed on Antarctica (McMurdo Station) a few different times (when he worked for Antarctica Support Associates & later Raytheon), so Antarctica for the win