I’ve added to my post a link that contains the original raster image, vectorized image, and the two VCarve project files.
5 Likes
That is gorgeous!!! That is one neat pattern.
2 Likes
I do wish that everyone’s submissions were uploaded to this forum/thread, because these linked files will undoubtedly disappear one day sooner than the forum files.
Brad, you found my scaredycat point with all those triangles just waiting for the last one cut to pop off and you had to start all over! 
1 Like
I tried to add it to the post, but the vectric files are not allowed as an attachment file type.
I had the same fears @CrookedWoodTex which is why I took a very shallow depth of cut and conservative speeds and feeds.
1 Like
You should be able to zip and add them.
1 Like
Really enjoying these contests and the creativity and talent that folks are gifted with!
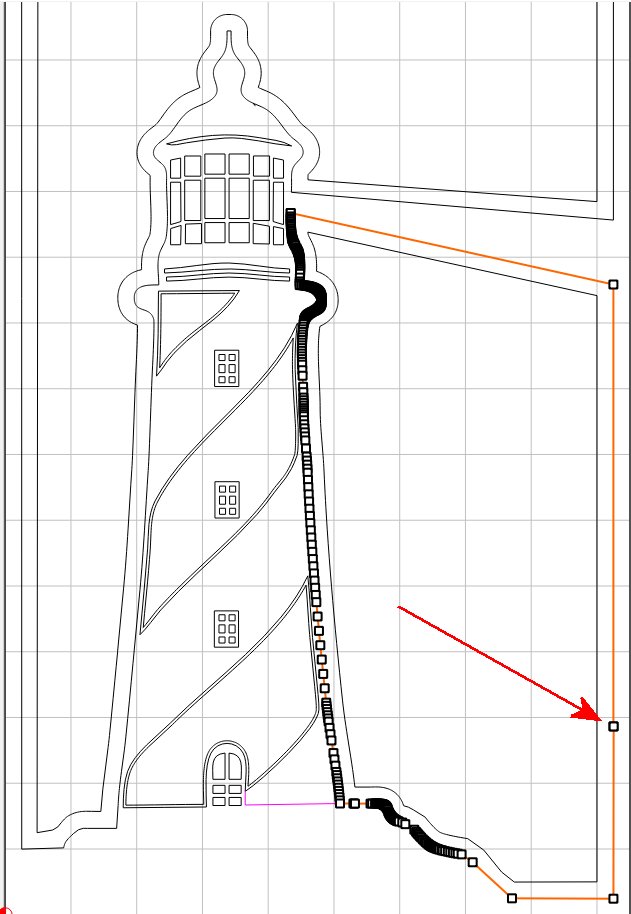
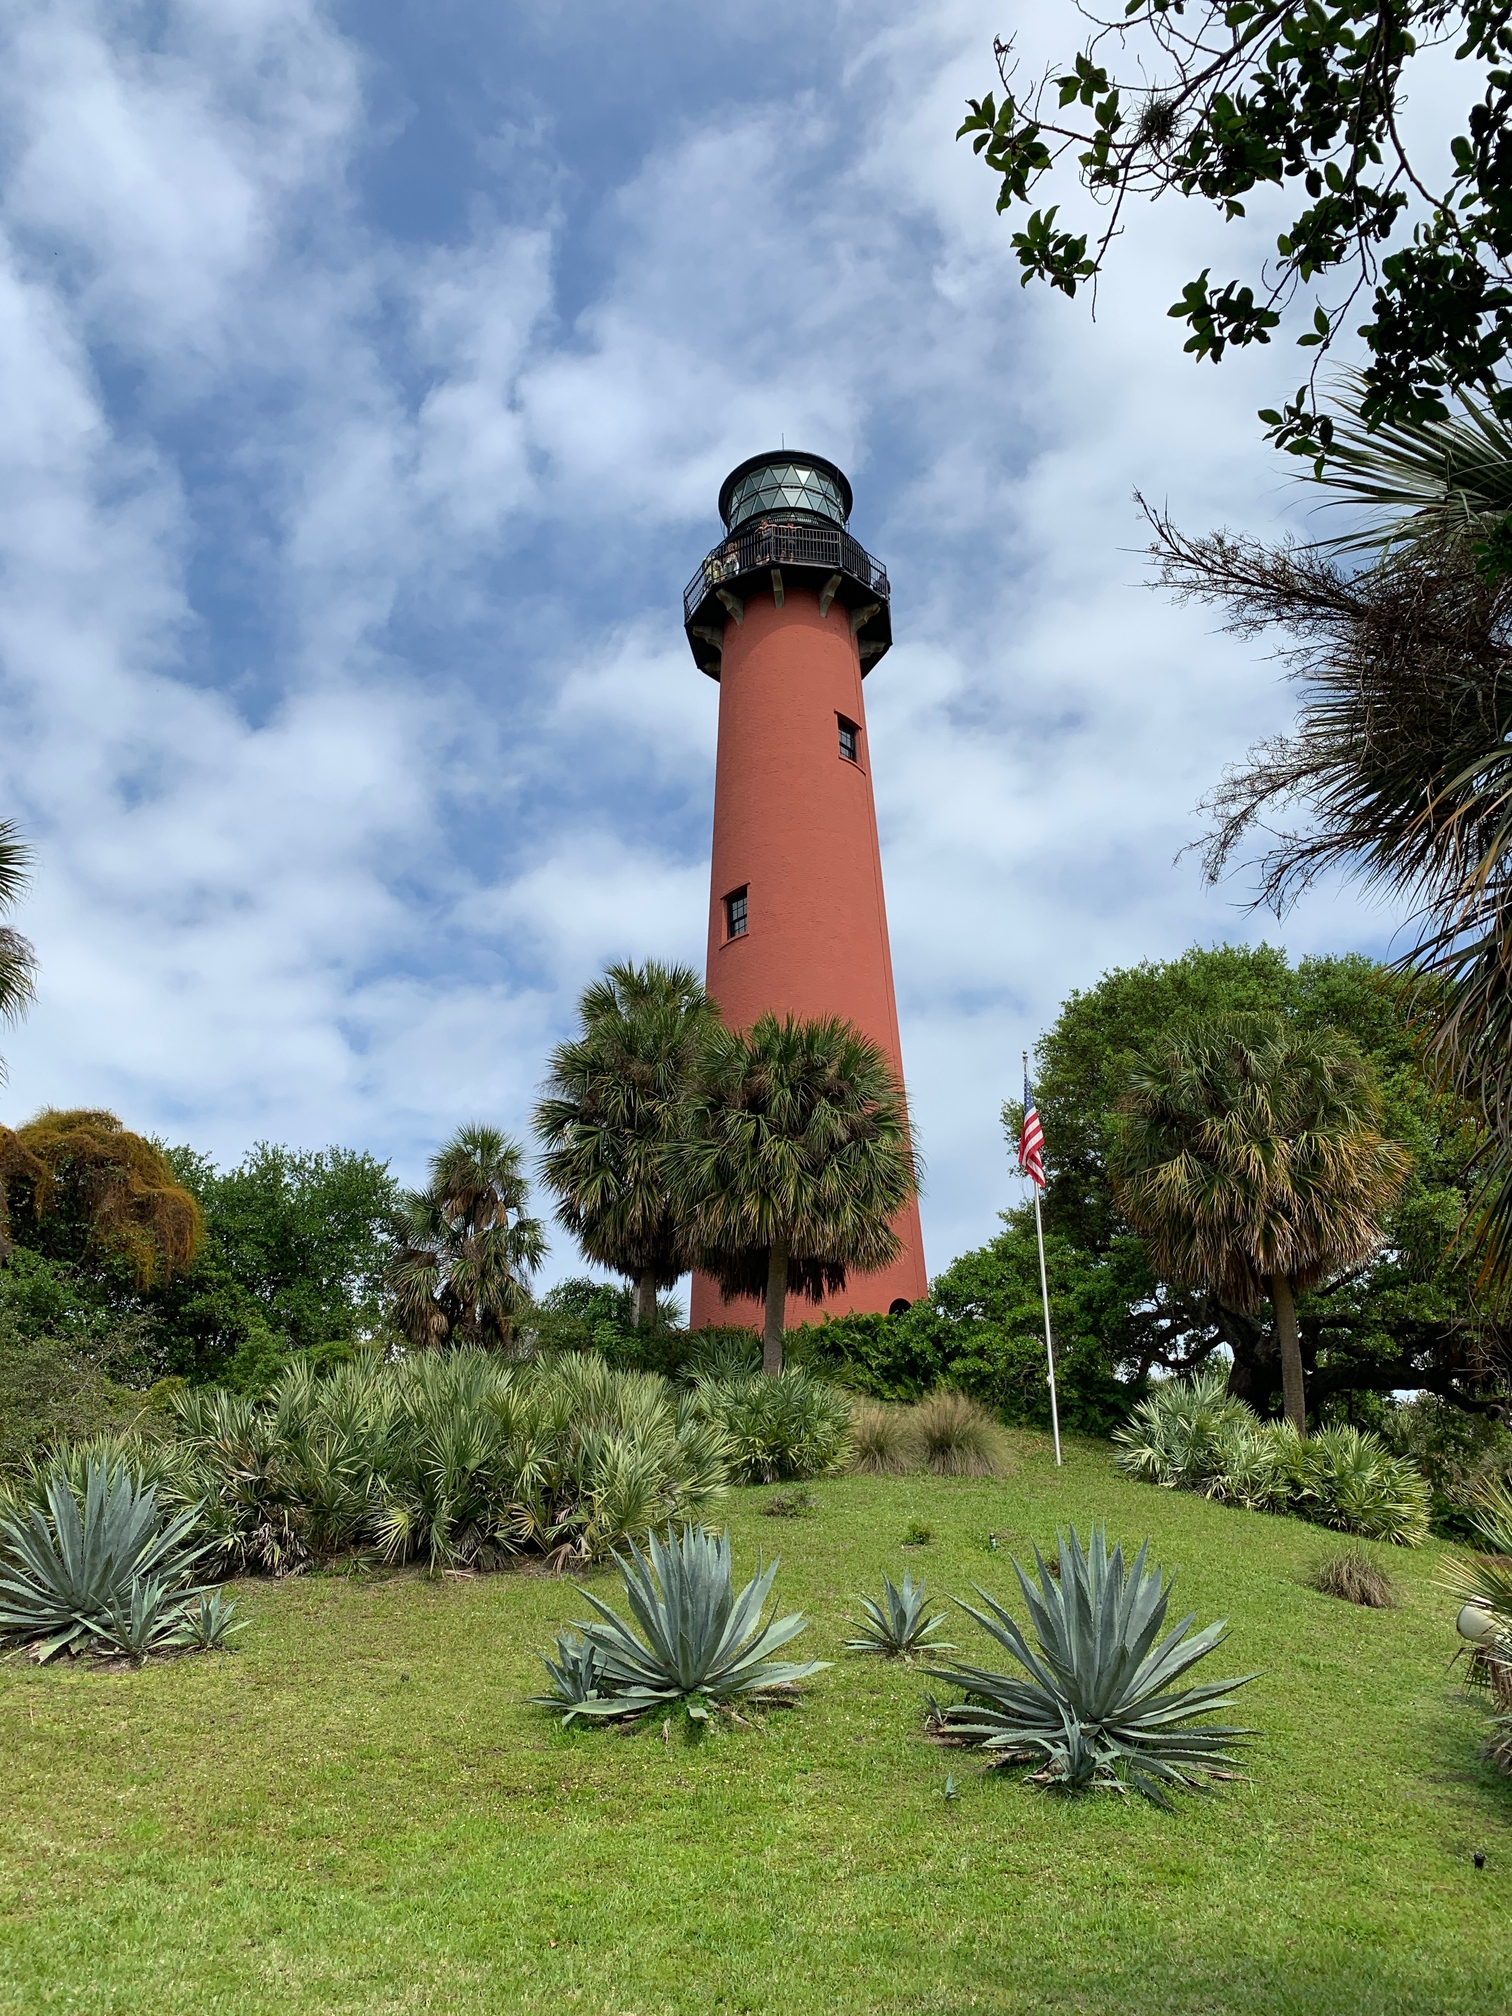
A Lighthouse
Certainly not as glamorous as the projects currently here, but I hope that there are a few takeaways that could be useful.
My goals for this project were:
- Use only Carbide Create & Carbide Motion with Advanced V-Carve.
- I don’t have a bit setter, but still wanted to create simulating the “advanced V-carve toolpaths” that were recently added in Carbide Create.
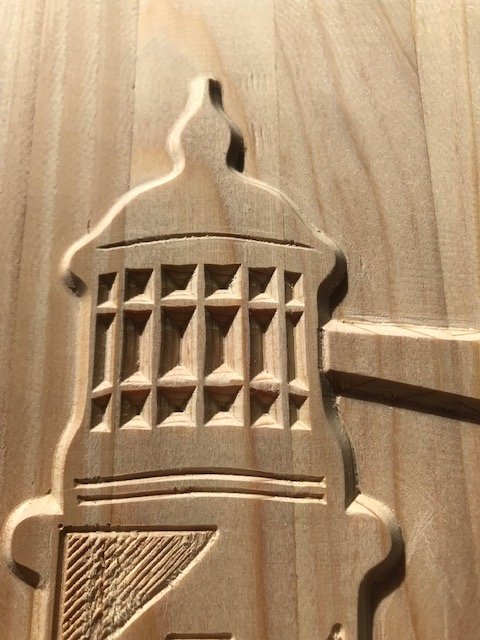
- Could detail, like windows, turn out using the 2-bit strategy? The lower windows and door glazing are pretty small and it would take a change to a 0.0625 end mill to cut these, which I wanted to avoid.
- And finally, cut a lighthouse because I like them.
The material is redwood 2X2s leftover from a honey do that I had laminated.
Design:
This is a mashup of a couple of different pictures I had taken over the years and searches for lighthouse images.
Once the design was finalized, I ran this through an online image vectorizer https://www.autotracer.org/, which I have good results with. Offset toolpaths were added to the vector image to simulate the advanced v-carving. @WillAdams covers doing this here: Could use some guidance on creating a carve - #2 by WillAdams
However, occasionally I have found in the simulation and subsequent cut v-carving will have an extra wavy or misaligned cut. There are a lot of posts about this and should be easy to search if interested. When doing these offset toolpaths. The trick for me has been to look very closely at the toolpaths in ‘Edit Node’ mode where I occasionally find random nodes which can simply be deleted, like this one:
Toolpaths:
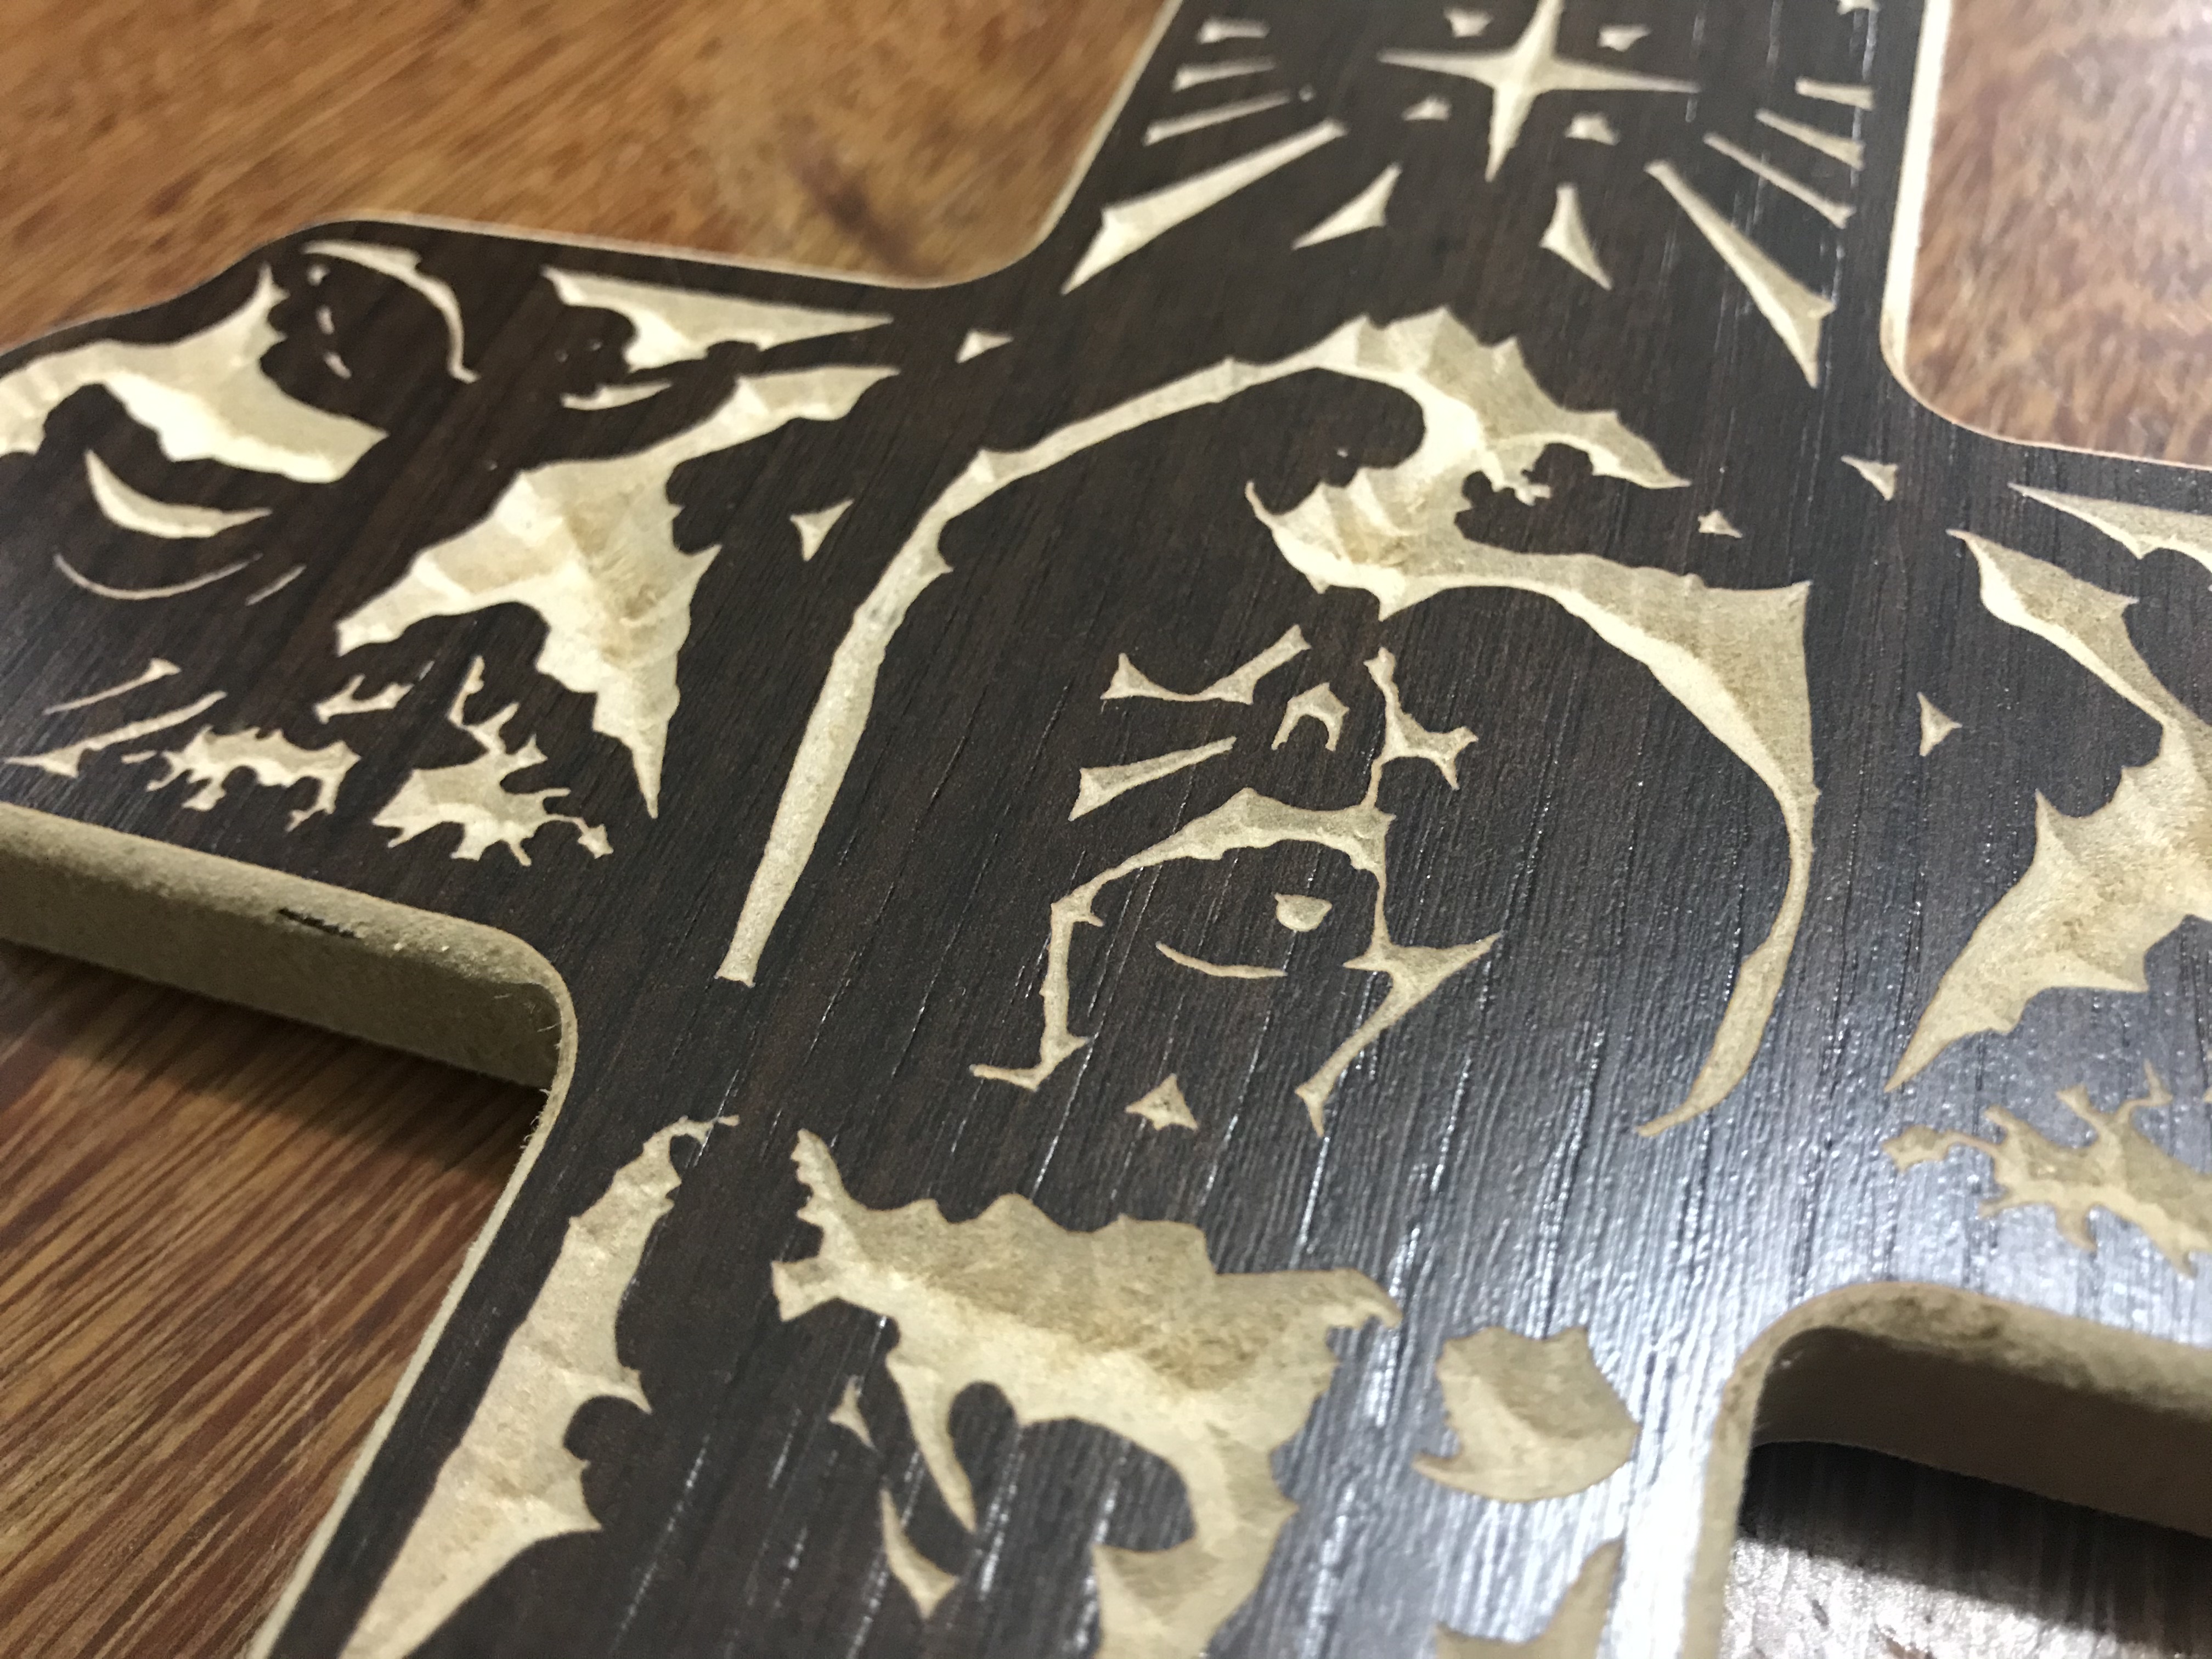
Really wanted to stick to the 2 bit self imposed limit, but a quick test found doing so would cause the cut to go past the boundaries of the borders on the tower stripes. Used tool #302 60 degree V for those, and then switched to the 90 V for the 2nd machining operation outline. Here’s an example of what I was trying to avoid and saw in a practice cut previously:
After the 60˚ V:
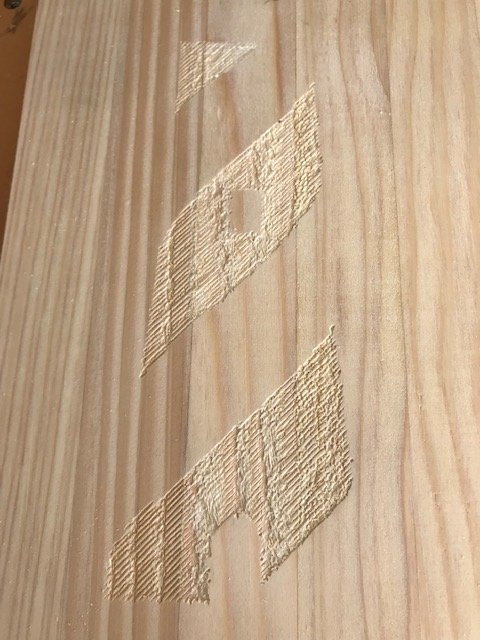
…the 90 V:
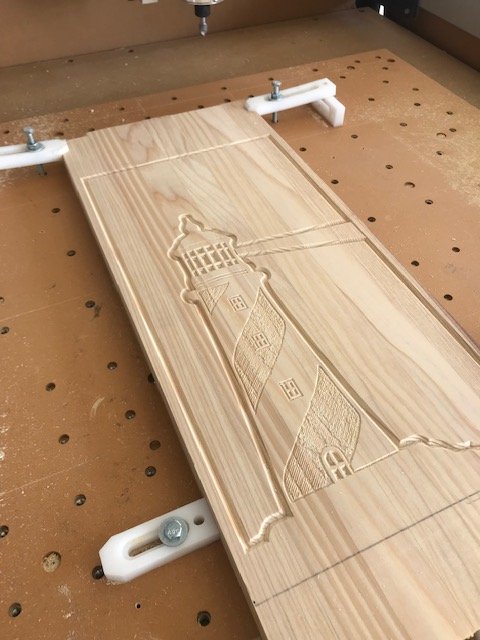
Finished:

Windows Close up:
Finishing:
The plan is to epoxy this using a fade from light to dark blue into the water. Need to apply a couple of coats of sanding sealer first to prevent epoxy air bubbles, again that soft redwood. Time constraints and cooler weather are preventing me from doing this, but I’ll post a finished picture to the gallery.
Notes:
1) RW is not the best for machining as it is soft, open grained and leaves a lot of feathering/gouging. Tried to control this and get a better chip-load by running at 200% over speed from the default settings in CC with CM. But using a harder, better machining wood would result in a much better end product.
2) In the 2nd Group 90 V machining process, Carbide Motion stopped and gave repeated messages to do a bit change even though the Group was all the same bit. I suspect this is because I’m running CM 4.0.412 and a simple upgrade to the new version will fix it.
3) Cross cutting the blank and regluing so the grain would have been horizontal, or the direction of clouds and water would have been a good idea, but time constraints (darn contests!) stopped me.
4) There is no OS profile cutout because the stock I used for this project was exactly 9.5” wide, I just miter sawed the ends off.
CC File:
Lighthouse Fini.c2d (1.1 MB)
11 Likes
I made a few custom STEEL touchmark stamps for myself out of some .5" square stock. I machined the design with a 90 degree PCB engraving vbit in a drill press vise .005" per pass 7ipm feed 5ipm plunge. I used air blast on a stock Z axis and periodic oiling to keep the cut going well. After the design was finished cutting I used a grinder to remove the squared off edges and give it the rounded profile around the actual design. Then I heated it up with a torch until it started getting yellow and quenched it in used motor oil to harden the strike face. It worked well enough that I made a bunch of different designs that day. It’s been fun stamping coins too and putting them out into circulation. The design is called a “Daisy Wheel” its been used for hundreds of years by builders. It can be drawn with only a ruler and compass and creates a number of exact angles which you can use. It’s like a protractor for before there were really protractors. This symbol in a larger form would often be carved on building frame members and used as a reference angle for things like how roofs were framed. Some people think they bring good luck too.


(upload://8gi4T9FsoJXx4mmK6tzfOWNMhM0.c2d) (122.8 KB)
7 Likes


I’m curious what these so called “advanced vcarve toolpaths” in Carbide Create are? I’ve downloaded the latest version, but the vcarve functions just the same…
I was hoping to submit an entry, but just realized that today is the last day, 15 days seems very short time for the contest to be open…maybe next time I guess…
In regular V-carve, you can only select a type of V-bit, and the toolpath with go as deep as it needs to match the width of the features you selected.
In advanced V-carve, you can select a square tool to do a clearance pass around the area of interest, and then customize the max depth at which the V-bit will go once carving, which is very convenient when you want a “flat bottom” in a V-carve.
The context submission timeline was already increased a bit, 15 days seems to be the sweet spot so that it’s both long enough (I now make sure there are two week-ends included in those 15 days) to create something, and short enough that it’s still a challenge!
Not to worry, there are other challenges coming up.
1 Like
I see, yes that’s a great feature, but I just opened CC and still didn’t find this added function, how might I use it? I read somewhere that there might be a paid version of CC, is that right? And the reason I am not finding it?
I think I may still try to gather pictures of a project or two that I’ve done in the past and hopefully post and fulfill requirements for the contest 
You may not have downloaded the latest beta version 460: https://carbide3d.com/carbidecreate/beta/
The paid version of CC (“CC Pro”) is another story, related to 3D features.
1 Like
I see, I’m on 451, thanks
Here’s one I’ve made quite a number of (nearly 100). The Christmas story on a cross. I bought the vector on a jigsaw pattern site. I’ve had to use a 120 degree v-bit to get the widest spots, while at the same time not have to go too terribly deep. The problem with such a “flat” v-bit is that it’s quite finicky on height, first the table of the CNC has to be very flat, and also the the material be held down equally over the entire piece.
Oh, it’s done on some MDF.
Checked my file and apparently I had it cutting at 2000mm/min which seems fast now; I can’t remember if I slowed it down with the override, but I probably did.
I used Fusion 360, which is a huge mistake if we’re talking about v-carving! 
I’ll upload a CC file that I had created when I waited on the beachball in fusion. 


Cruz natalina.c2d.zip (748.3 KB)
6 Likes
Hello.
Here is an old recycled piece of roasted maple with V-Carve black walnut Inlay. I made this for the 40th birthday of one of my good friend… 90° v bit, Shapeoko 3 XL. 
3 Likes
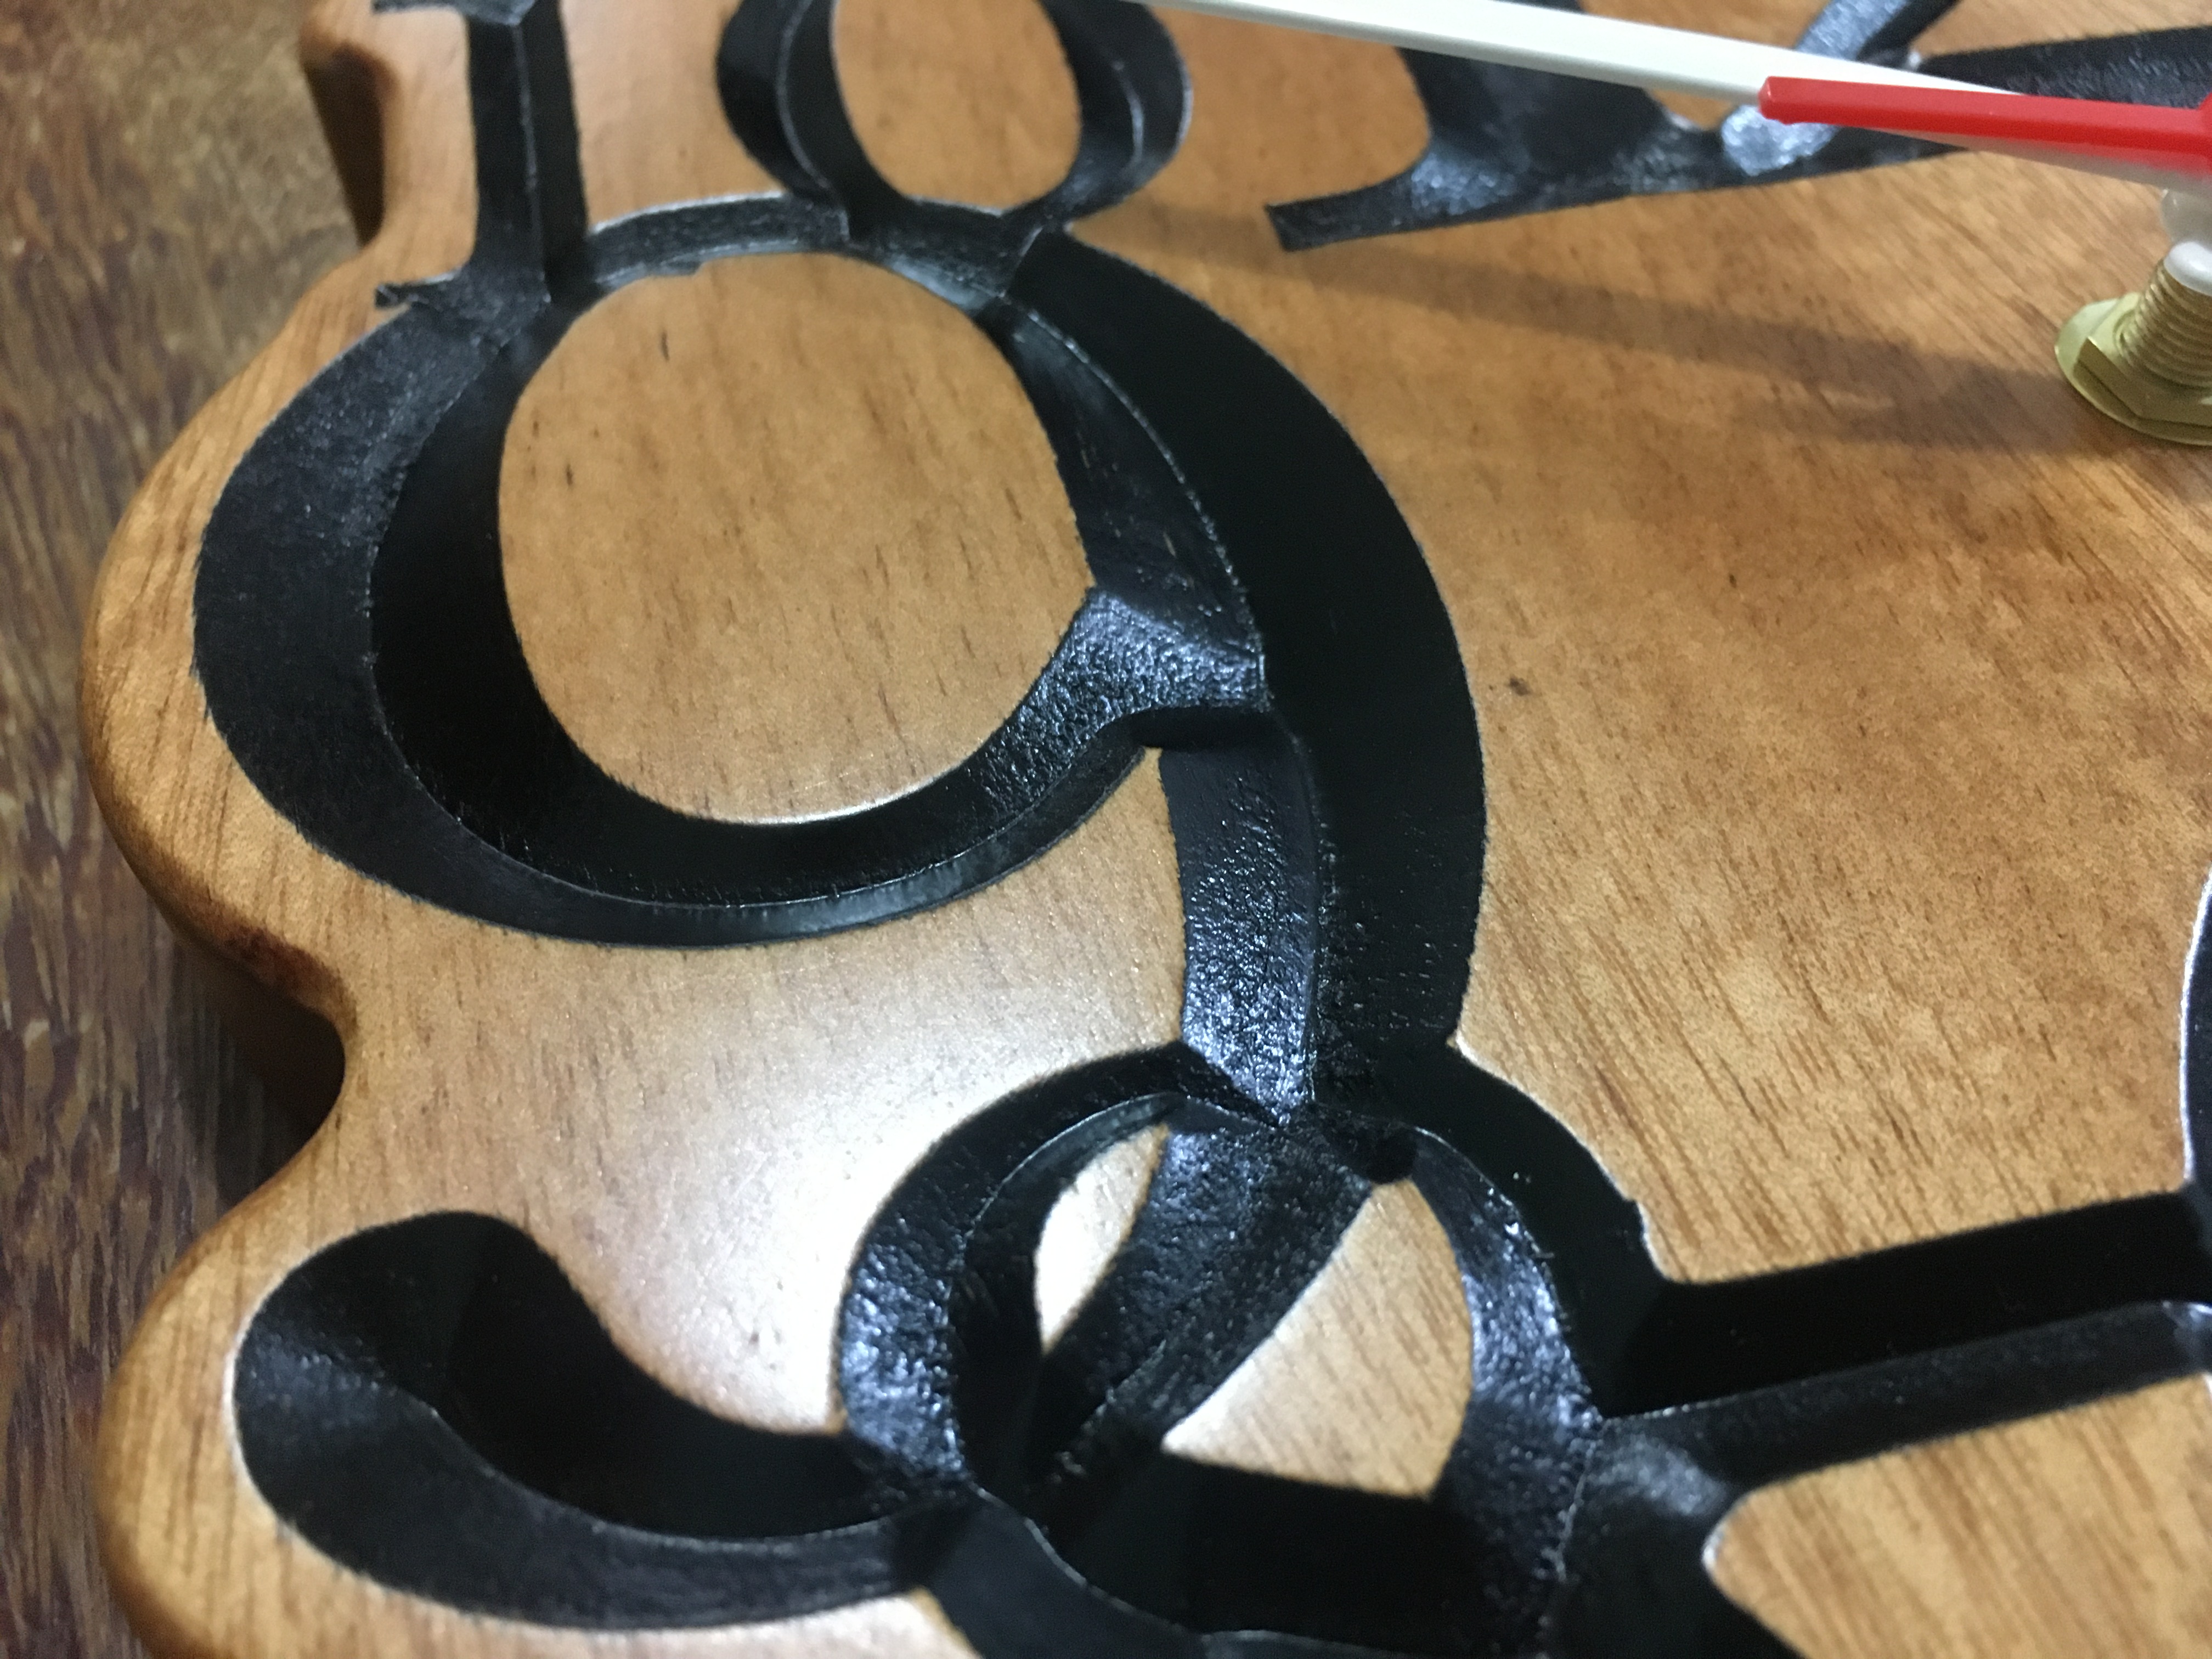
Here’s a clock I’ve made, also with 120 degree v-bit. Feedrate:1500 mm/min
This is nice wood to work with, excellent to machine. It cuts quite cleanly with very little, if any sanding needed. Name of the wood here in Brazil is Muiracatiara (Goncalo Alves or Tigerwood).
Unfortunately I don’t have any pictures of the v-carve before painting, but in the closeup you can see the v-carve. To paint I just spray painted the v-carve and after dry, sanded the face to remove the paint. This wood is also excellent because it doesn’t soak up the paint and bleed.
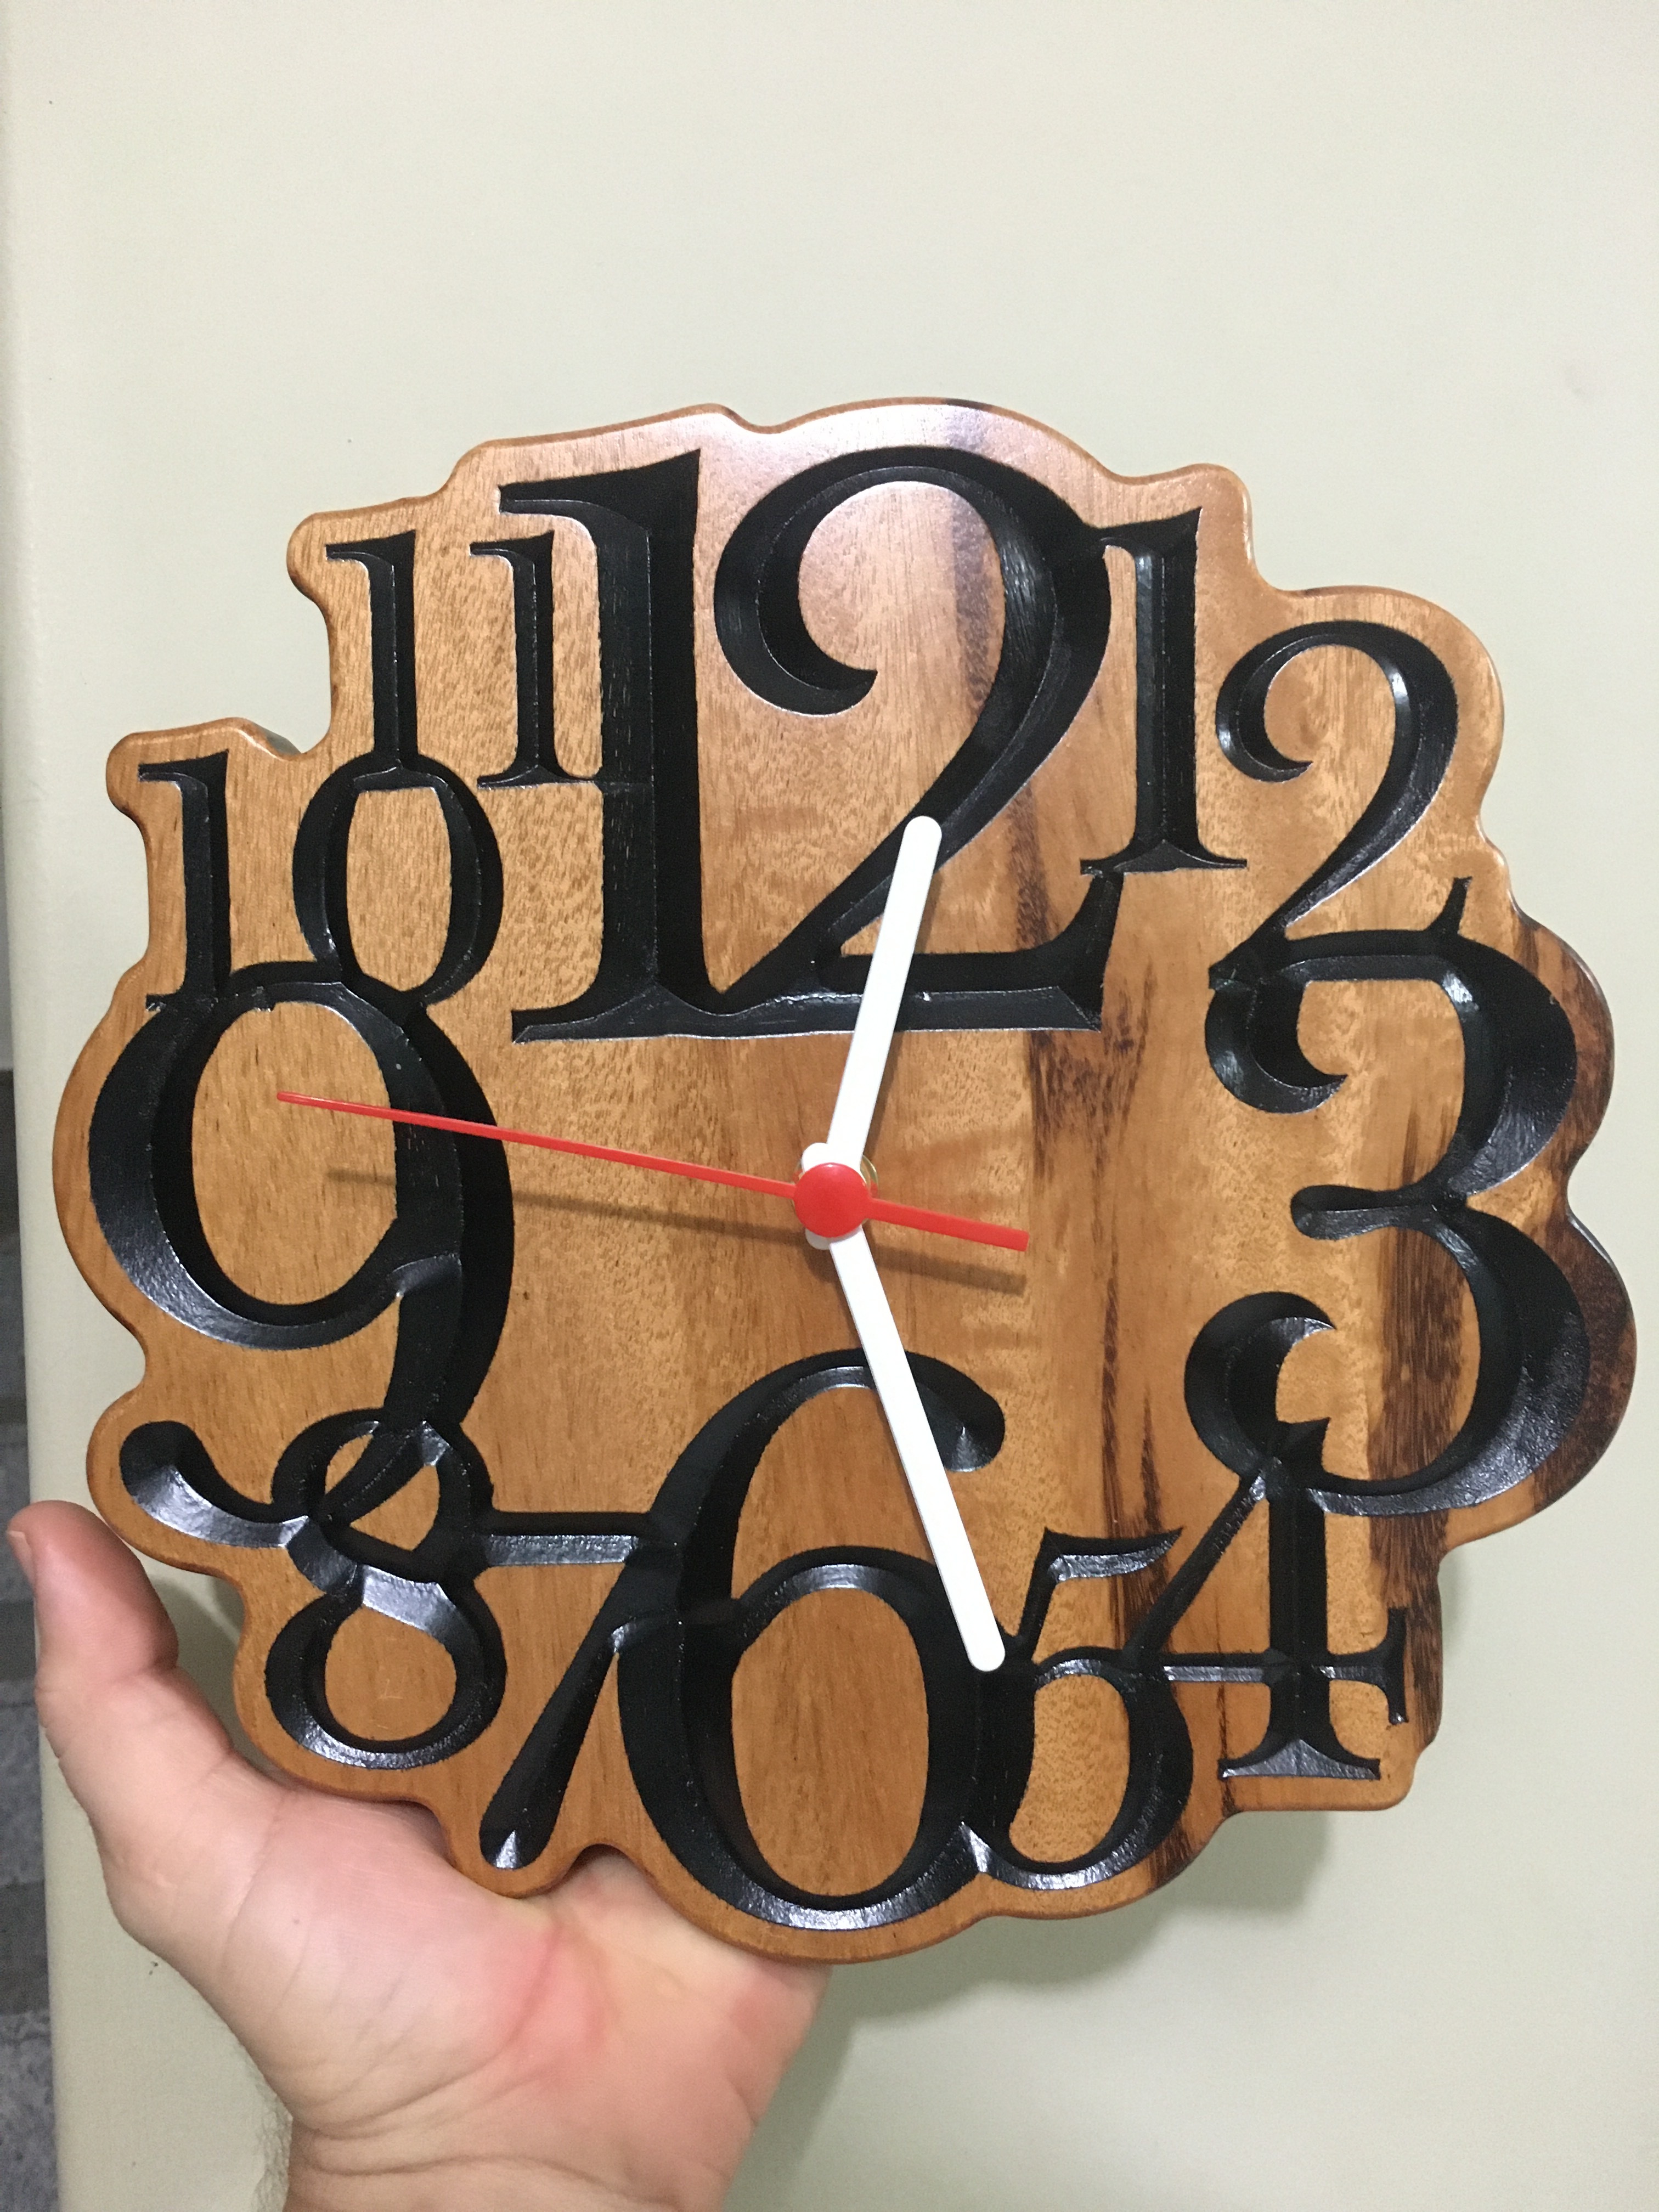
Unfinished
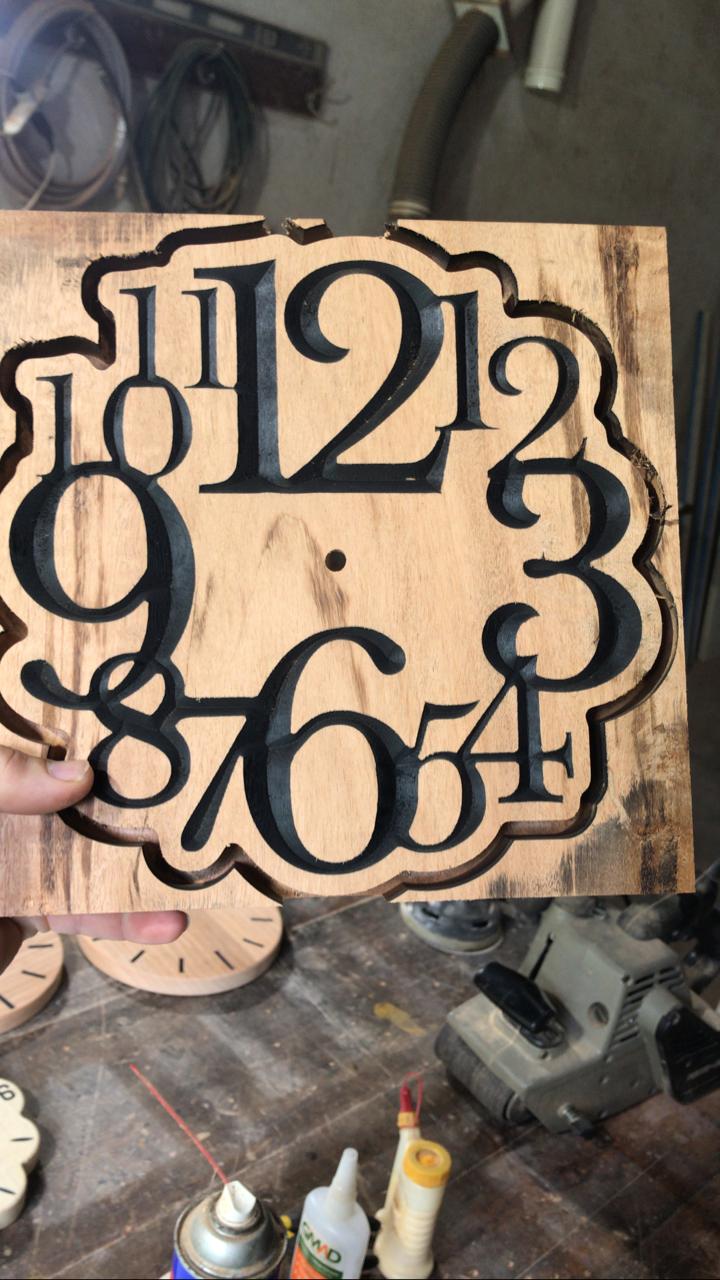

relogio todos numeros.c2d.zip (1007.4 KB)
7 Likes
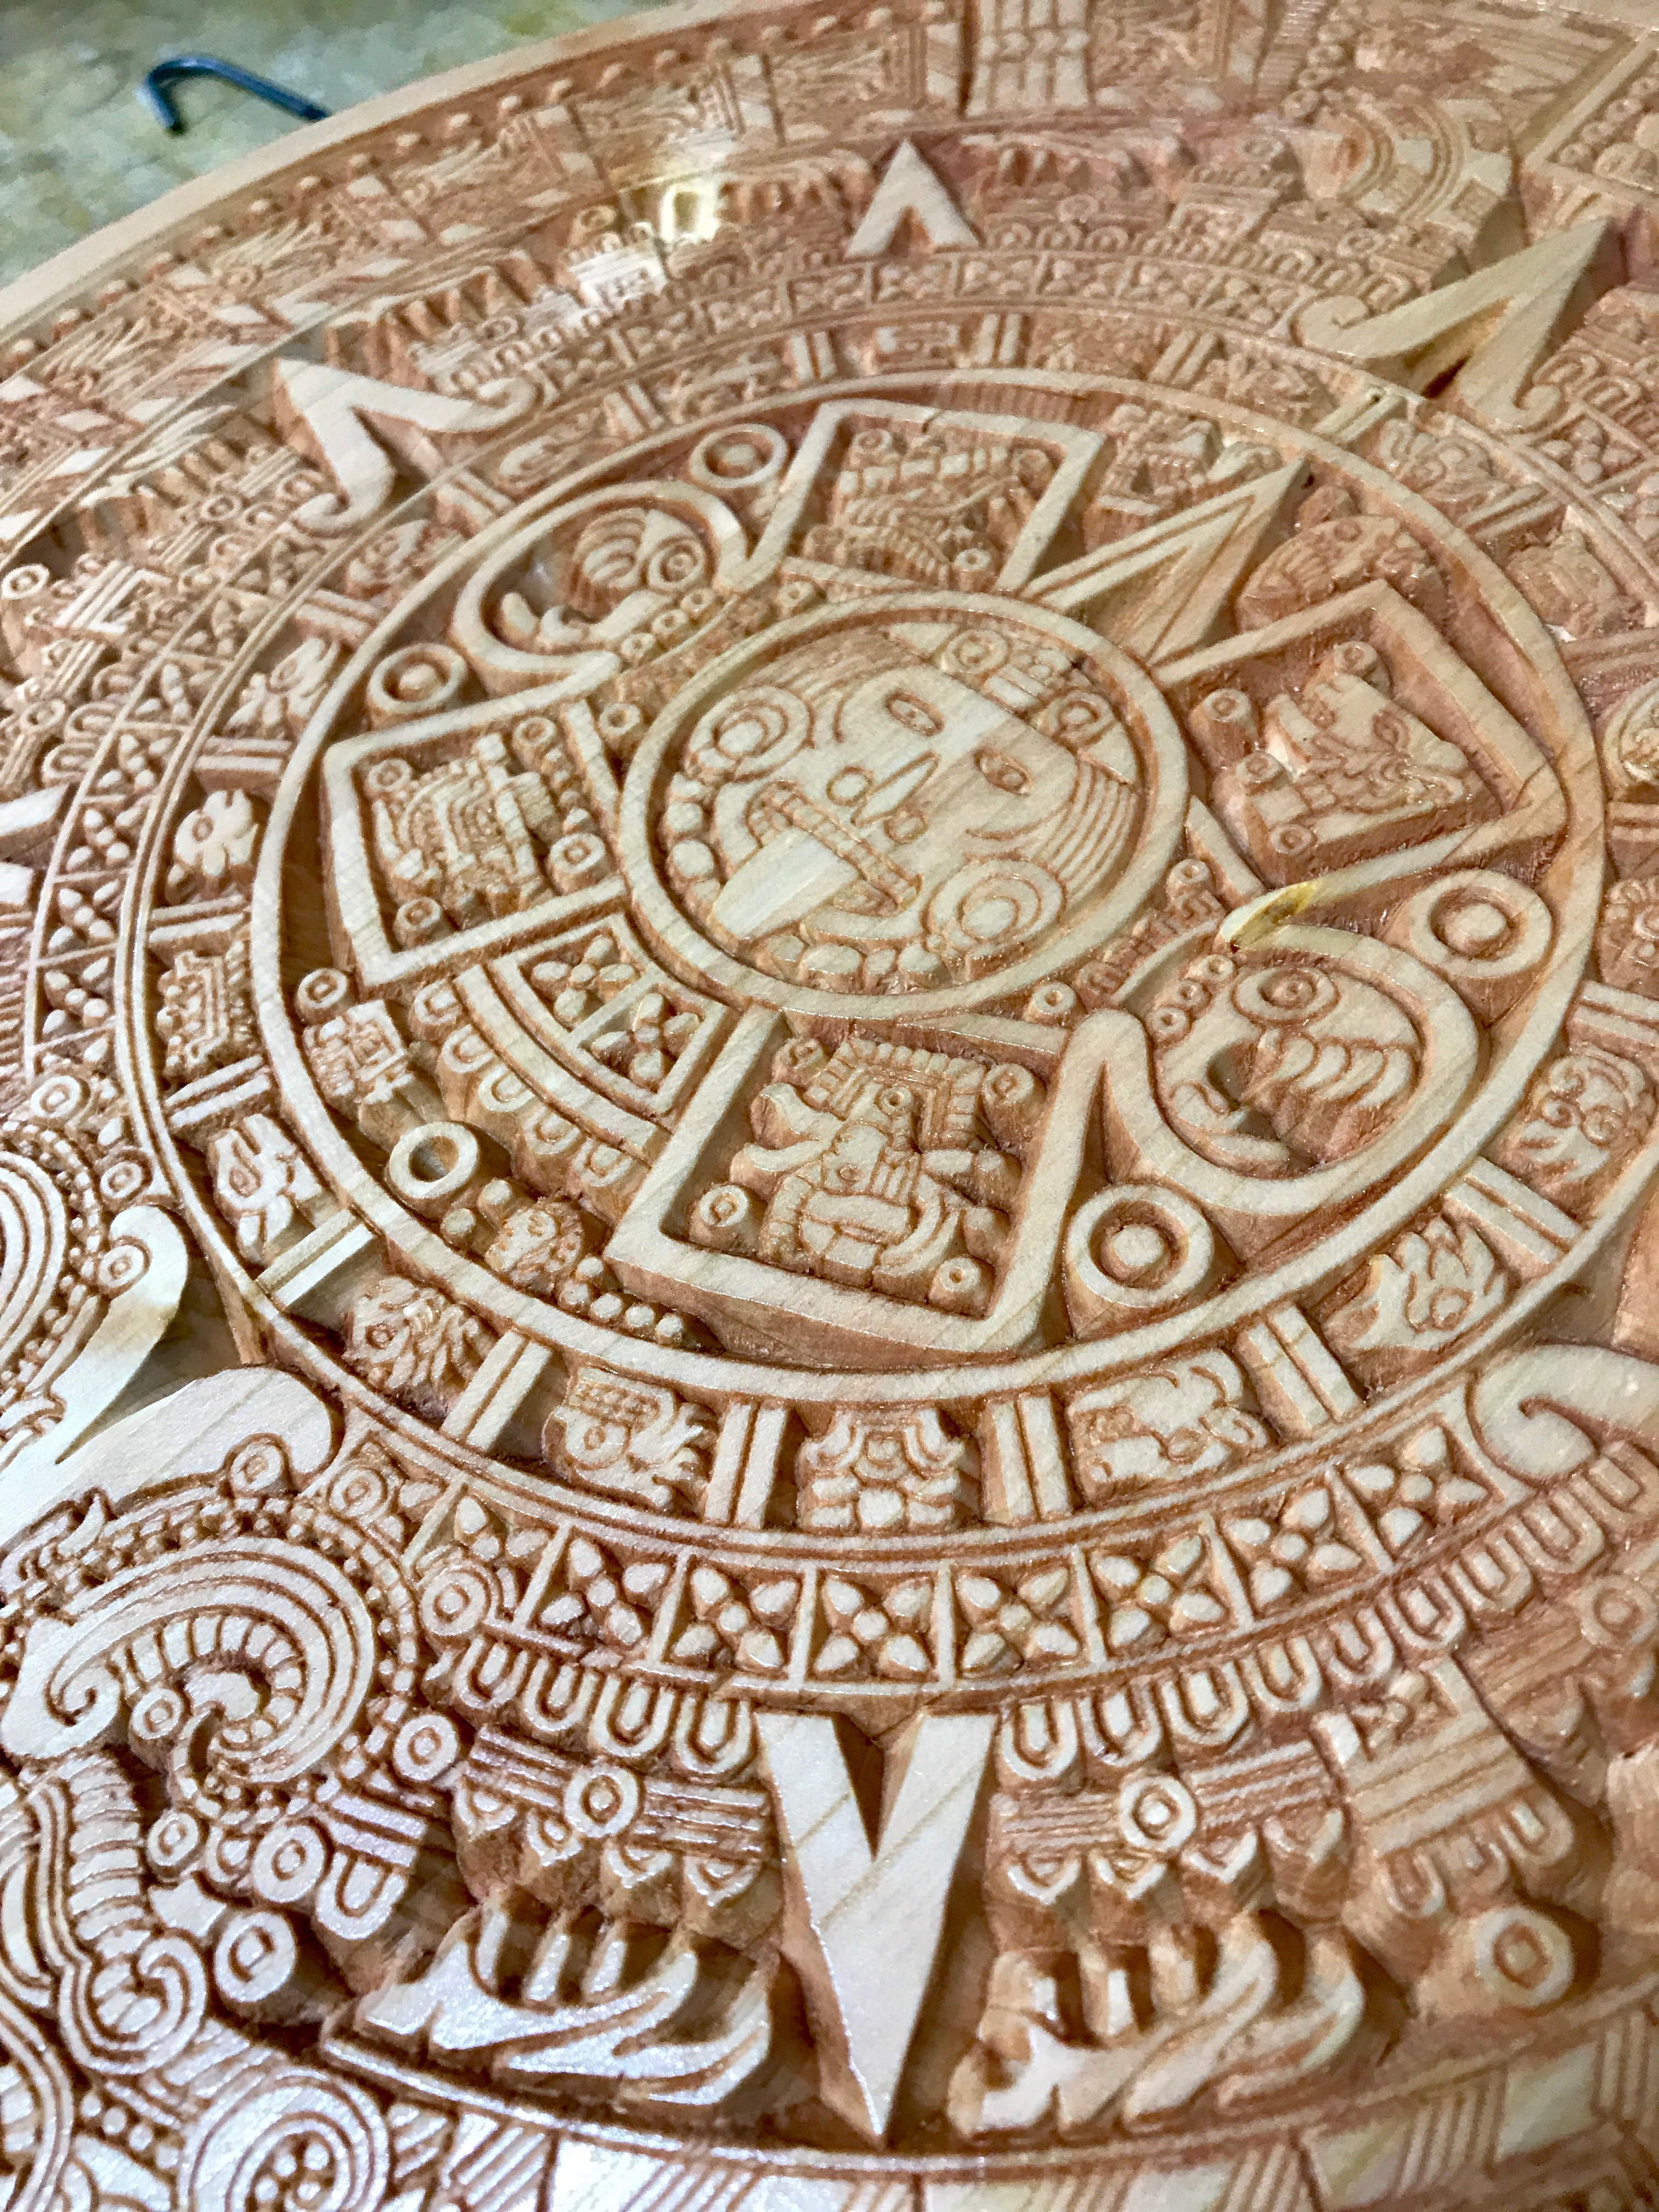
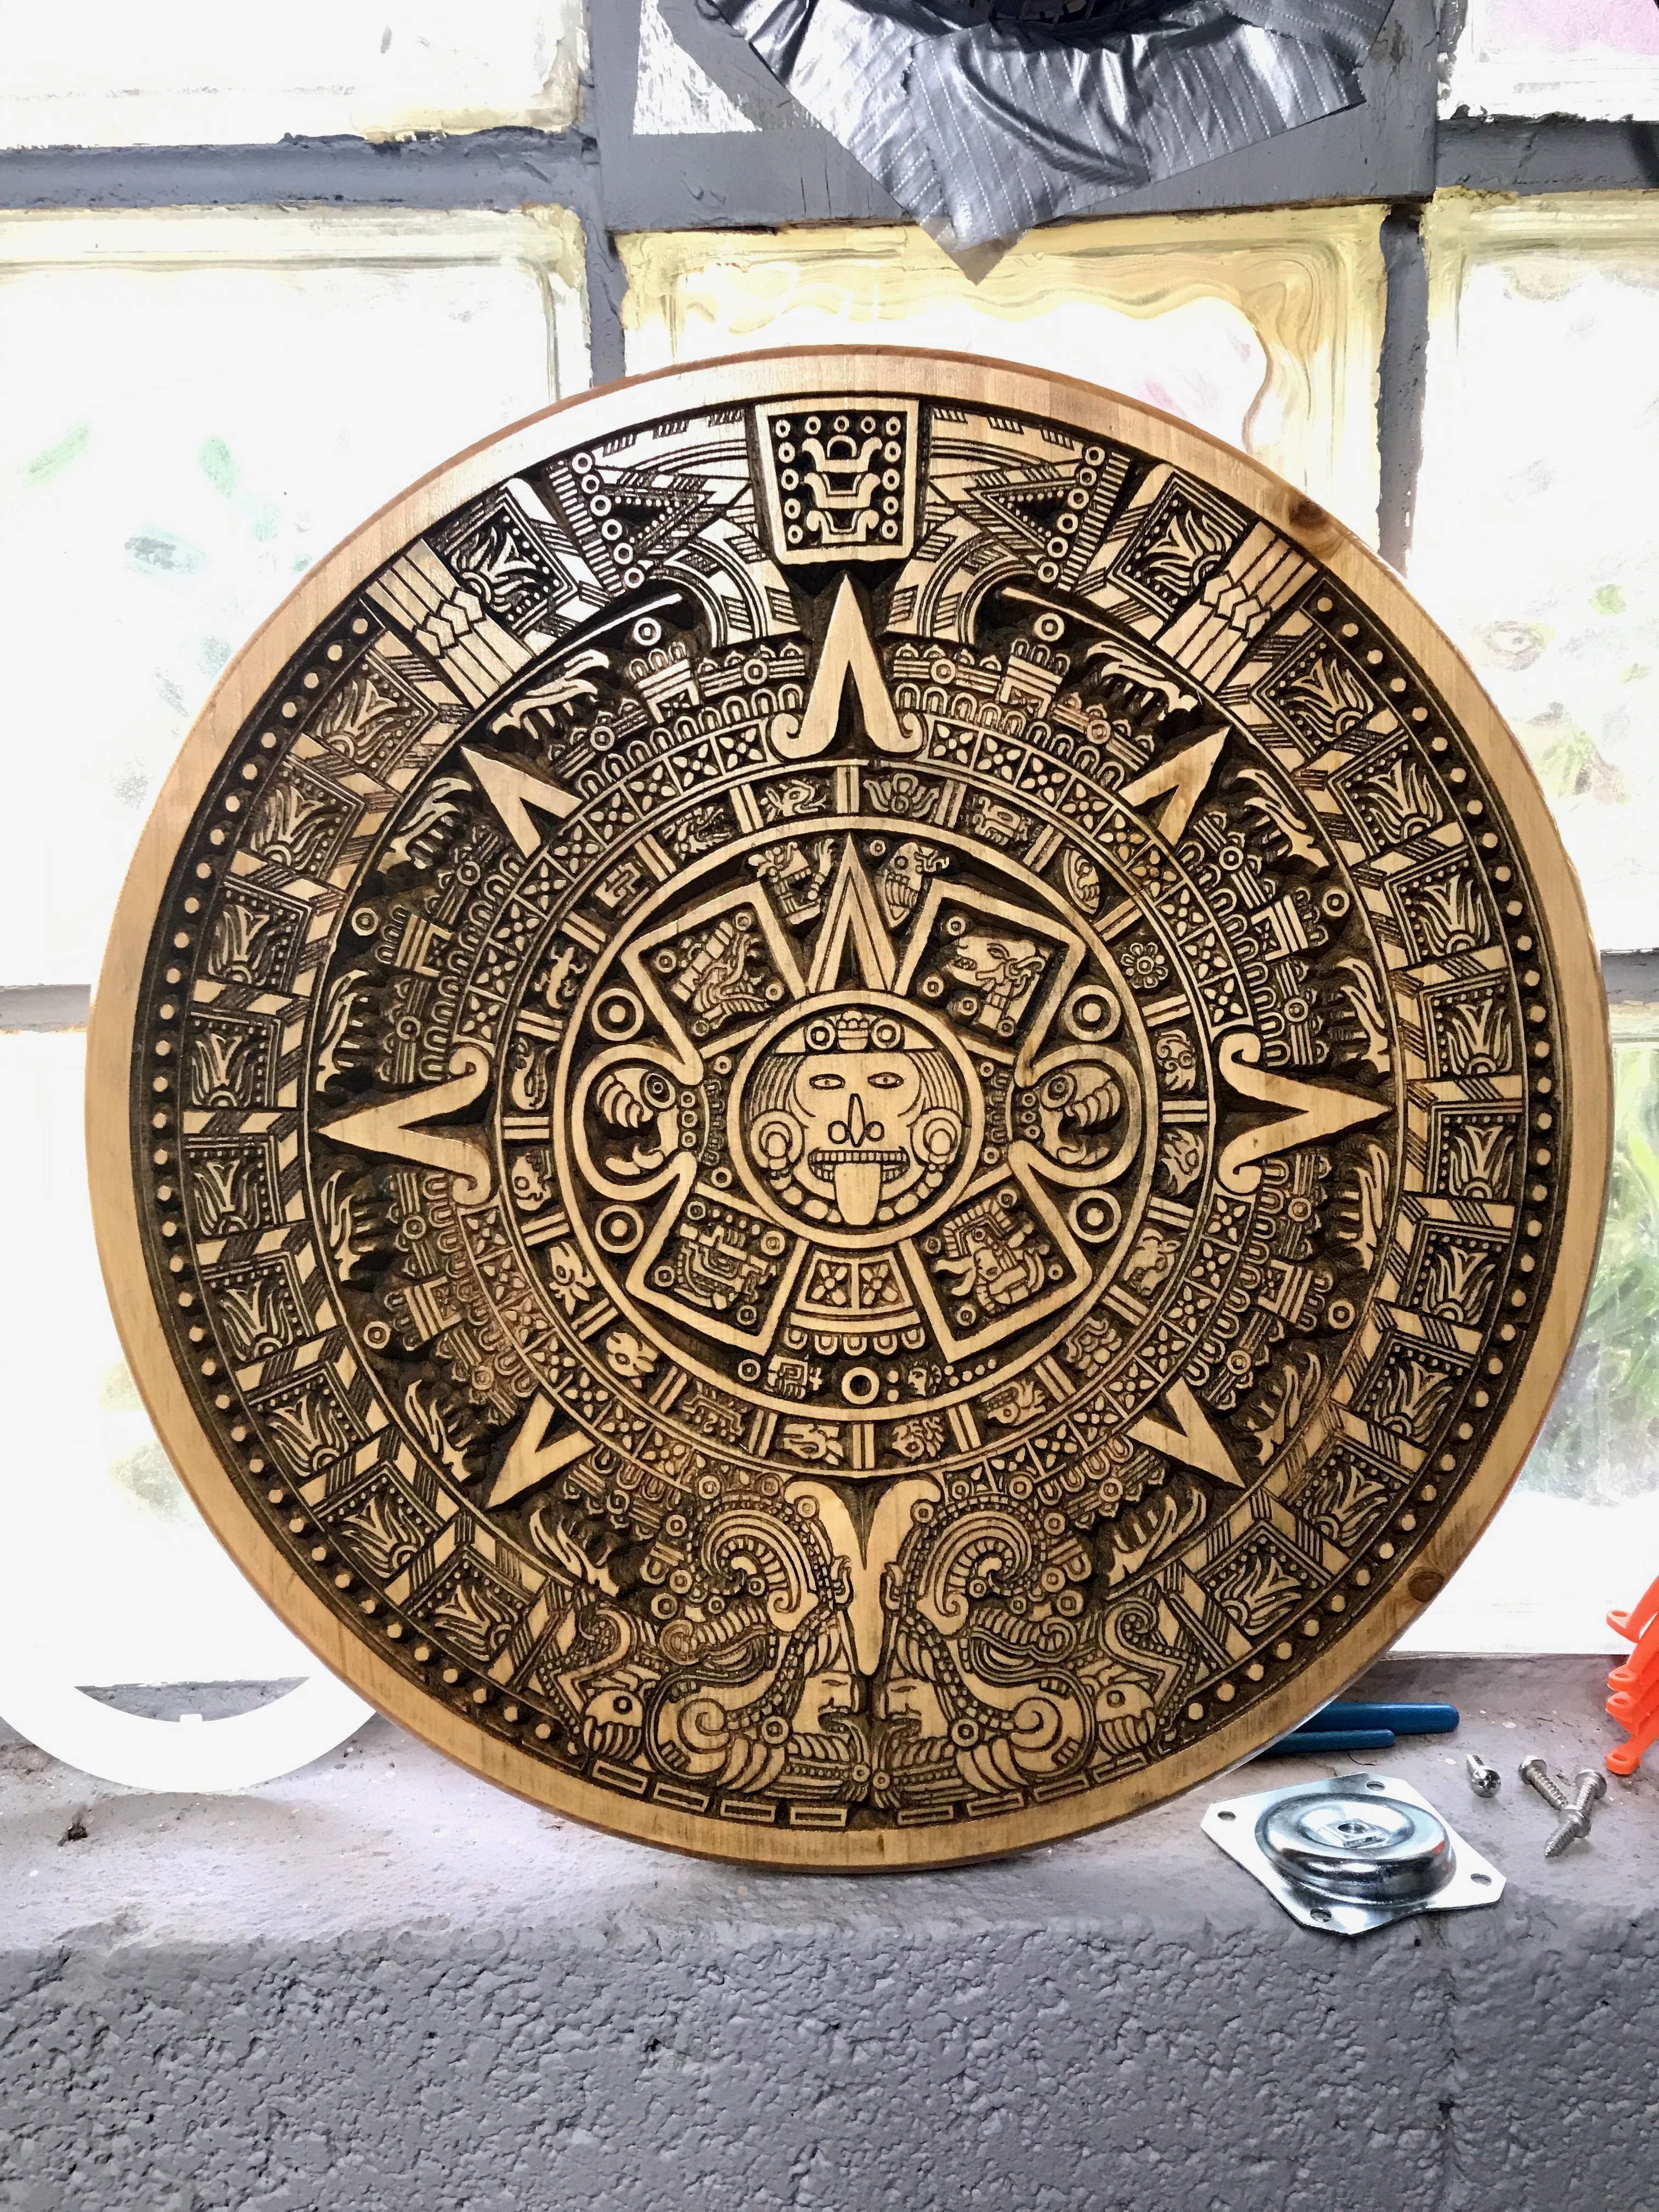
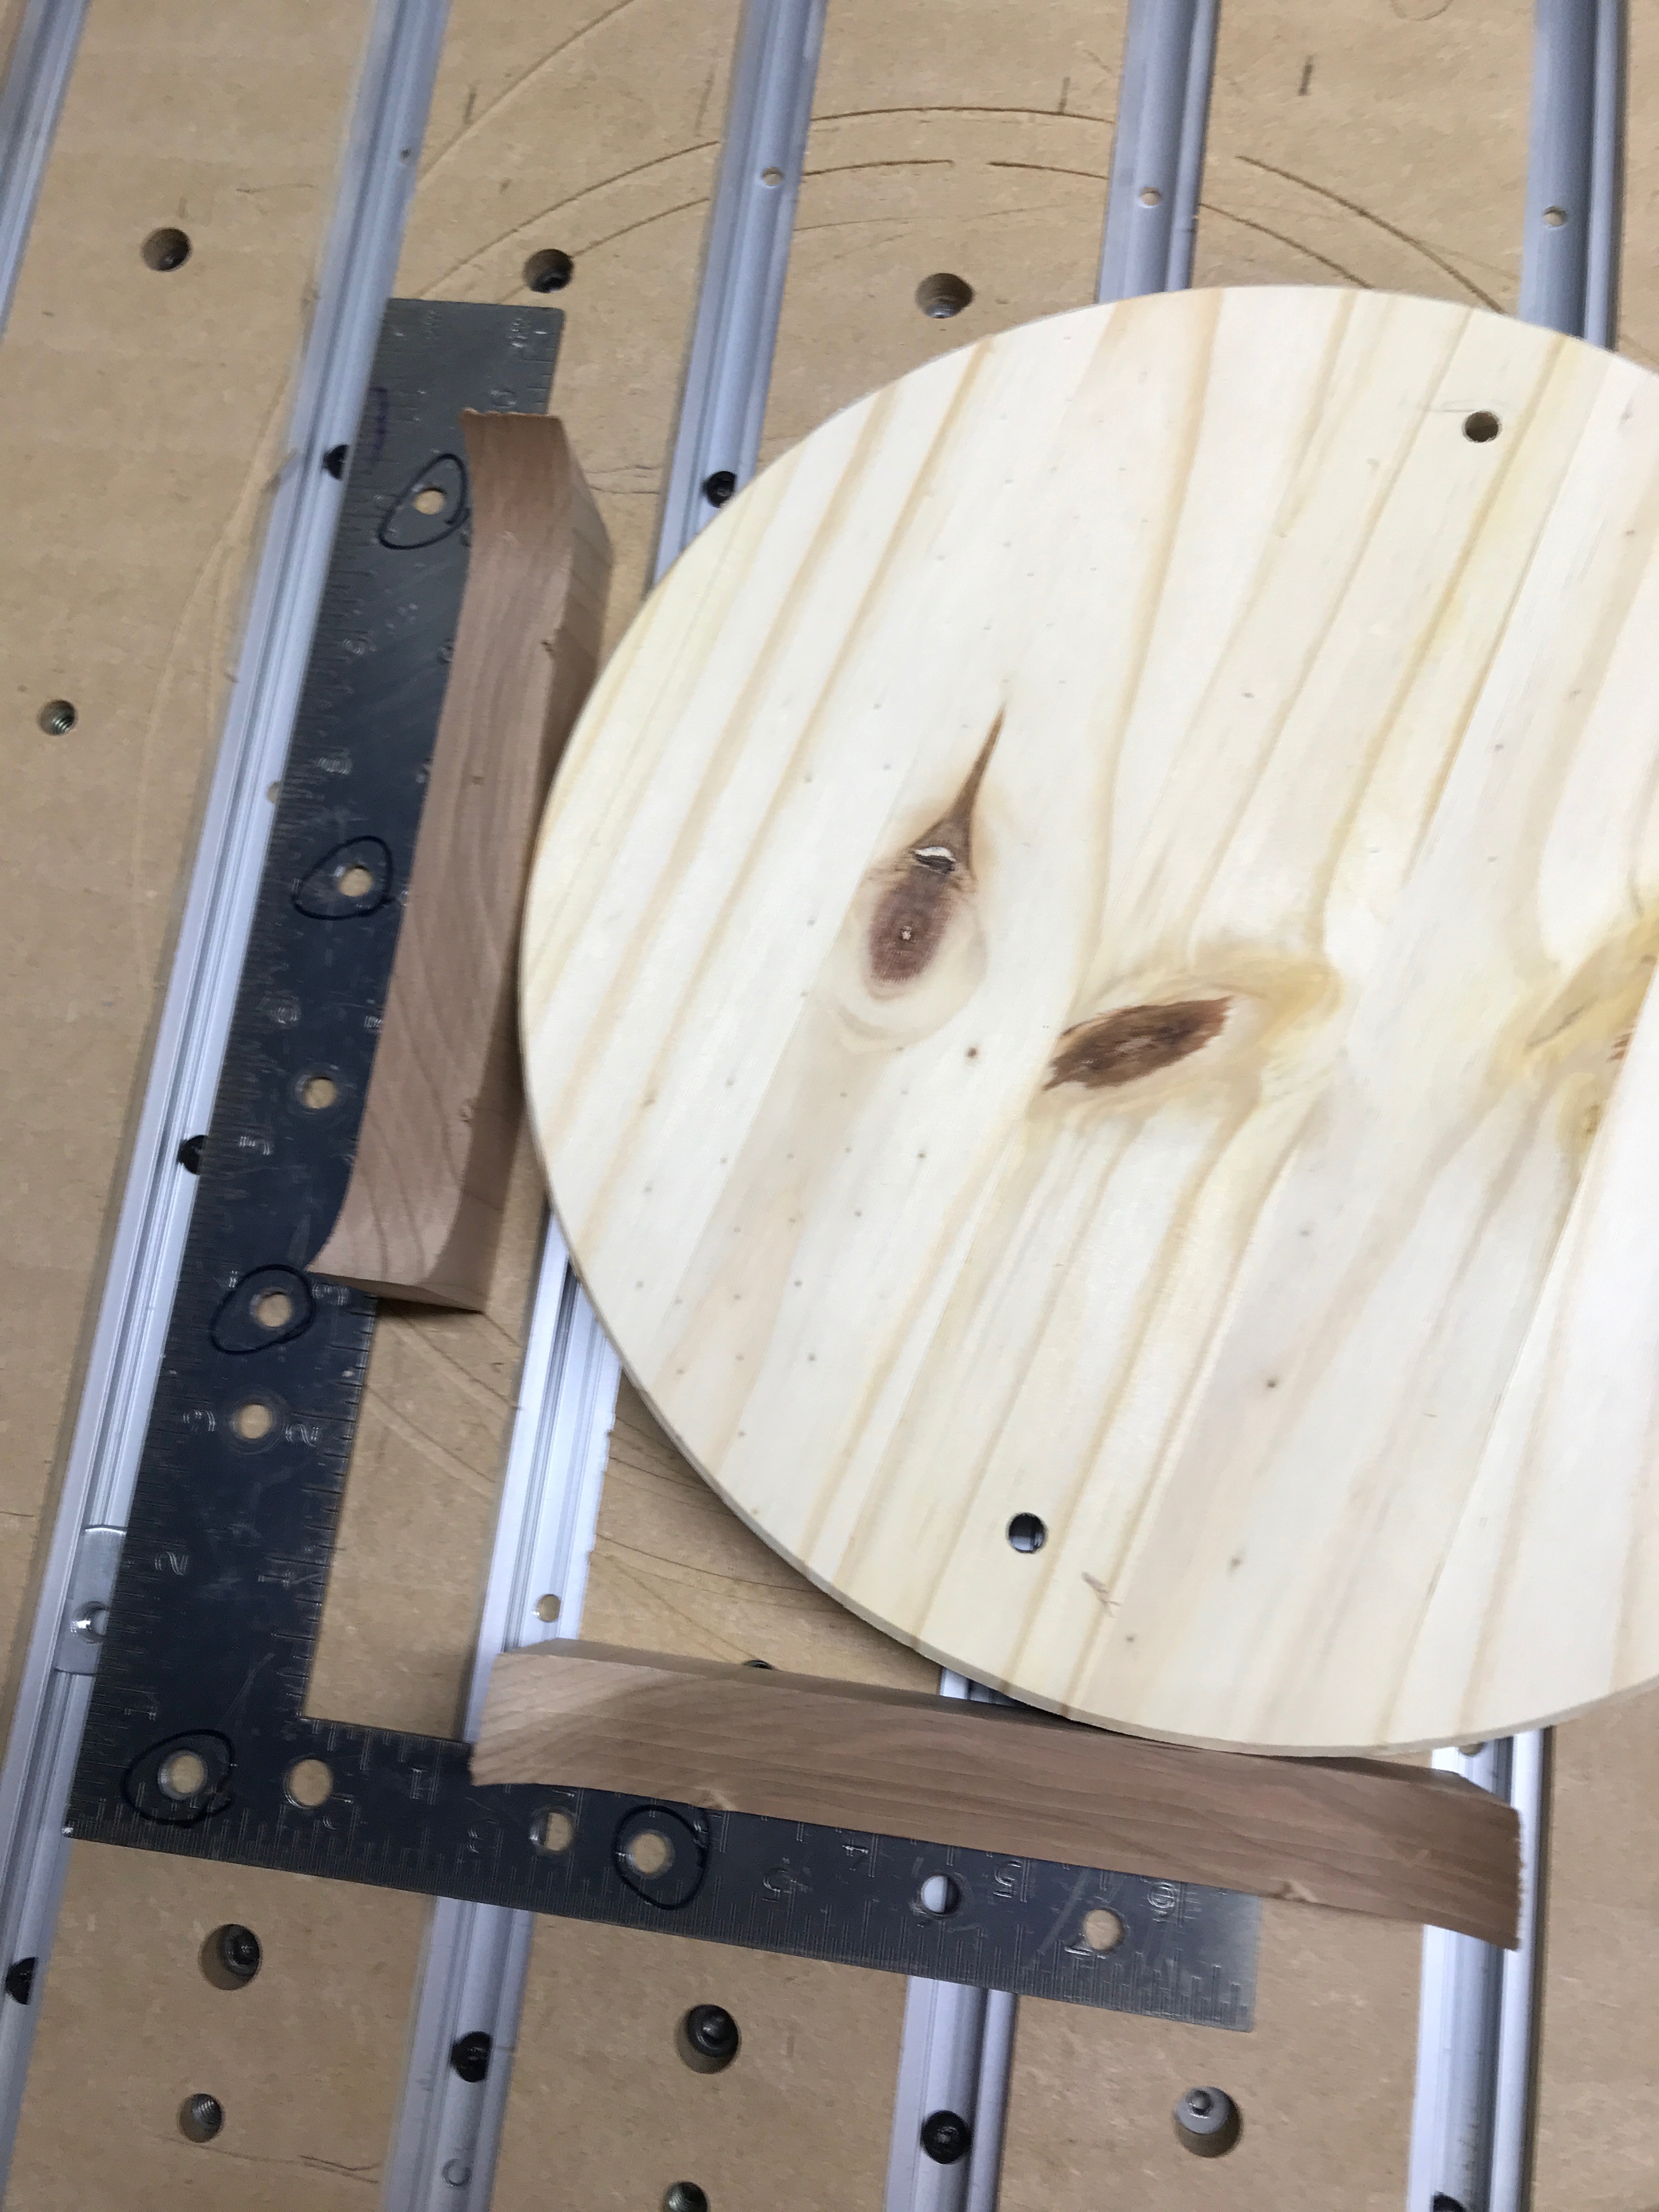
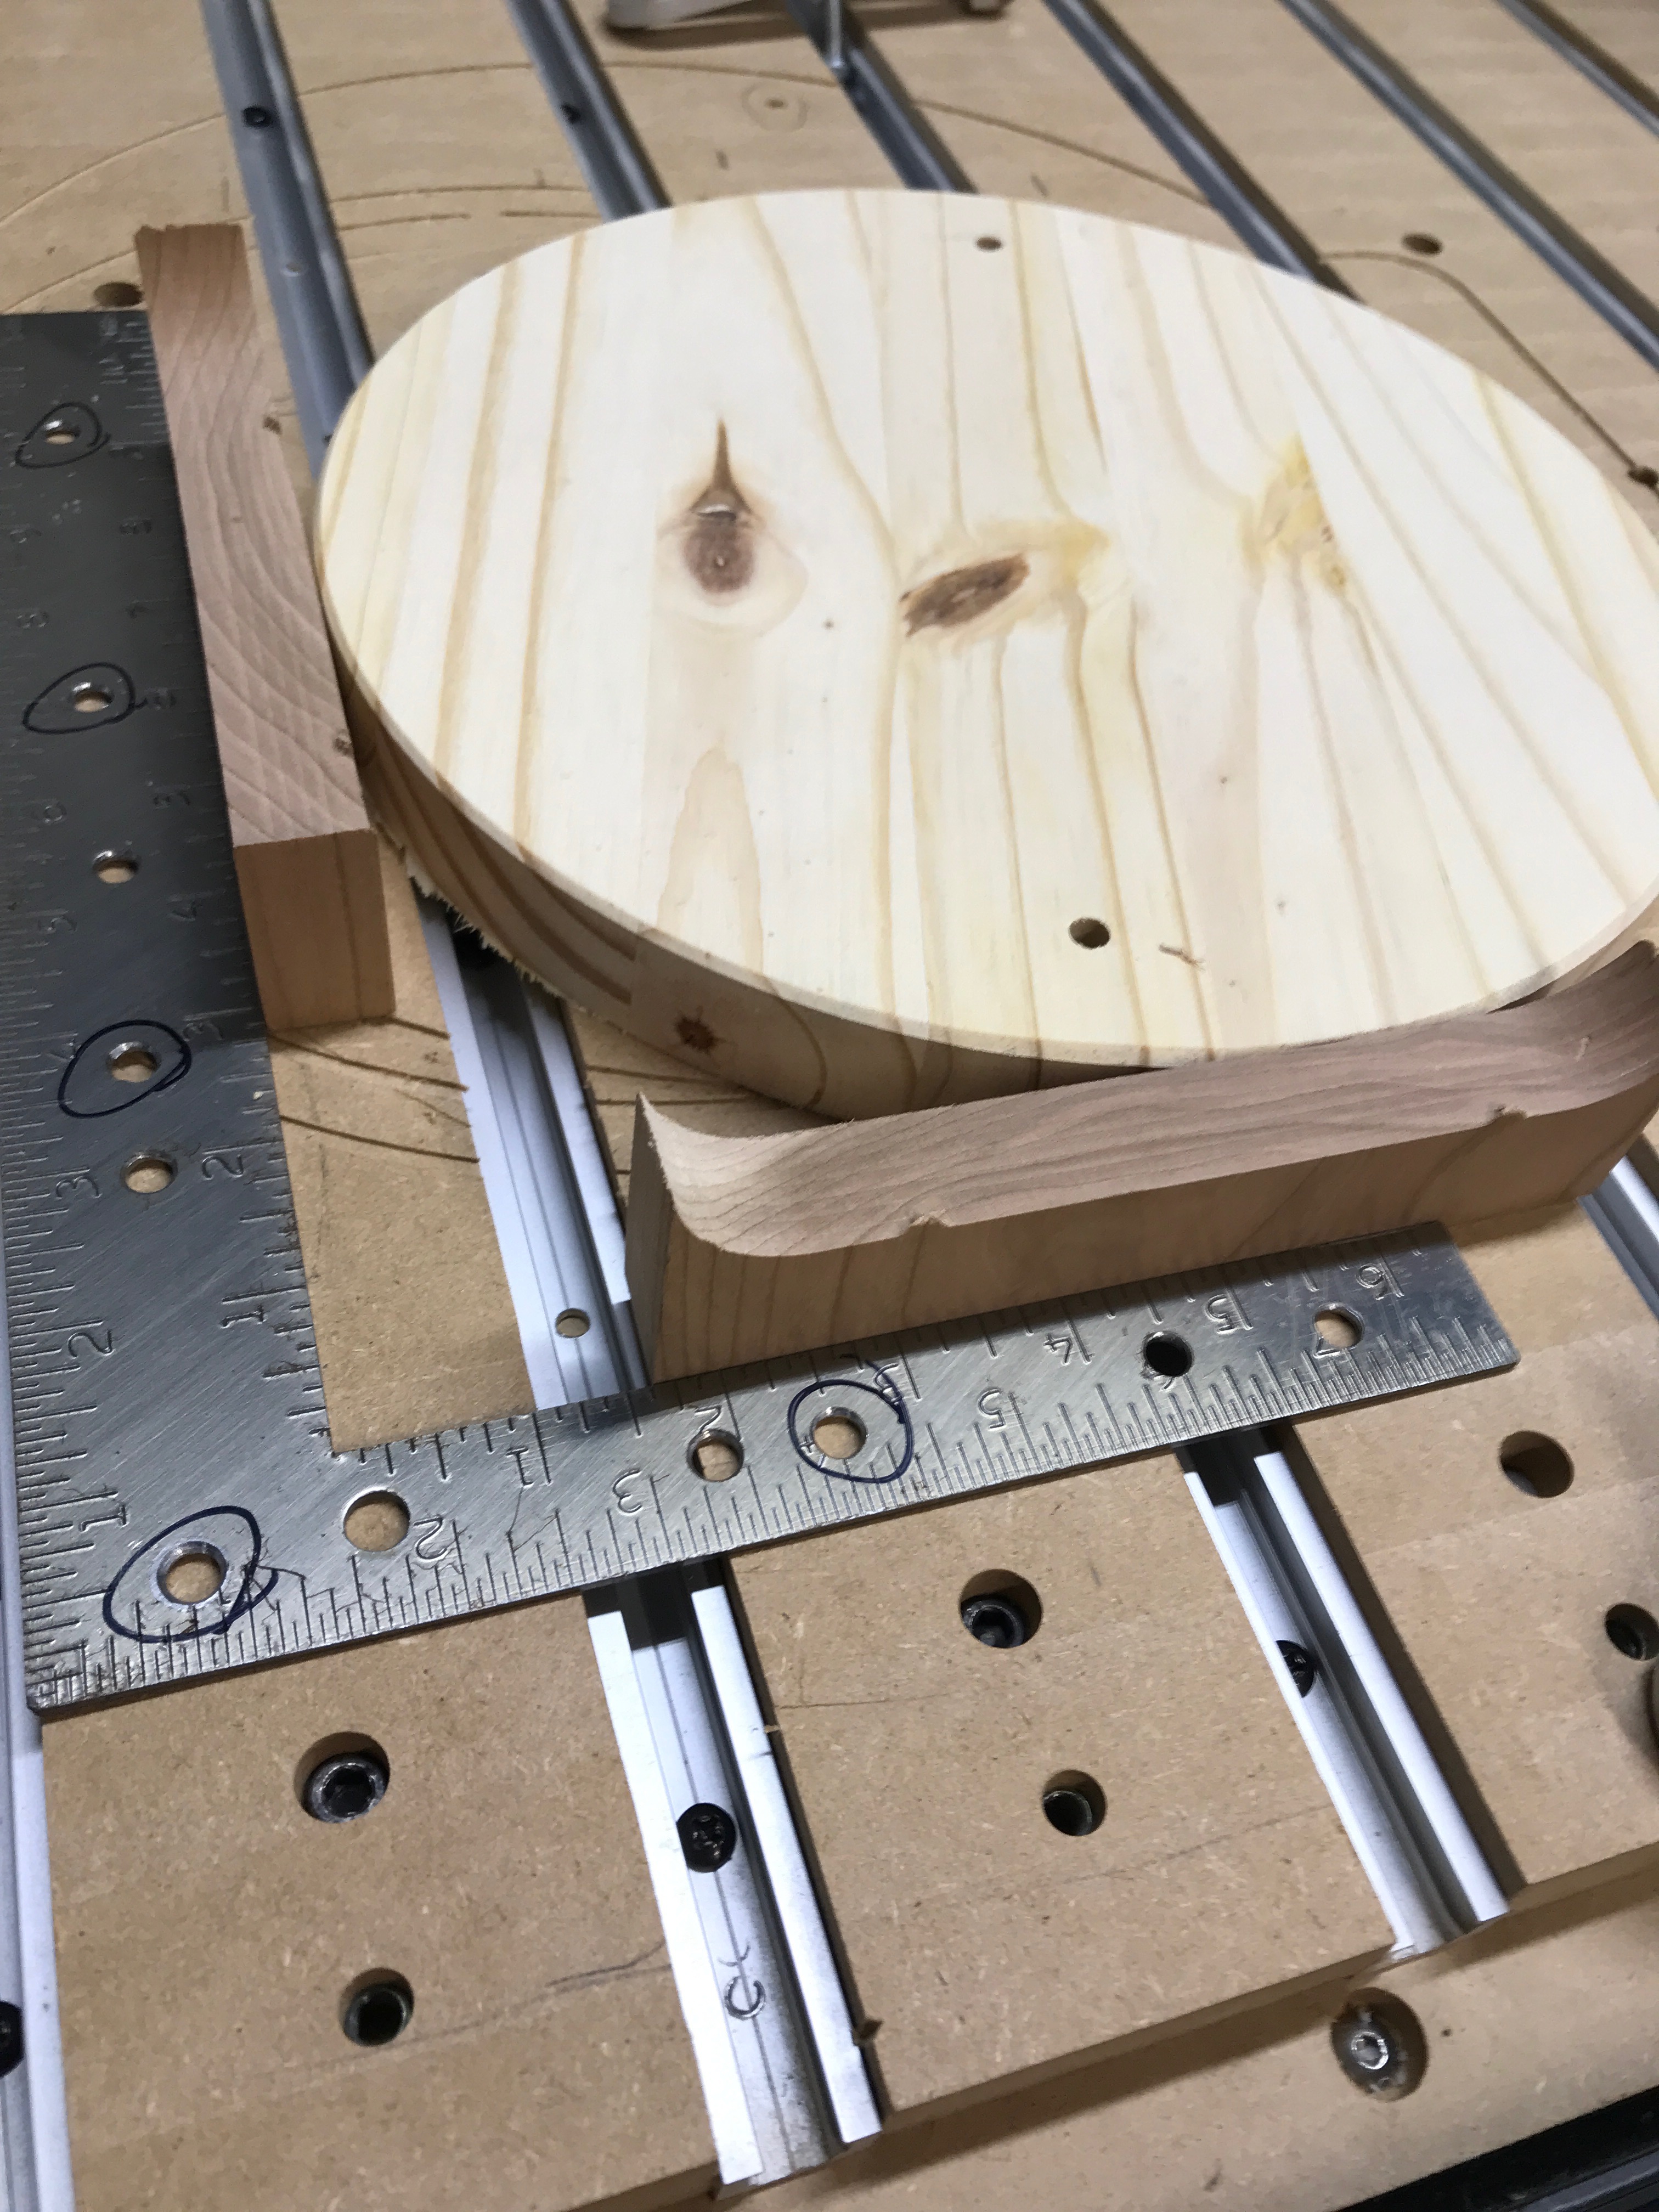
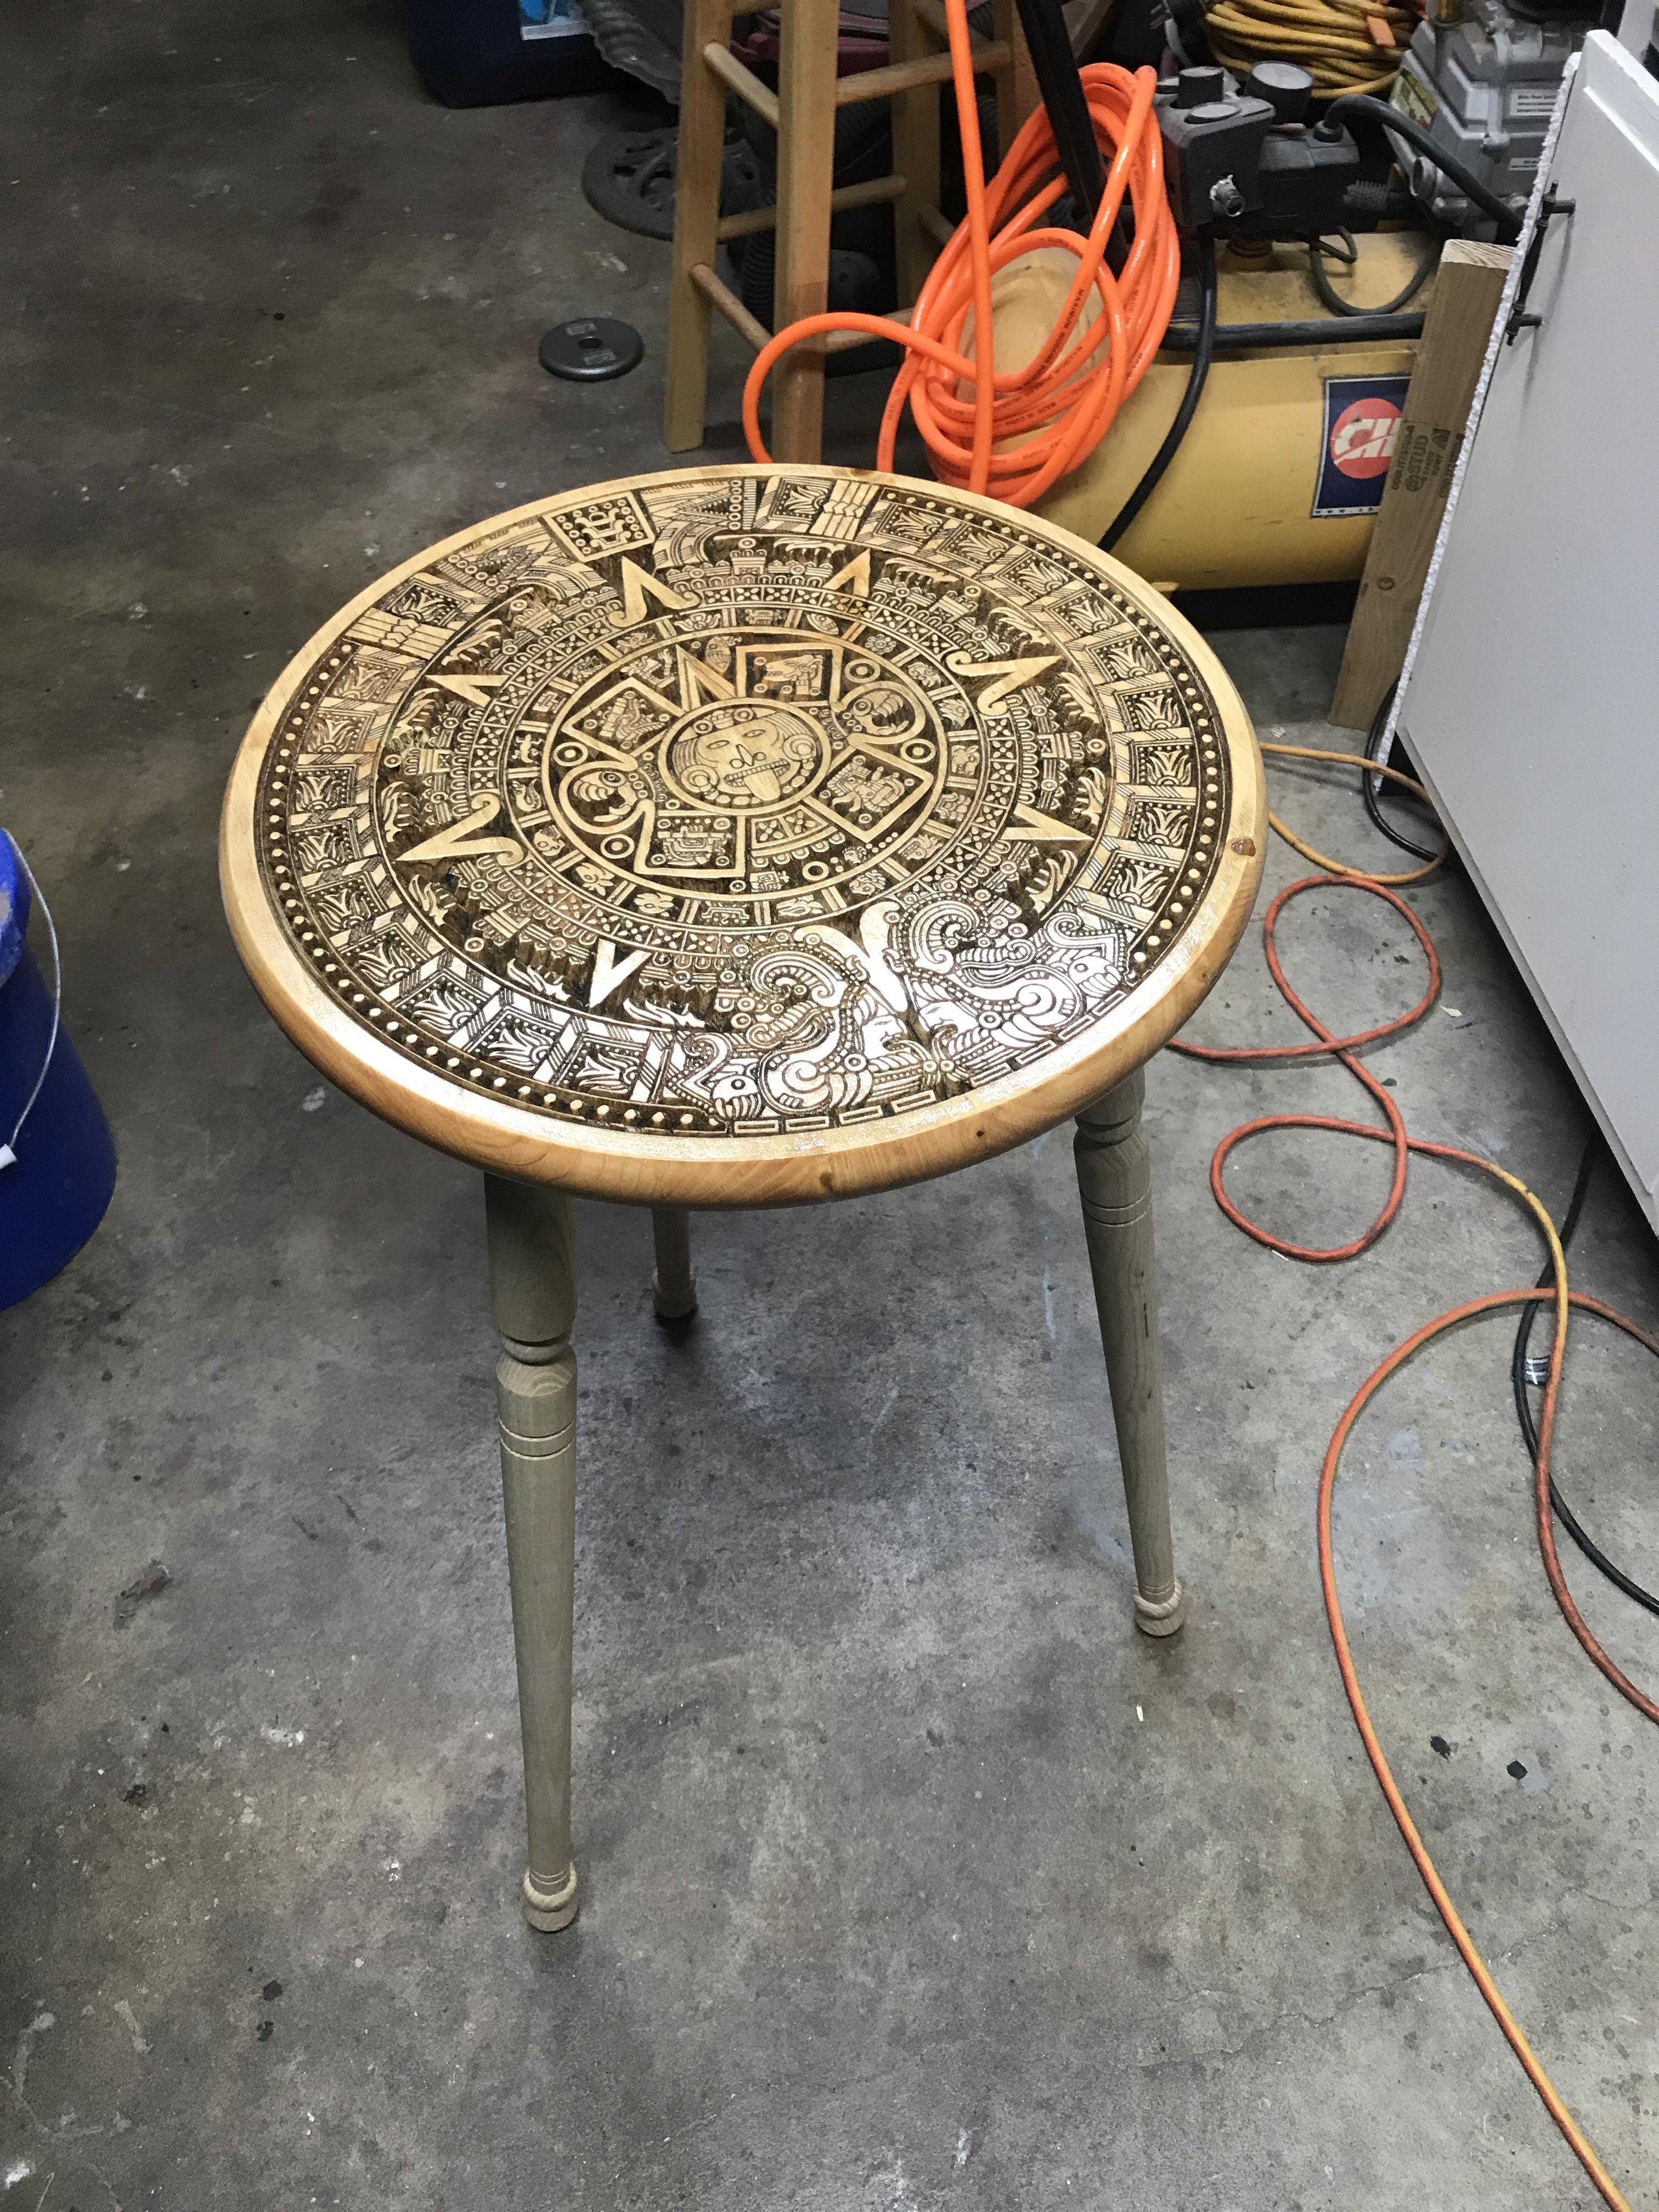
Here is a Mayan Sun stone table . The material I used was a round pine blank from Lowes, Table legs and hardware kit also from Lowes. I got the file from the interwebs.
If a file you are carving is cutting the wrong places, Like a negative, just add geometry around the outside and it will correct it.
This is a 15" carving done with a Whiteside 60 deg. V-bit . Cant say enough about this bit. It is my go to for almost everything. And last forever. Going on 3 yrs!
It took a little over 3hs to carve.
I stained them with Golden Pecan stain, sealed with shellac and glazed. Then Shellacked again.

To set up on table i used a square that is attached to my wast board. I use 2 pieces of .75 on each side to set zero. Just touch off the scrap.
Here is the file for anyone to give it a go. If you own a shapeoko this is a must!! Check you perimeters and such first.
File
https://www.dropbox.com/s/k21fcvwcqz51k23/sun_stone_01.crv?dl=0
Thanks for looking!
9 Likes
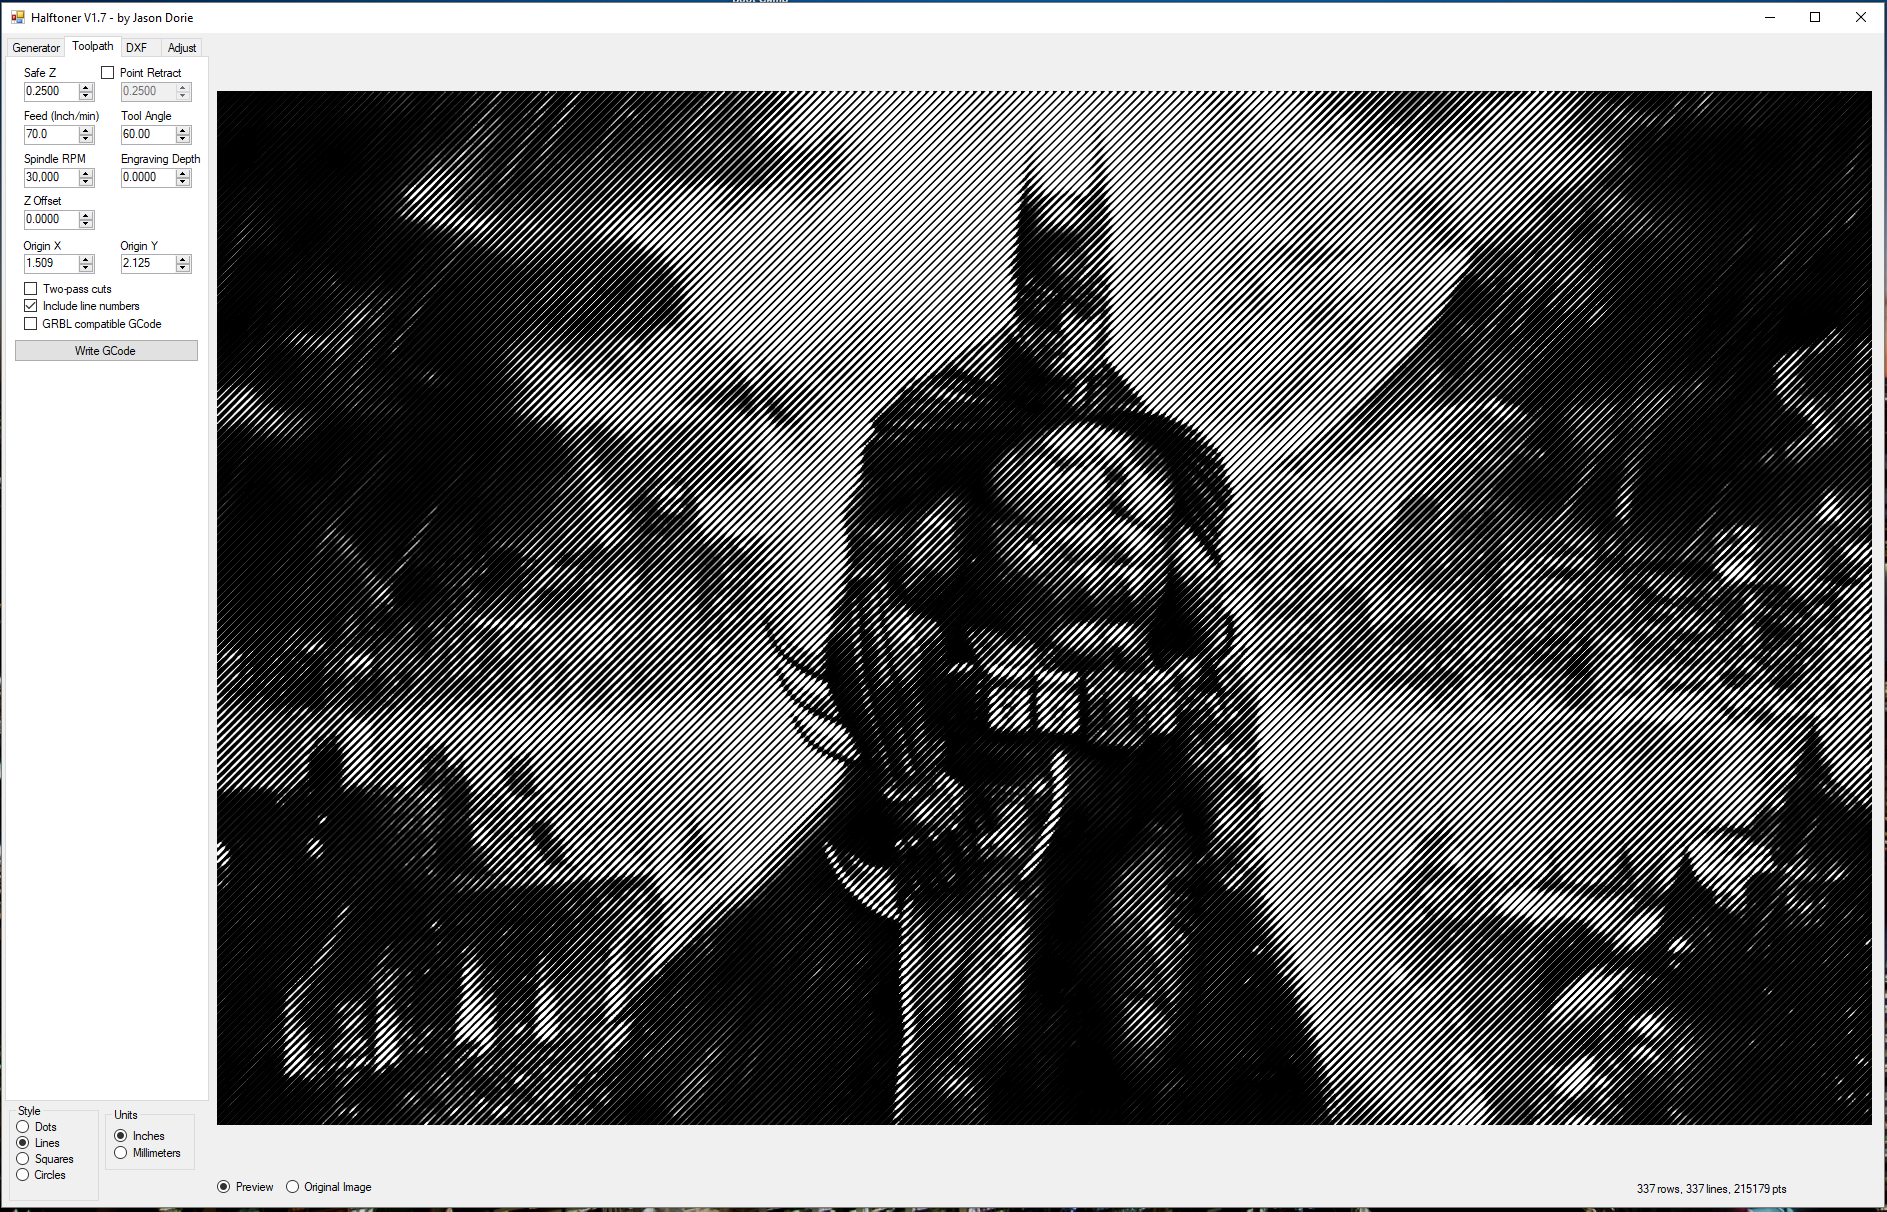
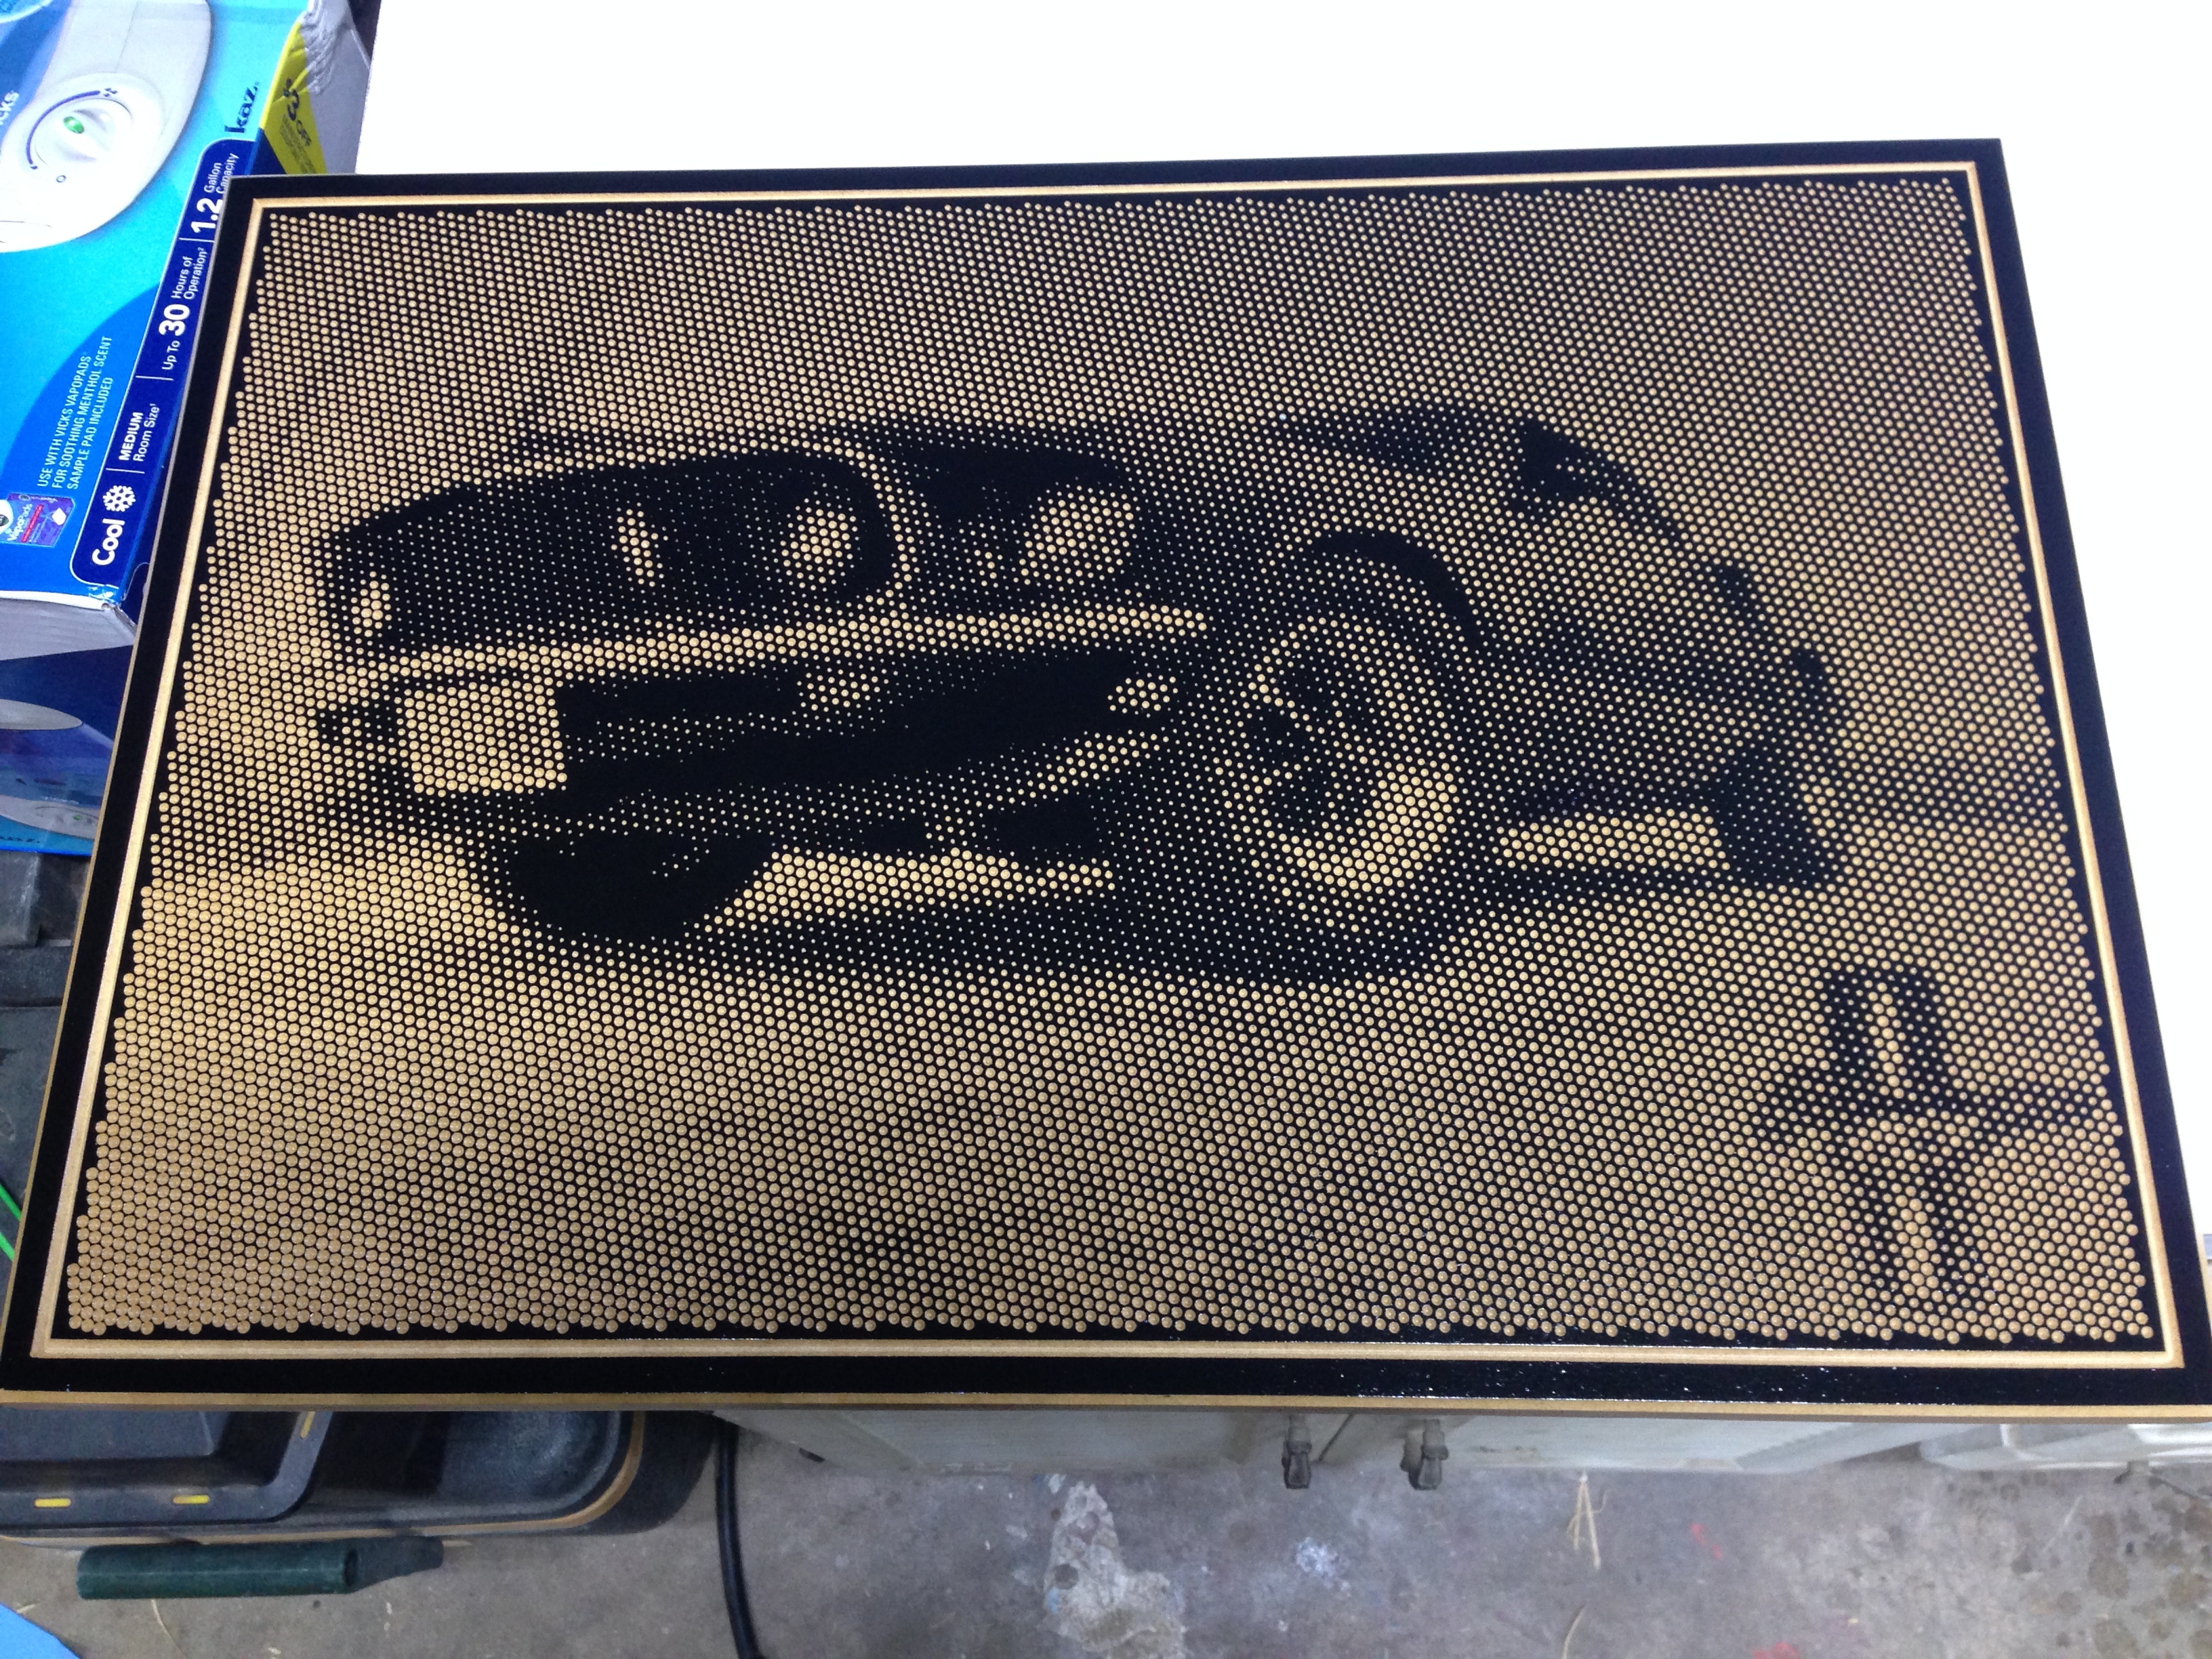
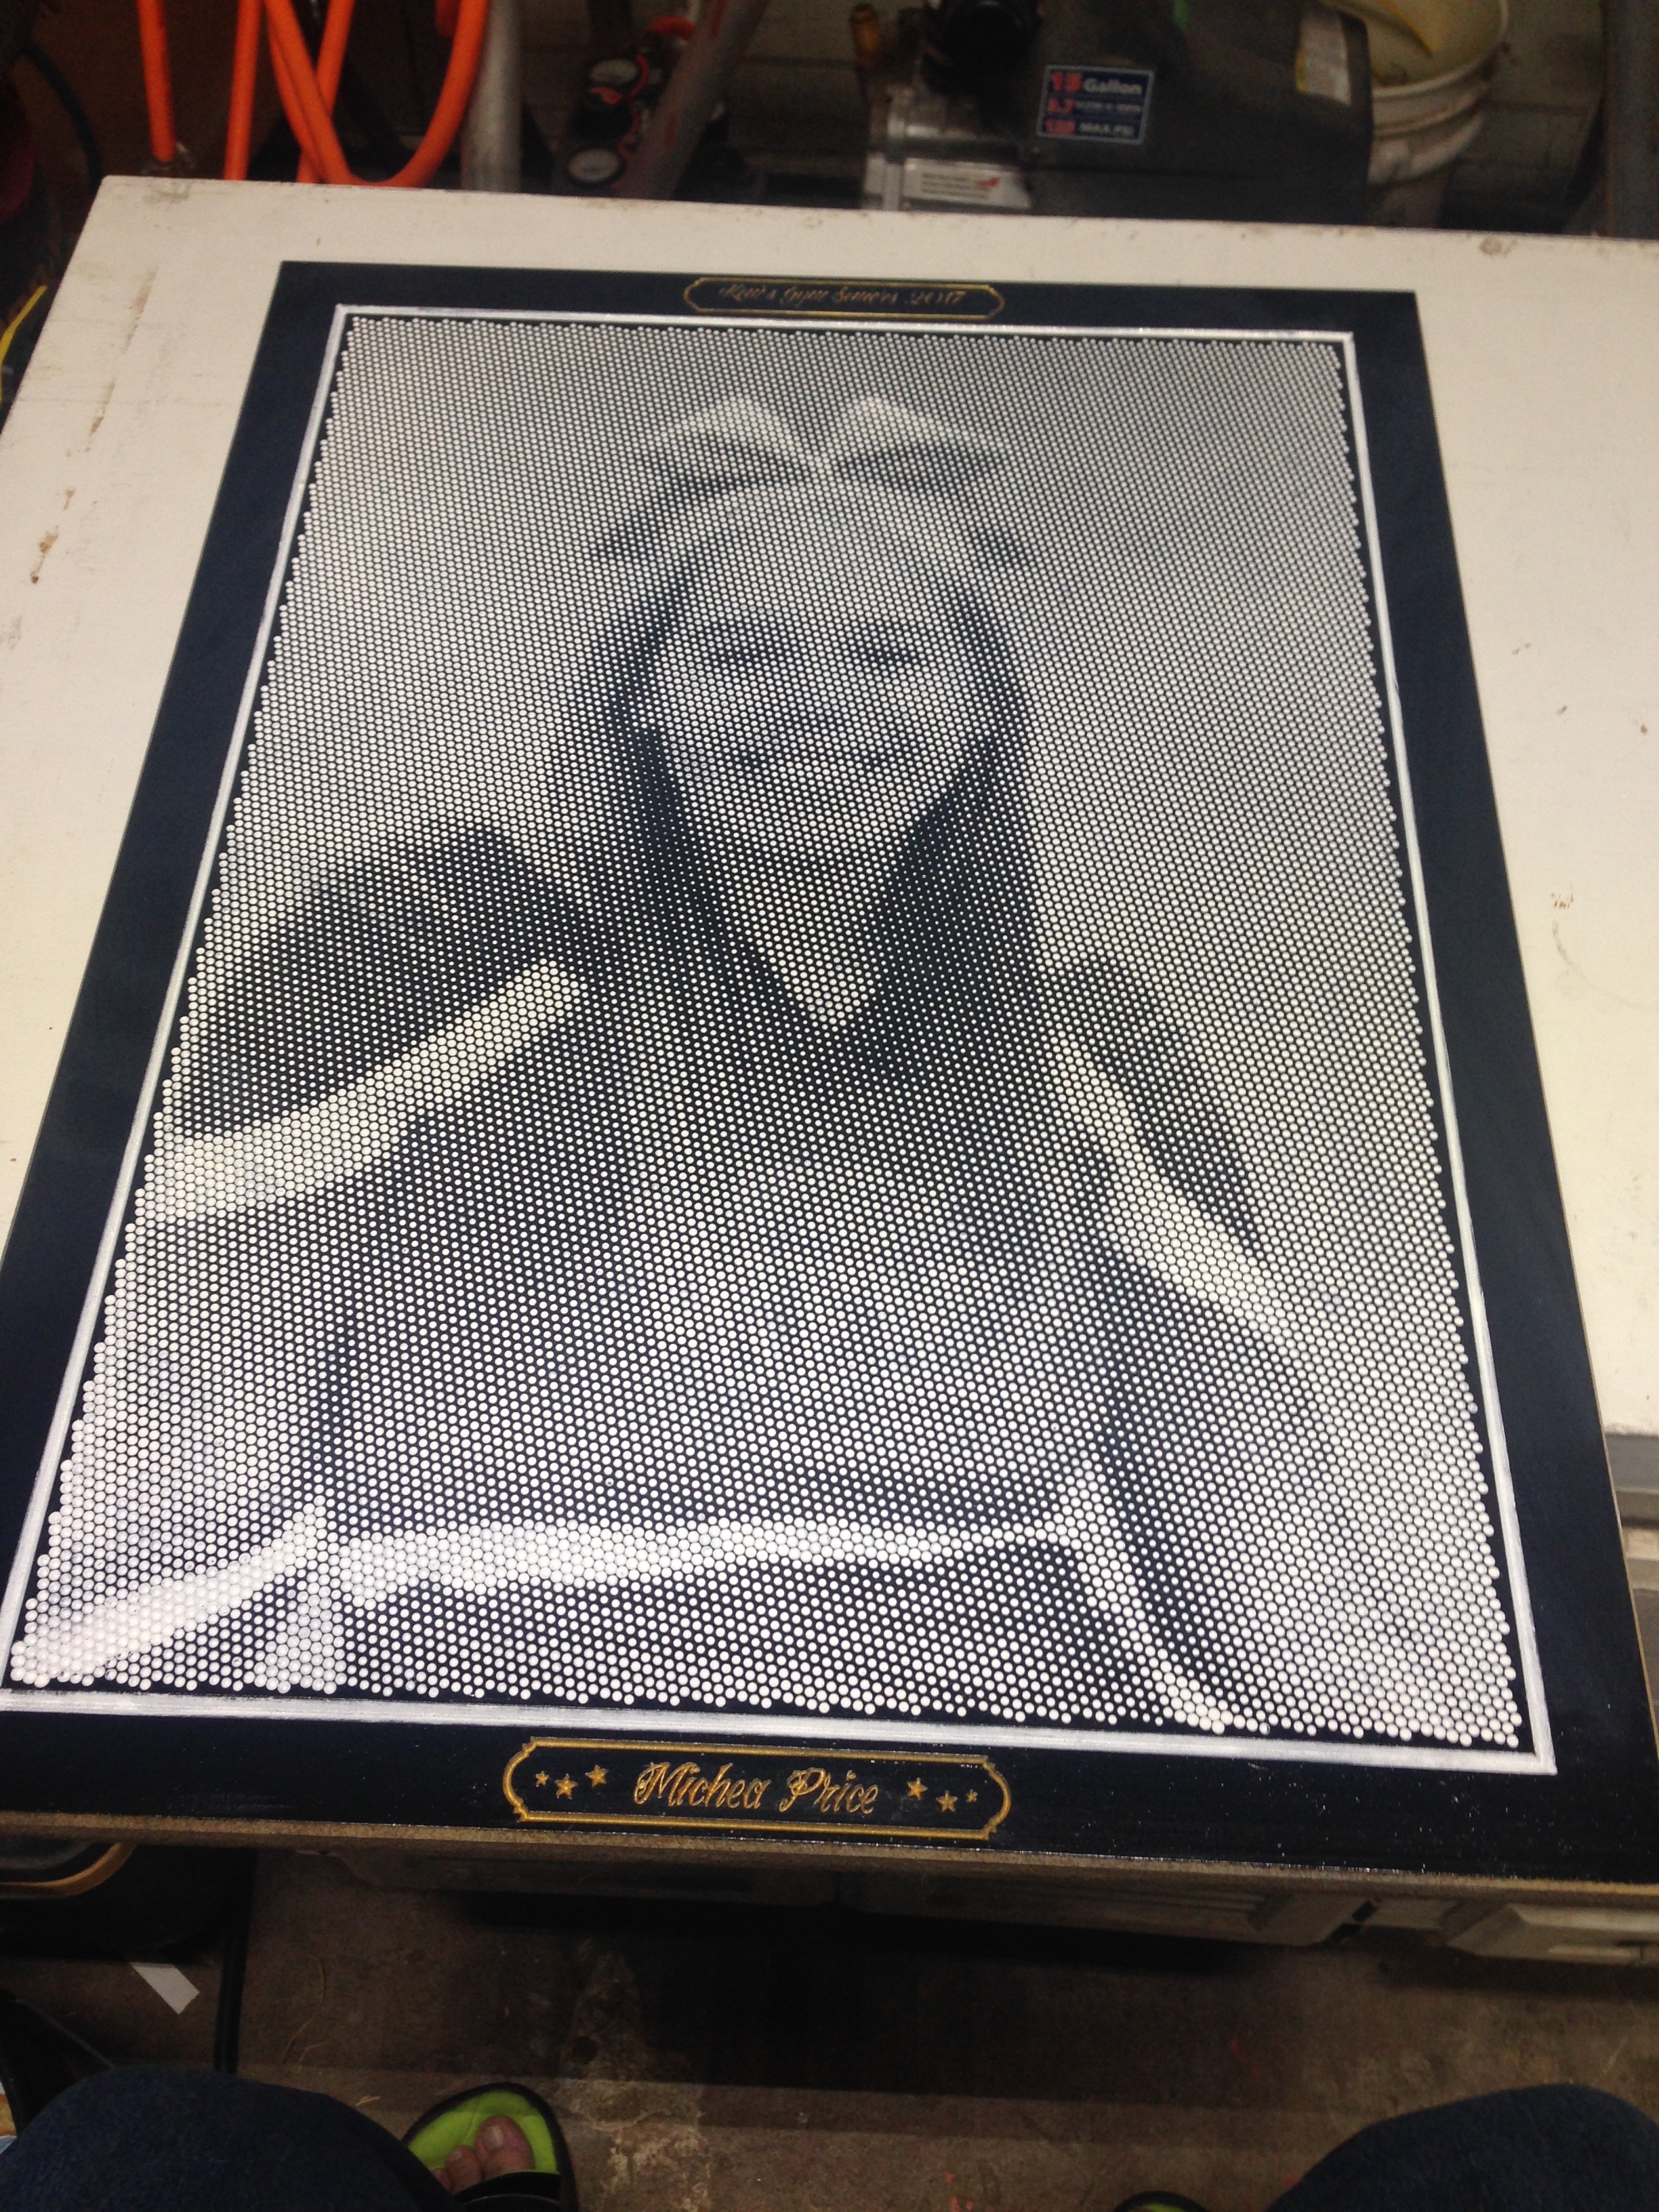
And here is a V-carved two tone image. I used regular MDF for the material. Used Halftoner for the processing and edit the code after the fact to mimic V-Carve. I have photo V-Carve and have used it for this but got mixed results. I have a sheet worth of mess ups. Moth of these are memorials.

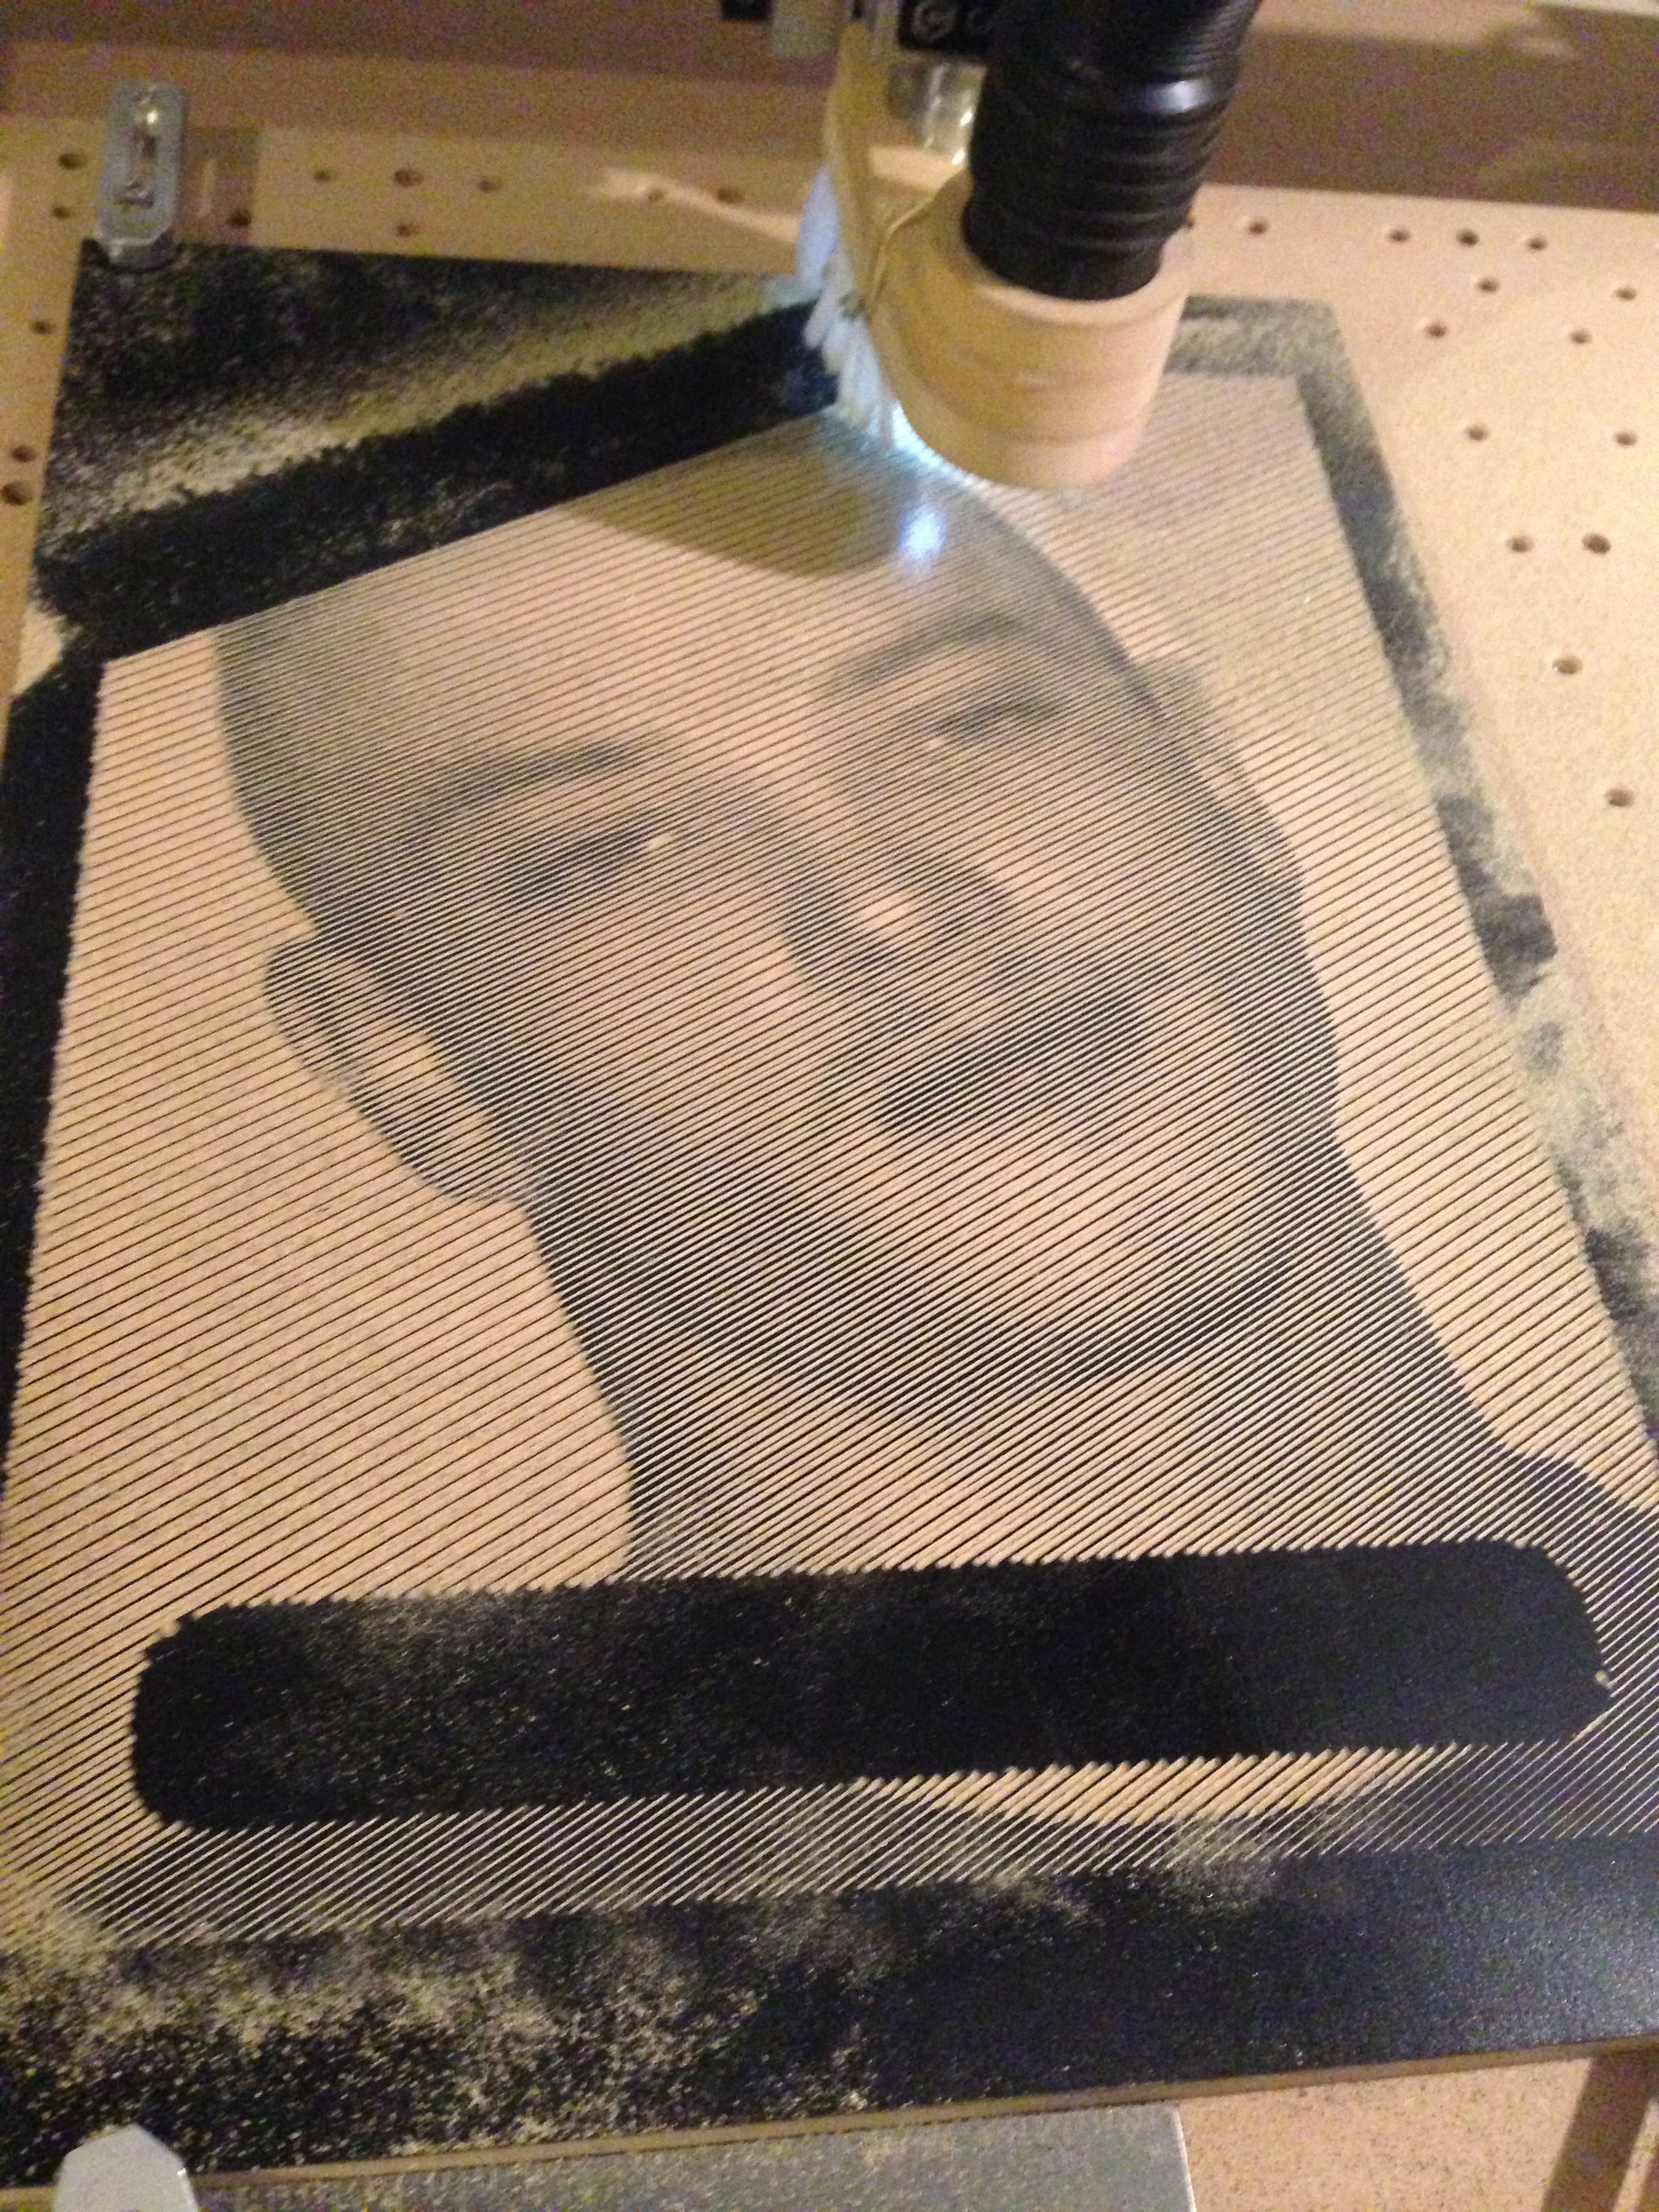
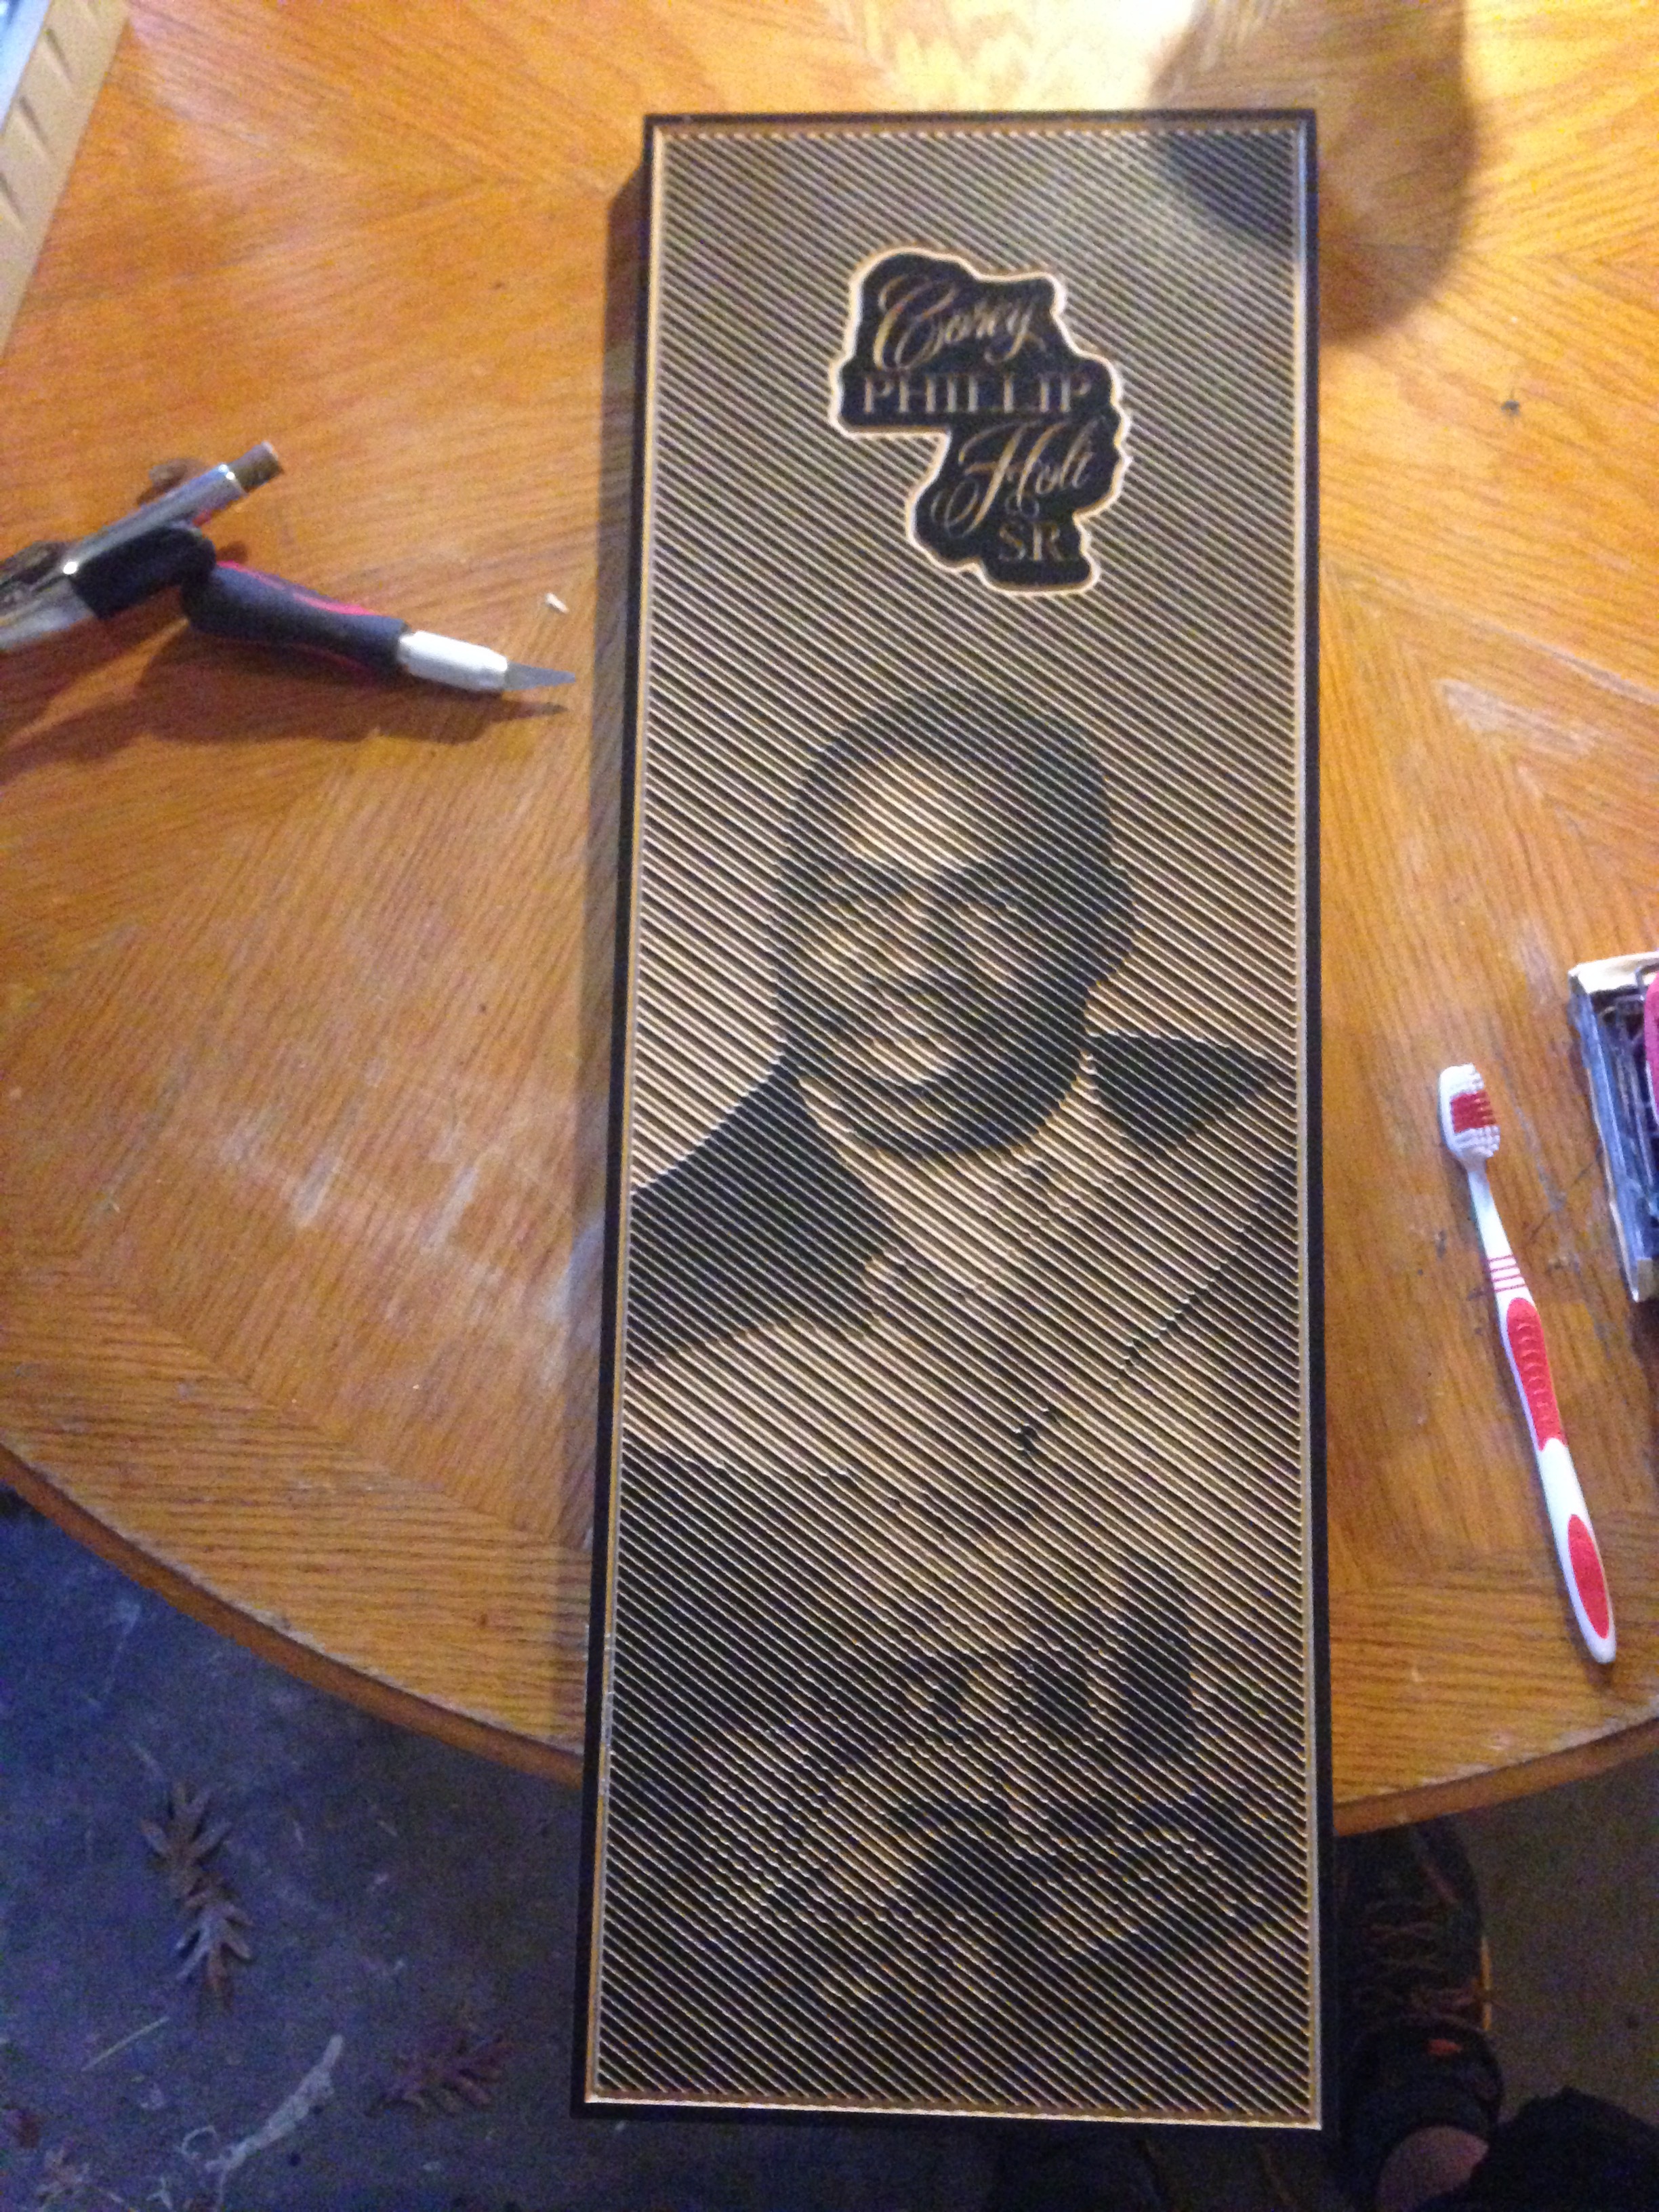
I cut the boards about 1 inch larger than oi wanted so i could run a cut out pathh and bevel the edges. I sealed the wood with sealcoat shellac, the spray painted black. About 1 can per 24x24.
Here is the file used for the outside frame. And the settings in Halftoner i used. This really takes trial and error to dial in and flatness is a must.
batman_01.crv.zip (157.0 KB)

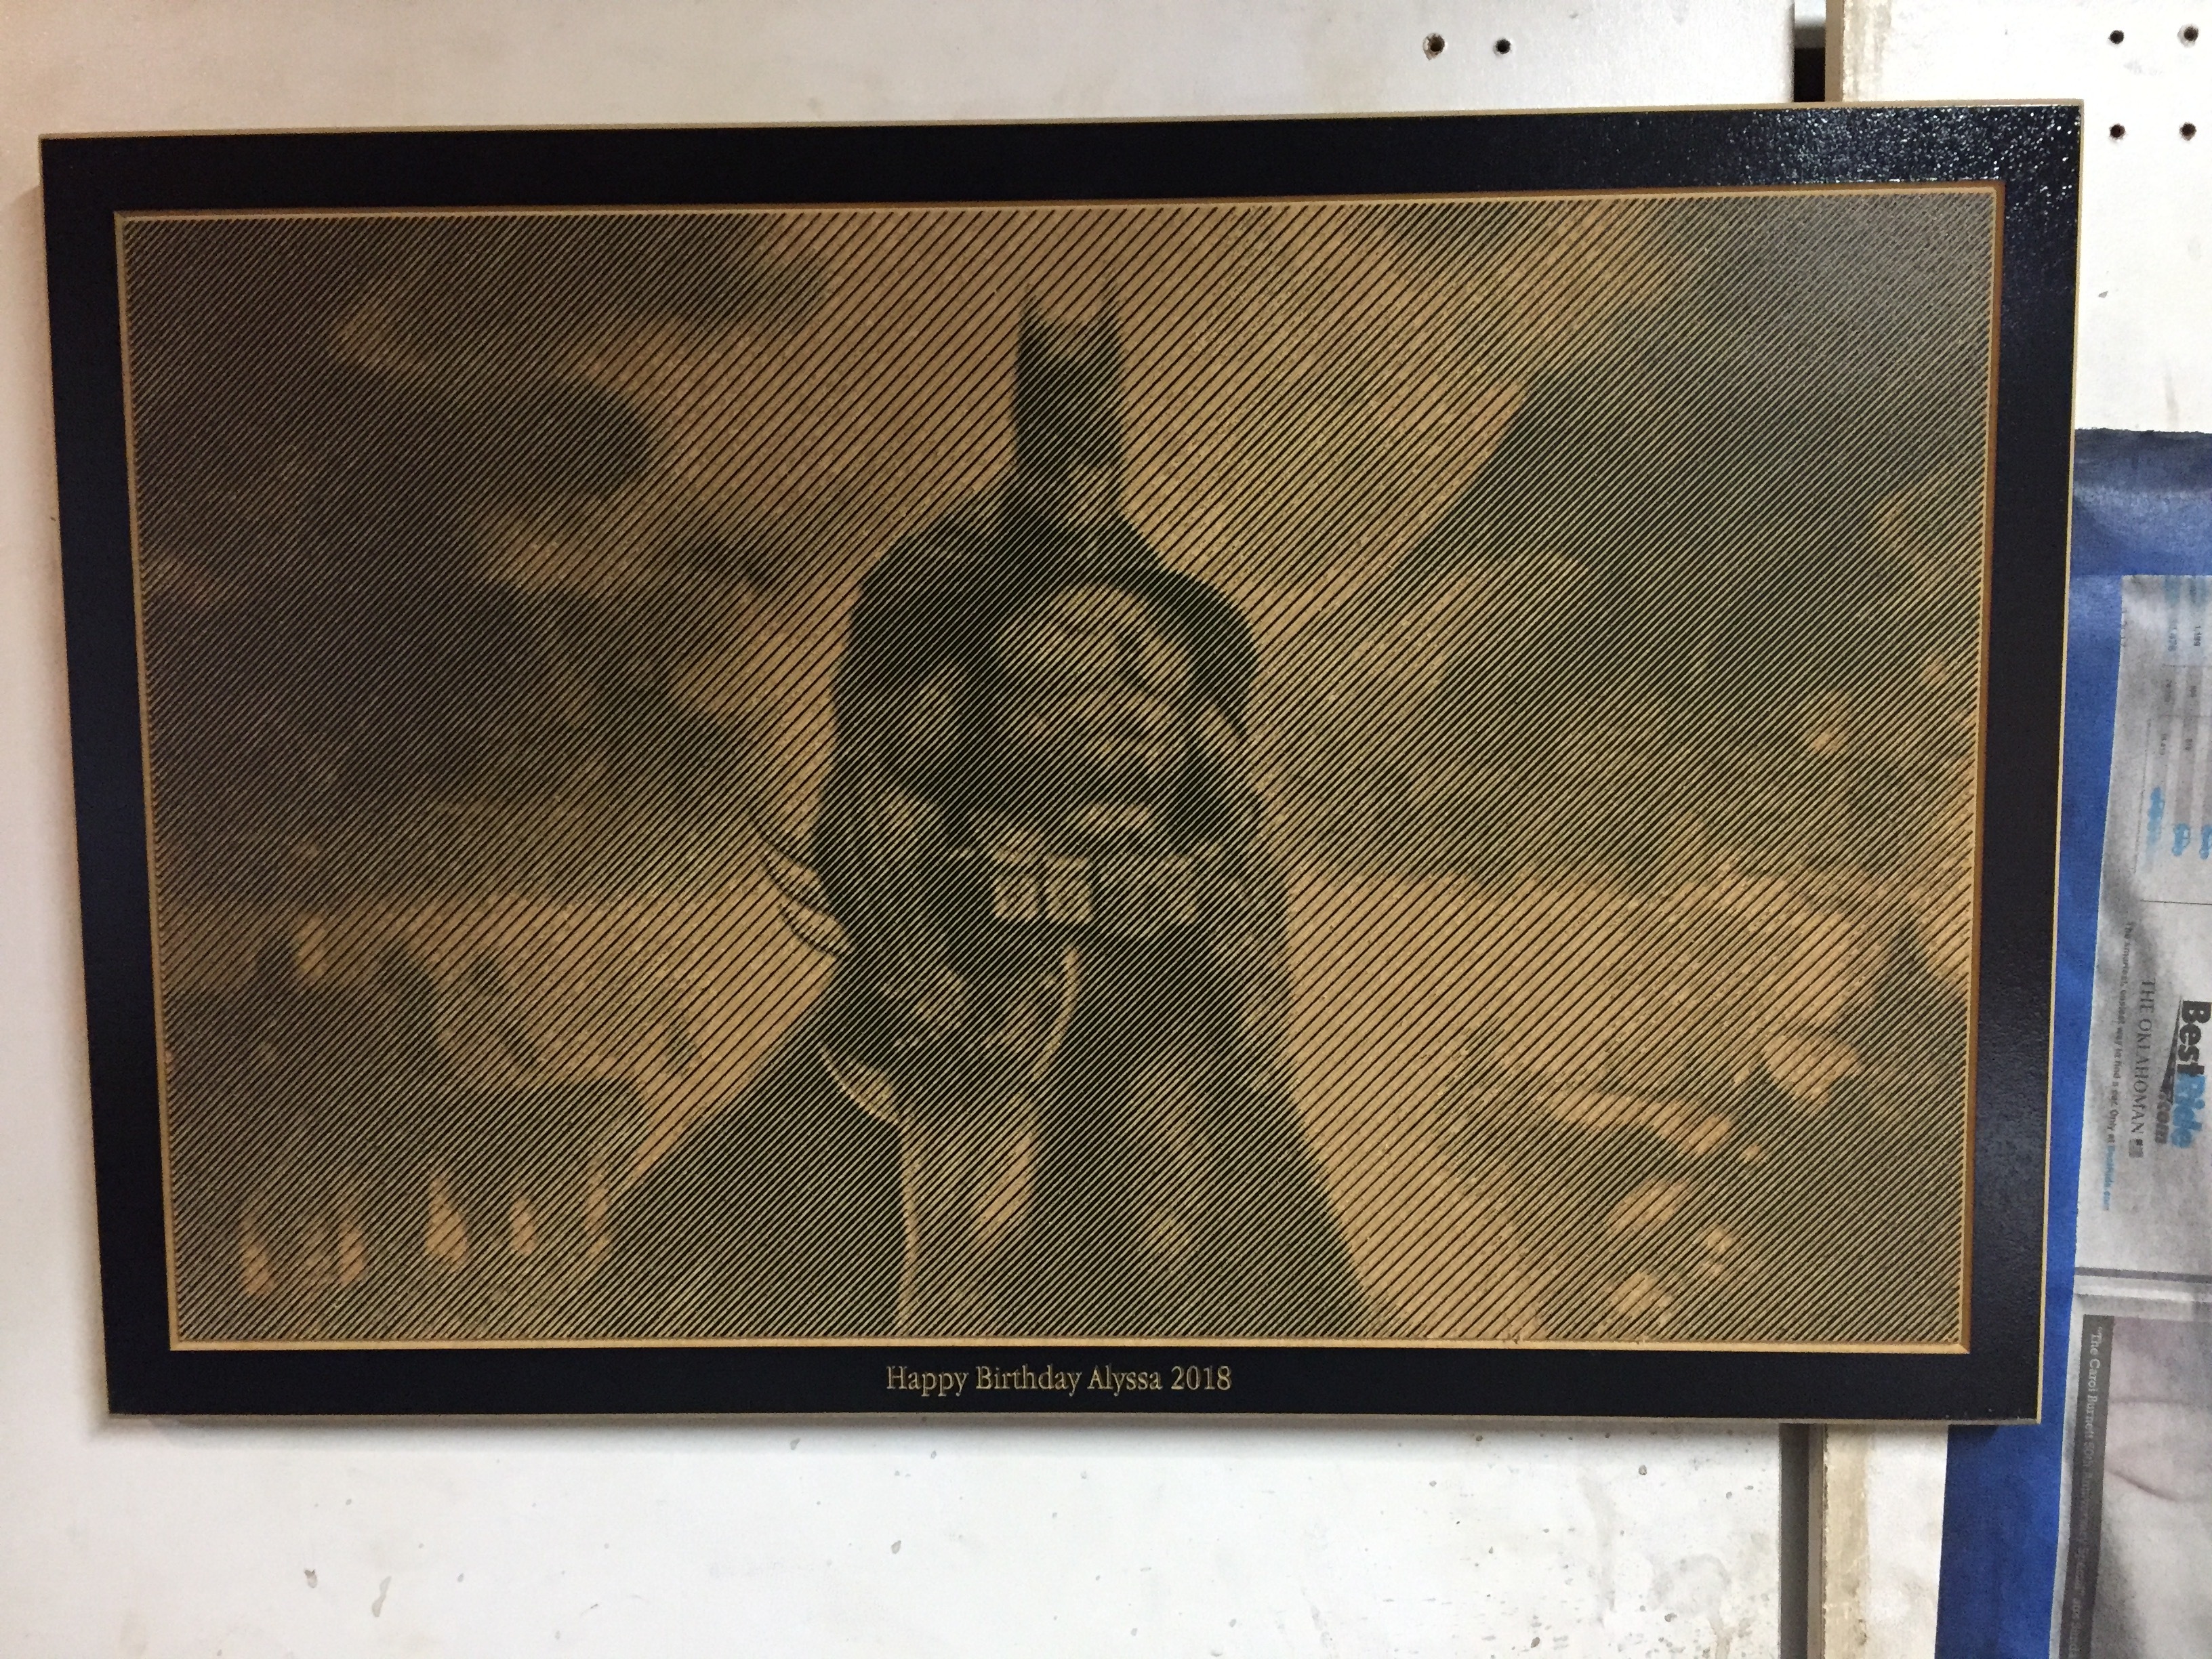
To finish i used spray shellac and used several THIN coats. Too heavy and the lines you spent 4hrs cutting will be too dark. Don’t ask how i know.
I tried a few with the hole option and burned up the Z driver and had to replace the board in my machine.
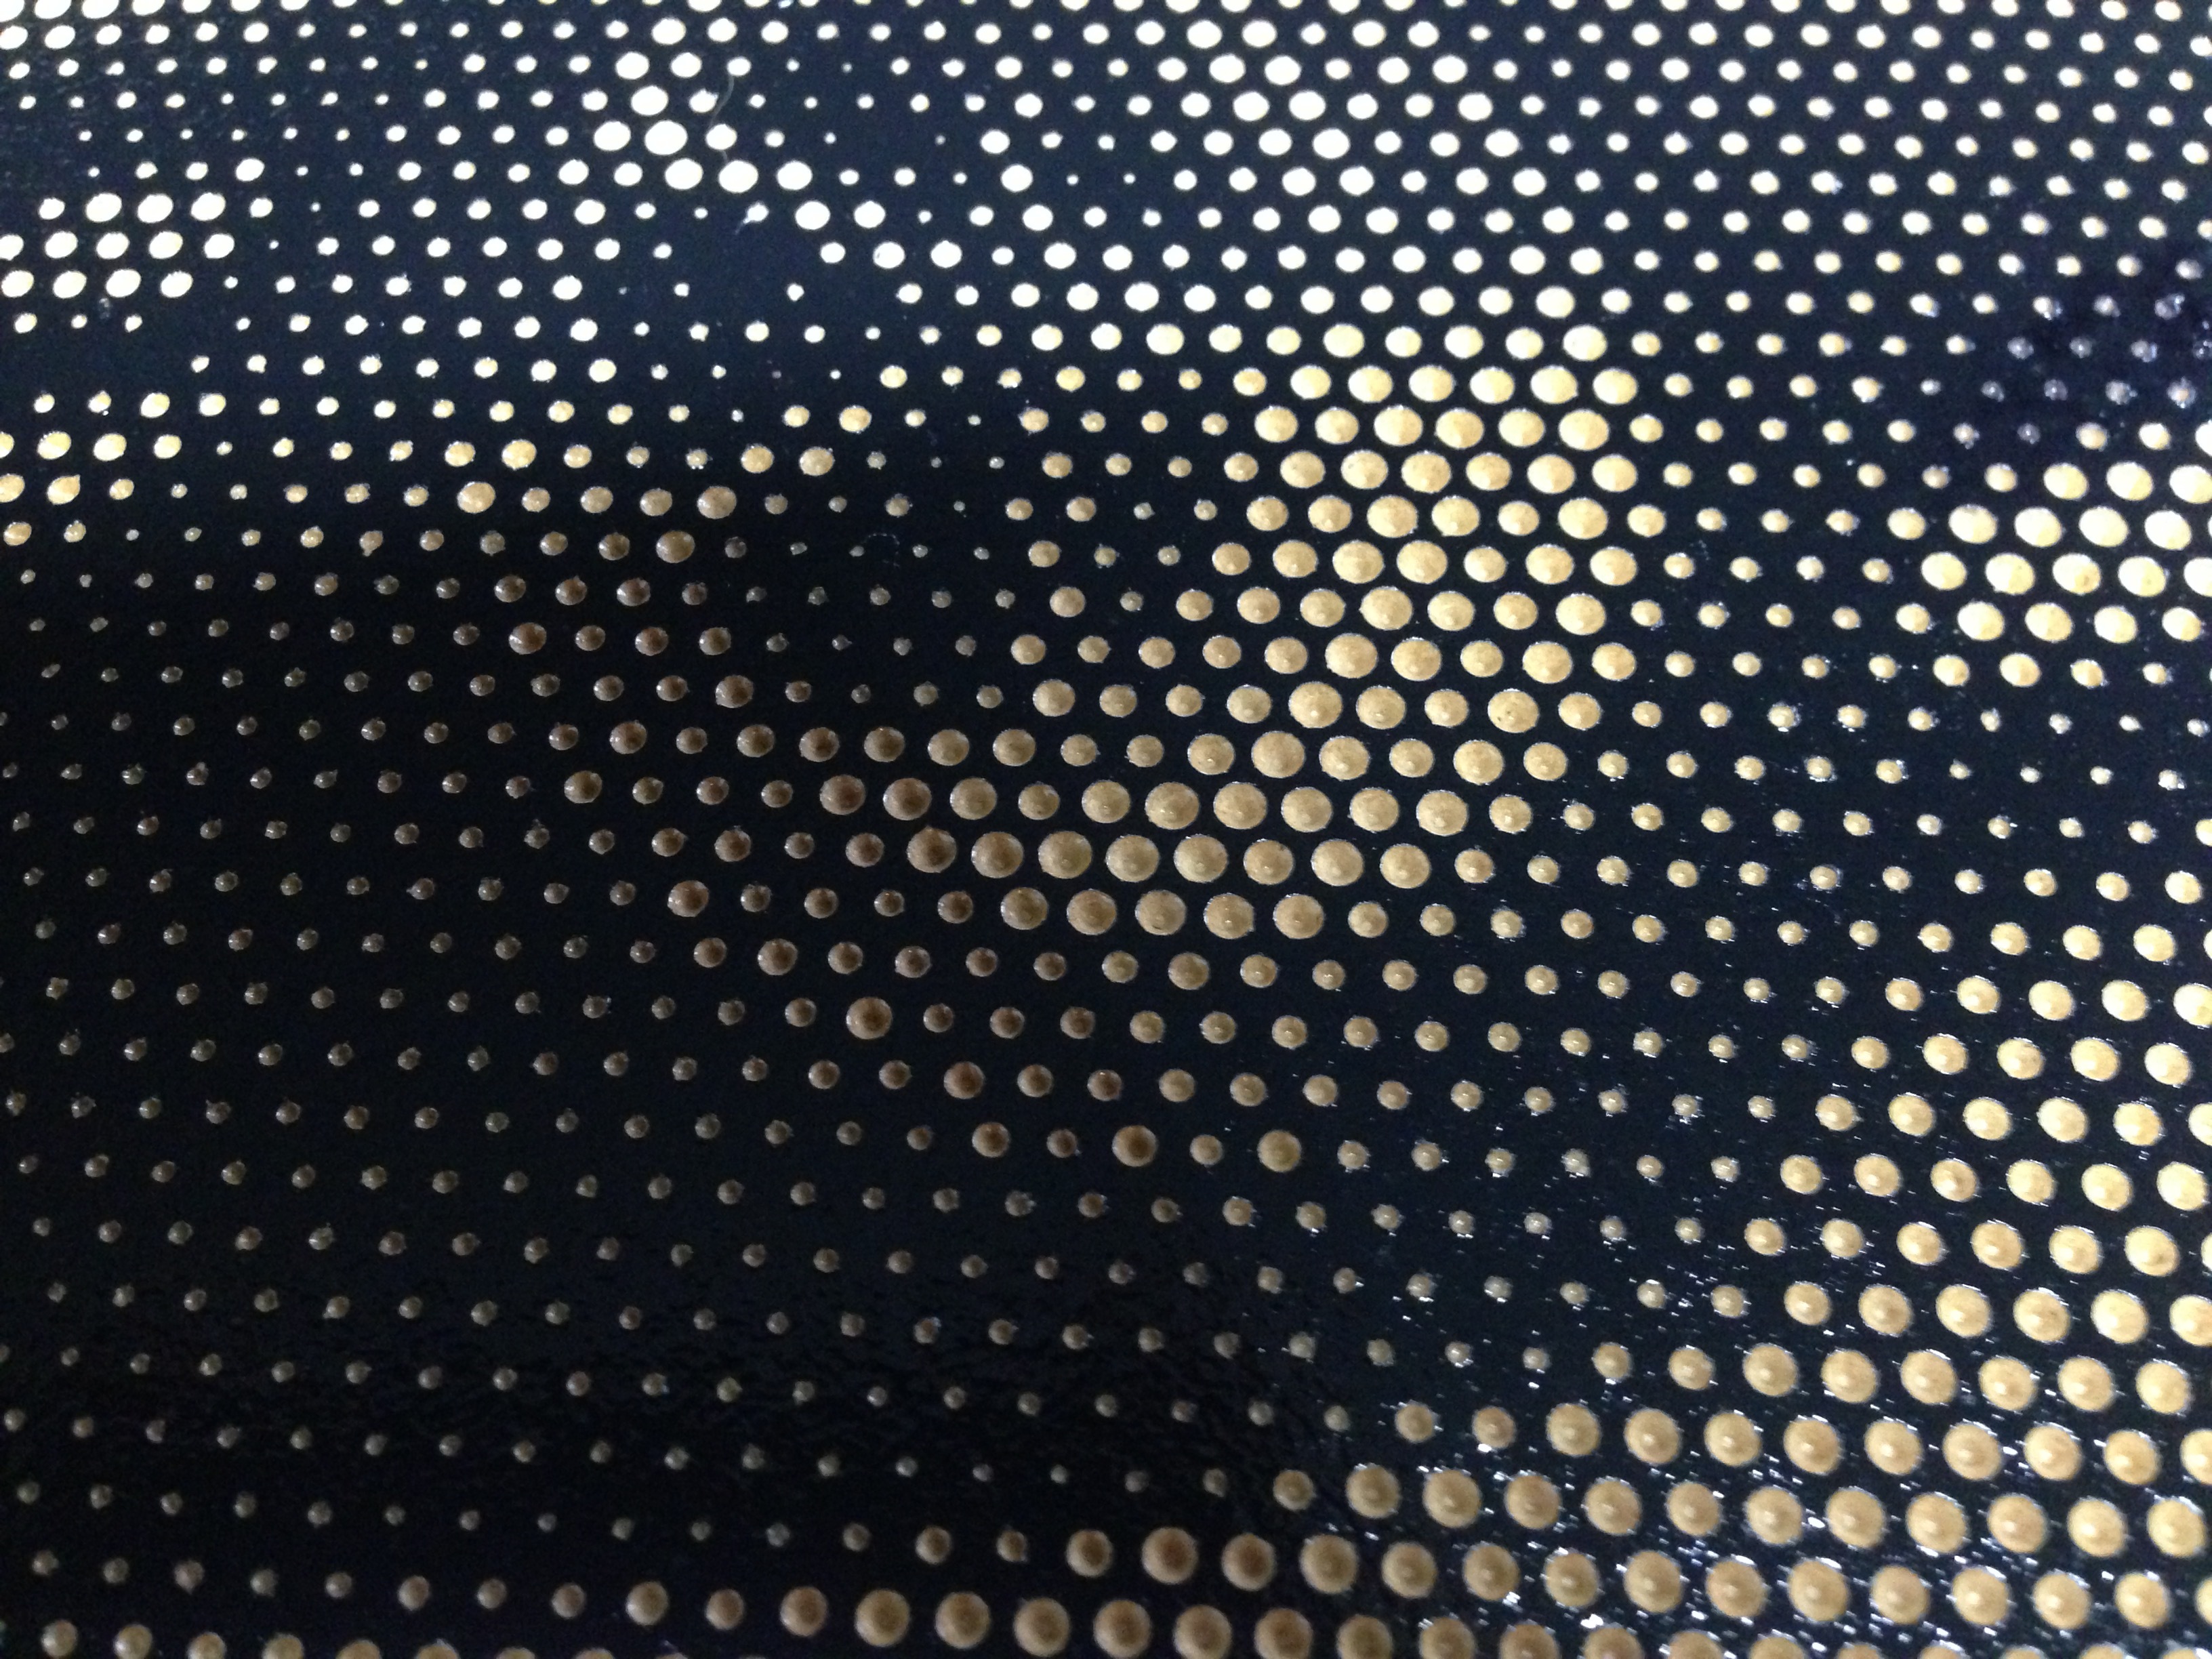
They look super cool but i wouldn’t recommend dong too many of the hole type. Like i said it burned up my board. But Carbide hooked me up after warranty for a replacement. Love this company!!
The last one i painted white after the final seal to give better contrast. It was a nightmare!
All were done with a 60 deg. V.
Thank again.
7 Likes
I’m not sure if I’ve missed the cutoff, as I’m in australia…
I also had a mandala and halftoner projects to enter but got beaten to it! haha they all look so good too!
This is my entry, an anniversary present for my fiance.
Carved from Tasmanian Oak, using amana V bit and carbide upcut 1/4" endmill.
Software used was Vectric Aspire, file is here 
5 Likes