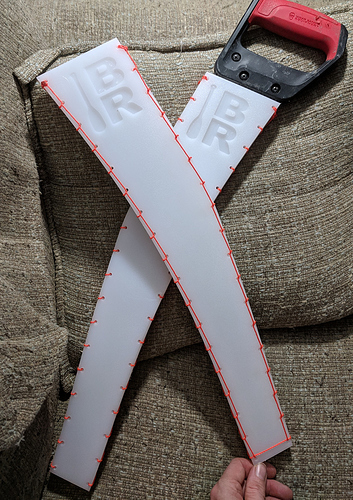
As “Chief Doer of Stuff” for PaddleBR, I’ve been clearing logjams and dismantling fallen trees on Bayou Fountain and other waterways around Baton Rouge for quite a few years now. When we’re out there doing paddle trail maintenance, our kit includes the Three Tools: a handsaw, a long-handled 4-tine cultivator (“rake”), and long-handled loppers. When it somes to the saw, one stands above the rest and has claimed its space in our canoes: the Corona RazorTooth 18" Pruning Saw (RS 7510D). It’s cuts like a dream, and at $25, we can consider it a wear item and just replace it after a year or so once it’s getting dull and rusty. (Paddle trail maintenance is not gentle on handsaws, what with all the muddy cutting and constant wetness.)
The one thing that isn’t all dandy about our favorite saw selection, however, is that Corona doesn’t make a scabbard for their big-box-store, consumers-and-down model. A while back, I made one with some plexiglass and some HDPE spacers, bolted together with small machine screws and locknuts. Well, now I have a Shapeoko XL, so I figured it was high time I made a new scabbard (and one for Mike, too, as he’s basically “Associate Doer of Stuff”).
Corona_RS7510D_Scabbard.zip (251.9 KB)
I picked up a half-inch thick 15x20" HDPE cutting board from Sam’s, and if I squeezed everything in, I’d just be able to make four scabbard halves from it. I took a photo of the blade and did a quick tracing in Inkscape, then played with the layout until I could get everything just right.
In order to have the most space inside the scabbard (to make it as easy as possible to toss the saw back in while out in a canoe), I made the two halves mirror images with a 5mm pocket in each. I decided not to attempt plastic welding nor to wish upon HDPE-capable adhesives. Instead, I’d just make holes on 1-inch centers down each side and then use some cord to stitch the halves together. (The Inkscape skills I learned on my double-spiral cribbage board made making the holes quite easy.) If the stitching ever gives out, it’s easy enough to replace, and it’s low-profile enough to be unlikely to grab things.
I’ve included the Inkscape SVGs, Carbide Create .c2d files, and g-code .nc files. I cut the saw pockets (with a #201 .25" Flat Cutter) first, but the board acquired quite a bow afterward. I added myself to the set of workholding devices, and everything worked out fine in the end, but it would likely be better to rearrange things and save the saw pockets for near the end. Everything else was cut with a #102 .125" Flat Cutter. In that g-code file, I added non-changing “tool changes” (g-code: “M6 T102”) when moving from one piece to another so the machine would pause automatically and thereby give me a chance to adjust my clamping (since I was using the board edge-to-edge). Have I mentioned how convenient I find using Notepad++ and, say, NCViewer.com together? (You just have to always click the “PLOT” button again whenever you make changes to the g-code side of the screen on NC Viewer, otherwise the “machine” side will still be using the g-code as it was before your edits and you’ll end up really confused.)
Anyway, the scabbards came out nicely, I thought, and I took a few minutes to stitch them together with some small-diameter line. I’m almost tempted to do a colored epoxy inlay for the PaddleBR logo, but I think I’ll just let the logo collect mud and debris the old fashioned way. (Maybe I’ll throw another set together to use at our Earth Day booth. Definitely have to do an inlay and possibly additional art for that, although definitely art first, then saw pocket.)
Anyway, just a quick post-Christmas project while I wait for more tools to arrive so I can continue getting everything with my Shapeoko XL dialed in just the way I want it.
