Thanks for the input. What about MDF?
Thanks for all the suggestions. LED lights and a kill switch is on the list. It’s just not in the CAD.
The idea with having an air intake in the top compartment is that the air will come in from there due to suction from the vacuum. The vacuum will exhaust air in the bottom room where there’ll be an exit baffle. So the top and bottom compartment will be sealed off from each other except the hole for the vacuum pipe. Does that make sense?
1 Like
Ah, yes it does. The top compartment of my enclosure is not air tight (far from it, with a variety of holes for cables and stuff) so I am in a similar situation, just not designed-in 
NP,
MDF is also sound reflective to mid and high frequency as it has a hard surface, at low frequency it becomes transmissive. It would be OK as a structure but the basic principle of sound absorbtion is to have a material which the sound waves bounce around inside and get dissipated by conversion to thermal energy.
Rockwool does this by having the small glass fibres move with the sound, flex and have friction against each other, also the surface of rockwool is porous to let the higher frequency sound in.
You could look at things like Acoustilay mats, these are great for mid and low frequency, your labryrinth will inherently make the path for high freqency more difficult.
2 Likes
I’d love to pad my whole box (or at least the top part) with Acoustilay mats or something similar, but it seems kind of expensive.
Right now I have the top compartment padded with polystyrene. Do you think that’s a bad idea as well then? Would you pad it with Rockwool instead? Can I use any Rockwool or does the type matter?
1 Like
I don’t think the inside should have any material that would hold/capture dust, because there is no such thing as “great” dust collection, best you can hope for is “good” (my opinion). And if you ever cut MDF the problem doubles.
I would also suggest tweaking your design to have two holes from the upper to the lower compartment. Dust collection is going to generate a static charge, and even with grounded dust collection you will have less disconnects if your dust collection hose stays away from everything else (if possible).
Who knew building a box would get so complicated?
1 Like
Yep, it’s a heavy duty solution, I’d only use it for specific areas.
I would not use polystyrene at all, for any part of the enclosure, it’s just a flammable material you don’t want to deal with. Polystyrene has very little to offer in sound absorbtion, it is reflective to high frequency and not dense enough to do anything at all to low frequency.
Rockwool or other soft, fibrous or closed cell foam type materials are good, lots of people have used rubber exercise mats and similar. The key is to have flexibility and air gaps. Closed cell foams are good as they won’t hold dust.
As Robert pointed out, rockwool would need some sort of fabric to cover it to keep the glass fibres away from you (don’t breathe them in) and to keep the dust out of the rockwool.
As for grades of rockwool, the denser the better basically, most have some sort of kg cubic metre (or Imperial units equivalent) but whatever the heaviest stuff that’s locally easily available will do.
HTH
1 Like
Thanks for the thorough explanation. It sounds like I should definitely keep away from polystyrene.
I might end up making an inner wall in the compartment and then put Rockwool between the inner and outer wall.
1 Like
I’ve been thinking about doing sand filled panels. The rockwool designs I’ve seen seem to require more wall space than I call afford in my work area. Loose sand held between thinner sandwhiched panels seems like a good way to cheaply boost the absorpion characteristics of the enclosure walls. I’ve seen discussion in other forums saying it’s really effective to being a nightmare for whole room sound proofing. Think jam session rooms.
However, planning for everything has been my downfall. Can’t bring myself to commit to it as the loss of flexibility to just screw in new accessories is a pretty hard downside. Every mounting surface would need to be planned, or the sand escapes when I poke a new hole. Plus it’d make everything comically heavy.
Long winded way of asking if anyone else here as tried it, or if it’s a bad idea worth pursuing.
3 Likes
Sand is an interesting animal from a vibration standpoint.
Initially it works really well by providing friction damping as the sand particles all slide around against each other. Unfortunately they tend to eventually settle into a stable configuration (like shaking the sugar jar to get the rest of the bag to fit) and at that point become just additional mass.
If you’re trying to stop kick drum getting out of the studio then that serious mass can be useful.
I’d suggest trying some of that really heavy carpet underlay style foam, the multicoloured reconstituted stuff is frequently quite cheap;
1 Like
Fire doors are fitted with cold smoke seals and intumescent strips, which can be routed into the frame or the edges of the doors, (The intumescent strips are helpful in holding the smoke seals in place).
That might be an idea?
1 Like
Thanks for the advice @Griff. In regards to the feet, would you drill holes in the T-box, puts bolts through and then mount the machine that way? Or can I simply takes the shoes off the SO3, lay down a non-slip mat of some sort and then put down the SO3 on that? Is it vital that the SO3 is level?
You are most welcome. There are as many ways to do this as there are people in this forum so…
My approach is to bolt the frame directly to the torsion box. More rigid then simply setting on top of a heavy mat.
If you choose this route you will need to knock the PEM nuts off the frame so it sits directly on the torsion box.
This is my most recent iteration for the machine Base board (note, not Waste board). The waste board sits on top of the baseboard.
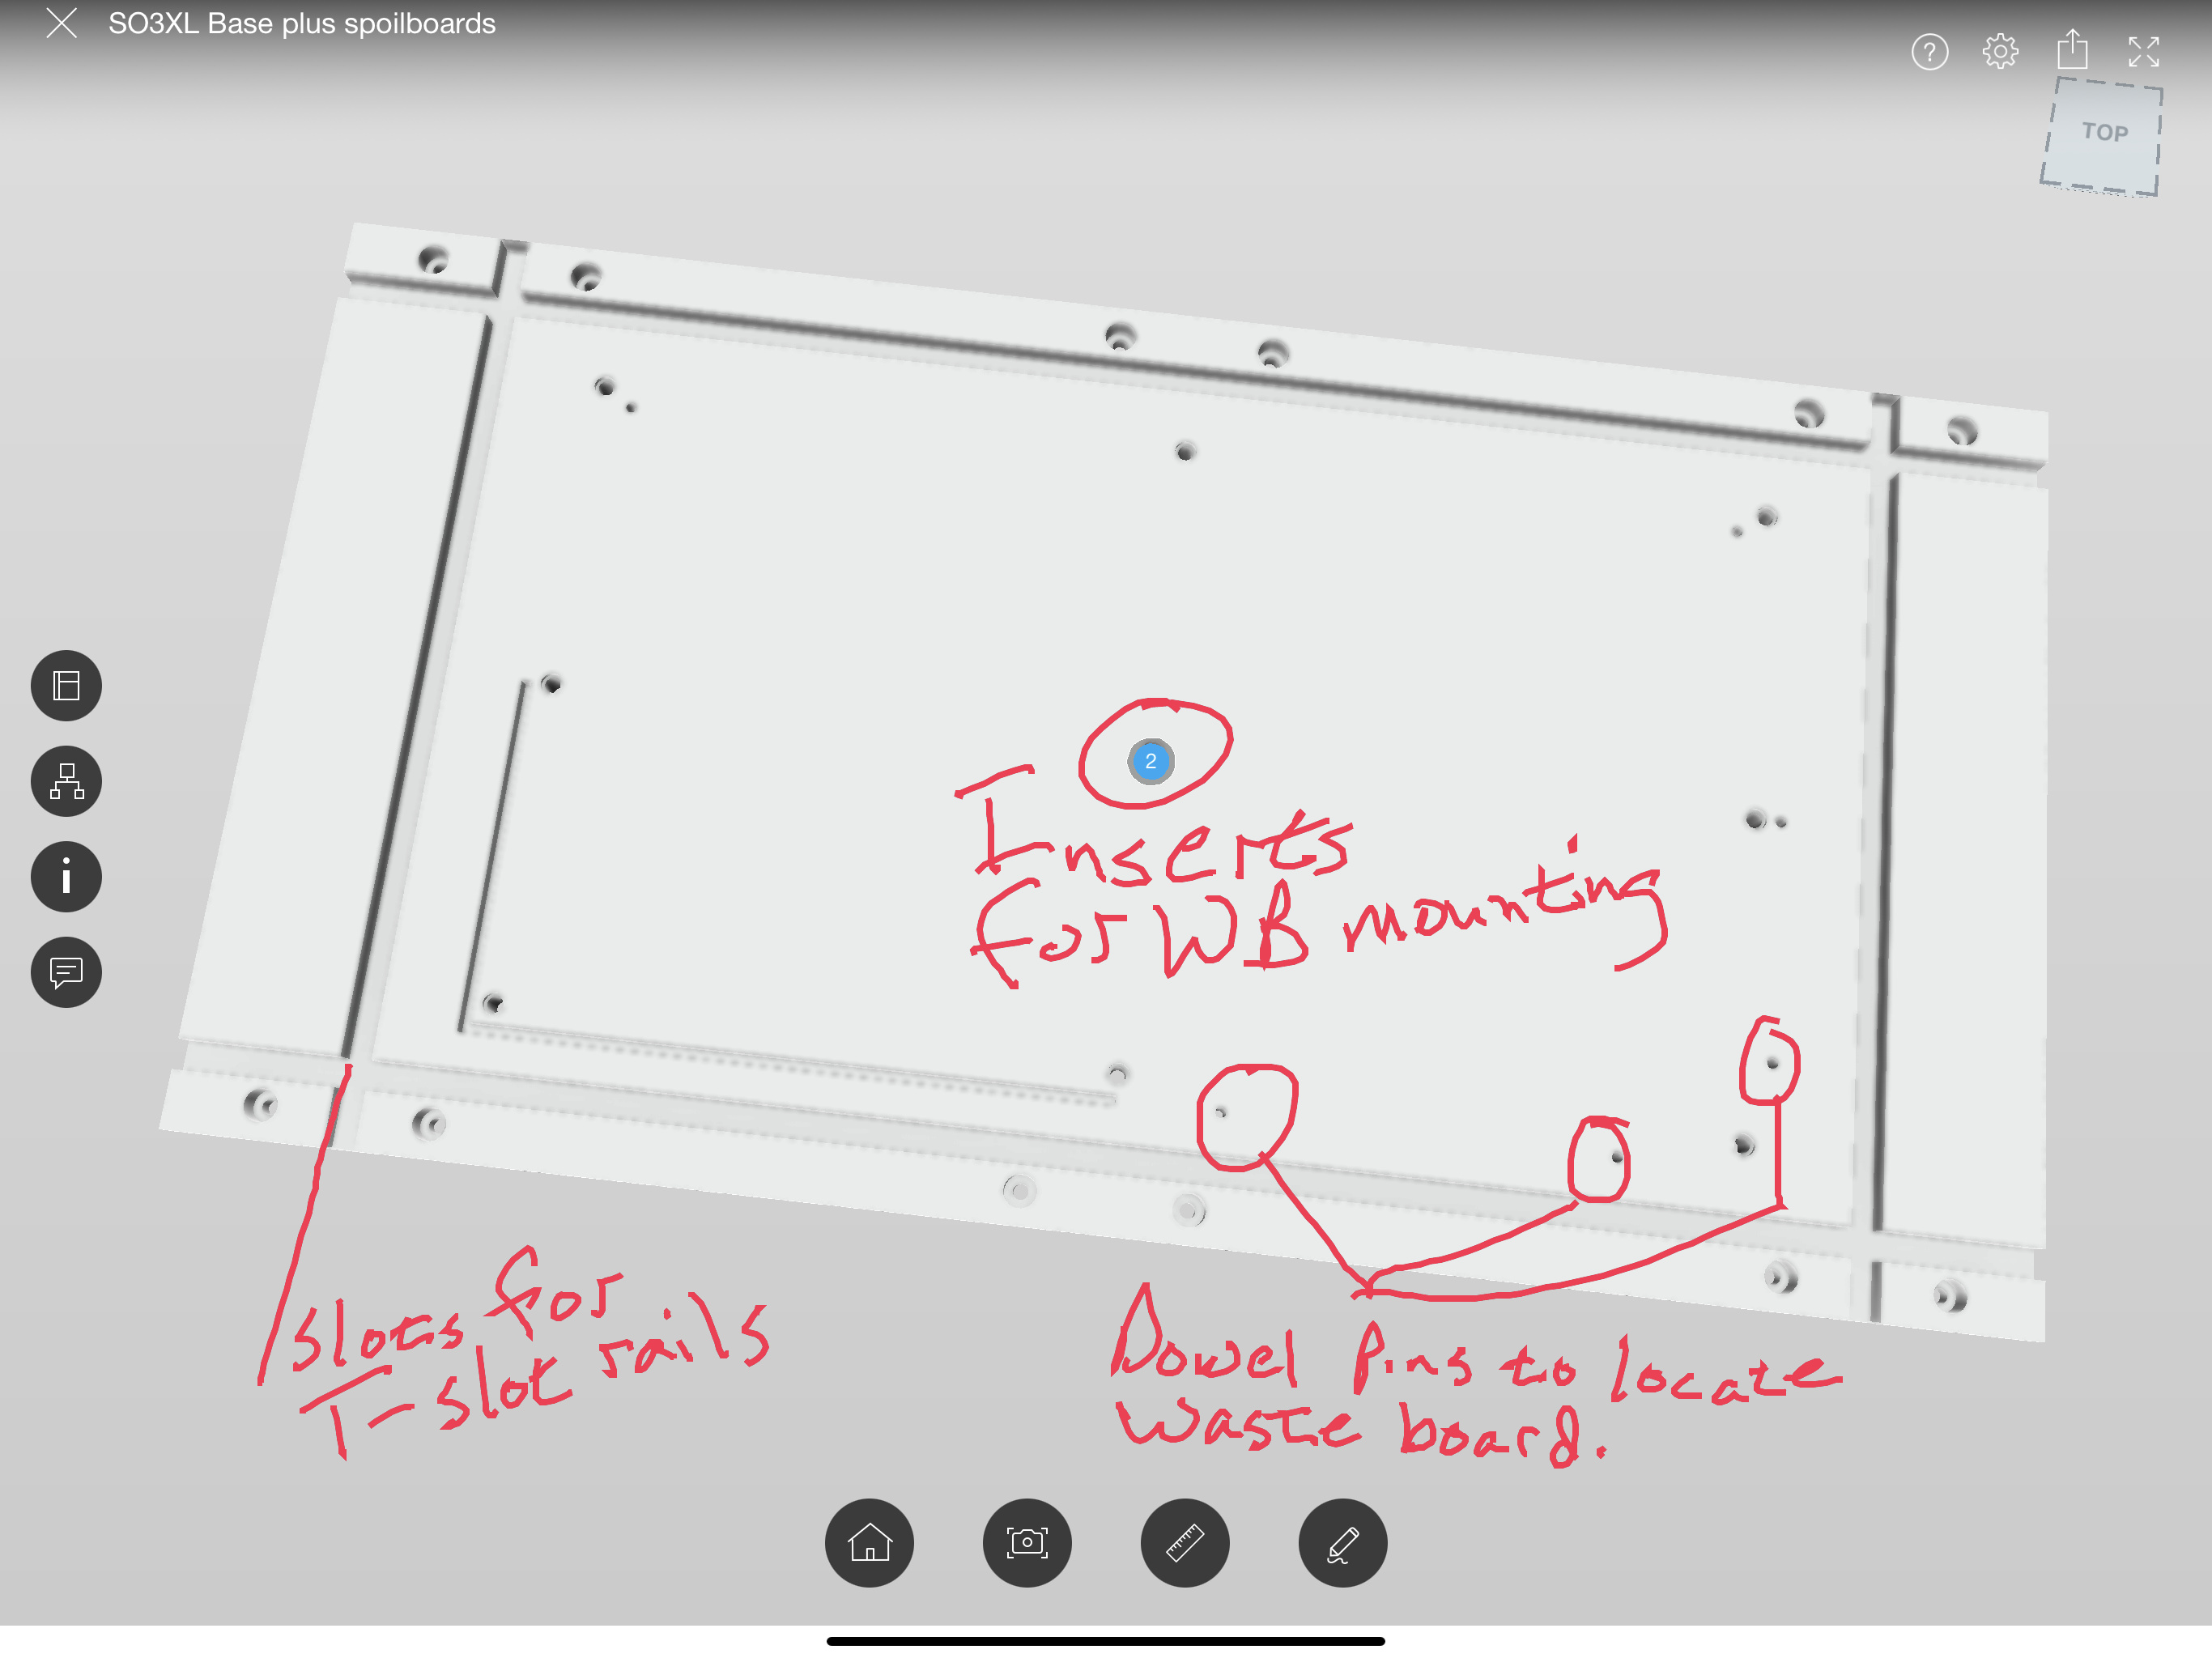
The board itself is 1” MDF sealed top, bottom, edges with several coats of shellac. Since the mounting holes for the XL are outside of the machinable envelope I simply use the frame itself as a pattern for the mounting holes. You want to use a depth stop on the first, larger bit to drill the socket clearance holes. I cut the slots on my router table.
Once the Base board and XL are mated and the XL checked for square and parallel the bolts are tightened and square re-verified.
At this point, using the SO3XL, we bore the holes for the inserts to mount the wasteboard and the dowel holes to locate the wasteboard square to the gantry. Now, once you’ve decided upon your wasteboard design(s) you set your four dowel pins in the base board, locate the wasteboard blank, clamp using the t-slots or using CA/tape. Then bore, slot, whatever and you are assured the result will be square to your machine.
No, it is vital that the gantry is parallel to the cutting surface though.
Once you’ve completed and mounted your wasteboard you will want to tram your machine and then surface the wasteboard to ensure parallelism.
Simple, right?
Have fun, whichever setup route you decide upon, we’re here to help.
I think it helps a lot — work from large–small — precision has to start somewhere — working from a level surface allows you to use a level to check things which is easier than trying to determine parallelism with a reference surface.
The machine will work just fine not level.
HOWEVER… if you make it level, it is much easier to make all other things in the machine square, since you can use a level (both flat and 90 degree) as a measurement anywhere on the machine, instead of having to do relative measurements and compensating for the non-level…
It is important that the bottom is FLAT… so if it’s not level, it should be equally not level across. You don’t want a “twist” in the system.
(most digital levels allow you to do a “set temporary zero” that makes all of this not impossible, but merely a pain in the rear)
2 Likes
One thing that you need to check on is the durability of the Nilfisk shop vac. I don’t think the Manufacturers warranty covers extended use which might last for an hour or more when running a long 3D job for example
1 Like
I suppose.
But my setup is on a garage floor that, per building codes, is not level. Plus, on occasion I roll my system to different locations in my garage. So, it’s never level.
But, the gantry is always parallel and square to the work surface.
If you put levelling adjustable casters on it then you can set it level for setup and alignment.
1 Like
I have also just begun the art of router CNS and the following is noted. The router motor is higher pitched and most likely to disturb the neighbors. The vacuum, but a good shop vac, fein, or similar with low DB rating. adding the noise from the router and the vacuum together its is a might noise to baffle. You need to also consider the routing of the vacuum hose to your dust boot as this will extend over the top of your router, as will your electrical cord to the router. They caution a to running the router cord in proximity of the control wires for the steppers as it may cause interference by induction of the steppers , lousing up your cut. What i did was to get a 5 gal bucket form home depo, cut a circle in 1/2" plywood with my CNC and an attach a low cost cyclone(https://www.wish.com/product/5de4bed6ae2961042c8cb089?hide_login_modal=true&from_ad=goog_shopping&_display_country_code=US&_force_currency_code=USD&pid=googleadwords_int&c={campaignId}&ad_cid=5de4bed6ae2961042c8cb089&ad_cc=US&ad_curr=USD&ad_price=16.00&campaign_id=7203534630&gclid=EAIaIQobChMI8q-Wh6ih7QIV6suGCh0bmgCSEAQYBSABEgKJlfD_BwE&share=web) $17 to catch dust and chips as you carve. The machine makes a lot of this and the dust is an issue for you and others in the apartment The cheap cyclone is $17-20 $, but it saves you for having to fuss often with the filter in your vacuum. I built a table to hold the machine with 2 x 4 and 5/8th inch particle board, glued and screwed. Strong and if you brace it no movement. For your enclosure, you only need plexiglass on the front doors of the cabinet. Make sure you have some air holes to allow the air the vacuum takes is not restricted.
Thanks a lot for all the advice for now. I’ve settled on a design now and started building it. Hopefully, I can post some pictures of an almost done enclosure by the end of the weekend.
3 Likes