I just got the new SO3 (with the Z-plus axis) and I’m designing a soundproof’ish enclosure for it. I live in an apartment, so reducing noise is really important to me.
I’ve already asked for advice on vacuums on this forum (I’ve landed on the Nilfisk Aero 21-01) and was hoping I could get some advice on enclosures.
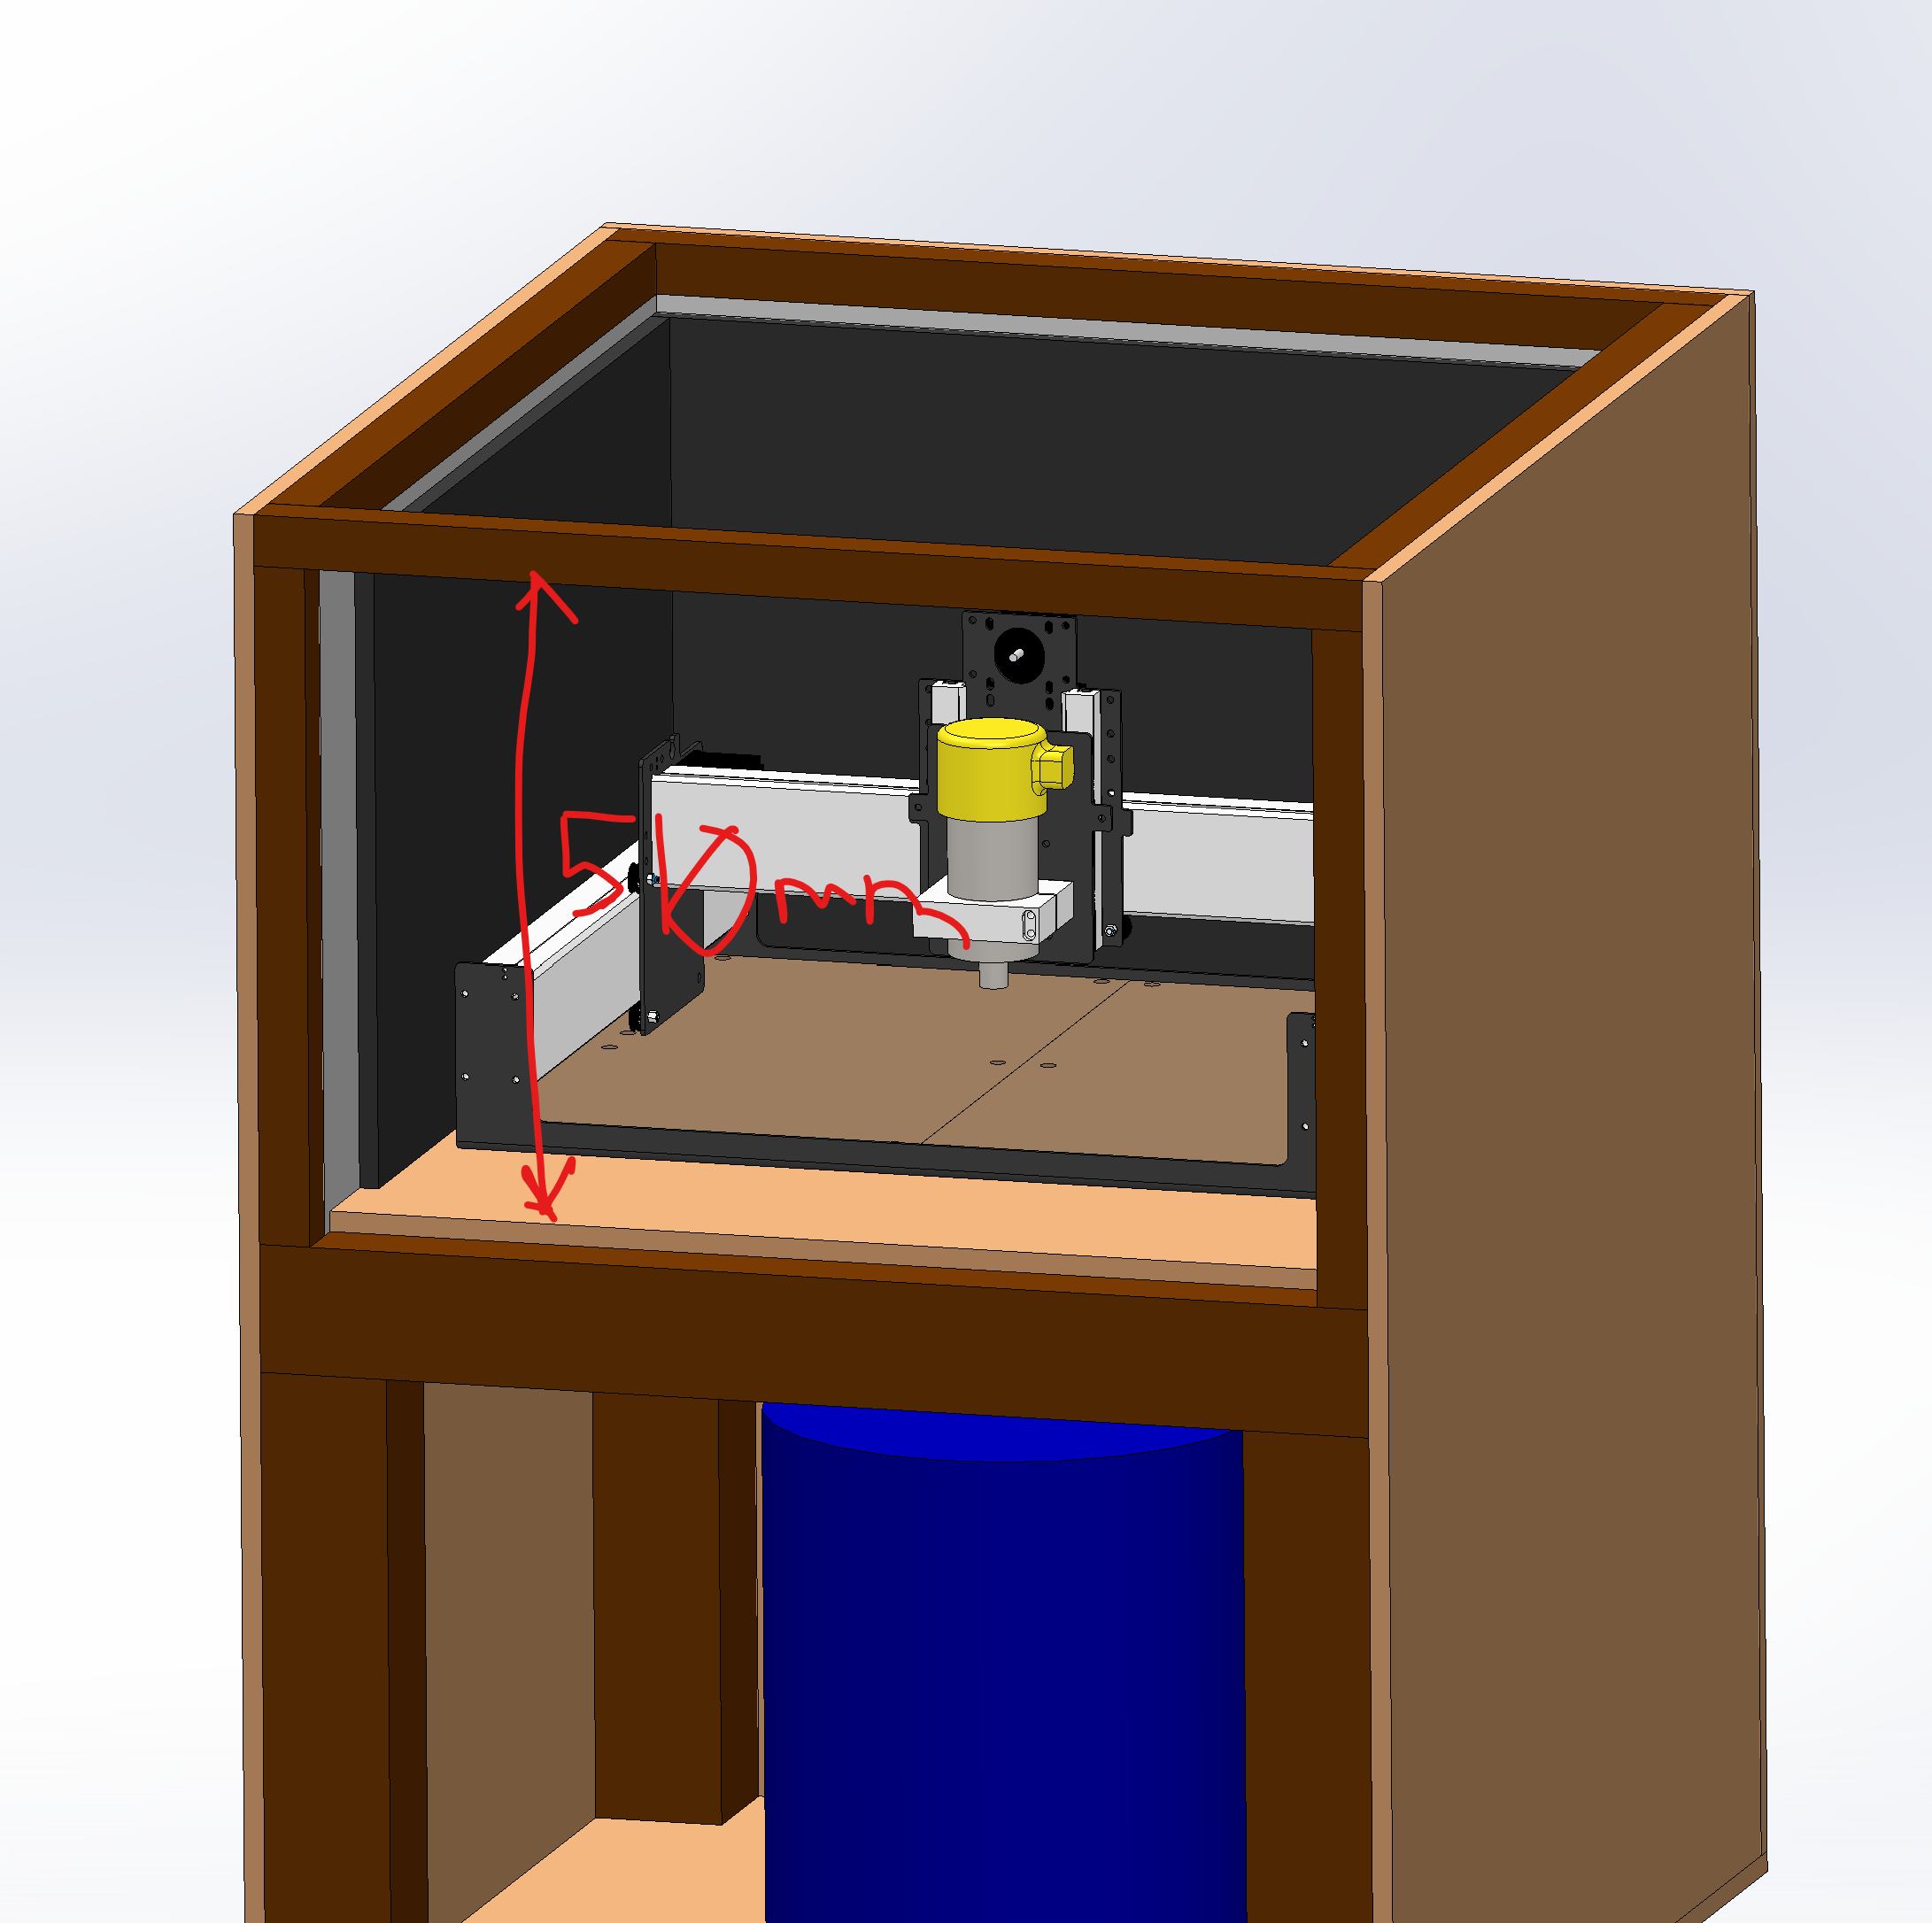
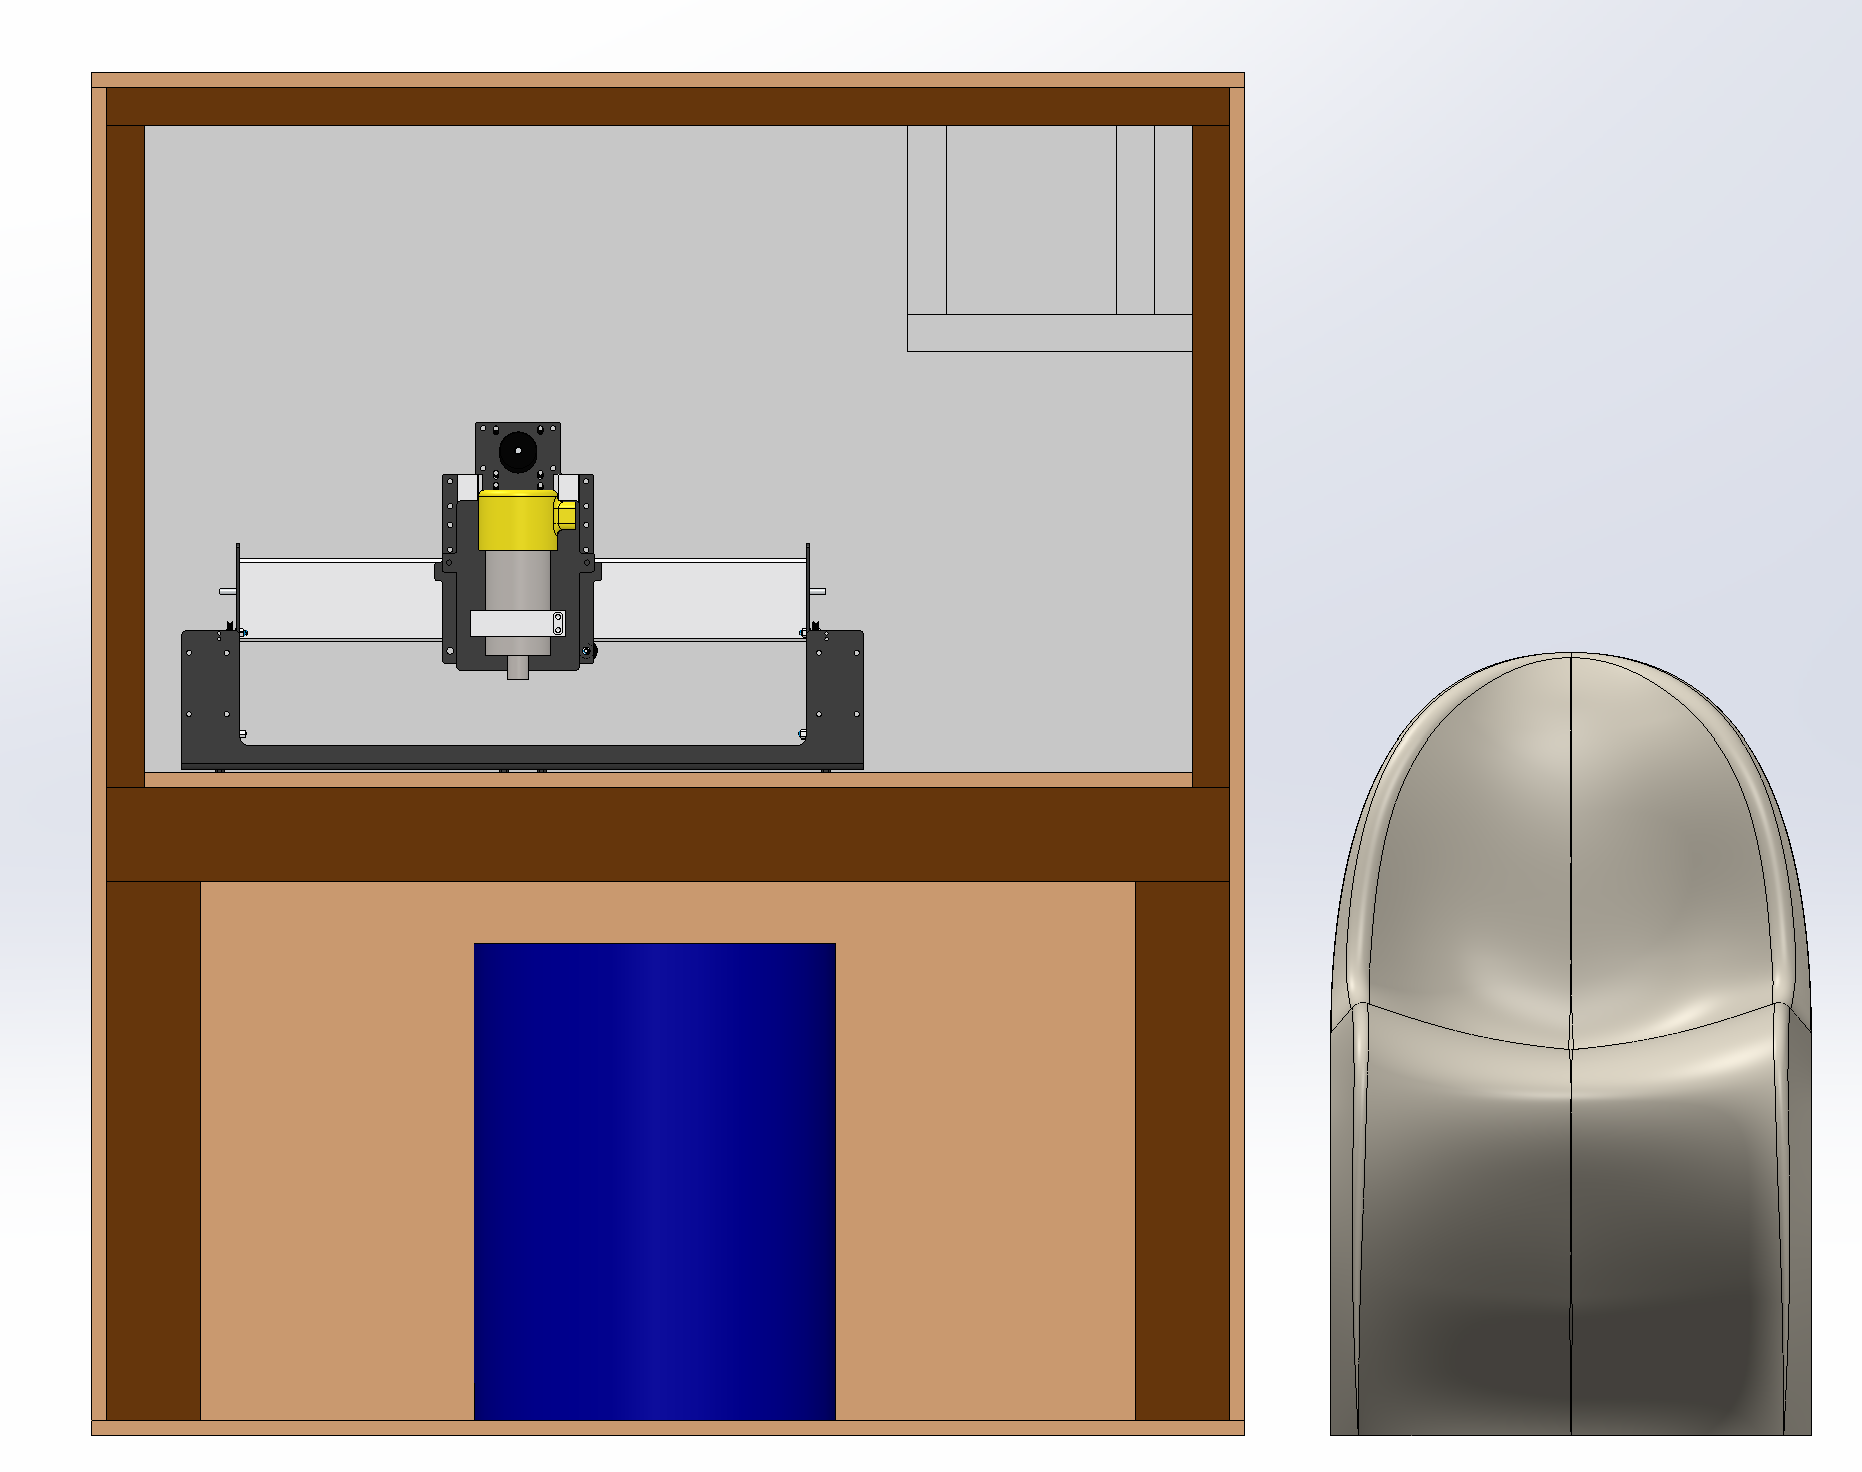
First of all… what kind of clearance do people feel is comfortable to the sides, back, front and top of the SO3? If the SO3 is in the top position, it’s 450mm tall from what I can measure. Right now in my design the room for the SO3 is 510mm tall. Is that a comfortable height for the SO3 to be in?
It’s still early in the design-phase, but I’m struggling with whether the sound from the vacuum can reduced as well. Right now, I’ve designed it so the vacuum (the big blue cylinder in the screenshot) can be in the room below. I’m concerned about the vacuum heating up too much though and I don’t know how it can get rid of exhaust air. I can’t find any good solutions for this in other enclosures. Does anyone have any suggestions?
The usual suggestion for the vacuum in an enclosure is a baffle system — they also make mufflers for some vacuums which can be attached to the air out.
lesson I learned from my enclosure: there is no such thing as too high,
I wish I had made mine higher (but I’m ceiling limited in my basement)
think of it this way, you as human at times will need to go in to the back of the machine. Every bit of height helps you not needing to be a pretzel (that is, unless you’re a total yoga guru of course, in which case, pretzel away)
in other words, if you have the space, 50cm is not a lot. I’d try to go higher, like almost double
I built mine a couple of weeks ago and made it accessible from 3 sides easily and the back side with the help of a screwdriver. I basically hinged the two front doors off of the side panels and hinged the side panels to the back panel. The side panels are secured with ( 2) 1/4 inch thumb screws towards the front frame (Internal frames is welded 1 inch steel tube). Removing the two thumb wheels allows both the side panel and the front door to swing completely out of the way for access.
The walls of mine are plexiglass and it does mitigate quite a bit of the noise.
Bill
I second the importance of side/back access. It’s nice to be able to easily access every bolt without needing to pull the Shapeoko out of the enclosure. That is probably only a big issue if you have a XXL, just reaching the back of spoil board requires almost climbing on top of it. Having the back open is also nice for working with oversize stock, you can use tiling and have it hang out the front/back (but that means no sound proofing during those cuts).
My enclosure is for safety more so then sound proofing, it cuts down the noise a little but it is not quiet. I have windows on 4 sides (made with laser safety acrylic) and it is nowhere near air tight. It also has a smoke filter system which is probably leaking sound out the flexible hose. If I sealed it up better it might cut noise down a bit, or I could use the noise as an excuse to get a HDZ and a 800w spindle.
The height is 23.25" (590mm) which has been enough for me with a belt Z, I am not sure if the Z-Plus or HDZ need more clearance then that. More height would be really nice but I was very constrained with ceiling clearance. It is also helpful to have extra space on either side of the machine to make it easier to work on, clean around, and have less chances of the dust collection hose getting stuck between the Z carriage and the sides.
My shop vac is outside of the enclosure since it is shared with other tools and basement cleaning duties. I have not had any overheating problems with the router inside the enclosure, but like I said it is not air tight.
Living in an apartment would almost make a water cooled spindle a necessity.
Something I did not consider when setting my table height… sometimes you might want to pour a resin or apply a sealer coat during the project. If you would like to be able to do this without removing the work material from the spoilboard, leave yourself enough headroom to see what you are doing.
I have a tiny garage and built an enclosure around my SO3 that is about as wide/deep as your model: at times you will wish you had more access on the sides (e.g. maintenance, checking V-wheels), BUT mostly this is fine (and me, I had no choice anyway, that’s all the width I had). Height on the other hand…don’t make that mistake many, many of us did. Build it MUCH taller than you think you need, because of all the reasons mentioned previously, and because if quietness matters to you chances are you will eventually upgrade to a watercooled spindle, which means cooling hoses coming from the top of the spindle. Having to dive into a tight enclosure to check something in the back of the X rail, well I have been there, it’s no fun.
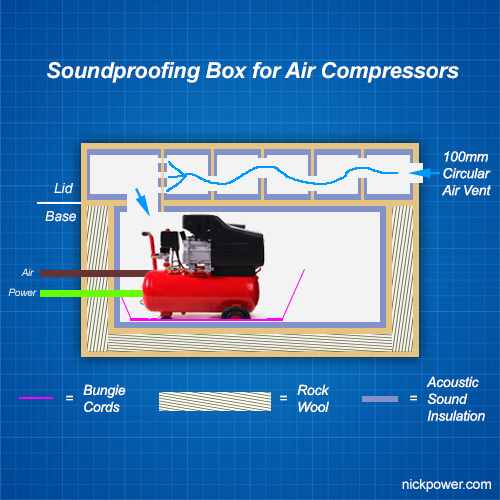
For the vac cooling, ideally you will want to design a baffle/muffler as Will said. Here’s a random pic from the interwebs that illustrates the interesting part: making sure the air has to zigzag to enter the enclosure
(no air outake in the enclosure itself in this pic, but you get the idea)
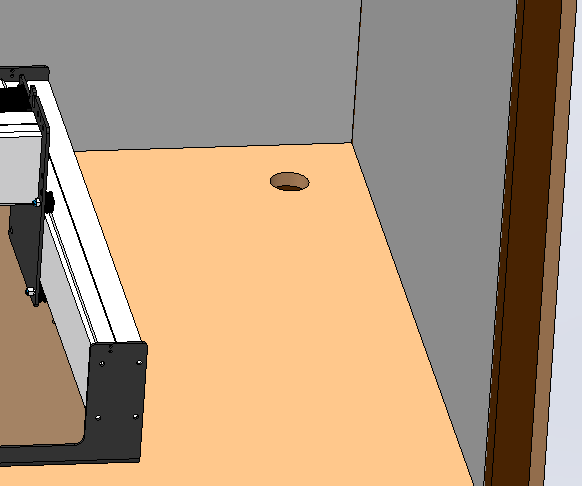
I went with poor/lazy man’s solution, cut a hole in the bottom right of my enclosure near the ground, cut another hole on the top left of the vacuum compartment, attached kitchen air extractor to that hole, wire the extractor to the same plug that activates the vac.
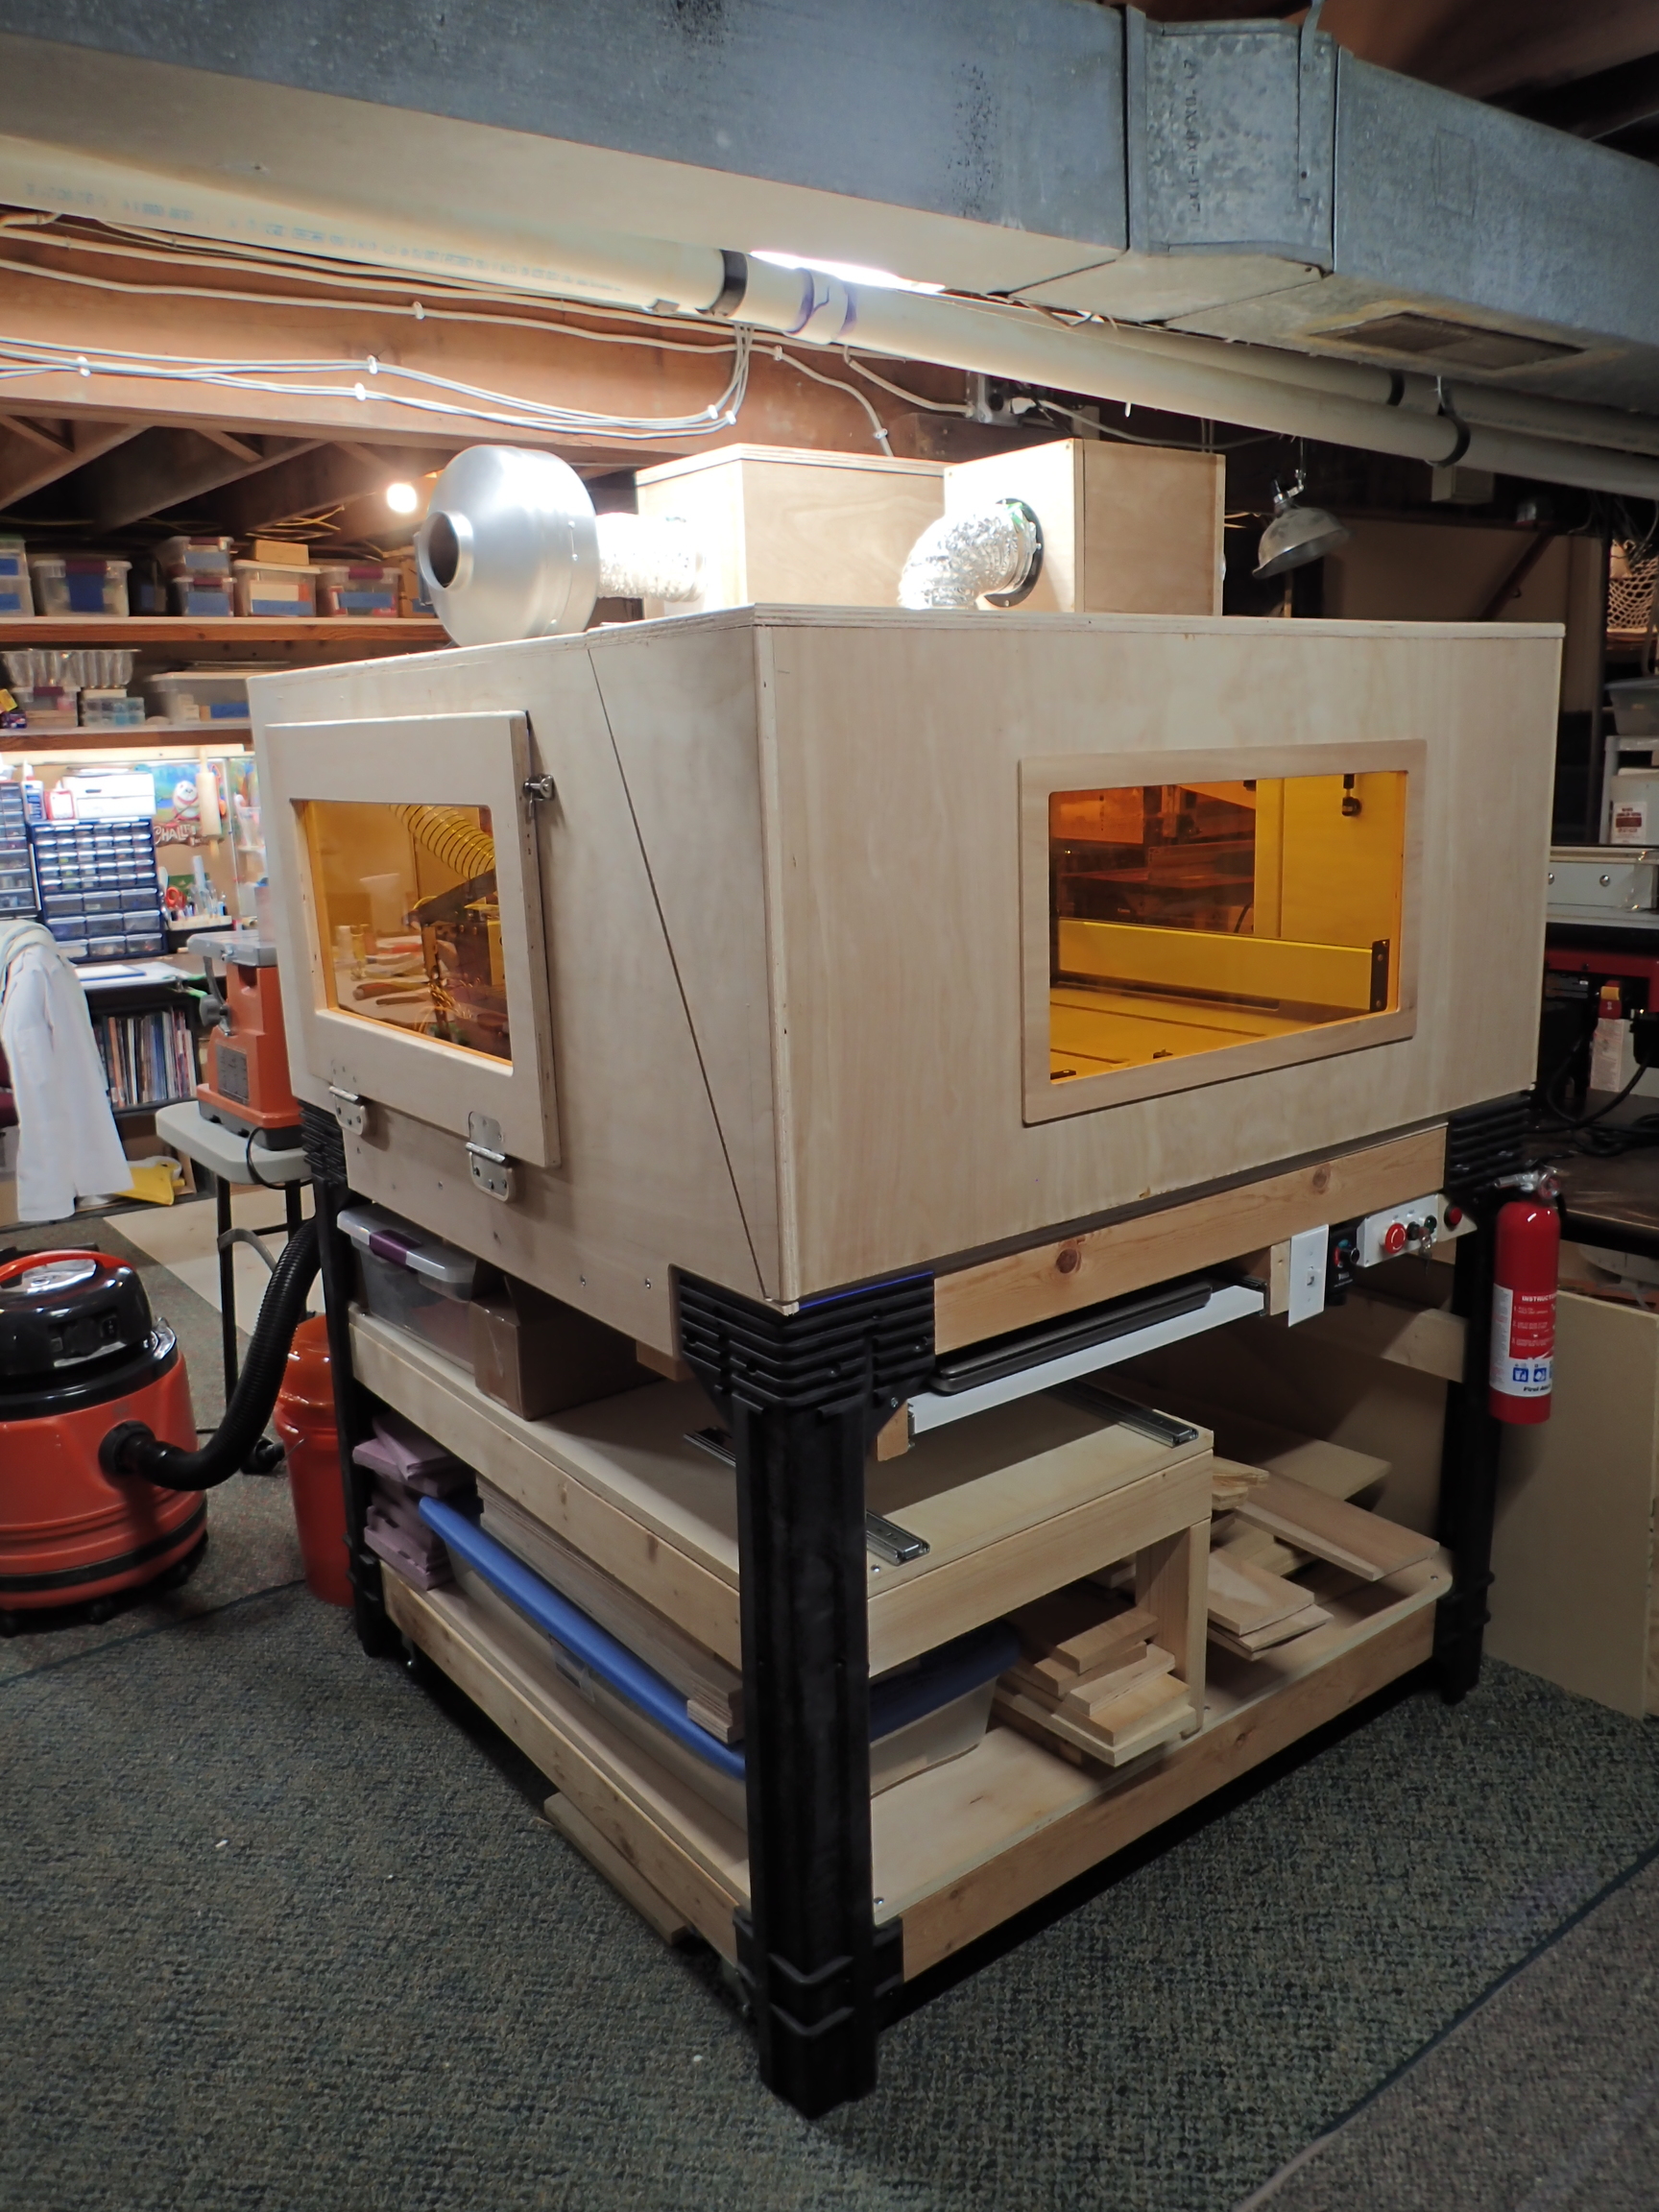
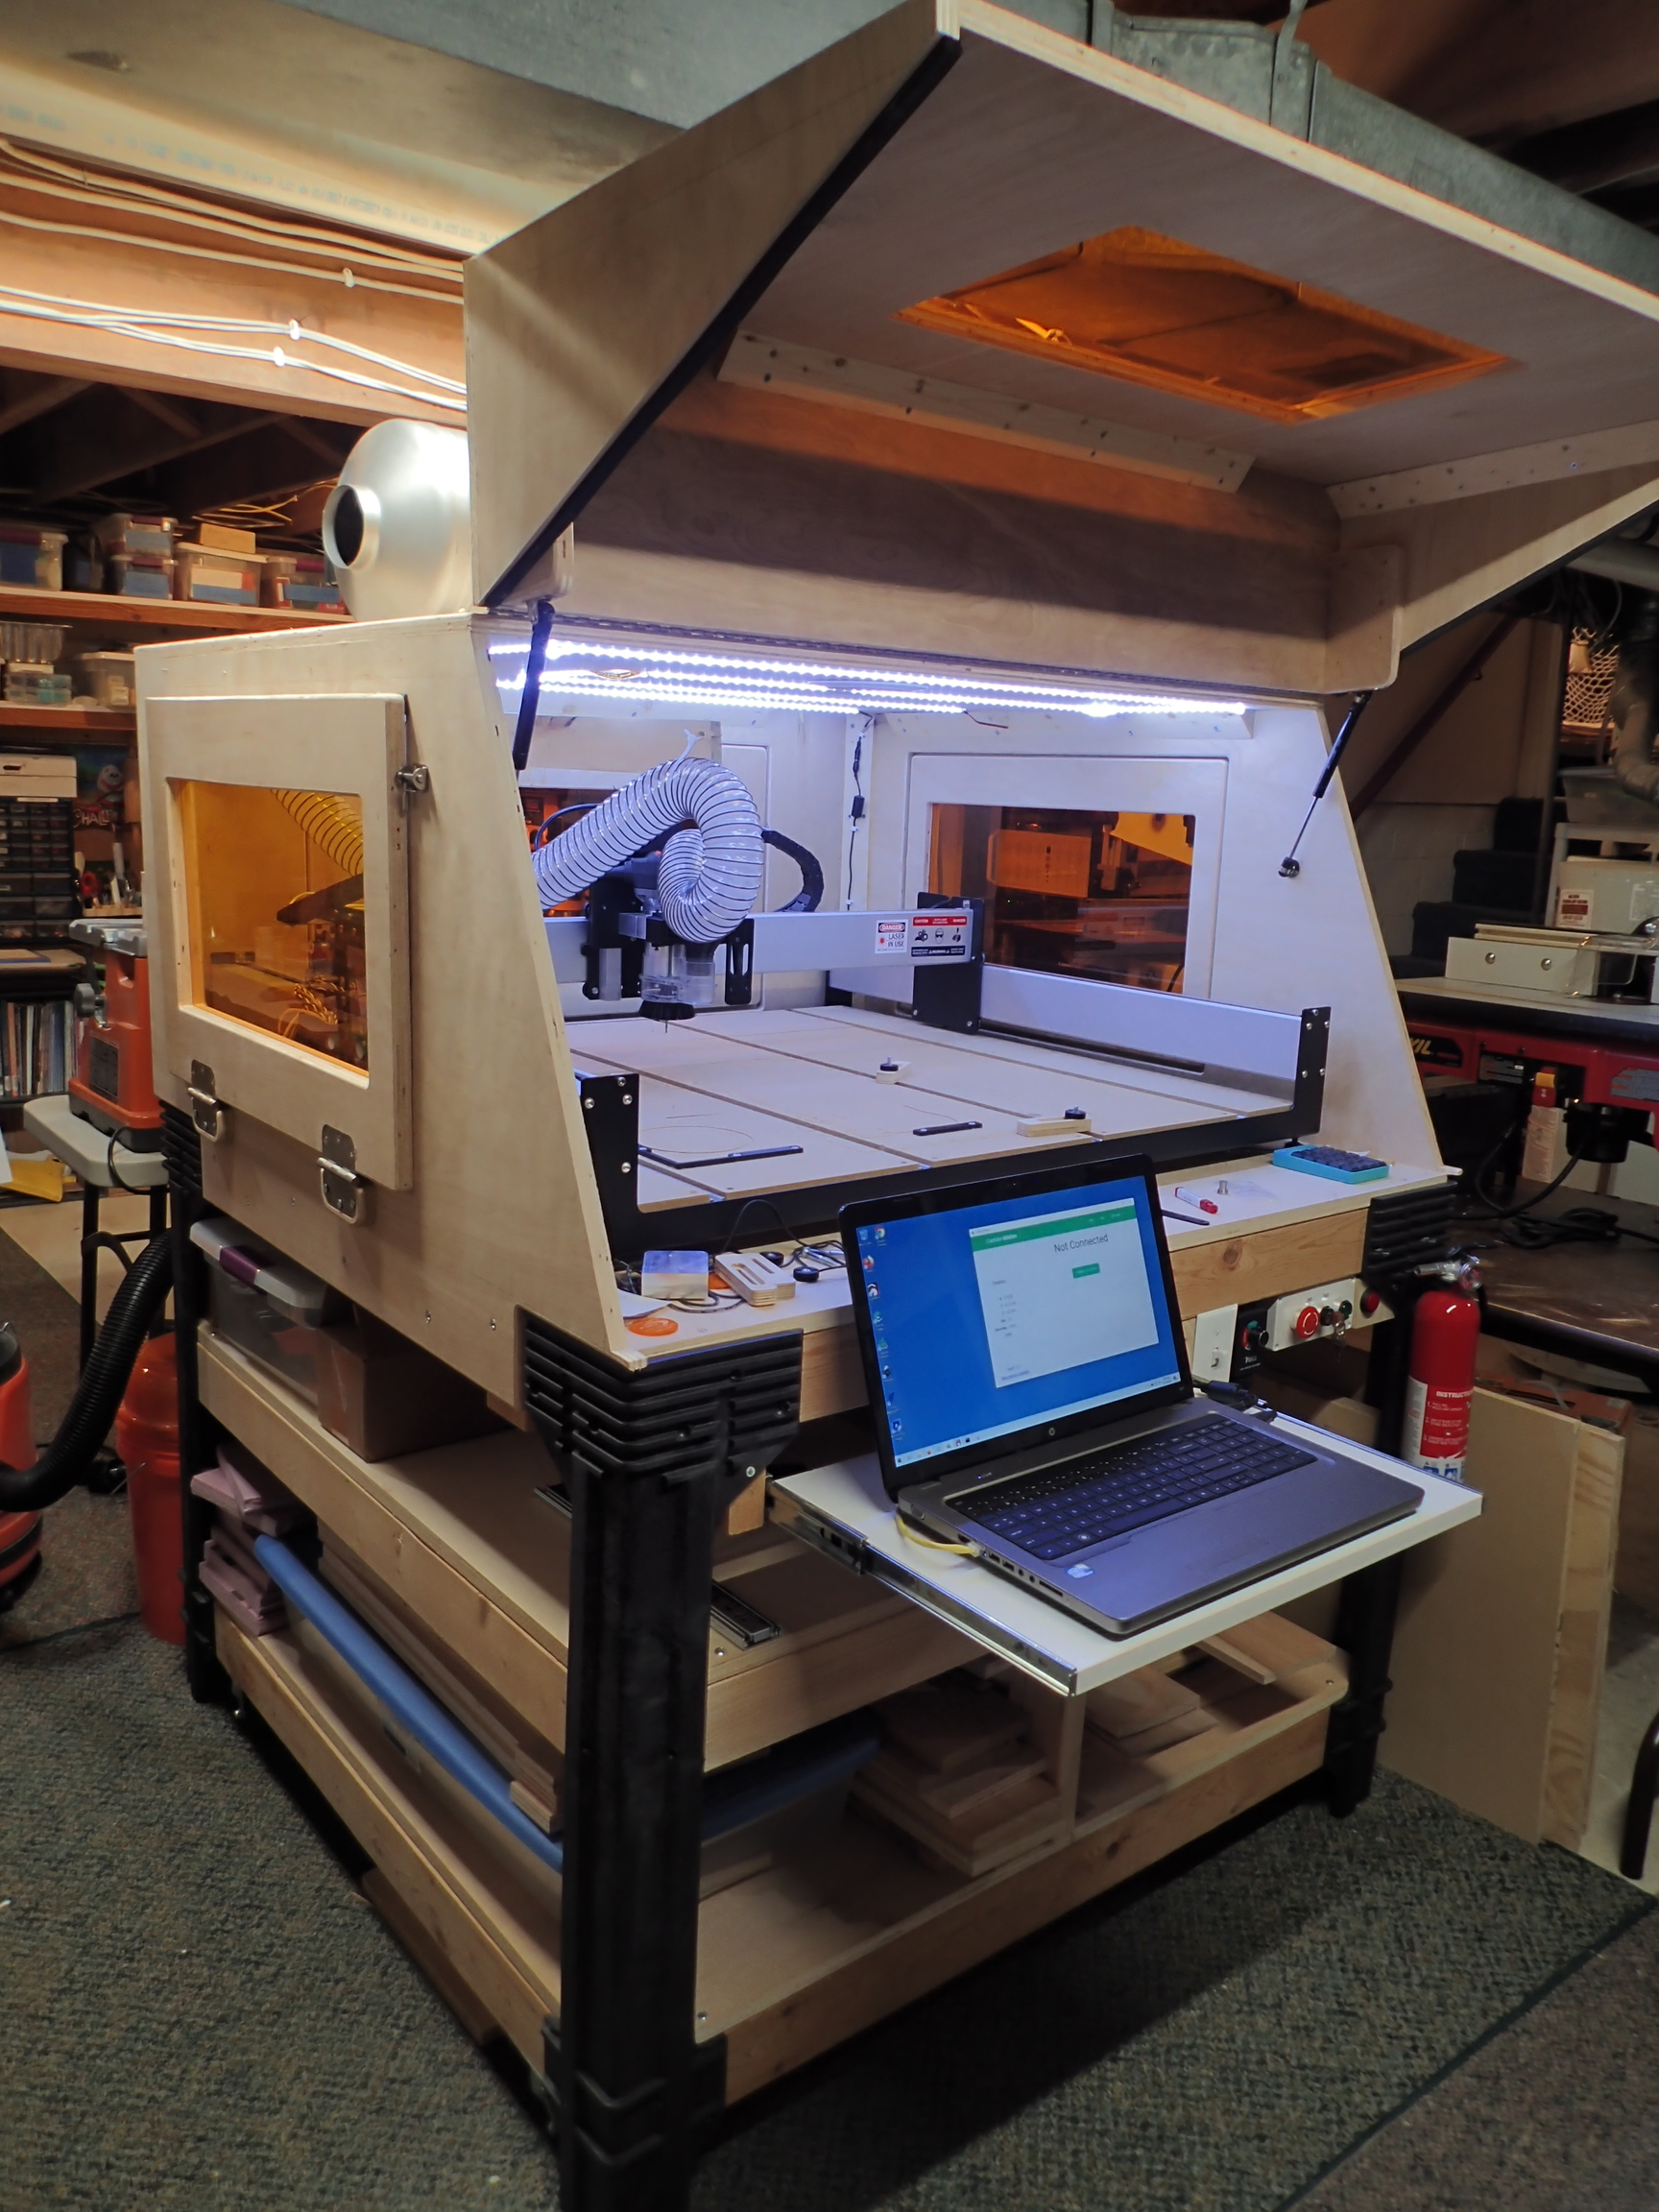
I built a sound reducing cabinet - 3/4" plywood on 5 sides, door with large Lexan window for 6th side. The sides, back and top are covered in fiber board ( also known as homosote). I added cheap LED strips from amazon to the top for light (had to put thin boards in for the LED strips to adhere to). I put 1" styrofoam on the bottom. I also made a 3/4" plywood box lined with 1/2" sheet rock to house the vacuum. My phone says running the vac and SO3 is about 75DB, I find this is an acceptable noise level, I can even hear the radio over it
A couple of things I learned:
I made it a little too narrow, you should leave room to vacuum out the sides between the SO3 and the cabinet( I don’t always use dust collection). I have to find a narrow radiator nozzle for the vac in order to clean the corners.
Cooling is a problem. Easy to get interior up to 90 degrees F. I finally wound up putting a quiet muffin fan in to circulate the air. Already had a hole to allow air to enter to make up air taken out by dust collection. All holes are covered by baffles as shown in another response.
The door being so big and the frame of only 3/4" I had to put stiffeners horizontally to keep it sealed. The door uses foam weather stripping for door seals
Now that the air is dryer, I’ve had several disconnects which were solved by removing the dust collection hose. I’m going to have to buy a conductive hose.
I have drilled and tapped a hole in each of the rails and one in the router collar. I ran ground wires from each to a single point and then a wire from that to a 110V plug ground connection. I also tie wrapped the torroid on the router cable in place to keep it near the router.
5 Likes
Griff
(Well crap, my hypometric precursor device is blown…)
11
My 2 cents as a 4+ year owner.
First, BEST solution to sound reduction is a water cooled spindle. 800-1500 watt packages are available for quite reasonable cost. Lots of help here on the forum.
Second, I’ve been running a cheap, small shop-vac-in-a-box, 1” foam insulation on all walls for several years, no problems even with 95 degree F operating conditions. 3” hole in the bottom.
Third, at least 6” clearance on all sides to enable changing v-wheels, belts, other maintenance. Ideally, full size doors on front and back.
Fourth, build as TALL as practical. You want to be able to reach all corners of the machine without contortions nor head-banging.
Fifth, torsion box base on cabinet with drawers. Mount the machine directly to the T-box i.e. discard the screw in feet included with the machine.
I made my enclosures 4 feet tall. I can lean in comfortably and I have room for vac hoses etc above it. Also the silence of a water cooled spindle is a must for keeping the noise down.
Vacs will get very hot when enclosed and may cause early failure but they do work. there are temperature controlled fans you can incorporate to get air flow with baffled entrances and exits, but it gets complicated. Or just let it cook and get one with a good warranty. Ridgid has a 203 CFM shop vac with a lifetime warranty. Very loud, 12 amps incredible static pressure and cost 179 at home depot. Currently out of stock.
You’re getting lots of good advice here, especially with the height. I would also suggest leaving a slot/hole in the back of the enclosure (that can be plugged/capped). No matter what Shapeoko you have it is basically unlimited in size on the Y axis as you can “tile” large projects. Take a look at what @MarkDGaal accomplished.
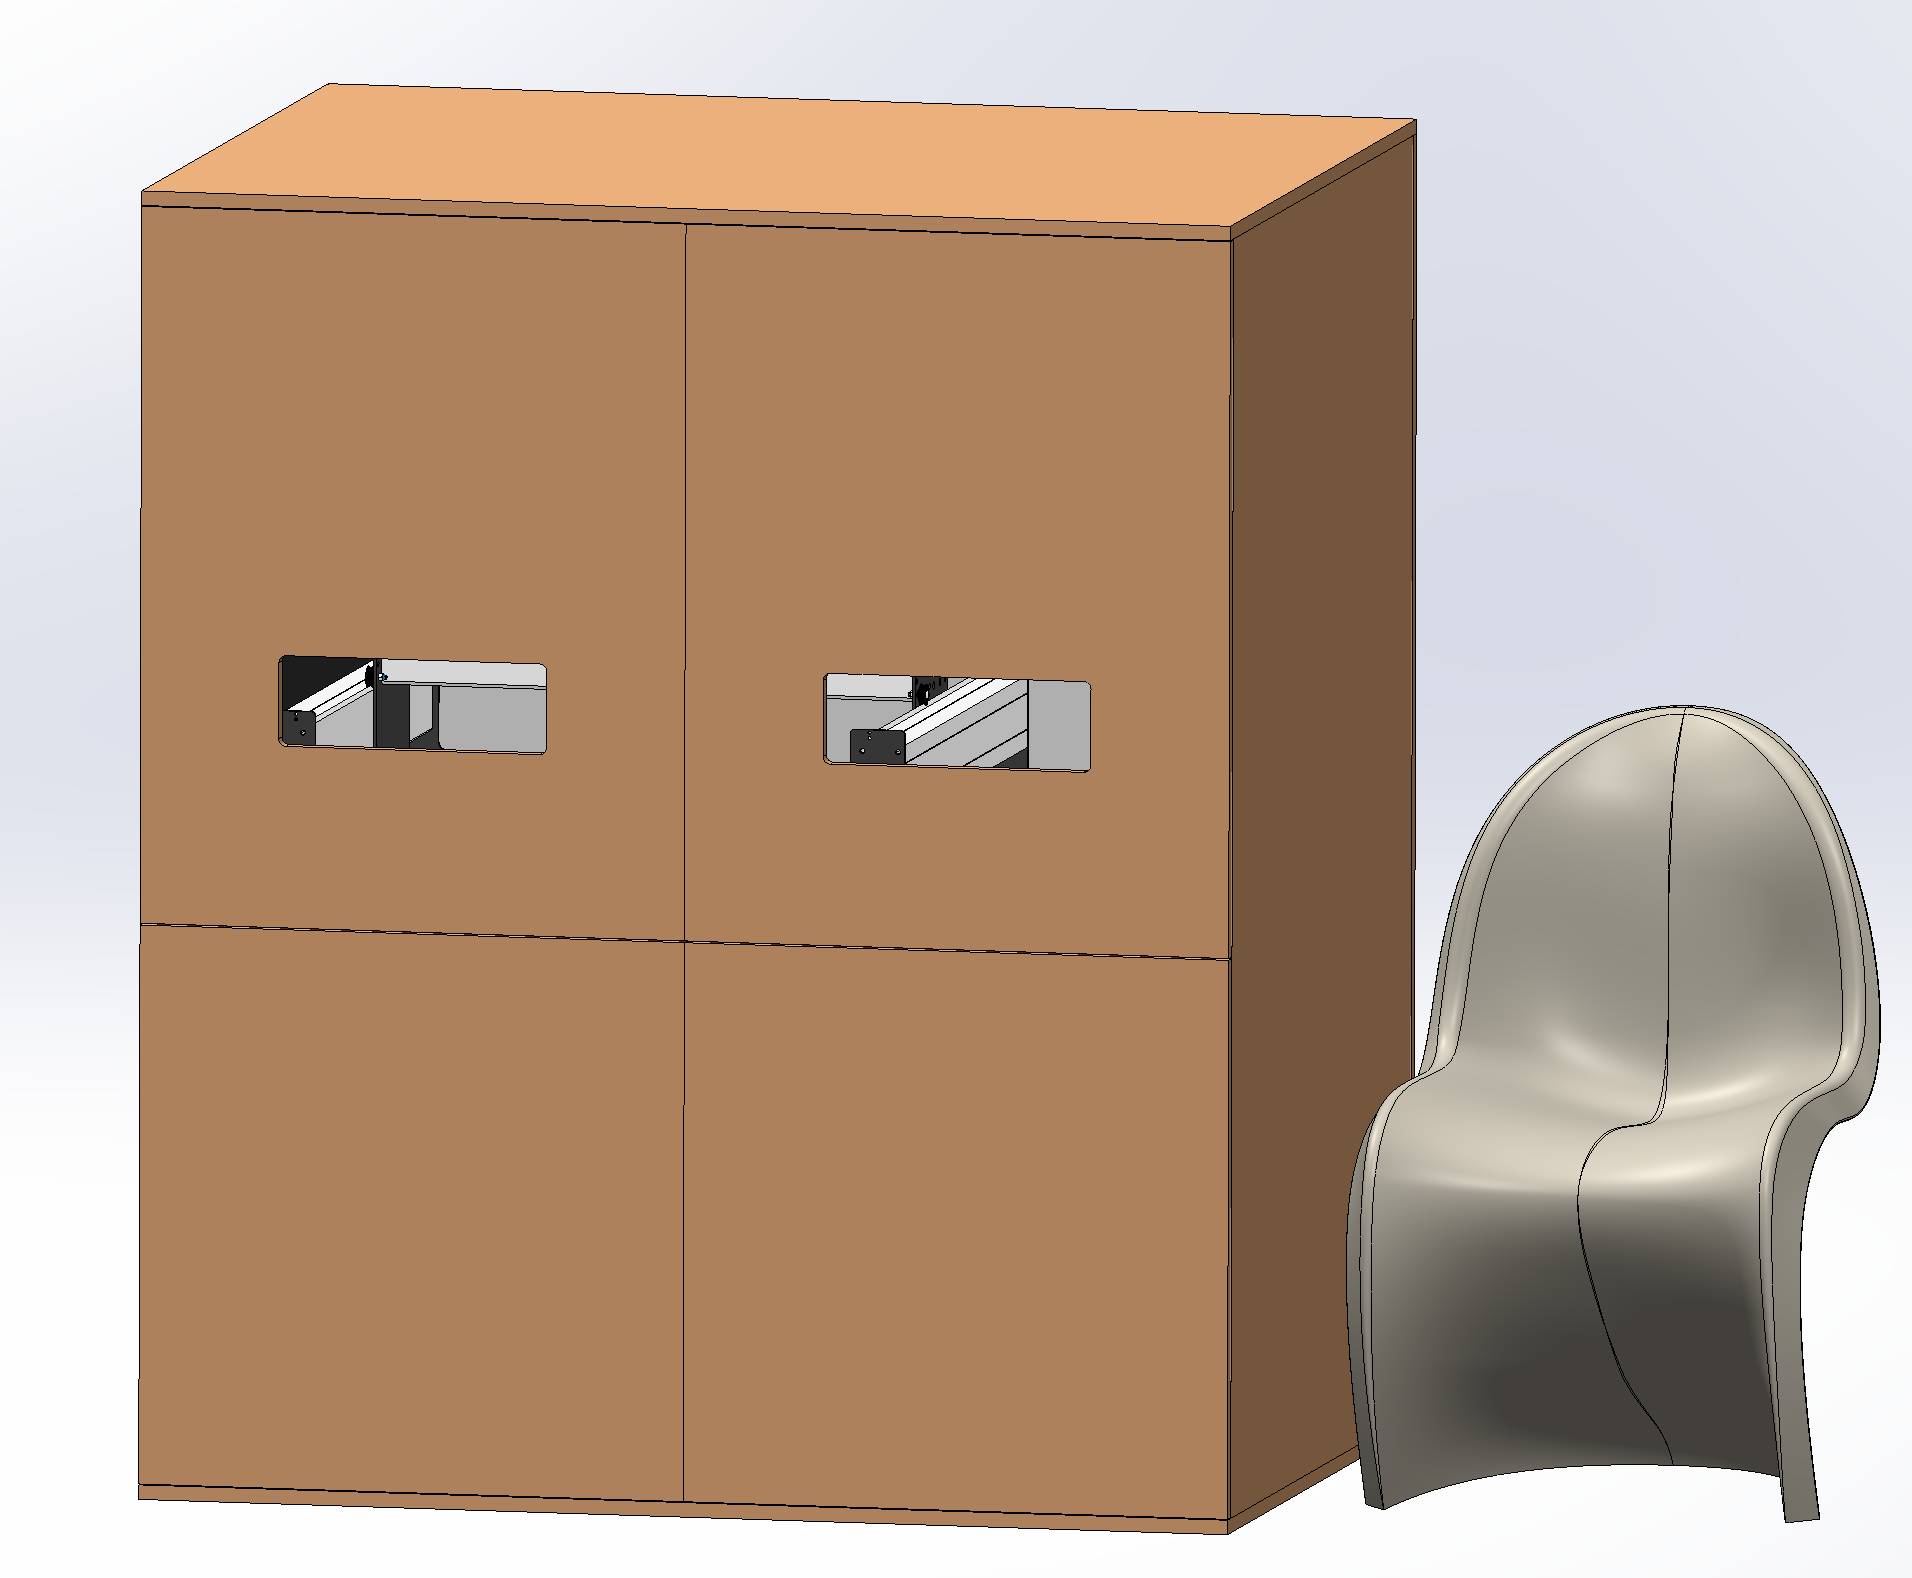
Thanks a lot for all the advice and suggestions. I’ve changed the design following all that advice. I’ve made the height of both the bottom and the top cabin taller and I’ve made the cabin wider, so there’s room to put some things next to the Shapeoko:
I still don’t know how I’m going to make the doors shut tight. Any ideas? Also, do you have any suggestions for making the polycarbonate windows as noise-proof as possible? I’ve been thinking about making many layers of polycarbonate to limit the amount of noise getting through.
I know people would probably like to go taller and wider, but I simply haven’t got the room.
What do you say to the revised design? Am I still forgetting something?
Looks good ! I for one would put the baffle air intake at the top of the vac compartment, not at the top of the enclosure. I don’t think there is a need to have the “shapeoko room” in the air flow, and I don’t quite see what the air flow would be between that and the vac compartment ?
For windows, I just went with thick (10mm? can’t remember for sure) acrylic and it’s efficient enough (for my taste)
Since you did not mention it (I think?), you also want to think about lighting in the enclosure (LED strips or giant LED panels under on the roof will work fine)
Finally, think about where you want to put your power controls. You will ideally want to have a killswitch/E-stop button easily accessible from the outside, there’s no time to open enclosure doors when bad things happen.
You need extra room on the front and rear of the machine, the extra room in front for when the dust boot is attached it will not bump into the doors when coming forward for a tool change. The rear might need some extra room for the cables that hang off the back.