Duplicating physical items (story of 2020 Christmas break)

In
Digitally Map a Surface in 3D [CNC Shark Duplicator] @JVarn was wondering (paraphrased) if a shapeoko could do the equivalent of something called “shark duplicator”, basically do a 3D scan and then a carve out of an object, and I couldn’t resist trying. Below is a short story with pictures on how this went.

It all started with one of these:


Which will act similar to the bitzero and bitsetter, and if you plan to buy one yourself, make sure you buy a “normally open” one that closes to ground, and can work with only 5V of input voltage (which is what the Carbide3D PCD supplies).

I then had to learn how to make those little 3 pin molex connectors to connect a long wire (the probe comes with maybe 4" or so) from the bitsetter splitter board to the probe… and soldering thin wires is, lets say, not my super power. But I got it to work, albeit a bit ugly (I optimized for “it will work” not “is it a pretty solder joint”).

A simple test with having Carbide Motion in the settings screen, and then by hand touching the probe showed that both the LED turned on, and CM noticed the probe. Ok, all the evil analogue stuff taken care of and working: The final contraption can be seen (next to the object I’ll be scanning) in the picture below:

Next… write some software to probe… and realizing I might as well do this as a browser app since it seems most CNC software I write ends up being ported to that. Thankfully something called “Webserial” is now a thing, and after spending 30 minutes learning that it only works over https and not http… I was in business. I ended up learning the hard way that controlling a Shapeoko (using gcode) over the USB cable is quite a bit more messy than just writing nice clean gcode for cutting things… but ok.
Wrote code for probing, wrote code for moving around, wrote code for interpolating inbetween probed points, wrote code to probe in the most interesting places (gradients etc), made the output a grayscale depthmap suitable for Carbide Create Pro… took a bunch of shortcuts and somehow ended up with roughly 3000 lines of code.

Probing is slow, and I decided that I was going to probe at least one real object before I was going to work on speed optimizations… and well, that wrench was around and was as good an object as any.
A small number of hours of probing later, I got this depth map: (1 pixel is 0.1mm)
download (2)
If I had kept scanning, the accuracy would have gone up but I goofed up something and didn’t want to restart, so called it “good enough for a first try”.

Next step: Carbide Create Pro… basic modelling step and then cut 5cm x 5cm scan out of a piece of scrap wood. I used a 1/4" flat endmill for the roughing pass, and a 1/8" flat endmill for the finishing pass with a 0.2mm stepover.

Pictures of the final result below from a few angles; overall I’m not unhappy for a first try.
But also some lessons learned:

  • The probe is fragile. And it gets out of center easily and then the rest of the probe cycle is a misfit
  • The probe also probes side ways (and has deliberate amounts of play for that), which means on a smooth sloped surface it will “slide” a bit before triggering
  • The probe is not super great at probing completely vertical walls due to the deflection property
  • It takes a long time to probe an object. I have lots of ideas to optimize this, but Christmas break is, like 2020, approaching its end and this might be for some future time instead.
  • I should spend some more time on interpolating; if I get that better I likely need to probe less
  • Despite being cheap and fragile the result was better than I expected

22 Likes

That’s a great first try. I am very excited where you take this.

I see what you did there :rofl:

jut trying to see if folks were paying attention :wink:

1 Like

I’d be very interested in this to simply copy 2D profiles. I found photogrammetry too much effort, and even if a probing routine is slow, its certainly faster than tracing, going to a printing shop for a giant scan, then using a canvas in Fusion. Thank you for all of your efforts.

1 Like

I know this wouldn’t make it faster but it may improve resolution.

What if first, you ran it like a roomba to get the perimeter. Like if it sensed the edge it would back up, move over and probe again until it returned to origin. Then stepped up slightly and repeated until it had an empty pass of your defined area. You could set it to account for the deflection of the probe itself.

If it could then do a vertical probe of each slice minus the previously defined slice it could further define the texture map of the object while limiting some of the fuzzing created by the unexpected horizontal trigger.

I am not sure how practical this would actually be, an I imagine that it would be complex to actually code. But maybe the idea will actually spark a plausible outcome.

1 Like

I just stumbled across this. http://fabacademy.org/archives/2013/students/henno.juliana/week7.html

Cool project!
I wonder where those wavy contours come from (in the different gray scale layers). Is it due to the probe or the probing algorithm?

very likely the interpolation algorithm… I need to debug that some more :wink:

Ah, I guess you need to get from an arbitrary distribution of points to a uniform, grid-like distribution?
How do you do it?

I’d suggest, for each point on the grid, find the three closest probed points.
Then calculate the barycentric coordinate of the grid point within the triangle formed by the three closest probed points and use the barycentric coordinates as weights to interpolate the z value.

I have code for this sort of thing somewhere. Would need a bit of digging to find that, if required.

I model every inbetween point as a 3D parabola with 6 parameters, and then do a least squares fit of that parabola with those 6 parameters with all measured points in the neighborhood (weighing by distance). For compute efficiency there’s optimizations like “if the neighbor pixels 6 parameters work better than this points parameters, just use them and optimize from there”…
All very hackish but it more or less works. … Except it seems to like to create a golf-ball effect a little bit

Okay, that sound like the more sophisticated way :slightly_smiling_face:. Especially as you expect smoothly curved surfaces.

@fenrus: now add a USB camera, implement AI image recognition to pre-determine the type of object being scanned and derive an optimal probing strategy :slight_smile:
(joke aside, this is seriously awesome!)

3 Likes

No NO. JUST NO The rabbit hole has been deep enough on this one :wink:

5 Likes

Thats dedication. I’d love some sort of laser scanning ability. I occasionally have to do a bunch of probing of free-form, hand sculpted wood/composite plugs and most often just do edge detection using a long shank blank with the old paper touch-off method to get close & then a magnifying glass to detect contact. Then go jogging, pick a minimum of points on constant geometry as far apart as possible, take down all the coords, and in cad, draw the shank dia at those points & draw the object as defined by those points. Then I do that 3-10 times, placing each new attempt on a separate layer. Then turn em all on and see what kind of accuracy I’ve got. It can take a day to digitize a model, but the results are pretty reliable. Is this what everyone else does?

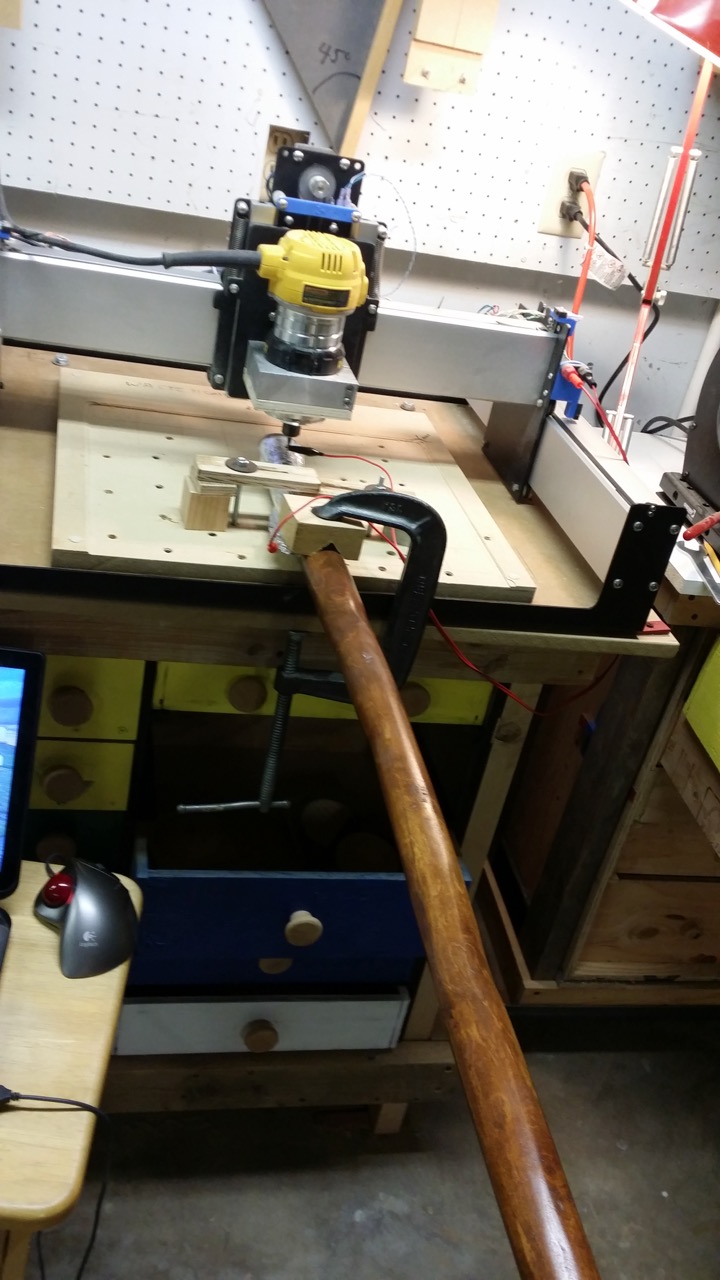
With regard to probing – I had made a couple of walking sticks as gifts to some friends, and I wanted to use the CNC to carve symbols on the curved surface. Well, you can’t just treat the curved surface as flat; the resulting carved figure will come out distorted. Instead, I wrapped the area I wanted to carve with aluminum foil, to give a conductive surface. I then probed it using the bCNC Autolevel feature to create an x.probe file.


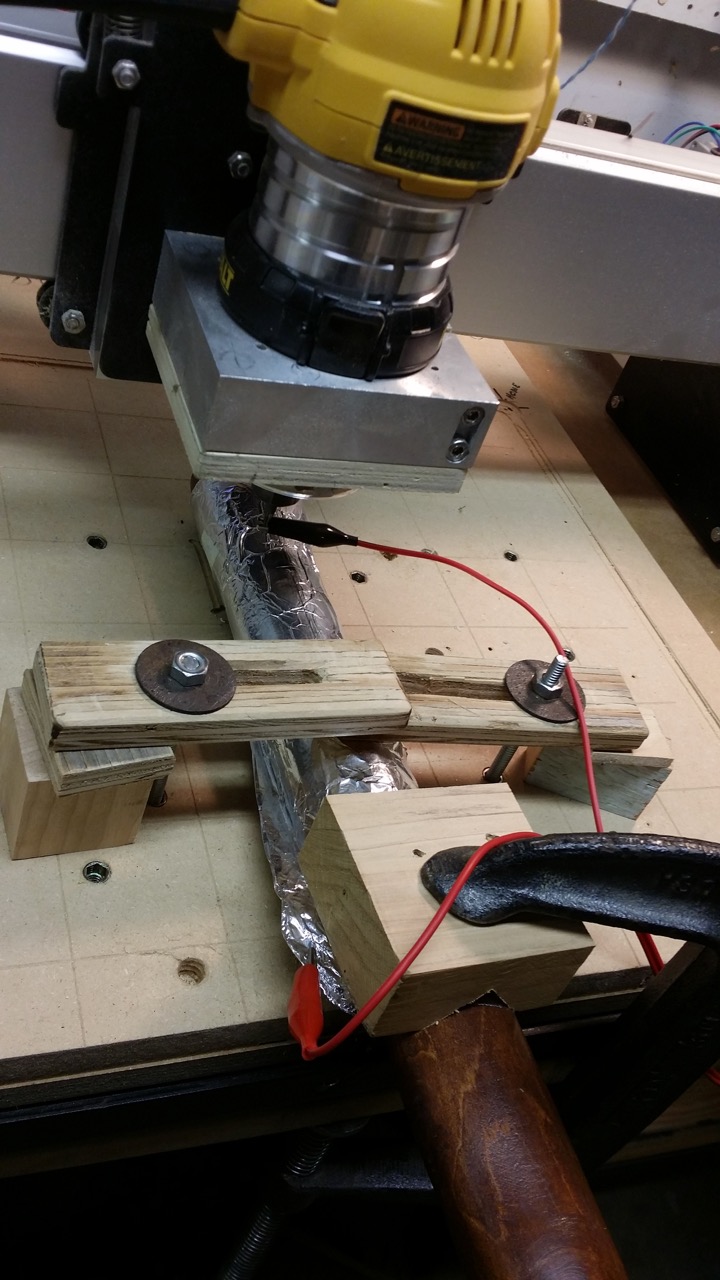
Then I applied that height file to my regular gcode, in this case from F-engrave. bCNC applies the Z=0 value from the probe(upload://y8K3li9QQeutOykYo9rA81QbymT.jpeg) file and automatically adjust the depth of cut.


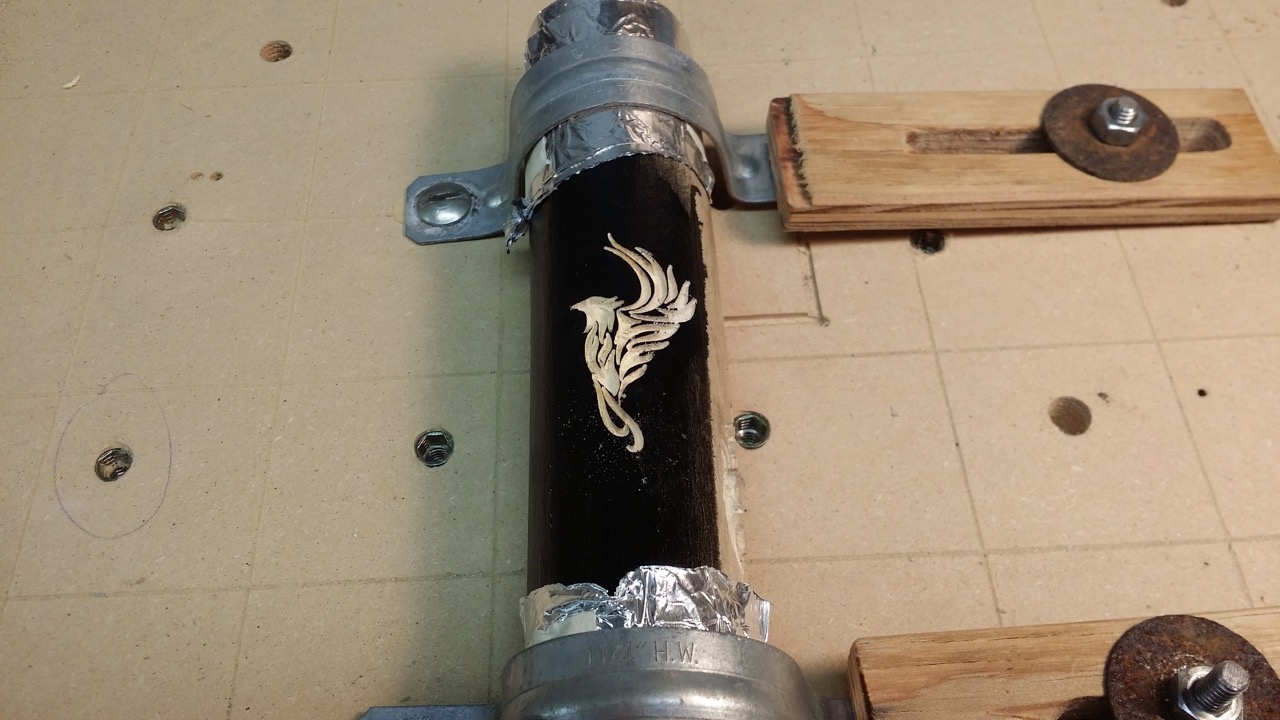
The results weren’t perfect – especially at the edges where the slope steepened, but it wasn’t bad. And it was a lot better than just treating the curved surface as flat.

8 Likes

this use case is exactly where I want to go with this… in my next break from work :slight_smile:

2 Likes

writing that makes me realize I can optimize probing to only the parts where the gcode of the deisng will go :slight_smile:

3 Likes

This topic was automatically closed after 30 days. New replies are no longer allowed.