I like the wood grain giving the impression of elevation curves and provides a frame of reference to view the height (or depth) of the terrain.
Indeed, I’ve got a small stack of just-delivered baltic birch plywood just waiting to have some toolpaths thrown at it. I’ll probably do one more proof test on dimensional southern yellow pine before I go there, of course, as on the one hand, I need to glue two pieces of 18mm baltic birch together to get the thickness I need, and on another hand, shipping on baltic birch plywood is rather un-cheap.
As for making the models and overlays, I think I’ve pretty much gotten the hang of the process:
- Load a DEM raster layer.
- Load a vector layer for your paths.
- Clip the raster layer to your selection.
- In the Processing Toolbox, under GDAL, Vector geoprocessing, use the “Clip vector by extent” tool to clip your vector layer by the raster layer.
- If trails don’t reach all four sides, edit the new vector layer and draw a stub line across each unreached side, then re-clip leaving clipped stubs to use for scaling.
- Export the heightmap PNG (using the plugin), and keep note of all the size parameters.
- Export the vector path layer to a DXF.
- Open Inkscape, import the PNG, and set it to the proper dimensions.
- In Document Properties, use the Resize page to drawing or selection option to fit the page to the PNG.
- Import the DXF, telling Inkscape to scale it to A4, then adjust it to the height and width of the image and align it on top. (Remove any scaling stubs and any paths you don’t want to include.)
- Double check the map, then save the SVG.
- Run the python code with the PNG, SVG, and model size parameters to get a path overlay G-code file.
- Load the heightmap in PixelCNC, set the same model size parameters, and CAM it all the way through.
- Throw all the files at the Shapeoko.
This is getting fun. ![]()
1 Like
This is awesome man! I love it! I can’t wait to give this a try when I finish up the next few projects I have on the books.
Well, I’d call that a win.
I wanted to go full ahead with a test run, so I clipped a section around Mount LeConte that would fit all the trails I’ve hiked going to to the top – Alum Cave, The Boulevard (from Newfound Gap), Rainbow Falls, Bullhead, Trillium Gap, and Brushy Mountain (from Porters Creek trailhead).
I like to do a very coarse roughing pass with a 1/4" ball nose to clear most of the wood volume (5mm stepover, 3mm depth of cut, 1mm stock to leave). I follow that with a 1/4" shank 0.5mm radius ball nose tapered mill with 31.75mm flute length ($16 from Amazon) to carve the terrain (this time with 0.2mm stepover). It handles the very scalloped roughed-in surface quite easily. As long as I keep the total depth of the model less than that 31.75mm, I can do it all in one pass, so I tend to treat that as a semi-firm limit that I should only break in case of artistic necessity.
So, playing with the numbers in the Heightmap Export plugin, I saw that I could go with about 30mm deep and end up with a model 225mm by 206mm. With a border allowance, that’s roughly something like 10" by 9-1/4" by 1-1/2", which fits pleasingly into a 2x10.
I ended up using 0.2mm deep as my offset for cutting the trails with a 0.25mm tip radius ball nose tapered mill, 1/4" shank (also $16 from Amazon), and other than being just a bit shallower than elsewhere in the flat around the Rainbow Falls/Bullhead/Trillium Gap trailhead (left side near the top), that seems to be about right.
The process seems to work just as intended. I can say from many hiking trips on all the trails on LeConte that the trail alignment with my dialed-in process is spot-on. (Cliff Tops, Myrtle Point, The Boulevard, Alum Cave Bluffs… they’re all right where they’re supposed to be.)
This was one of the ideas I absolutely had in mind when I decided to get a Shapeoko, and you can color me delighted that I seem to actually have managed to pull it off. Now I just need to put some polish on the code, document and release everything, and get around to experimenting on that baltic birch plywood that’s stacked next to the machine. 
4 Likes
After forgetting to write down my links and then hunting down the sources again, I figure I may as well document where I get NPS and USFS trail data for everyone’s convenience, including my own. Note that both of these datasets are vast, and you’ll definitely want to clip just the portion you’re using in a project to make things more efficient. I’ve successfully used them in Google Earth Pro and QGIS 3, but it does take a noticeable few moments to load the full data.
National Park Service:
- “NPS - Trails” dataset: https://public-nps.opendata.arcgis.com/datasets/nps-trails
(I choose KML from the download button drop-down.) - See also their trail data search page: https://public-nps.opendata.arcgis.com/datasets?q=trail
National Forest System Trails:
-
https://catalog.data.gov/dataset/national-forest-system-trails-feature-layer-69c5c/resource/2e964c86-8838-43c3-83ef-c2b9b1c88d57
(The download button downloads a KML file.)
1 Like
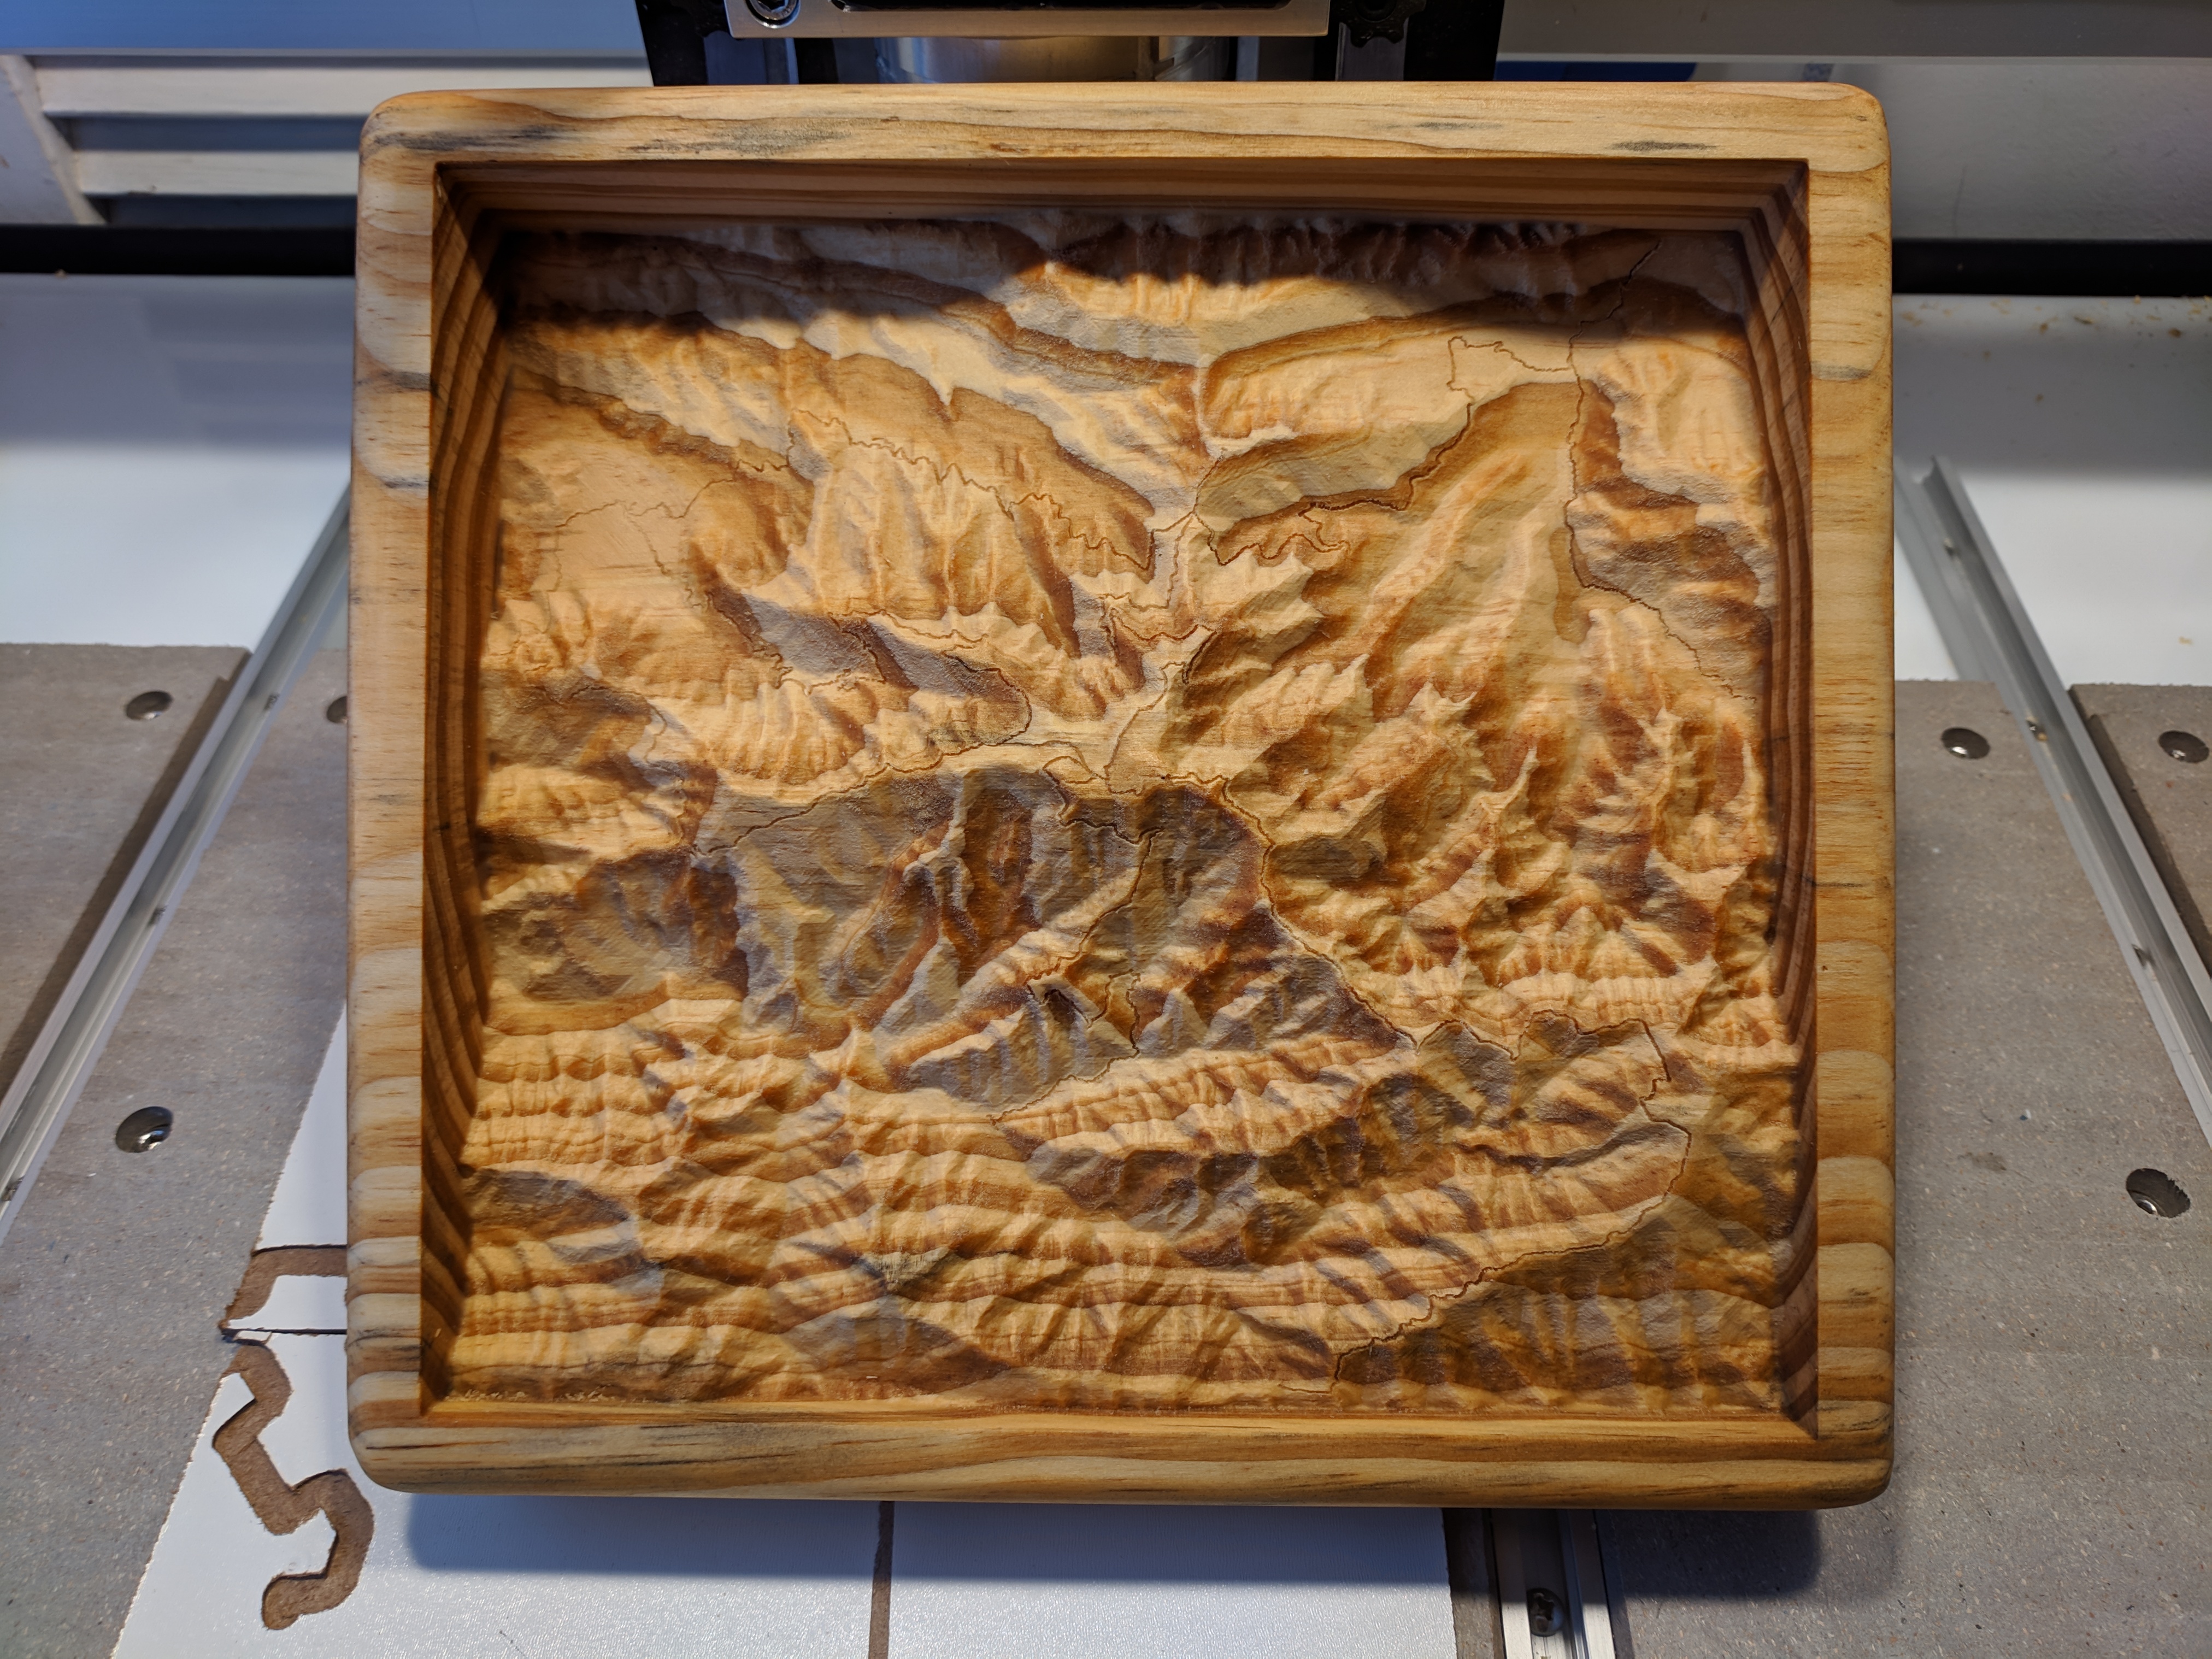
Figured the part of Sequoia/Kings Canyon where mb and her sisters went backpacking last fall would do for a first attempt of a terrain relief model on some baltic birch plywood.
Not a perfect wood specimen (a couple voids and a bit of an unglued layer in one area), but not bad for a first go with the material. Engraved the paths at Z-0.3mm, and this is what it looks like hot off the press… well, still clamped down, actually.
3 Likes
I’m still working on the code, but I just did a little patch/workaround on the SVG library I’m using to process the paths. For the very large path tracing the entire loop in that last carve, it was taking about 65 seconds to step through and trace it onto the heightmap workspace. Switching it up to calculate the segment lengths once and use python’s bisect module made it just a little more efficient – it’s under a second for the tracing step now. 
1 Like
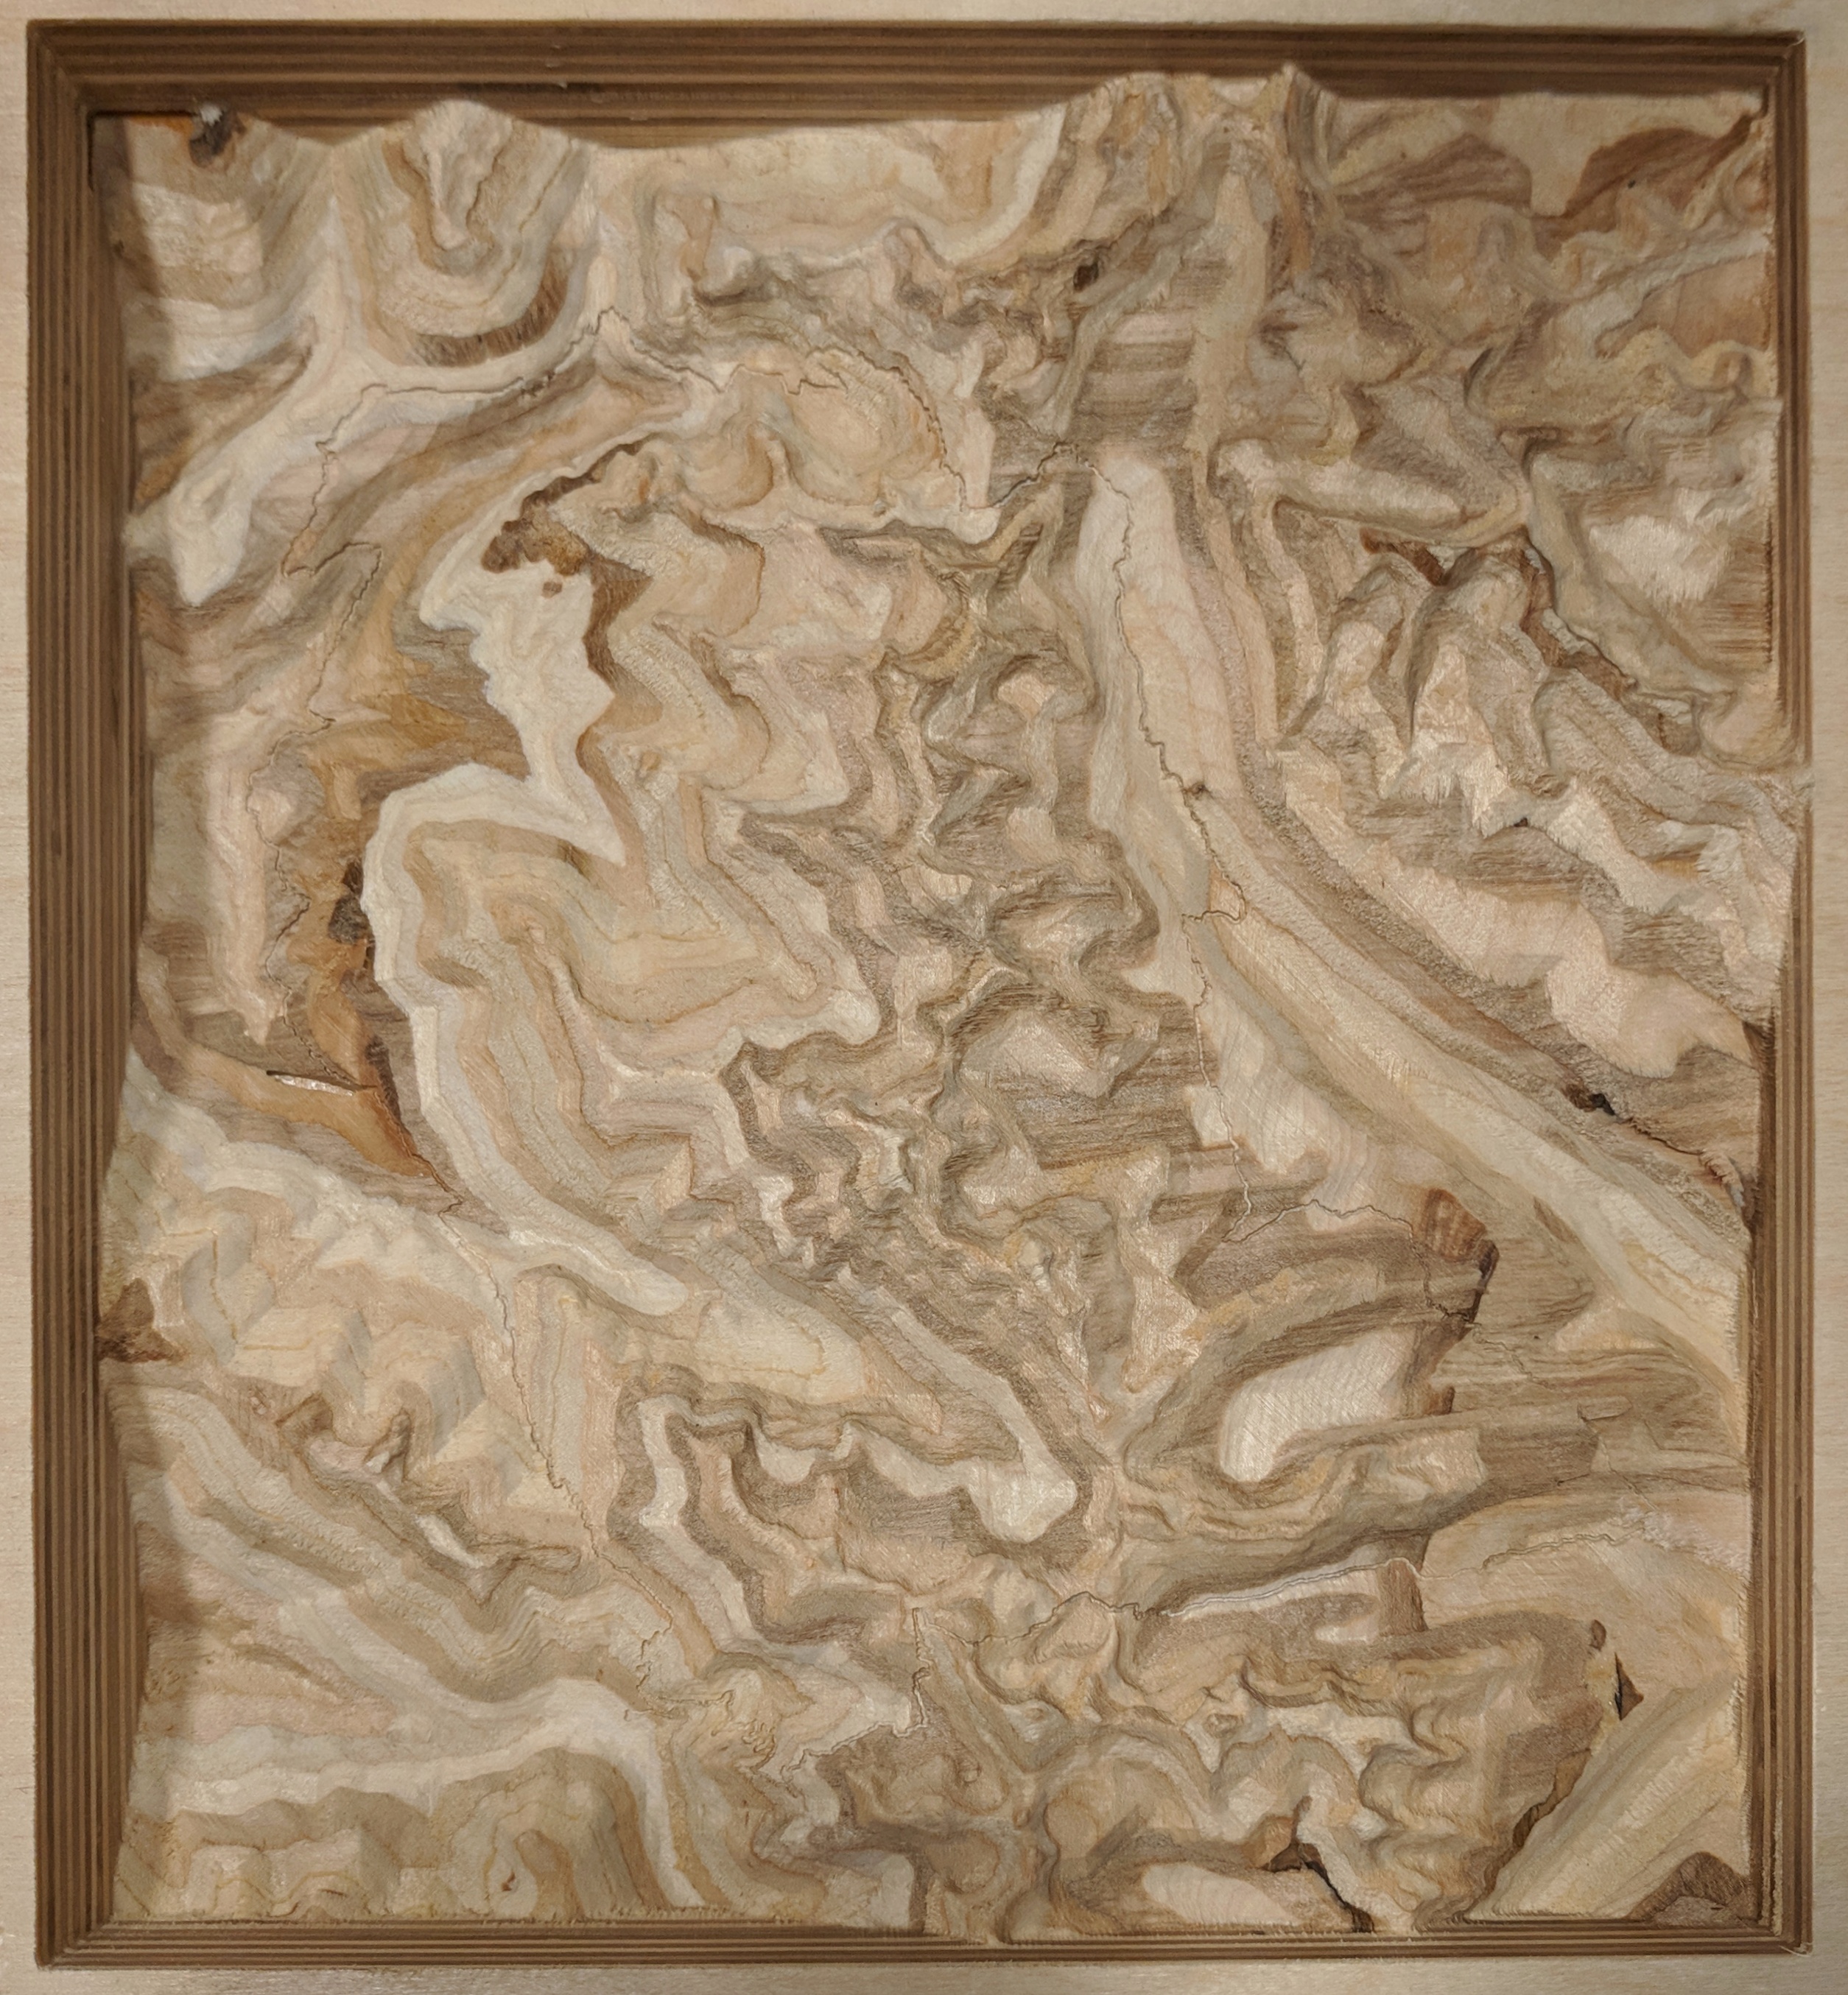
Okay, so Valentine’s Day is coming up this week, and while mb isn’t into the whole valentiney thing, I’ve always been a bit of a hopeless romantic. She rather liked the demo piece I made of the area she and her sisters backpacked last fall, so I figured I’d do it up all proper and giftlike.
That’s the standard to-scale process, with 36mm baltic birch plywood as the stock (by gluing two 18mm pieces together). This is actually the second copy, as the first had a void that resulted in a bit of unscheduled geologic alteration. It’s not bad, but I figured I’d give it another round, seeing as there’s nothing like a present that presents the present state of the terrain. The layer variation in the second also looked cooler.
So, standard procedure. USGS DEM data into QGIS. Use the plugin to create a heightmap. Run the CAM via PixelCNC. Extract the trails from NPS vector data, using Inkscape to turn the DXF into a properly scaled SVG. Process the paths and heightmap with my special python code. Then run the roughing pass (1/4" ball), finishing pass (0.5mm radius taper), and engraving pass (0.25mm radius taper, Z-0.2mm). I decided to add the V-carved text, which I drew in Inkscape, processed in Carbide Create, and cut with a 90° V-bit.
I did a quick video (with poor focus and loud router noise) of the engraving pass, just to give an idea what it’s like. I optimized the SVG to join all the segments to make it just a single path. (In Inkscape, choose the node edit tool, click a path, then shift-click the path to join. Drag a select box around the end node of the first and the overlapping start node of the next, then click the “join selected nodes” button. The two paths are now one continuous path in the SVG.) Anyway, the loud, poorly-focused video clip:
After it was cut on the Shapeoko and the corners rounded on a belt sander, I took a 5/0 spotting brush and some medium viscosity acrylic artist-type paint and meticulously hand painted over the engraved trails. In hindsight, if I thought about painting them, I would’ve engraved them as lightly as possible while still being able to see them as guides when painting them on. The wood fibers tend to grab at the tiny little brush. I added little dots to mark where mb camped each night, and then I painted the V-carved letters. After the paint set, I lightly sanded over the letters, and the edges cleaned right up. (The gel-like paint didn’t seep into the wood fibers like other more fluid paints I’ve used.)
I’ve put a few coats of lacquer over it so far, and I may do a bit more finishing, but I figured it was good enough to show off here. Just don’t tell mb. It’s a surprise. 
5 Likes
Well, I’ve been playing around with PyQt5 and so on to make a GUI for my python code (and then build a Windows app out of it) to make things easy for anyone who wants to play with the code without a python environment. The GUI seems to be working now (it’s just a single dialog box, actually, as it’s quite a basic little utility).
I just need to work on making a nice installation out of it, and I’ve got to make a little patch to the Heightmap Export plugin to save the model size parameters so you don’t have to type them in. If I can finish that, I should have something to post for anyone who wants to play around with this experimental proof-of-concept project. Oh, and I did send a patch upstream on my optimization for the SVG path package, too. 
2 Likes
Quite extraordinary work you do sir.
Hope to eventually work up a project using your guidance centered on Tuolumne Meadows in Yosemite.
Thanks for the inspiration.
I decided that the overhead of making the python code into a nice executable was rather silly when you consider that QGIS is required for the HeightmapExport plugin and it already has a perfectly cromulent environment with python, Qt, et al. So, why not just add a button to that plugin that launches the PathTracer dialog? Since it’s been over two weeks and still nothing back on the original plugin, I figured I may as well take advantage of the fact that QGIS 3 has a built-in feature in the plugin manager that lets you load plugins from zip files.
So, with all the usual notes about no guarantee of fitness or usability and so on and so forth, here’s a quick QGIS 3 plugin package. I’m pretty sure you can find ways to make it throw up errors, as I have not yet added insanity checks to every input and function, but I’ve just run several complete workflows (except the actual making of chips), and if you’re not intentionally mean to it, it seems to be happy so far.
HeightmapExport-3.1.zip (77.3 KB)
2 Likes
Okay, I had to hand-edit the gcode from my PathTracer system, as I don’t have laser control built into it yet. (That’ll be added to the QGIS plugin shortly, hehe.) Fortunately, changing gcode from “carve with a tapered endmill” to “blast this with a laser” is simple and straightforward. And so, may I present, Mount LeConte with Laser Trails!

7 Likes
Extraordinary! I aspire to achieve your capabilities.
1 Like
Ok, you’ve really got my attention now, I have to need a laser because, well, laser beams are cool!!
Actually I have a work mate that is an avid hiker, I may have to give this a shot sometime soon.
Really nice work!!!
Dan
Okay, time to move on to a completely new writeup with a completely renovated workflow and lots and lots more information. So, on with the show…
2 Likes