Epoxy Gift Coasters

If there is any bleeding, I’m going to suggest using this as a sealer. I’ve had wonderful success with it, there are many different brands, it’s super easy to use and readily available:

2 Likes

Would it be worth the effort to put just a small bit of clear epoxy in each cavity before you add the colorant, to prevent any of the colored epoxy from seeping through - basically the trivet cavity version of putting a clear coat on a v-carve before painting to prevent color bleeding?

Maybe just paint on a thin layer of clear epoxy on the trivet before you clamp the trivet to the Plexiglas and pour the colored epoxy?

3 Likes

Yup, that is my go-to for clear coating something that is not going to get spray painted.

By the way, I found out that if you coat wood with this, then v-carve and spray paint the carve, the interaction of this and the spray paint will cause the paint to bubble and wrinkle. I didn’t find out until it happened.

The answer for me was to first, find out that clear spray paint exists, and then use that clear spray paint if I plan on paint filling in any carving I do. I have mentioned it before, but thought I would mention it again so someone doesn’t have to go through what I did.

2 Likes

The pouring is just judgement of hand and eye. With a quite thick (consistency of honey) resin to pour, it took a few attempts, under-filling a few then topping them up to get the feel for it. Plastic ‘beaker’ pinched in my hand to make a spout. It’s not precise, and I think some sort of large nozzle diameter pipette is likely to be a much better tool - in the knowledge that once used it will be scrap as the resin dries.
On the next two I might try the suggestion of painting a fine coat of resin on the clamped-down face, just to actively place non-coloured resin there as a barrier.
I like the contrasts between the hot parts of the world and the cold, ie: does the condensation form on the outside or the inside… particularly when remembering if it is safe to pick up a beer glass without tapping it on the beer mat first!!

2 Likes

Oh what I would give to be back in Singapore right now, given the UK (and most of Western Europe) Covid round 3. Just dreaming of a cold beer alongside the river… Shame I don’t get to work out there as much as I used to (Brit through and through, and love my ‘green and pleasant land’ - except the cold, Covid, UK politics, UK media, UK pot-hole roads,… but I wouldn’t permanently move anywhere else)

2 Likes

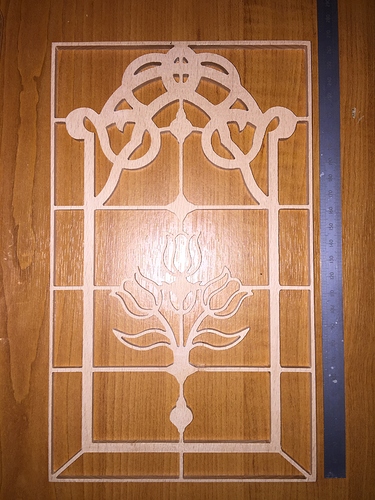
So having mastered the technique for the coasters, I was pondering a stained glass window insert.

A slightly nerve-wracking 10 machine hours later, having picked 2mm geometry for the frame and support bars (because it matches the window it will fit in), it is ready. Cuts in this piece of (I believe) Cherry were 1/4" clearance, 1/8" first detail and 1/16" final detail at 6mm stock thickness, 20,000rpm ‘gently’ on feed rate. An outer frame with tabs mirroring the braces was used, and a few dots of carefully places super-glue to stop the central area lifting or moving, sliced away with a razor blade once cutting was finished.

I have to say I am really impressed at what the 3XL has achieved. Now to await new supply of resin and the pouring can re-commence!! Will be a few days, depends on Amazon’s delivery times in these ‘cram it in’ last few shopping days before Covid-Lockdown Christmas.
9 Likes

(epic inlay incoming!)

Thank you for helping me live vicariously through you while I finish other projects @AndyC!
Looking forward to seeing the end result.

1 Like

What does one do whilst waiting for the Goose to cook? Mix the glass-resin and colours, and pour the stained-glass window!! Merry Christmas all :slight_smile:

18 Likes

Awesome @AndyC and really inspirational!

wow.

this is absolutely awesome. Clearly I need to go hunt for some fun designs

any tips/tricks that were there to it ?

(I might try to get fancy and do epoxy-in-epoxy as I’ve done before; basically poor the epoxy, let it harden in the machine, and then later cut pockets in it to again poor epoxy, to get some wood-less joints)

2 Likes

Have you figured out how to pour without clamping?

The tips I picked up doing the coasters, then applied to this.

  • Mix the resin thoroughly, then once it turns clear, mix in the dye thoroughly, then continue mixing really slowly to help get the bubbles out
  • Get rid of every loose strand of wood, speck of dust etc before pouring
  • Mix a clear resin, only a few ml needed, then paint this on the bottom face of the wood - what will be the front when all done. Clean the Plexiglass throughly, mark your target placement and then place the frame straight down and don’t let it move. I weighted this, and let it cure overnight to give me freedom from needing clamps when pouring the colours
  • Test the colours… You don’t get an awful lot of time before the resin starts to turn
  • Mix too much rather than too little, as a second mix won’t be the exact same colour and on transparent work like this window, it will show
  • Use a gentle heat source, a halogen lamp or a gentle hair dryer, to remove any last bubbles and ensure the resin has run into every corner evenly
  • I would probably suggest, from mistakes made such as stray drips of resin, pour the darker colours first and if a later, paler colour drop happens it won’t show up as much
  • Under-fill the ‘pockets’ slightly. The resin tends to climb a little, and this meniscus is what makes it look like old run/cast glass

The artwork for this window was a few crude iPhone pictures taken at various times, and an idea formed. An hour (or two) in VCarve drawing, shifting bezier curve handles etc and there was my design. I did see some nice ones on Etsy etc., but wanted to try my hand at art this time.

But most importantly, try it. It’s hugely rewarding and although a systematic approach is needed, it is not a difficult project.

11 Likes

thanks for the tips

I had planned to go light to dark, so that I could incrementally add some ink to the resin “pot” and mix one larger batch, and just go darker and darker as I poor the pockets of increasingly dark colors of similar hue (adding a bit of black if needed as well).

but maybe that’s the wrong way around … will need to ponder this some more since yeah mistakes will happen (maybe I need to be ready to re-stir existing pockets in place in case of accident)

I think colour order, light to dark or vice-versa, is going to depend on the job, the colours in question, translucency or opacity, and work style. My piece is curing just to ‘dry tacky’ under halogen lamps, and I’ve just seen a small group of tiny bubbles that must have come from the wood itself… I’ll call them ‘character’.

2 Likes

bubbles in epoxy are… part of the character :wink:

so far I’ve found that heating up the epoxy just before or during mixing helps somewhat, as does using the heat gun multiple times after the poor (about every 5 minutes or so).

pre-sealing the wood with clear epoxy is what the youtube universe suggests as the best option… in your early step where you pre-coat that is likely when to do that.

also I saw a video where they used a USB coffee heating thingy under the epoxy while stirring to keep it warm… those are pretty darn cheap on amazon so I’ll try one to see how it goes.

2 Likes

I’ve an acquaintance with a vacuum chamber that works very well. I’ve been looking for a suitable pump and will eventually give that method a try. He says his only pulls a negative 1 or 2 pounds which seams reasonable.

1 Like

If you look at some epoxy casting videos, they do use a paint pressure pot. They don’t use vacuum. They pressurize the pot with the parts inside. Applying vacuum will just bring out more air from the wood.

I think the reason is that it compresses the bubbles to a point where you can’t see them. The items that they encapsulate always contain some air.

1 Like

Result!! One very Edwardian style stained glass window panel gently placed in position. Not sure I have ever liked the ‘wavy glass’ in this door, so might look to change it for something nicer.

However, this has lifted the door enormously. Very happy with that :slight_smile:


Stained Window Panel Rev-2.crv.zip (1.5 MB)

11 Likes

I predict a number of “epoxy stained glass” threads in the near future, considering how cool this is. :+1:
The texture of the original glass seen through the epoxy gives it a lot of pop!

Now, the only possible next step is for @MikeG to make one, to reclaim ownership of this thread ! :slight_smile:

3 Likes