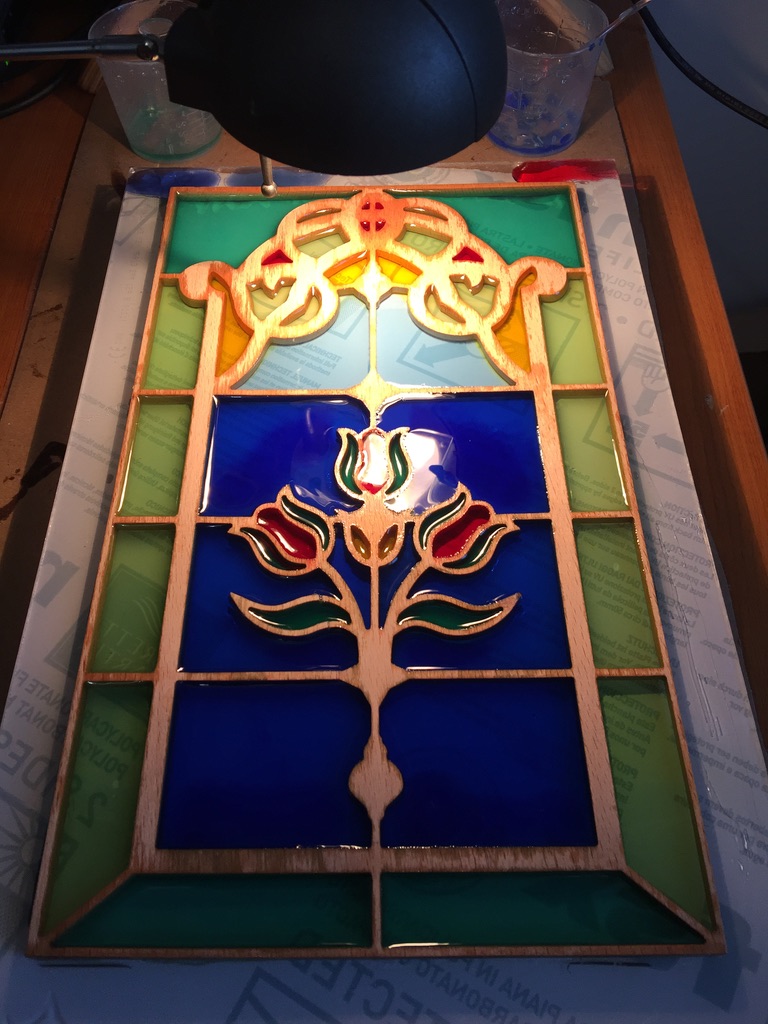
What does one do whilst waiting for the Goose to cook? Mix the glass-resin and colours, and pour the stained-glass window!! Merry Christmas all 
18 Likes
Awesome @AndyC and really inspirational!
wow.
this is absolutely awesome. Clearly I need to go hunt for some fun designs
any tips/tricks that were there to it ?
(I might try to get fancy and do epoxy-in-epoxy as I’ve done before; basically poor the epoxy, let it harden in the machine, and then later cut pockets in it to again poor epoxy, to get some wood-less joints)
2 Likes
Have you figured out how to pour without clamping?
The tips I picked up doing the coasters, then applied to this.
- Mix the resin thoroughly, then once it turns clear, mix in the dye thoroughly, then continue mixing really slowly to help get the bubbles out
- Get rid of every loose strand of wood, speck of dust etc before pouring
- Mix a clear resin, only a few ml needed, then paint this on the bottom face of the wood - what will be the front when all done. Clean the Plexiglass throughly, mark your target placement and then place the frame straight down and don’t let it move. I weighted this, and let it cure overnight to give me freedom from needing clamps when pouring the colours
- Test the colours… You don’t get an awful lot of time before the resin starts to turn
- Mix too much rather than too little, as a second mix won’t be the exact same colour and on transparent work like this window, it will show
- Use a gentle heat source, a halogen lamp or a gentle hair dryer, to remove any last bubbles and ensure the resin has run into every corner evenly
- I would probably suggest, from mistakes made such as stray drips of resin, pour the darker colours first and if a later, paler colour drop happens it won’t show up as much
- Under-fill the ‘pockets’ slightly. The resin tends to climb a little, and this meniscus is what makes it look like old run/cast glass
The artwork for this window was a few crude iPhone pictures taken at various times, and an idea formed. An hour (or two) in VCarve drawing, shifting bezier curve handles etc and there was my design. I did see some nice ones on Etsy etc., but wanted to try my hand at art this time.
But most importantly, try it. It’s hugely rewarding and although a systematic approach is needed, it is not a difficult project.
11 Likes
thanks for the tips
I had planned to go light to dark, so that I could incrementally add some ink to the resin “pot” and mix one larger batch, and just go darker and darker as I poor the pockets of increasingly dark colors of similar hue (adding a bit of black if needed as well).
but maybe that’s the wrong way around … will need to ponder this some more since yeah mistakes will happen (maybe I need to be ready to re-stir existing pockets in place in case of accident)
I think colour order, light to dark or vice-versa, is going to depend on the job, the colours in question, translucency or opacity, and work style. My piece is curing just to ‘dry tacky’ under halogen lamps, and I’ve just seen a small group of tiny bubbles that must have come from the wood itself… I’ll call them ‘character’.
2 Likes
bubbles in epoxy are… part of the character 
so far I’ve found that heating up the epoxy just before or during mixing helps somewhat, as does using the heat gun multiple times after the poor (about every 5 minutes or so).
pre-sealing the wood with clear epoxy is what the youtube universe suggests as the best option… in your early step where you pre-coat that is likely when to do that.
also I saw a video where they used a USB coffee heating thingy under the epoxy while stirring to keep it warm… those are pretty darn cheap on amazon so I’ll try one to see how it goes.
2 Likes
I’ve an acquaintance with a vacuum chamber that works very well. I’ve been looking for a suitable pump and will eventually give that method a try. He says his only pulls a negative 1 or 2 pounds which seams reasonable.
1 Like
If you look at some epoxy casting videos, they do use a paint pressure pot. They don’t use vacuum. They pressurize the pot with the parts inside. Applying vacuum will just bring out more air from the wood.
I think the reason is that it compresses the bubbles to a point where you can’t see them. The items that they encapsulate always contain some air.
1 Like
Result!! One very Edwardian style stained glass window panel gently placed in position. Not sure I have ever liked the ‘wavy glass’ in this door, so might look to change it for something nicer.
However, this has lifted the door enormously. Very happy with that

Stained Window Panel Rev-2.crv.zip (1.5 MB)
11 Likes
I predict a number of “epoxy stained glass” threads in the near future, considering how cool this is. 
The texture of the original glass seen through the epoxy gives it a lot of pop!
Now, the only possible next step is for @MikeG to make one, to reclaim ownership of this thread !
3 Likes
Very nice, Andy! And thanks for the list of Tips.
1 Like
Currently working on a couple of chess boards,yes,epoxy is in the mix. But once those are complete, and with all the great tips @AndyC and others have shared, I’m hoping to see many more of these awesome examples. As far as owning the thread…I’ll be back.
2 Likes
How do you guys handle the waste that comes with the epoxy projects? Like buckets used to mix, brushes or rags to apply thin epoxy layers and of course unused epoxy.
I currently use paper cups to mix the resin and re-use those as often as possible. Each use adding a layer of remaining epoxy. Then, cloth scraps from old shirts or the like are used to apply thin layers or to remove unwanted droplets and stains. But these can only be used once, usually.
Finally collecting everything in a special waste bag.
Are there any tips for an efficient - and healthy - use of those disposable tools?
3 Likes
Sounds like you’re making the best use of your epoxy tools now. I try to do the same, wiping the mixing cups out with a paper towel, reusing stir sticks etc. I do wear gloves and work generally in an open door shop. The current chessboard project has been an eye opener only from the standpoint of having filled my Thein bucket for the first time on a single project. Looking at all the mixed wood/epoxy chips gave me pause as I cannot think of any way the combo could be recycled. Tightly sealed it all up in in a bag knowing/hoping nothing would spread to our environment on the way to the landfill, sigh.
2 Likes
I use a reusable silicone cup to mix epoxy, pour, and then I just let the unused epoxy harden at the bottom of the cup. Then gently pushing from the bottom, it comes right off. I usually have to do some extra cleaning to make sure there are no other residue, but it works pretty well.
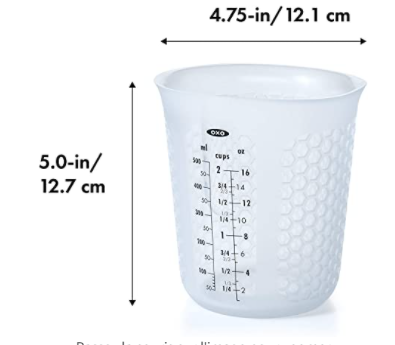
The beak and the ability to squeeze it when pouring is also useful, much easier to control than a large rigid cup (for clumsy me)
10 Likes
Those are pretty cool @Julien, do you have a link for where you got them?
Edit - never mind, I should know by now to check Amazon before I ask.
4 Likes
It is very difficult to get the pour side clear like glass, you are spot on. Sanding is tedious and maybe not even all that good. Have you thought of a ‘flood coat’ of a glossy finish to cover any sand marks and make it super shiny. That flood coat would cover everything, including the wood, but it would be even and smooth and shiny.
