I am very new at this but loving (almost) every minute of it.
I am using Fusion360 to model my parts
Everything looks good in design and CAM but when I actually cut the piece the measurements are not accurate. I am cutting wood so the tolerances don’t have to be that close,I would like them within a/16th of an inch for now.
I’m thinking it is in offsets or stock to leave.
I don’t really understand the differences between Roughing Strategies and Finishing Strategies. I understand finishing slows down and roughing is faster but if I have 0 in my “stock to leave” fields on a 2d adaptive shouldn’t it mill it down to the actual size of the part?
I would be grateful if someone could point me in the right direction.
Start simple — calibrate the machine: https://docs.carbide3d.com/shapeoko-faq/how-to-calibrate-the-machine-for-belt-stretch/
then try making pockets of easily measured sizes in scrap materials which are easily cut — once you have confidence in the machine and the software you should be able to move on to more complex things and less yielding materials.
2 Likes
A zero in stock to leave should result in the proper finish size.
When calibrating, and when cutting, you do need to be sure that the tool parameters are properly set. In Fusion360, you should check to be sure that the tool is properly defined (for most purposes, the nominal size is ok). Selecting the incorrect tool is not uncommon, and will really mess up your results.
In Fusion, most of the roughing strategies give the option for finishing, as well. Finishing strategies should not be used for roughing, in general. They will usually not perform well on heavy cuts. In many materials and applications, there no need to follow a roughing strategy with a finishing, as the roughing strategy will give a sufficiently good finish. When using a finishing strategy, a good, sharp, tool should be used, as the cut will be light.
2 Likes
You did not mention how inaccurate your dimensions were ? 1/16" is a LOT, with a properly tuned Shapeoko and the right toolpaths you can get 0.002" tolerances (or better). If your pieces are more than 1/16" off, I would agree with @enl_public that you should first check your tool settings in Fusion360.
I would be surprised that uncalibrated belt stretch alone could explain 1/16th of an inch, but definitely check that as @WillAdams said. Even before modifying the $100/101/102 parameters, you should check what length the tool actually travels when you jog it in the air by a given commanded distance.
Once your have checked the tool settings in Fusion and the machine calibration, you should be down to small tolerances already, and then you can use the “stock to leave” option to your advantage to manually compensate for any residual dimensional inaccuracy (it could come from the machine calibration, from the tool size not being exactly as advertised, from the tool deflection, …):
Run a test cut and measure. If it comes out too large, adjust stock to leave by some small positive or negative value, and rerun the cut. Say you cut a 1"x1" pocket, and you measure it to actually be 0.98" x 0.98" : adjust radial stock to leave to -0.01", this will cut 0.01" further into the stock all along the pocket perimeter, and you should end up with a 1"x1" pocket. On the other hand if you measure the pocket to be say 1.05" x 1.05", adjust stock to leave to +0.025". If you are cutting an outside profile, the signs change (i.e. you need positive stock to leave to end up with larger pieces), you get the idea. And in case you get different dimensions along X and Y, then you’ll know you need to fix machine squaring & calibration first.
3 Likes
Agreed, I’d also start by checking the machine mechanically — just going through the checklist will help a lot.
Thanks everyone for the help. I am new to all of this including forums, I am reluctant to take my problems to others but you all have been great and welcoming. Thank you.
I will try calibration first. The machine is practically new, less than 2hrs run time so I am thinking belt stretch may not be the issue but belt tension could do it, right?
More later.
2 Likes
Forget about belt stretch for now, make sure you have “guitar-string tight” X and Y belts first, which in my experience corresponds to a point where they are tight enough that you cannot easily slip one finger under them (in the middle of the string length)
Then tell us what you get/see/hear in excruciating details, and we will be happy to steer you in the right direction, this is what this place is for!
1 Like
Sorry, not sure what checklist you are referring to? The set up steps? Would you mind sending me a link to the checklist you are referring to?
Please see:
I got back to my machine after work and thought I would try a test with carbide create to see if my issues were based in fusion360.
In CC I inadvertently set the tool path zero to center. When I ran my 1" circle and 1" square the router ran directly to the front. I hit the power switch as soon as I could, I don’t know if it crashed or not. However, now the manual jog doesn’t work. Rapid Positioning works as does the Homing Cycle but when I click on X,Y or X I get nothing.
I thought I read to go to MDI and send $20=1 and $21=1 and $22=1 but nothing seems to happen.
I am running CM Build 4.0.416.
How do I get my manual jog back so I can get back to working on my other issues.
I have restarted CC,CM and my computer. I have nothing else running.
Mystery solved, at least my latest issue about manual jog. Sometimes I overthink things.
My jog was set to .01 mm and I didn’t notice it.
Now back to my size issue.
2 Likes
Back to my size issues.
Using CC cutting a 1" square and a 1" circle with a .25" sq end mill I am getting a .983 x .967 square and a oval .993 x .968 circle.
The movement by hand in the x axis is a bit tight and a little bumpy. Does sawdust get caught up in the v rollers and the belts? When I clean those should I expect better accuracy.
- have you checked whether your machine is square ? when you bring the gantry all the way to the front, or all the way towards the back, do the Y plates contact the front plate on both sides at the same time / with no gap on one side ? If not, you will probably need to go back and fix that first.
- manual movement of the axis : if you move it slowly by hand, is it smooth ? The “bumpy” part of it can happen if you move it faster, then the stepper motors start generating energy which flows back in the controller, and that’s normal. If it really feels too tight, maybe you tightened the eccentric nuts too much. Check both X and Y axis.
- measuring the dimensions of one pocket is ok, but to take the endmill dimensions out of the equation and minimize the measurement error, it would be better to cut several pockets, aligned along X and Y axis, spaced e.g. 10" apart from each other, and measure the distance from edge to edge, like this:
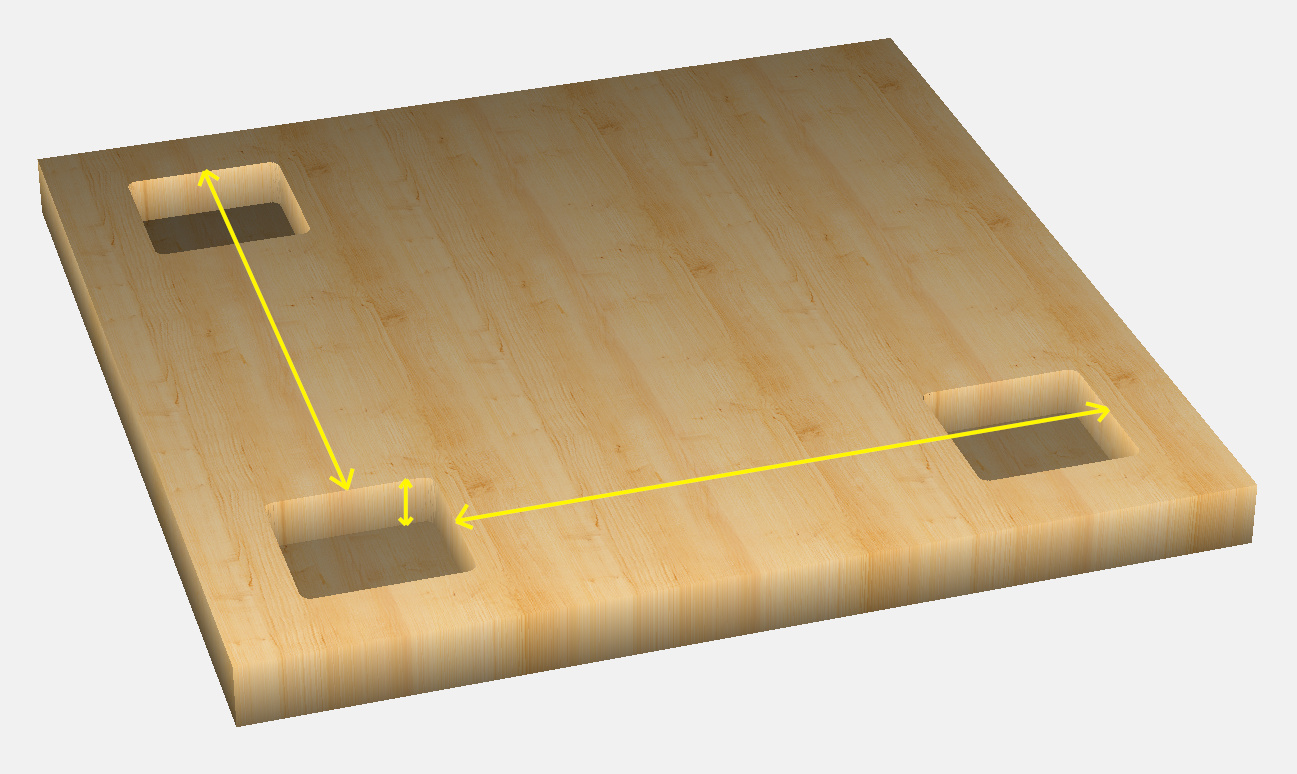
(ignore the “depth” arrow for now)
It looks to me like the ~0.99" for 1" on X is ok and belt calibration will take care of the residual error, but 0.97" for 1" on Y is a bit more suspicious, so I would first check the Y axis mechanically (eccentrics, belt tension)
THEN once you are confident that mechanically everything is fine (square and smooth), you can start adjusting the $100/$101/$102 parameters following the procedure @WillAdams mentioned earlier
When moving by hand, if the wiring is attached the stepper motors will generate current which will occasionally cause a movement to the next full step position — please don’t push the machine hard enough to cause that, it can damage the electronics.
To adjust see: https://docs.carbide3d.com/support/tensioning-eccentrics/
Yes, if dust and debris get caught up on the V wheels, V extrusion, belts, or pulleys it can cause problems — please keep the machine clean per: https://docs.carbide3d.com/general-faq/machine-operating-checklist/
Thanks everyone for the advice you have given.
I recalibrated my machine as best I can.
The bed is square within 1/16 on an inch.
The X gantry touches almost the exact same time, the right side touches leaving less than a 1/16 [f an inch. I don’t know how to get it any closer or if I need to.
It appears the back of my waste board is about 1/8 of an inch lower than the front. Is milling it the only way to adjust that?
I have cleaned everything and re-tensioned all the belts.
Now when I run a square and circle test I am only 1.5-100ths short on X and 2.5-100ths short on Y.
I am almost happy with these results since I am only cutting wood projects with high tolerance but I know as time goes on I am going to want more accuracy. I am sure I can adjust the offsets to get where I would like to be but I dont think I should have to.
I don’t think understand what the $20=1 grbl and the like is all about.
Where do I go from here to find more accuracy?
Please see:
You can certainly cut a lot of projects just fine with machine squaring being just 1/16" off. In case you want to get it perfect, you can shim the ends of the X-rails. I wrote a bit about this here:
https://shapeokoenthusiasts.gitbook.io/shapeoko-cnc-a-to-z/squaring
The 1/8" front/back height difference on your wasteboard can either be addressed by surfacing the wasteboard, or by going back to mechanical assembly and checking/adjusting the leveling of the two Y-rails with respect to the steel plates (but it’s a pain in the neck to do this after initial machine assembly)
Now that you are within 2/100th of an inch of the expected dimensions, the belt calibration procedure that @WillAdams mentioned OR using offsets in CAD will get you there. I have written a bit about this also as well as other sources of dimensional inaccuracies here:
https://shapeokoenthusiasts.gitbook.io/shapeoko-cnc-a-to-z/x-y-z-calibration
To do the belt calibration thing, you will need to play with the GRBL settings ("$" parameters) in the MDI console, but it’s easy enough, and you don’t have to understand them to adjust them.
1 Like
Thank you guys for all your help.
I followed your advice and now I am within 2 or 3 thousands. I wasn’t sure if I believed i could get it that close. I am very pleasantly surprised.
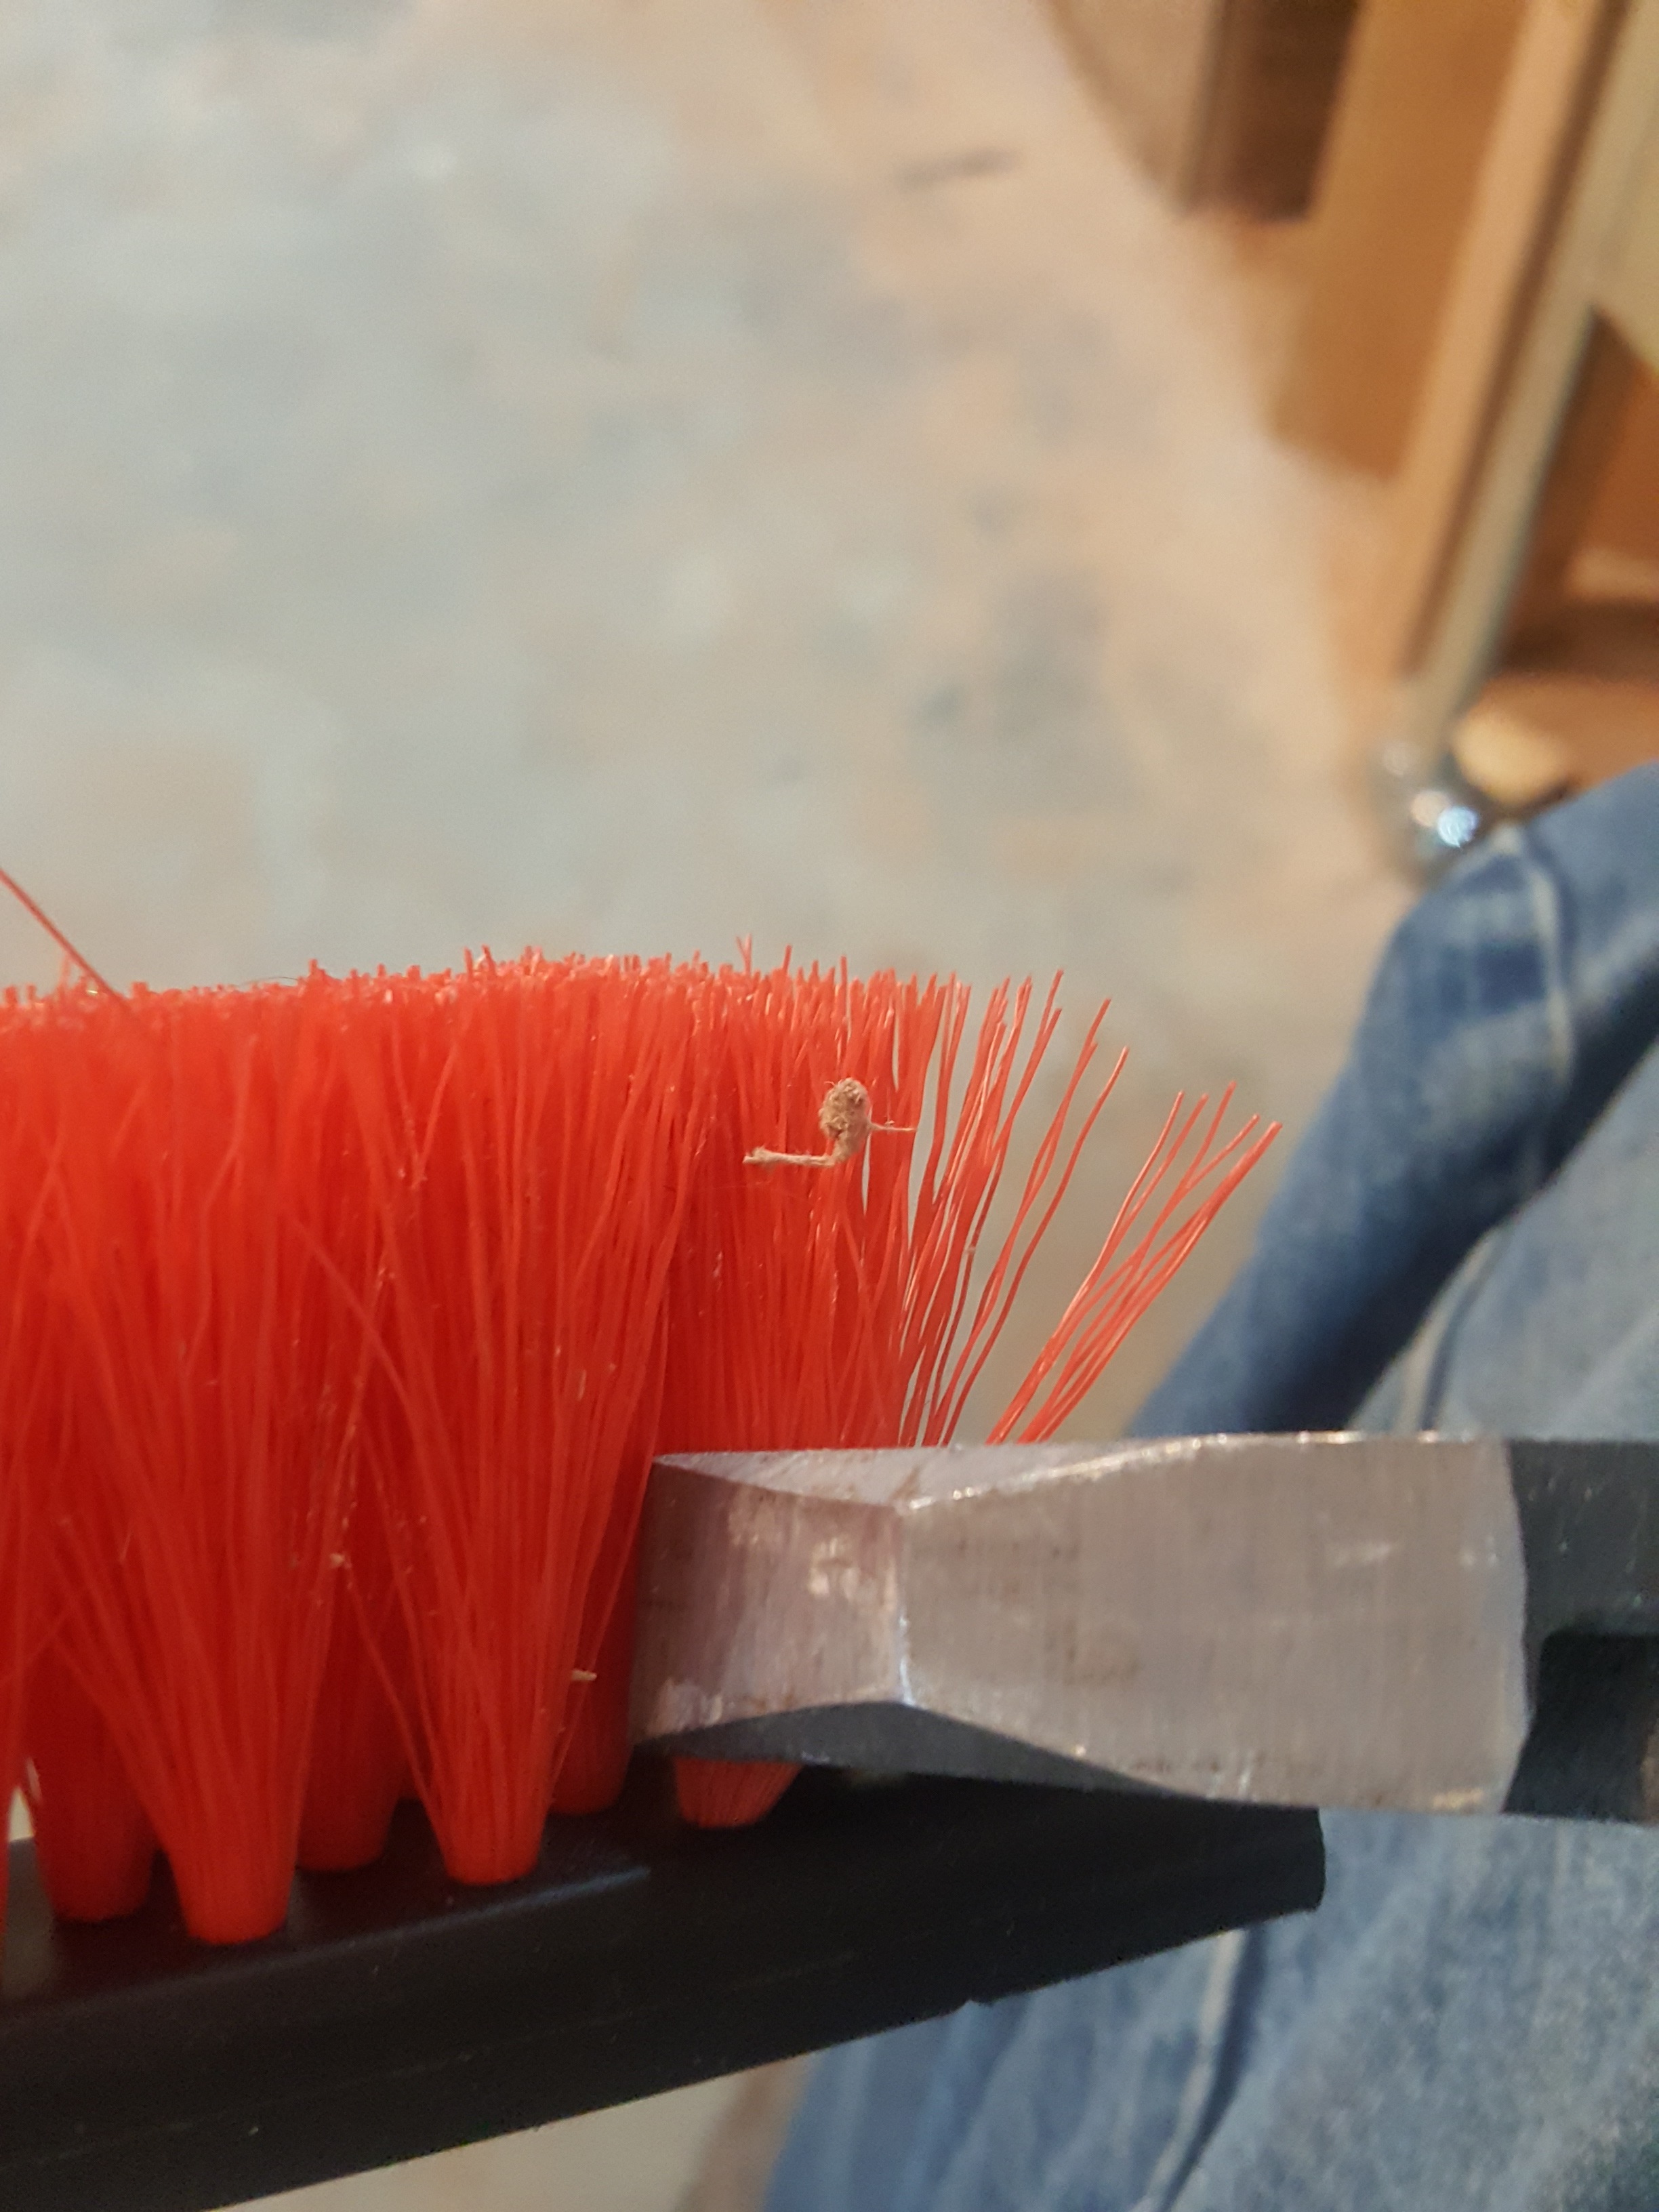
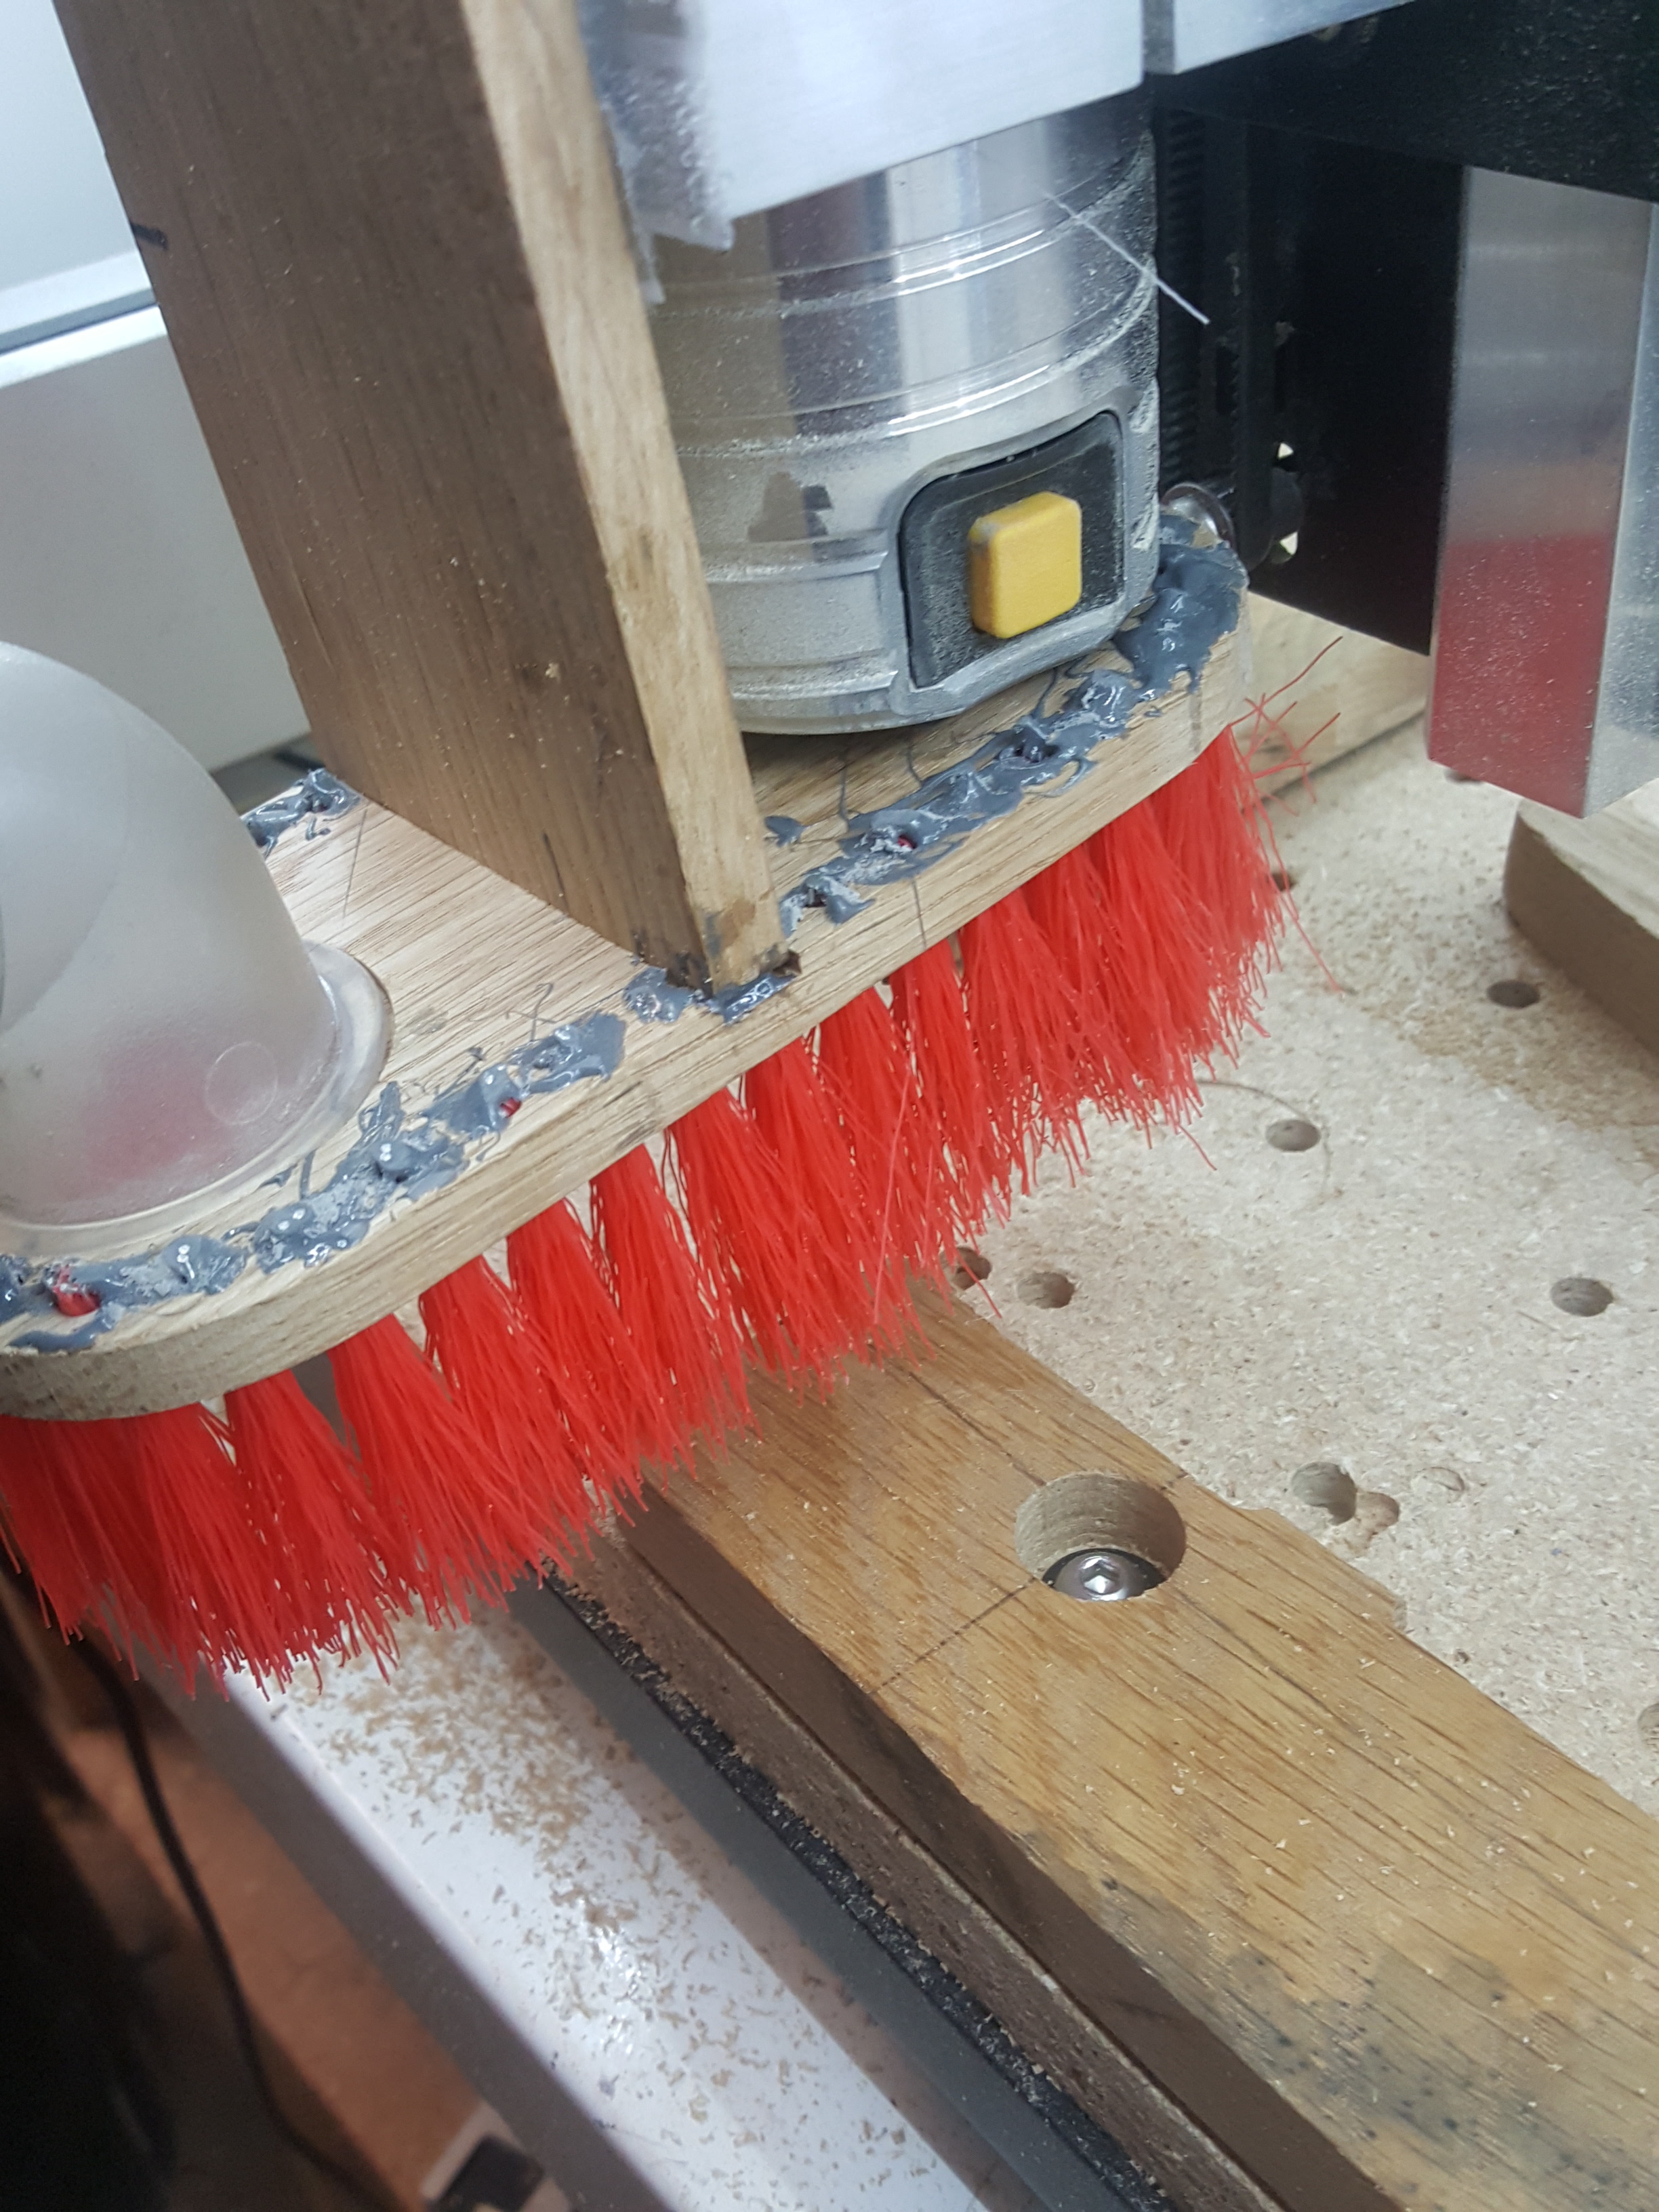
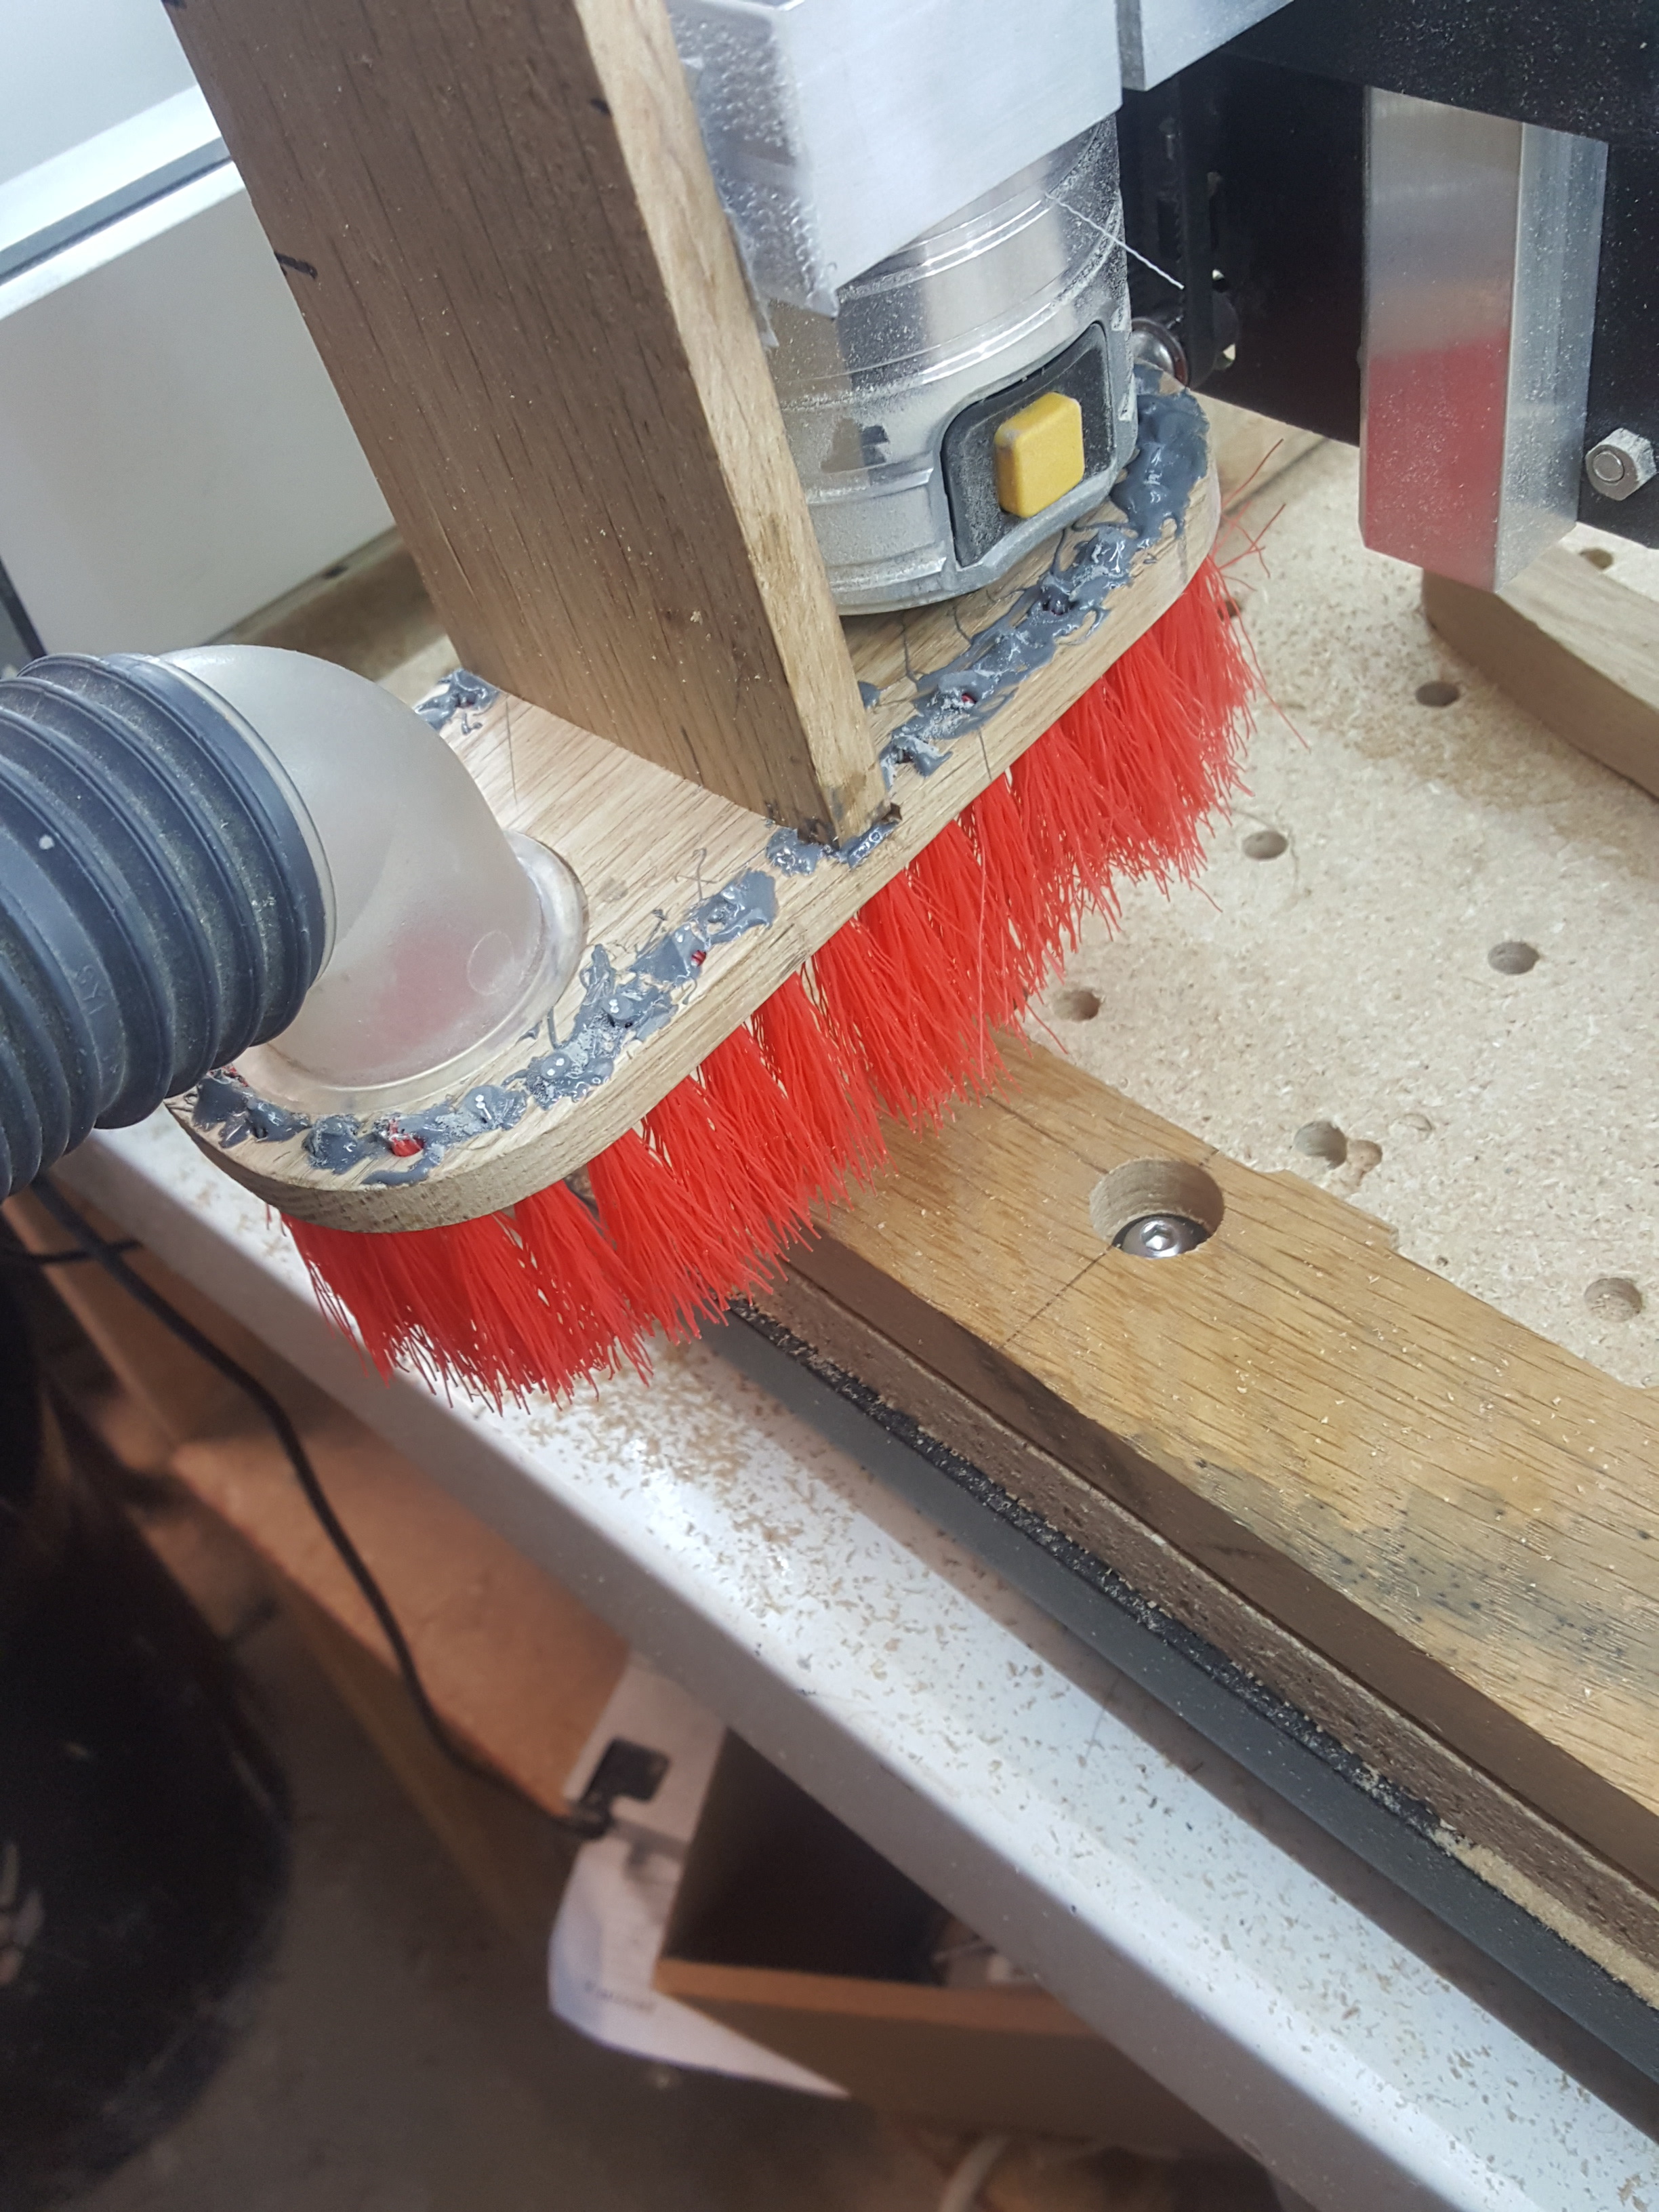
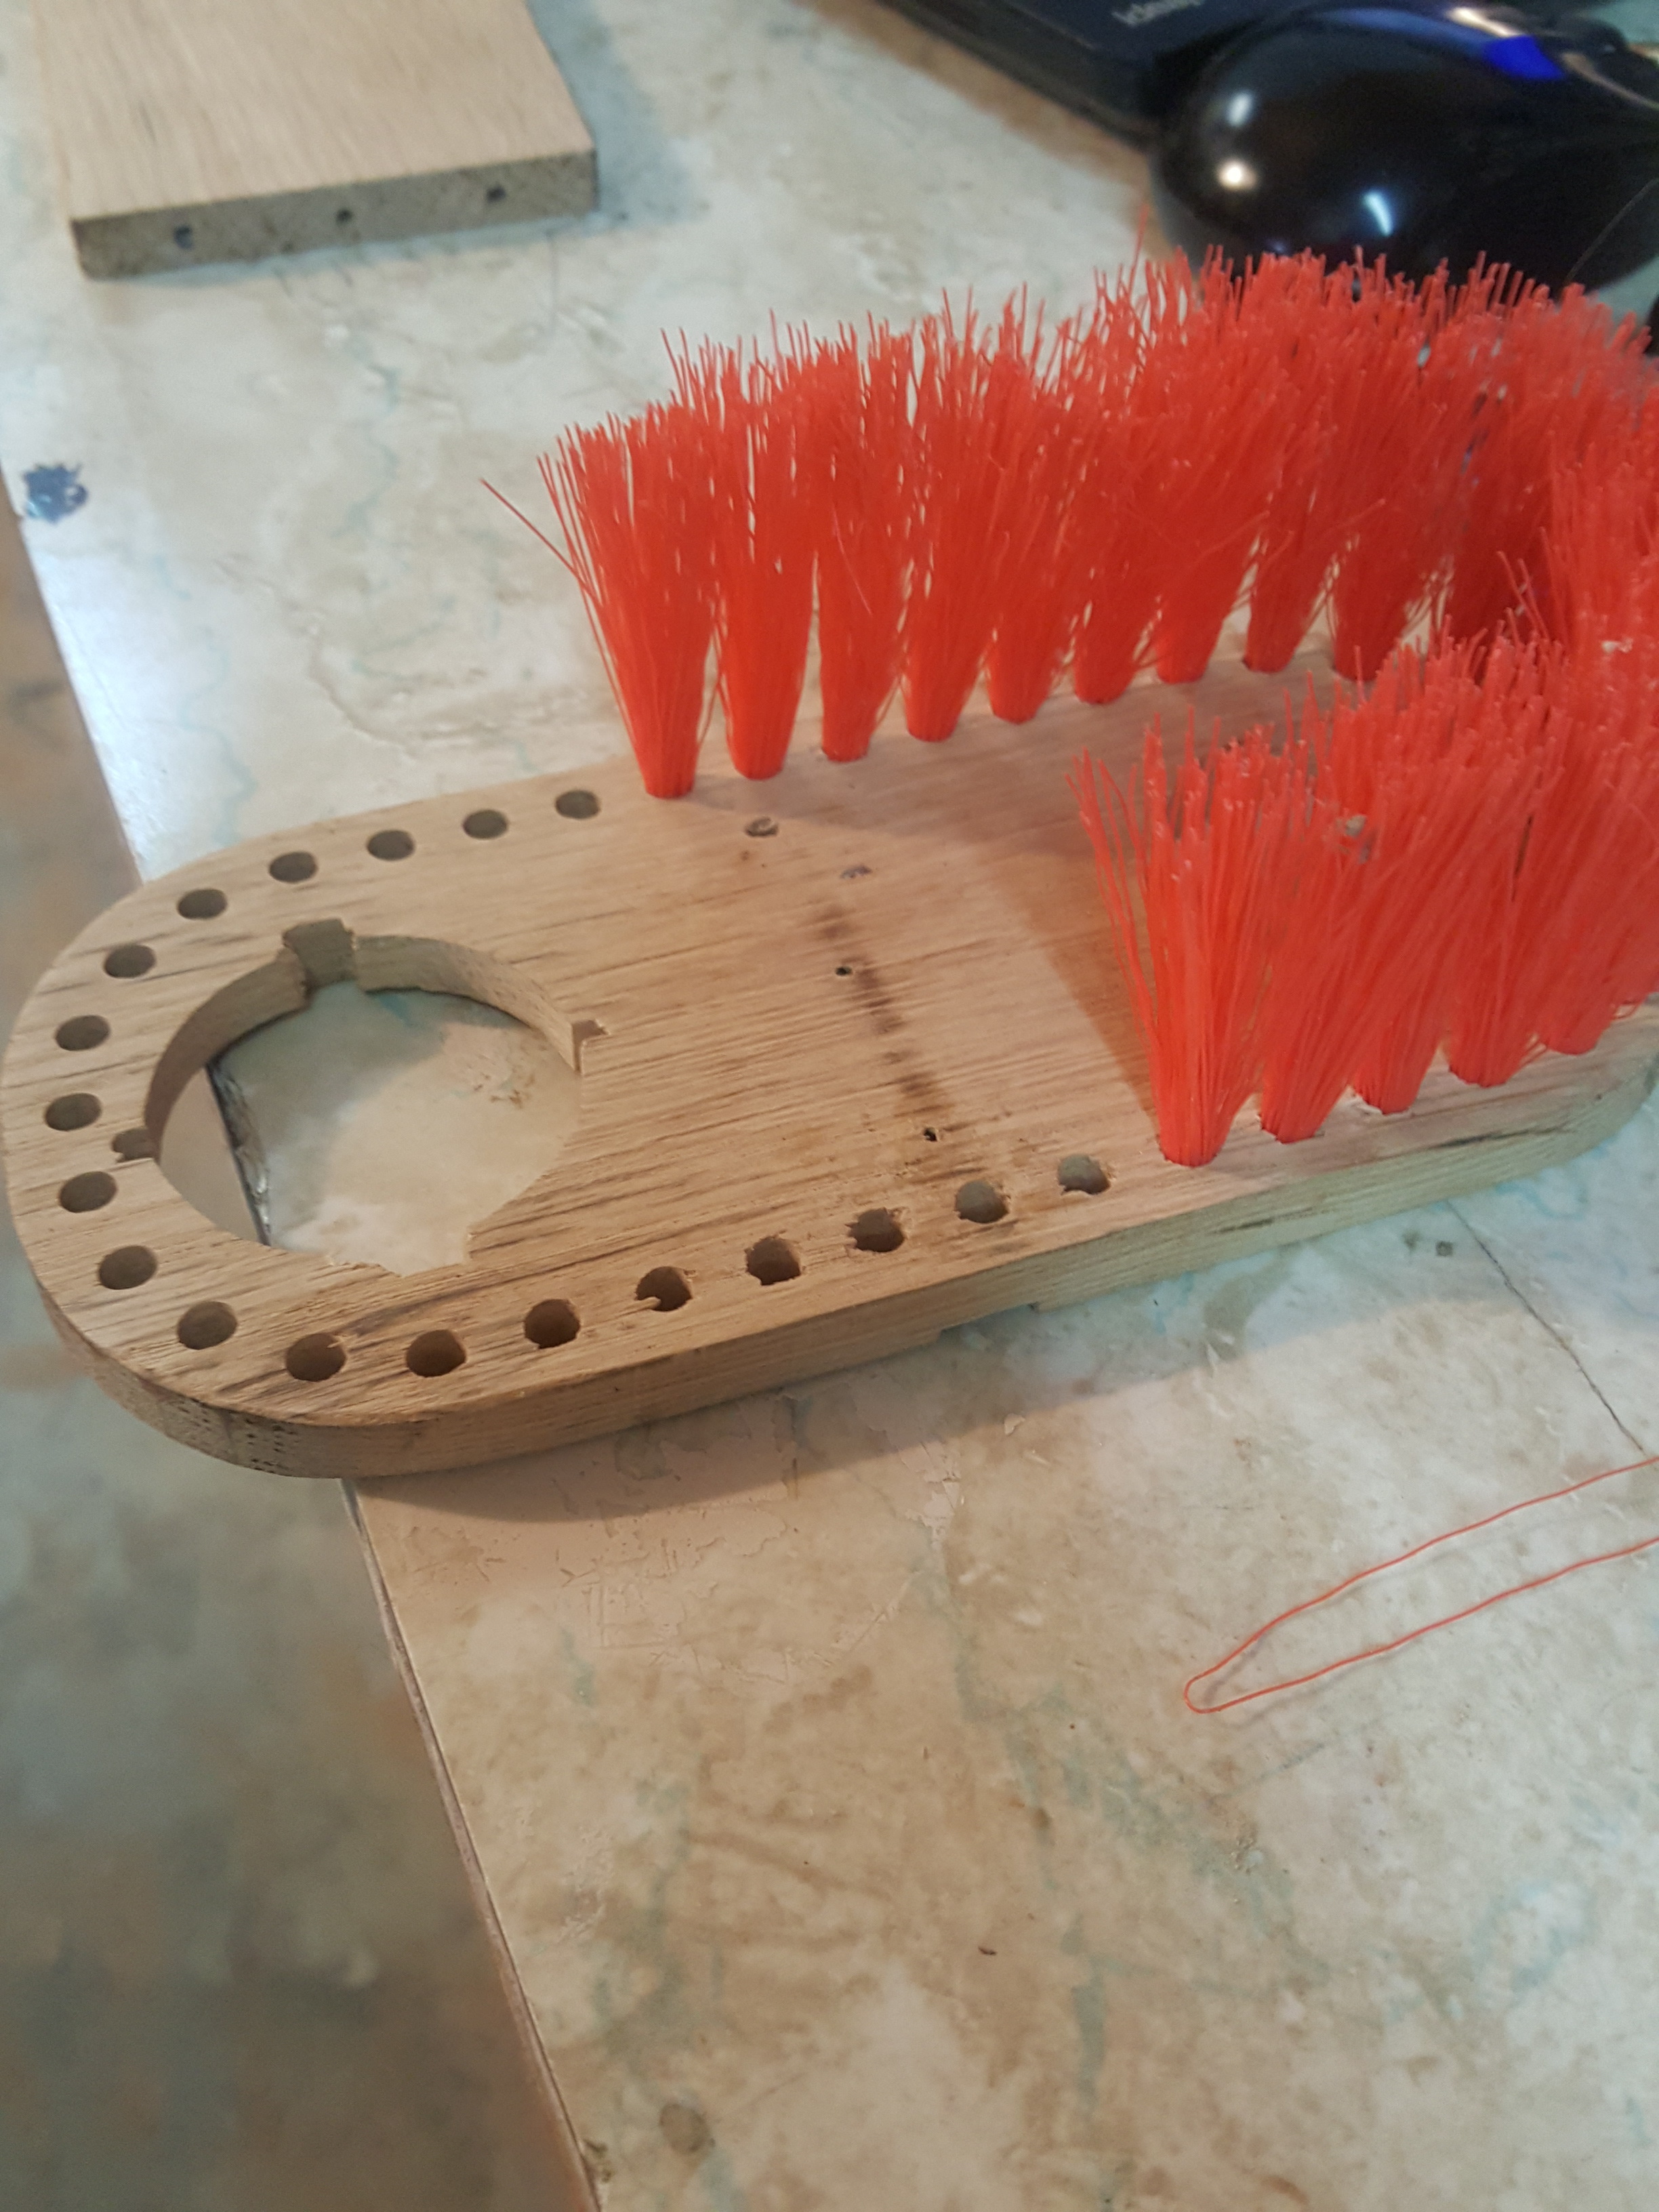
I thought I would show you the first real project I made. Its a suction boot. I know I can buy one on line that is probably better but the learning experience has been well worth the effort. And I made this one with no $ out of my pocket.!
(Not sure if I uploaded photos properly.)
2 Likes
2 Likes
making a dust shoe is something of a rite of passage, congrats ! 
2 Likes