I was working on a reply in another thread, and in looking deeper into the “Texture” toolpath option in Carbide Create, I ended up running some experiments and examining the resulting G-code. Looking at the results of one of the experiments, it became clear what the “Min Depth” and “Max Depth” values in the “Texture” toolpath options actually mean. They’re the range of the maximum depth of each texture segment, not the actual minimum and maximum depths. Each texture segment’s actual Z depths range from the surface at the ends to a randomly selected maximum depth somewhere between the entered “Min Depth” and “Max Depth” values.
So, “Texture” toolpath option does not yield G-code suitable for diamond drag bit engraving.
Interesting… I would have thought setting “Min Depth” and “Max Depth” to the same value would have yielded a single consistent depth per pass. Is that not the case?
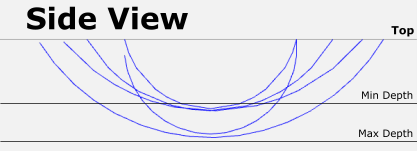
It is not. Here’s a quick annotated screen crop of a few texture toolpath segments viewed from the side (i.e. an edge view through invisible stock).
In this example, I’m just showing the first few toolpath lines starting from a very small part of the design, as otherwise the view would just be a solid mass of overlapping lines. If you were looking straight down along the Z axis, each blue curve in the illustration would be one straight line. Looking edge-on (parallel to the wasteboard), you can clearly see that each blue curve starts basically at the surface, curves down to some maximum depth, and curves back up to the surface.
The “Min Depth” and “Max Depth” settings in the “Texture” toolpath options set the bounds for randomly selecting each individual texture toolpath segment’s maximum depth. So, the actual minimum depth for each segment is the top, i.e. “Start Depth”, and the actual maximum depth is some randomly selected value between “Min Depth” and “Max Depth”.
I don’t know about $200 drag bits but I purchased a set with 3 different angle bits with a spring holder on E-Bay at less than $50 a few months ago and I have done several carves in granite and aluminum and I have used only one in the set but it is as sharp as it was at the beginning. I don’t know how much you will use but unless you go into a large production, save your money, you can buy 3 other sets for the price of the expensive one.
Just keep in mind that diamond tipped bits are very strong but brittle. So ease into the cuts. Diamond tips can be dislodged if it is used too violently. I use a diamond topped tool from Oneway to dress my wheels on my slow speed grinder. So even though the diamond is the hardest thing in your shop it can be damaged if you do not be very gentle with it. Remember that although the diamond is hard it is anchored with material that is less hard than the diamond and the diamond top can be broken off even by dropping the bit.
I bought a drag bit, and now I am trying to figure out how to make a tool path in Fusion 360. It works if I use 2d Trace. But I can’t find any solution to using it in Parallel. When I used the drag bit, I got an error: “Invalid tool type for milling.” That’s logical because it’s an engraving bit.
So, any advice from more experienced users? Do you just use a different “fake” tool just to do the trick in Fusion, and for machining, you use drag bit? Thanks