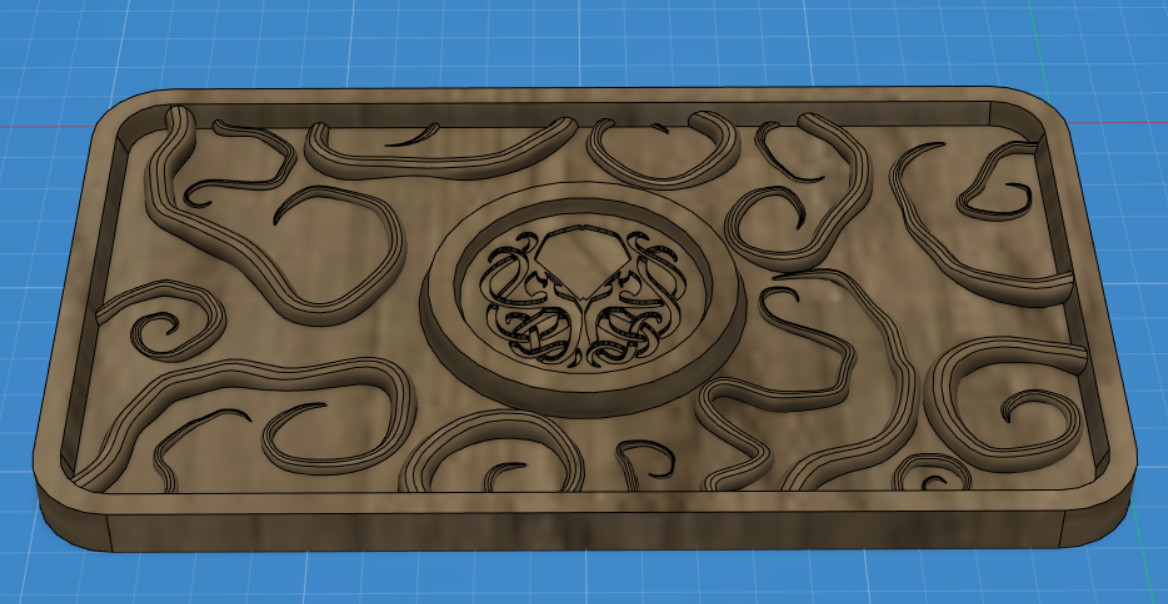
(The logo in the middle is from here but I designed the rest myself)
The box itself is fairly simple but I am having trouble figuring out how to carve out the lid. The box is basically all 2D tool paths which I have gotten fairly good at. The lid however is mostly 3D tool paths which I am having a hard time wrapping my head around. I was planning on used the following 3 end mills:
6.34mm 2 flute flat up cut end mill (link)
2mm 2 flute tapered ball nose end mill (link)
0.25mm 2 flute tapered ball nose end mill (link)
I plan on using the flat end mill to hog out most of the material, the 2mm ball nose to rough out the shape, and the 0.25mm ball nose for the details. I do not know though what the best mix of tool paths, feeds, speeds, step overs, etc to accomplish this in 3D are. I would like to keep the machining time to a minimum while at the same time getting a good finish on the hard to sand parts. Any advise is greatly appreciated.
do you have something in the 2mm range that is flat? Your design has a large flat area, and finishing that with “only” ball noses will give a ribbed style finish… doing the big areas with a flat bit might be able to get you a nicer finish/less sanding
(I don’t normally use F360 so that part I unfortunately cannot help you with)
I guess for feeds and speeds you could take a peek at CC’s tool database defaults for 3D parameters, as a starting point. I assume the material is going to be (hard) wood ?
In Fusion360 I would typically use a 3D roughing toolpath (with a ~2mm tool like @fenrus said, in this case) using semi-aggressive parameters, and some stock to leave (say, 0.5mm axial and radial), then follow-up with a 3d finishing toolpath, there are many types but for this I would try a simple parallel finishing, with a repeat pass at 90deg angle, so that it runs first horizontally, and then vertically (or at -45 and +45°, sometimes it helps sometimes not).
Given the geometry of the 3D features in your design (not too deep), I think you should be able to be pretty aggressive with the finishing toolpath feeds and speeds (the 2mm endmill will not have left too much material) to minimize finishing time.
Stepover versus cutting time is the usual dilemna. For this 3D carve I did sometime ago, I used a 0.2mm stepover which gave me a nice result, at the price of several hours of machining. In retrospect, I could have pushed the feedrate higher, those tapered endmills are quite tough.
Maybe share your Fusion360 file when you have created those roughing & finishing toolpaths, and let people comment on how they would potentially optimize it to achieve the best cutting time vs finish quality. Spoiler alert: if you are anything like me, one extra hour of machining is much better than one hour spent manually sanding/cleaning-up the piece
This dice box should look pretty cool when it’s done!