Hi all,
feeling more than a little frustrated, trying to get Fusion 360’s adaptive clearing to work on my machine. F360 seems to want to mill at full d.o.c., and my machine absolutely will not do that.
I’m just trying to cut pockets in hardwood. I can do it the regular way, but my current program takes 2 full hours to do the job, and I’d really love to speed that up using Fusion’s strategies. Does anyone have any experience using a Nomad for this purpose?
How deep have you been able to mill? How are you setting your feeds and speeds for adaptive clearing? Any thoughts or suggestions will be very welcome!
Also, how does one calculate “Feed per tooth?” I can’t seem to find this value in G-Wizard.
Adaptive 2d or adaptive 3d? You need to change the entry type, the max depth of doc is controlled in “mill multiple depths” if I remember correctly.
Don’t worry about feed per tooth - use parameters you have, and it’ll fill in the rest (ie. tool with the right number of flutes, diameter, and feed rate).
Oh, sorry, Adaptive 2d.
What is the entry type? You mean Helix, Ramp, Plunge? Half the time I can’t get it to ramp or helix into the material the way I want, anyway.
Select “passes” then check “multiple depths” and in there is “maximum roughing stepdown.” Don’t forget to clear “stock to leave” if you want a this cut to go to final size - you can get a better finish usually if you choose to leave stock, and then use a different kind of path for final size (like a 2d contour on the wall, and maybe a spiral cut pocket on the bott). 2D adaptive only supports plunge, “predrill” or helix entry - if the parameters you specify here can’t be performed, you get a plunge (ramp diameters can be a tough one depending on what you’re cutting) . 3D Adaptive provides some more options here, and can sometimes be the choice you need if 2D won’t get it done.
I think I usually sit around .5 or .75mm for hardwoods on the nomad for stepdowns. I could likely push it further but that’s been where I settled at.
Agreed on the wiki for feeds and speeds and step down. https://wiki.shapeoko.com/index.php/Materials
About a quarter of the way down there are 2 massive tables. One for the Shapeoko and one for the nomad. Pretty great starting point.
Thanks for this, I actually have been using those tables for years. I find the numbers very conservative. I routinely run my Nomad in hardwood, slotting, at 1mm (.039 in) depth, about 1482mm (58 in) feedrate, 736mm (29in) plunge, with no issues.
But those numbers are from what Fusion 360 refers to as “legacy machining strategies,” i.e. going down a little bit at a time until you’ve cut your slot.
With Adaptive Clearing you’re supposed to be able to run it much deeper, thus engaging more of the cutter head, which apparently increases tool life, provides less stress on the machine, and generally makes you better looking and happier and so forth.
But every nc file I’ve run out of Fusion just fails almost immediately.
I’m going to reach out to Bob over at G-Wizard and see if he can help me understand how to do this better, but if anyone has done the adaptive stuff on their Nomad, I’d love any insights!
Thanks everyone for trying to help, I really do appreciate it!
Not sure about the Nomad, but lots of people here have done high DOC adaptive clearing on the Shapeoko, and it should be the exact same principle on the Nomad: you need helical ramping down to full depth (slow and easy), and then the adaptive goodness starts (high DOC, small WOC, light and fast cuts)
I have applied that strategy for this project in wood.
The trick is that there needs to be enough room to do the helical ramping into the pocket size versus the endmill diameter and selected helical ramp radius in Fusion.
Maybe if you share one of those Fusion projects of yours that fail, we might be able to tell you what looks right and what doesn’t, for an adaptive clearing approach.
That would be great, thanks! Here’s the fusion link: https://a360.co/30xHTEJ
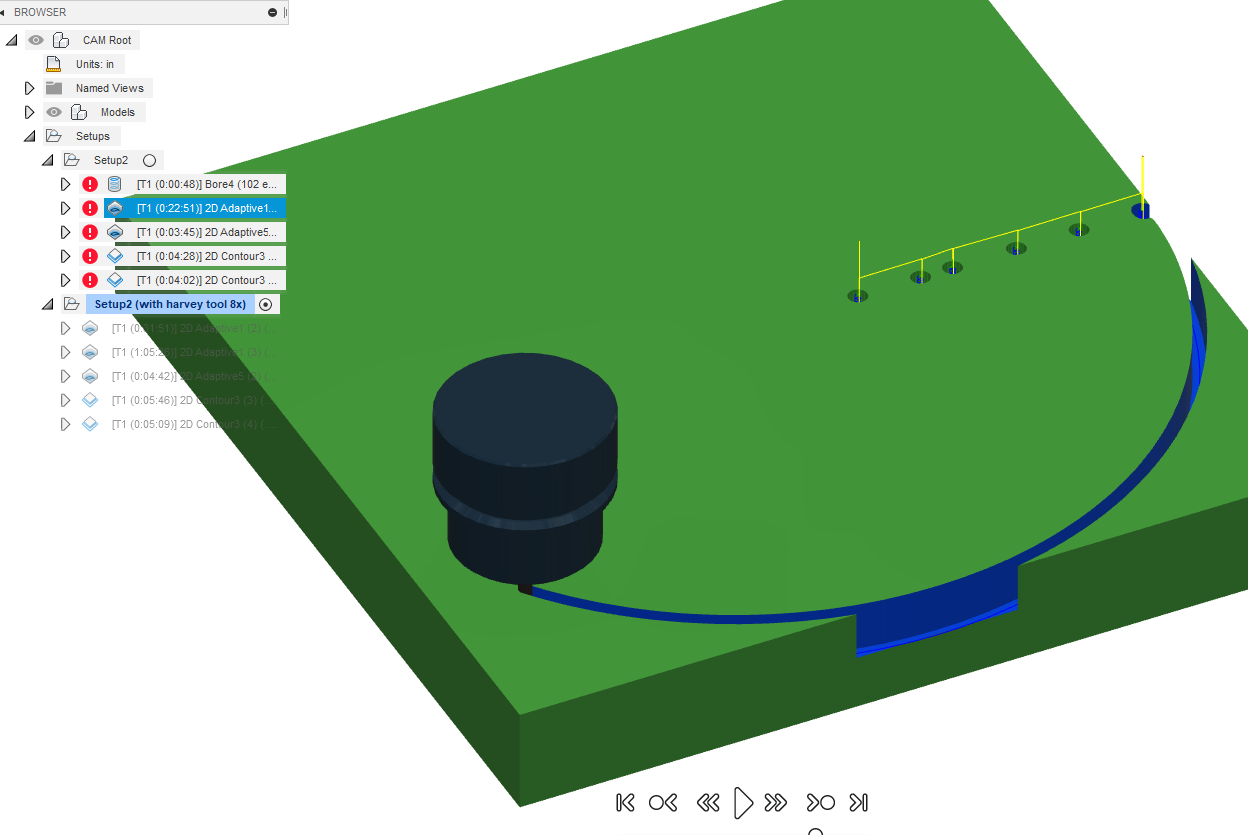
Note that there are two setups in there, the first one is the result of lots of different failures with the Carbide 3d endmill. The second one is attempting to use a tool from Harvey tool company, since the eventual pockets I’m making have to be 1" deep.
I took a look at your file, there are a few things to discuss, first focusing on your first setup (with the carbide 3D #102 1/8" endmill):
Let’s ignore the first operation of boring 6 holes, I suppose you intended to clear the descent path for the upcoming toolpath, but you should use ramping instead (as you figured out in later toolpaths)
then your first 2D adaptive toolpath begins, but the way you defined your selections, it does straight a down plunge, then starts “adaptive clearing” at a depth of 0.47".
The problem is, at this stage you have not removed any material yet, so what this ends up doing during the first moments of the cut, is a 0.5" deep slot, as shown on the beginning of the simulation:
0.5" is 4 times the endmill width, so your are slotting at 400% DOC, while a conservative value is around 50%. The feeds and speeds also make things harder for the spindle:
9200 RPM, 50ipm for this 2-flute endmill is a chipload of ~0.003". That’s three times what I would usually start with for a 1/8" endmill in hardwood. So long story short, no wonder you spindle stalls
You second set of toolpaths is much closer to what needs to be done : helical ramping down to full depth, and nice large adaptive arcs:
Your feeds and speeds in this one is also much more reasonable (0.001" chipload), so that should work much better, but doing the full 0.62" depth of cut in one go may still be hard on the endmill/machine.
Side note: those yellow lines indicate that the tool will fully retract between each arc. To avoid this, you can set the “retraction policy” to “minimum retraction”, and you end up with this:
I have no time to check the project in further details tonight (it’s getting late this side of the pond), but hopefully this can give you a few pointers, and I’m sure others will chime in.
Wow, thanks very much indeed! I really appreciate the in-depth help.
The odd thing is that for the second set of toolpaths, I tried to run just that one, to see if it would work, and it was able to ramp in, but then promptly failed. At that point I gave up for the day. I will try it again tonight at half the depth, and see if the machine will do it.
G-Wizard has been pretty reliable for me on the nomad - are you 100% sure it’s set up properly? Nomad has a difficulty with plunge and slot just because it doesn’t have much power - it can’t clear the chips and gets all jammed up. a 1mm-2mm DOC may sound conservative, but on a ramp entry, you can get yourself down into a 4-5-6mm sort of cut without much trouble, and it IS much more efficient…for the amount of power available.