Hello all,
I am very new to the cnc world, so forgive my ignorance. I have been woodworking for over 35 yeas and I finally purchased a machine. I need some direction with trying to purchase a file completely set up for a compass rose inlay. Any direction would be helpful. I already purchased an etsy file and spent hours trying to set up tool paths with 0 luck. Thank you for the help in advance!!
Thanks, yeah I have been watching those and still having and issue designing and setting up tool paths for this. I am able to do other projects.
If you post the file, we can help.
CompassRose (1).dxf (133.9 KB)
For one thing, the file has a TON of open vectors. How to fix.
Hit Control A then hit the “Join Vector” icon. That will close them all.
Next Step is to do the Female side.
Place the art work at your location of choice. I chose the center.
Select all and to a .25 deep advanced V-Carve. Save the file as Rose Inlay Female side.
Carve at your leisure.
Next Step is to Save the file again but click Save As and save it as Rose Inlay Male side.
Select the Rose inlay and do a offset vector outside of .5". Next select all again and click the Mirror Horizontal button.
Toolpaths. Select all again, and hit advanced V-Carve. Starting Depth is .23" Max Depth is .33".
Now add some tabs to the offset vector and select it to make a contour toolpath.
That should cover the carve. Add ample glue and use a good clamping system.
Final Step is to resurface the stock to remove the excess inlay material.
Ensure you use the same exact tools for both the male and female side. I chose a .25 EM and a 60 degree vbit, but I recommend a 3/16 EM and a 30 degree Vbit.
Here are the files.
https://www.dropbox.com/scl/fo/nuyfgnn5dr0jvvom2zj7z/AK704LpS96V3-g7WuKumdDU?rlkey=oim3t1glyd8iq3daulhkyoa15&dl=0
Anthony,
Thank you!!! Much appreciated!
Why purchase one when there are step-by-step instructions for drawing your own?
The file has TWO open vectors. ![]()
0.25 seems deep to me. I usually go 0.050 or 0.100 with a softer material.
But those numbers should work.
I would start the male side with Start depth of 0.050" and Max depth of 0.330". This allows you to fit the female part to the male part & measure the actual top gap, then adjust the male numbers to get the results you want. If there is any deflection, or the Vee bit doesn’t have a perfectly sharp point, or slight variations in the top surface, the parts will fit differently.
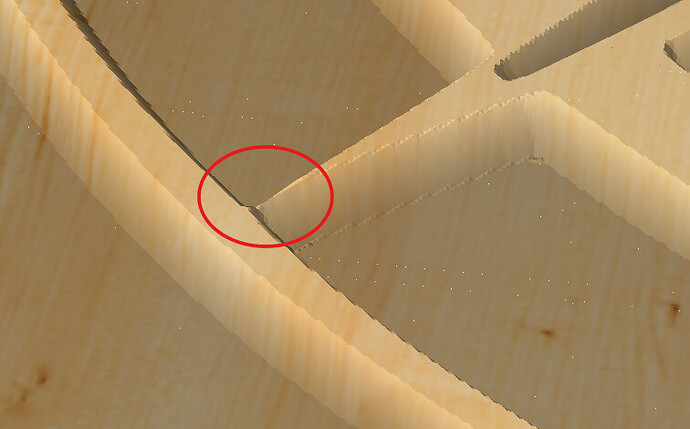
Another thing to note, anyplace the male side comes to a sharp point there will be 0.0" glue gap.
You may need to sand or shave the pointed top edge to get it to fit properly. In your case it looks like only these areas…
This topic was automatically closed after 30 days. New replies are no longer allowed.

