I had been putting off designing new cribbage boards because I did not want to manually place 360+ holes or go back to using Inkscape to set them up with the tools available there. While it was possible I found ti was a lot of trial and error. When the new array feature got announced I finally got off my butt and decided to get to work.
The first thing I did was import an SVG of a scale NHL hockey rink. I played around with making the track run along the inside of the rink to make the details bigger but then decided it would be better to run the tracks along the outside and make them more like seating. So I offset the outer boards 0.25 inches and then two more offsets 0.2 inches from the first offset. This gave me the location I wanted all my centers for the holes. I then started using the array tool to create the holes I would need. It took some trial and error still to determine how far apart I wanted them and how many would fit along each side. I created the array for the bottom and top and then the sides and manually removed every 6th hole to provide a gap between each group of 5 holes.
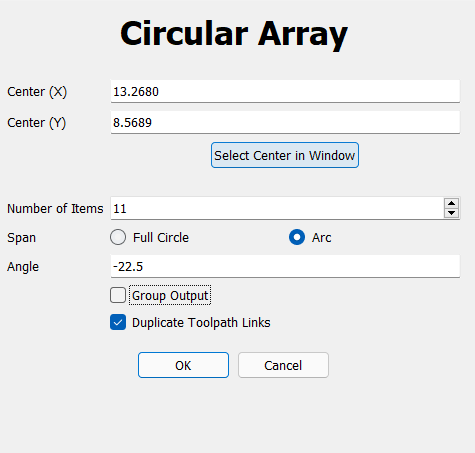
That was the easy part. Next I had to figure out how to get the corners to have the required holes and what I ended up doing was creating a circle that fit almost perfectly into each corner and then I drew a couple polylines to give me the center of the circle. Once it was fit to my corners I could then use the center point of the polylines for the center of the circular array by clicking on the “Select center in window” option. Depending on the corner I changed the angle and used an arc. With 11 items selected I could then have the circles offset to the part of the circle I needed. Once the circles were all in place I could remove the middle one again so I have spacing for groups of 5.
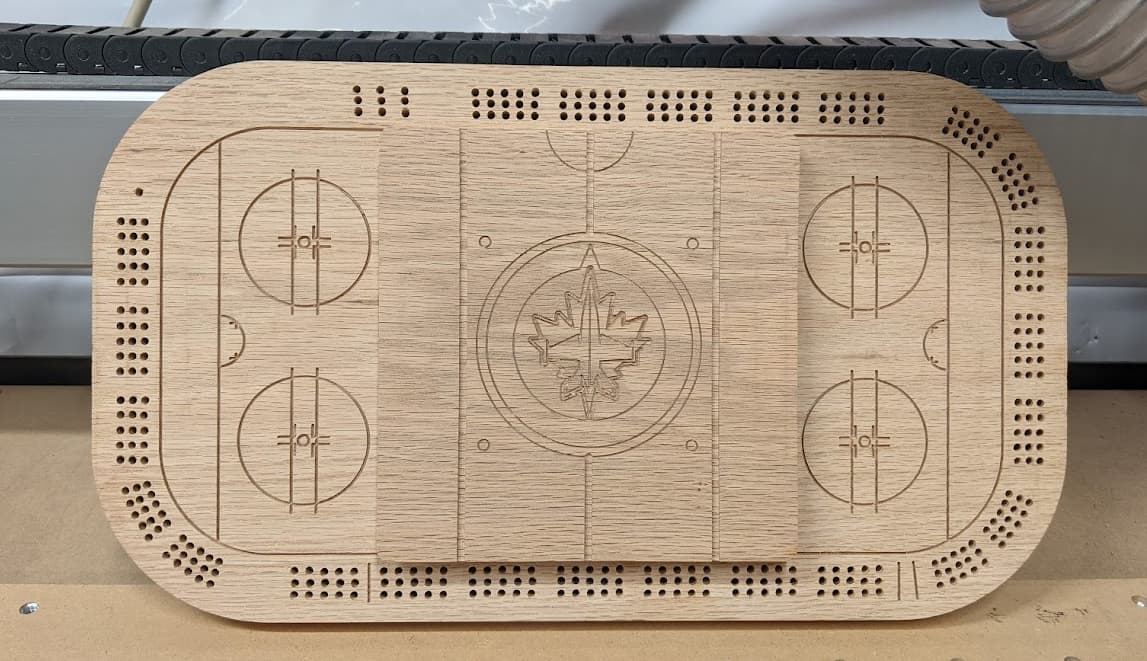
The resulting board looked like this in Carbide Create.
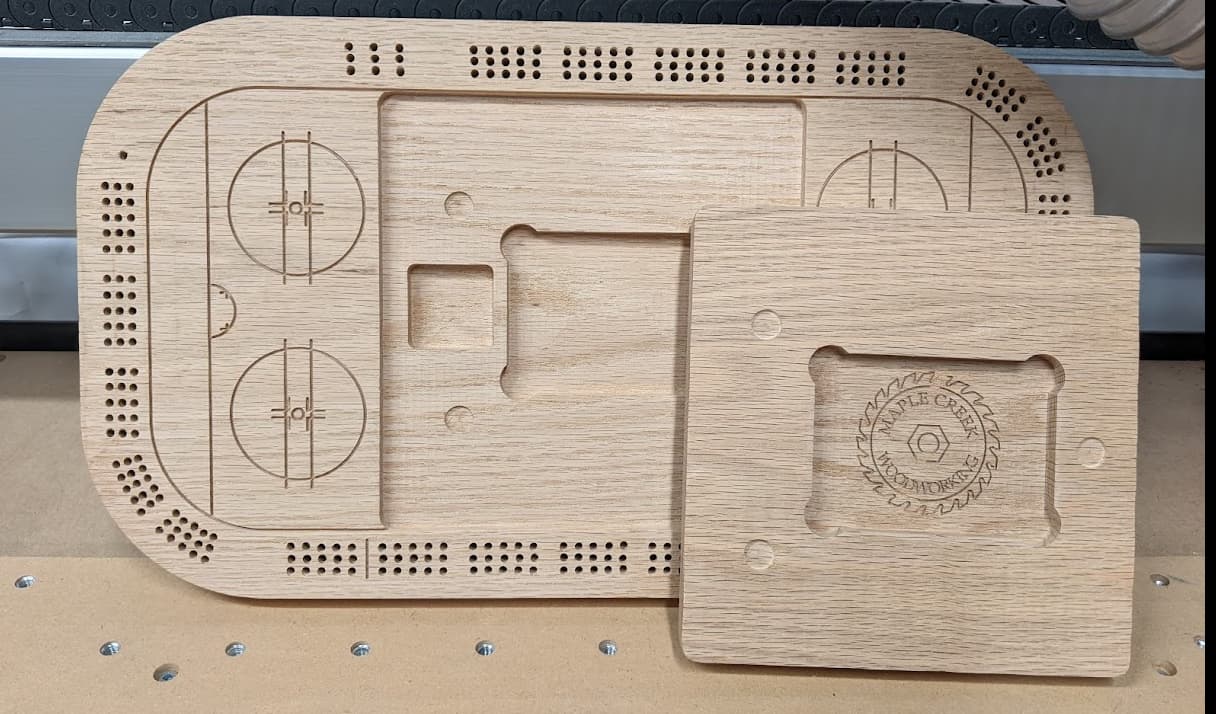
I did not carve the details in center ice and left the blue line, center line and face-off dots and instead carved the center area out and carved a place for cards and pegs and some magnets. The details for the center ice area were carved on a topper which holds the cards and pegs in place.
I still have a little sanding and polyurethane to add but was really happy with how it turned out. I also plan on adding some holes to mark wins on the next version since I forgot them this time. They will go in the top left corner. There were also lines missing from the original for the trapezoid behind the net and the lines that went through the two circles in each end I realized don’t go all the way through after watching a game last night on TV.
I will add some pictures once the finishing is applied as well but really wanted to post what it looks like so far.
I agree doing this in Inkscape was pretty painful. It comes close to working how you would expect but not quite. So glad that CC has this new array feature since it will help with most layouts but having the geometry follow a path would be an awesome feature in the future.
Very nicely done! I’ve been designing a board but hadn’t yet figured out card and peg storage. I really like your idea of the topper. Do I understand correctly that it is held on with magnets? Is it flush when installed and, if so, how does one grab onto it to remove it?
Also, did you use a regular 1/8" endmill for the holes, or did you use something else, such as a pointed carbide drill bit?
The topper is held on with magnets and it is not flush. It sticks up so it can be grabbed onto to remove it. I do need to put a bit of a chamfer on the topper though as it is just a little too blocky with this current iteration. It works ok but I don’t like the look being that chunky.
I used a pointed drill bit with the drill operation in Carbide Create. I still get some burning on the holes with it when the RPM’s are dropped as low as they will go but it is not too bad. I would like to upgrade to a VFD spindle in the future to slow it down even more but that is out of my price range for now.
Ryan, you’ve inspired me to enhance my cribbage board design. After seeing your work I really need to up my game . It won’t be a hockey rink, but you’ve given me all sorts of great ideas.
Regarding drilling the holes, what depth did you select? Are you drilling each hole in one motion, or are you peck drilling?
I bought a 1/8" carbide drill bit from drillman1/Oliver Tool Company (1/8" (.1250") solid carbide jobber drill - AlTiN Coated - Monster 450-101250B 888226128919 | eBay). I tested it out over the weekend on hard maple, peck drilling to .4" depth in steps of .2" with a full withdrawal at 20IPM and 10,000 RPM (the slowest speed my router has). I only drilled 15 holes but they came out very clean. The bit was slightly warm. If you or anyone else has any tips on how best to drill the holes I’d very much appreciate it.
I am glad you found it inspiring. Always good when we can learn from each other and get better. I know I have learned a lot from this forum over the last year.
For the holes I think I went with a half an inch. I am doing the peck drilling. I have to go to the shop and check all the settings to let you know for sure what I used. For a few holes I know mine is not getting too hot but by the time it is done 360+ holes it definitely is. I use red oak for these larger designs usually and it does ok but I am definitely getting some burning by the end.
To be clear, you laid out the holes with CC and drilled the holes with your SO3XL? I ask because the hole spacing on some of the holes looks off. Like, your machine should have located the holes much better than they appear to be.
I apologize for being critical, but I think you may want to investigate why some of the holes are not lined up properly.
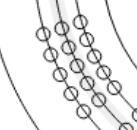
Here they appear to be laid out uniformly:
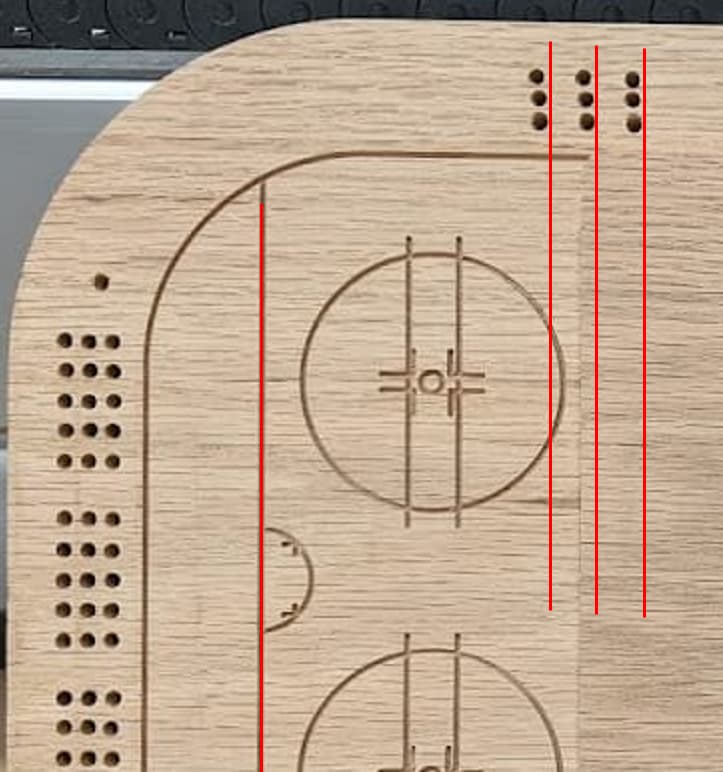
But here they appear to not be located uniformly like you would expect:
The red line is initially made parallel to the cut line on the board to get a vertical reference line, then I duplicated it and translated it without rotation to the three additional locations to help show how it looks like the holes are not vertically aligned.
It is interesting that the other lines appear to be straight and intersect where they should. What kind of drill bit or end mill were you using? Maybe it was wandering before biting and starting the holes?
You are absolutely correct that some things are not exact. I have since fixed some of the issues and it was in the design mostly. There may have been a little bit of wobble on the bit I used but it was mostly design. I appreciate the critical feedback. It is how we all learn.
With regards to the holes matching the curve around the corner boards, that was due to the fact that the radius of the boards is not a perfect circle while the array tool lays them out in a perfect circle and I did not fix them before running this prototype.They appear uniform in the design even though they are not. I needed to manually align them with the actual curve as opposed to allowing the circle array to do all the work. I have moved them in the design since and they should come out better in the future. The design screenshots I posted have the fix whereas the original carve did not.
With regards to the misalignment on the actual carve for the holes that should be lined up straight. As @WillAdams mentioned I was concerned about missing steps at first but I don’t think that is the issue since all of the rest of the carve turned out as expected and the holes were the first thing carved. I would have expected issues with the rest of the carve to be off too then. It seems to have been due to some issues with a weird duplication I had as well as the bit wandering a little. The duplication issue was a result of me creating the array using two shapes accidentally. There were two circles stacked on top of each other and both were selected. I realized part way through the carve that the holes were being drilled twice and when I looked closer at the drawing there were two circles for each hole and when zoomed way in they were somehow slightly offset. I am very surprised I did not have more issues with more of the circles to be honest.
Hopefully the issues are resolved and I get a cleaner result on the next carve but I will definitely give the design a really good look over in Carbide Create before running it again. I won’t be able to do anything on my machine again until Sunday though. I can’t wait to get my basement back. Having someone stay with us has really cut into my carving time.
So I have gone back and finally had time to run another modified board. This one is slightly smaller than my previous one since I forgot to take into account how big my shipping boxes were. So this one is now 15 inches by 8.5. The previous one was a little longer and wider. I also added some extra holes to track wins that were missing from the previous version along with the missing lines for the trapezoid behind the goal crease.
As was mentioned in the previous replies there are some holes on this one as well that are not quite in line with each other. It really seems to be the bits wandering when they first hit the board. I think I need to order better bits. I can also try moving these farther into the collet and see if that helps any. It does not seem to be missing steps. Nothing else ends up out of line on the board and the holes are the first things that get run. Overall I am pretty happy with the revisions and