I am using a Carbide #251 .25" Downcut Flat Cutter for my pockets, but the result seams to vary in depth +/- .5 mm. from side to side and the pocket gets “soft” (like filt). Also does RPM matter ?
I guess my other question is most likely related, how do you afteradjust after probing, if you find out that the x,y or z is some mm. off ?
If you’re seeing that much variation, something is probably mechanically wrong w/ the machine — check the pulley set screws, belt tension, Delrin V wheels — per the machine operating checklist: Machine operating checklist , the basic points of adjustment for a machine are:
Belt tension (see the relevant step in your instruction manual, e.g., Getting Started with Carbide Machines) Note that the X-axis motor is held in place on standoffs and if those bolts are loose this can cause belt tension issues. Also, belt tension for the Y-axis stepper motors needs to be even/equivalent on each side — a significant difference can cause skipping on one side eventually resulting in lost steps on both. Measuring belt tension, squaring and calibration
Yes, RPM matters — you should use feeds (selected in Carbide Create) and speeds (applied by the dial setting on the compact trim router used when cutting) — this could also be an issue. Extensive discussion at:
and
One thing I like to do is to adjust the Depth per Pass in Carbide Create so that the final cut of a pocket is a very light cut — say that one wants a 1/2" deep pocket (0.5") and the depth per pass is specified as 1/8" (0.125") — the machine will make 4 passes:
0.5 / 0.125 == 4
If you reduce the depth per pass for that pocket to 0.12", you will instead get 4 full-depth passes, and a finishing pass of 0.02".
To get the same effect around the interior you would inset this pocket to leave a roughing clearance, then only cut to 0.48" deep, then assign a second pocket operation which you cut 0.5" deep in a single pass using the original geometry.
If a Probe operation is off, how it is handled depends on when it is determined:
if before the cut is begun, re-probe, or manually adjust the zero
if during a cut, pause, stop, re-initialize, and begin again
What’s the purpose and why do you need it to be hard & smooth?
I’d agree with Will, the downcut won’t be helping much as pushing the fluff / chips down into the MDF will make more fluff. Also, you need sharp bits in MDF to get clean edges.
I use one of these for surfacing MDF, it is a ‘bottom cleaning’ bit with faces on the bottom to cleanly surface the bottom of the cut
I run it at 20kRPM, 2,500mm/min feed and 0.25-1mm depth of cut and get a clean finish. There are other more specialist cutters which you can also use.
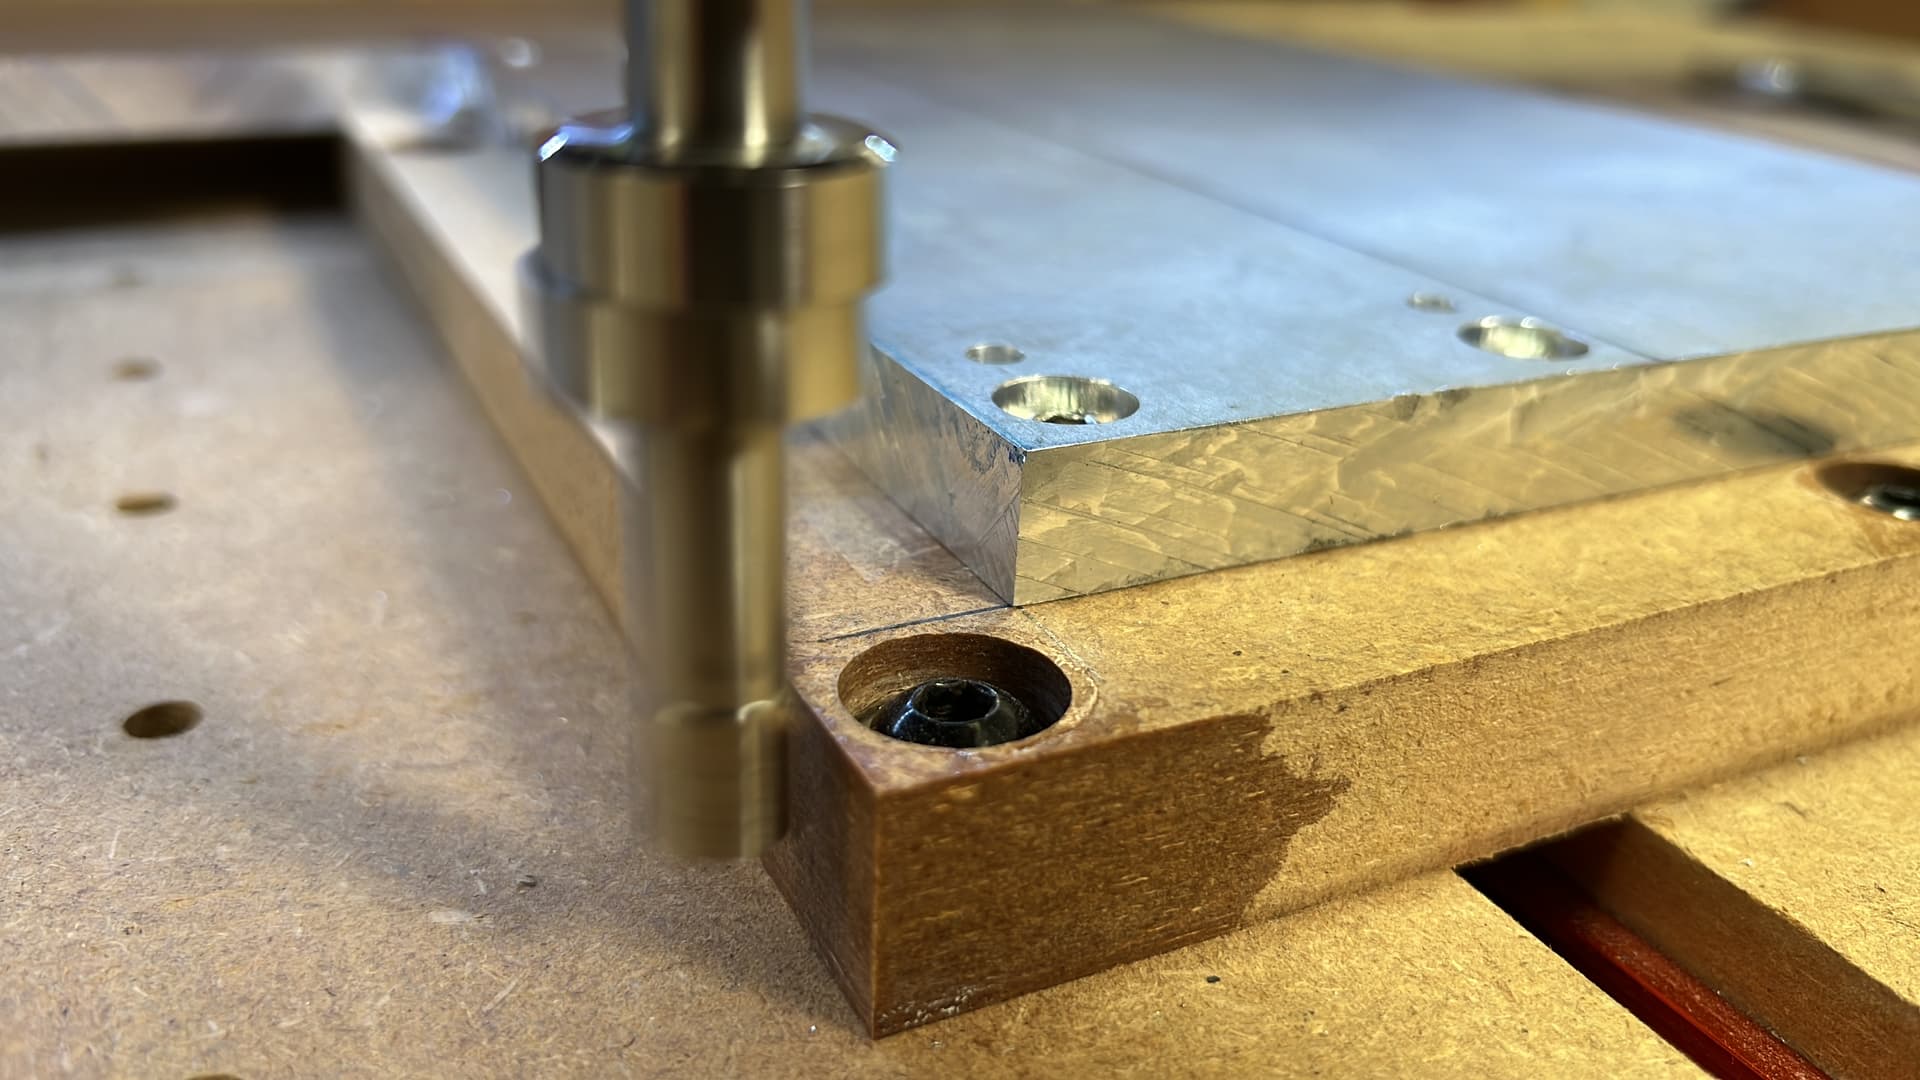
To get really clean crispy surfaces and ‘hard points’ for probing zero, bolt counterbores or inserting dowel pins for location I do the first roughing passes and then soak low viscosity CA glue or Tite Bond into the MDF to make a composite before finish passes, this gives reasonably predictable and stable hard points to work from.
Just an idea: would it make sense to bore the pocket slightly undersized and press it into the final shape with an Aluminium die? Maybe that could be combined with @LiamN’s composite idea?
I suggest you do the pocket with 0.5mm or so stock to leave as a roughing pass, paint on a 50/50 mix of PVA wood glue and water, let it set and repeat, do this a couple of times and the PVA will form a composite with the wood fibres, you can then run the finish passes to cut to clean size.
This is a common trick to treat the ends of the MDF before attempting to prime & paint to reduce the amount of primer soaked up by the cut MDF.
This approach would also usefully stabilise the bolt holes for the drive units, but insert your Tee nuts or threaded inserts first.
I have to kibbitz that after working with MDF for a bit these past few months, I consider the product to be nothing more than thick cardboard. As soon as you mill MDF into anything thinner than 5mm you’ll see just how cardboardy it really is.
@LiamN 's trick is similar to what’s called “sizing” in the woodworking trade, used to get some strength in solid wood joints involving end grain.
Some people use CA glue to strengthen MDF, but I think that makes things too brittle, especially if you’re going to mill it afterwards.
When the size is really critical I create a new tool and set it up so the tool is a bit larger than it really is. Then measure the difference between actual a desired. Make the adjustment in tool diameter and run the finishing cycle. I think it could also be done by creating a parallel profile just smaller and measure how much bigger you need it and re-run the finish path. Sort of like sneaking up on the final desired size.
Silicone will not work the best on MDF. Actually get Woodworking glue as noted above, titebond is one brand. You can thin this and paint it on the cut surface to really harden it. And it seals the MDF quite well once you are finished. Makes it easier to paint without the edges soaking up three or 4 coats. Spray shellac is quicker to seal… But won’t work as well.