I’m still getting used to dealing with LightBurn and the J-Tech laser. I’m trying to give myself time, but we have something coming up where it’d be great if I can get one thing etched for the weekend. I’m having two issues:
The Shapeoko is moving slowly. It looks like it’s moving quickly, but one Lightburn Demo (to make a QR code plaque for visiting friends to use to get wifi) took, apparently, 5-6 minutes on the demo machine, but took over 45 minutes and still had a lot left to do on my system.
Only the outlines of the boxes within the QR code were etched by the laser, not the actual boxes. In the preview in LightBurn, it looked like everything would be done properly.
I know I can change some parameters in GCode directly, but if I put the right settings into LightBurn, shouldn’t that handle everything automatically?
Also, can anyone who is successfully using this combination (Shapeoko, J-Tech Laser, and LightBurn) post screenshots of their settings or any other information that would help me be sure I have things set up properly? (Including any startup or shutdown GCode commands and sequences?)
(Also a side note, if it matters: I can’t control the Shapeoko directly from my workstation with LightBurn on it. I’m using UGS on a Pi touchscreen system to send GCode to the Shapeoko. I save the GCode file to a network share from my Mac, then, on the Pi, load that file from the share and run it.)
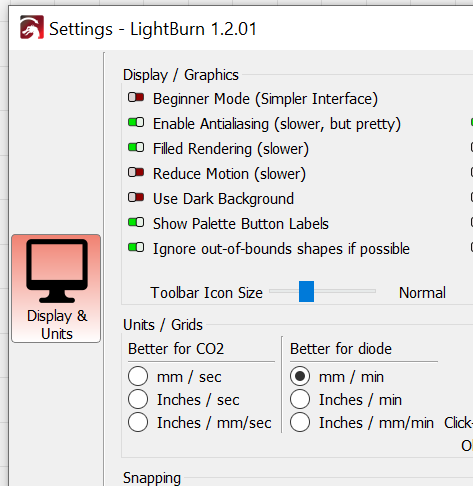
The first item I would check is the default units in LightBurn. Being generic software you may find it defaults to much different units than you expect, making the system crawl or run into the speed limits of your machine.
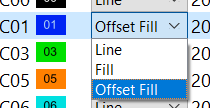
For the outline vs fill can you post a file? this is typically how you define the selected vectors.
Line is an outline
Fill is a raster fill
Offset fill is like milling a pocket a spiral fill - geometry permitting.
Each of the strategies have their own power and speed definitions that you’ll need to set.
A long run time and edges that are burnt is typically caused by not having GRBL laser mode enabled on the controller. Without laser mode on the controller pauses movement each time the “spindle” (your laser in this case) changes RPM (laser power). This causes the laser to dwell in a spot as it pauses, burning more then while moving (scorching the edges), and also causes the run time to increase because of all the pausing. You want to send “$32=1” at the start of the job to enable laser mode, then “$32=0” at the end to disable it (to be ready for a regular CNC job). Typically this is set as a button macro in LightBurn, but if you are running the job from a Gcode sender you need to do it from your sender I expect (or maybe include it in the gcode file?)
I’ve also realized there’s another issue I have to fix - which is easy, I just need to be aware of it. I have two Macs, one in the shop, in the barn, and one in the study, in the house. The machines, of course, are in the shop, but I like to do my design work in my study. I have LightBurn on both, so now I need to get in the habit of keeping them synced as far as configuration is concerned. Easy to do by importing and exporting settings, but definitely something I’ll have to keep up with.