I’m still getting used to my JTech laser. Since I plan, eventually, to be using it in production, I went for the 14W model. While I didn’t want to spend that much, I think the extra cost for the power powerful laser will pay for itself when I get going.
I’m doing my designs on LightBurn, saving the GCode, then I use UGS on a touch screen Raspberry Pi to drive the Shapeoko 3.
I know I’ve been asking a lot of questions. I’m still trying to get an idea of what I can and can’t do. (Generally I ask more questions when I’m starting something new, then, when I finally get an overall feel for it, I don’t need to many questions at all.)
What is the maximum speed I can use for moving the laser? Right now it’s at 20% and the speed seems to be maxed out. I imported an image the speed was set at 3000 mm/m. I’ve tried higher and it doesn’t seem like it’s going faster. At this speed, I’m etching out a 2" high (and not as wide) figure of something my wife drew and it’s taking 13-14 minutes. I don’t know if that’s normal, slow, or fast for a 2" high outline of a hand drawn image of a girl in a ball gown. (This is mainly doing outlines.) Sorry, but she won’t let me post her drawing!
When I get to the point of wanting to cut through my material, I’m concerned about damaging the wasteboard. I know that’s something I’ll be replacing regularly, but I’m trying to get an idea of what I should use for speed and strength to START with. For now, my tests are on 3/4" plywood because I have a LOT of scraps I’d throw out if I weren’t doing tests. I just want to make sure that when I start cutting, I don’t end up going too deep into the wasteboard.
I’m using LightBurn for all my design and pattern work. For the design I’m using, it said 2:53 for how long it’d take, but, as I said, it took 13-14 minutes. Is this difference between the speed estimate and in reality normal?
You should be able to run as fast as 200ipm ~= 5000mm/min
This is controlled in GRBL by parameters $110 and $111, so if you seem to be capped at 3000mm/min check those. I’m not sure what the default values programmed by CM upon “sending configuration data” are these days.
You will likely need to set multiple passes to cut through any thick material anyway, so chances are you will barely burn the wasteboard. But if that is a concern, just use a sacrificial piece of MDF under the piece you are cutting ?
Maybe check the machine settings in Lightburn, this may be what it uses to estimate the cutting time, and if values are not matching reality it may explain that the estimate is completely off (lots of "may"s, I have not actually checked, just giving you possible leads)
It might also be worth considering using Lightburn as the GCode sender (rather than your rPi with UGS) at least in the short term - until you get completely comfortable with the laser side of things. Reduce the number of moving parts, so to speak.
Thanks, @Julien (who answers something like 95% of my questions for me!) and @Gerry.
Yes, maybe short term. Long term, that’d be a mess - I want to be right at the Shapeoko when I’m controlling it and I do not want USB cables on the shop floor (for this or the printers).
(I had bought and set things up to use USB over ethernet, but found out it doesn’t use ethernet protocols, just the ethernet cables. I’ve lost a lot of equipment in that building from lighting strikes and inductance in the cables in the ceiling (which means they’re less than 2’ below the peak of the roof) and cables in the old waste trenches under the floor, so I use fiber optic cables instead. The converters don’t work with fiber.)
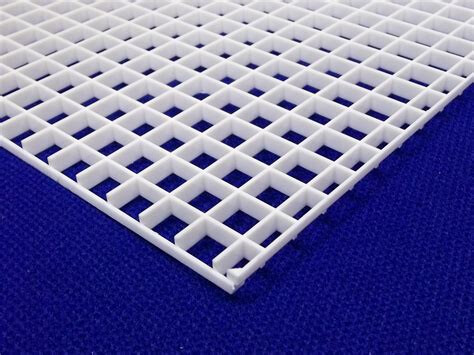
I just recently bought the 14W Jtech laser too and have just started setting it up but won’t be able to cut or laser anything for a bit, but I’ll be interested to see how things go. I have been doing some research and noticed some folks are using the plastic grid from the fluorescent lights to lift up the material and then are using a painted piece of metal/steel underneath to save wear and tear on their wasteboard. I have purchased those things for when I start cutting, so I will let ya know how it works. I like Julien’s idea using sacrificial material underneath too as I’m sure the multiple passes won’t hurt it too much either.
I want to make sure I’m following this, so can you tell me if I’m right when I say it in my own words?
People are painting metal (so it doesn’t reflect) - or buying painted or coated metal. This goes on the waste board, then, over that, putting the plastic translucent material that’s used in openings for fluorescent lights in ceilings on top of the painted or coated metal.
Is that right?
I do figure it takes some kind of sacrificial material. Well, the wasteboard is sacrificial, but I prefer not to replace that but so often - have to run to the store for it, then cut it to size, have the Shapeoko drill in holes for the screws, then I can finally remove the old one and put in a new one. It’s a pain. Also, I know at some point I’ll be cutting pieces that are bigger than the spaces between the T-tracks, and I do NOT want to be damaging those with a laser.
I did some testing with my laser at 100% and slowed it down to 50 mm/m and made multiple passes. It lightly scorched the surface next to the cut and still, with something like 6 passes, did not cut too deeply into the scrap indoor quality 3/4" plywood. I doubt it even cut 1/8" down! One possibility I might try is to do several passes with it at lower power, so it cuts down into the wood, then increasing the power for later passes to see if that prevents the scorching. It’ll be a bit of a pain, since it’ll require different GCode files (or hand editing the ones I use), but if it works, that’d be useful.
Yes that is correct. Here is a pic of the plastic grid. And as an example you would place the painted metal underneath like what is showing in blue in the picture.
Make sure you have a good externally vented enclosure and add air assist to get full use of a higher power cutter.
I just ran my first burn this morning on my Atomstack A20 pro 20w and while it made fairly quick work with the air assist it quickly hazed the garage even with the door half way up and a high velocity cage fan blowing. It also left me smelling like a local BBQ and now I’m hungry.
Good to hear about the success part of that. I’m still working on a cage for it - that’ll be part of my final table for my Shapeoko. (The cage will also have ends that come off so I can slide boards along it for tiling.)
I have a 14W laser that I would think, at 100%, would cut deeper than not even 1/8" after several passes and it’s slow as my granny trying to run a marathon. I’m also using an M1 Mac Mini and Lightburn has issues connecting to the Shapeoko on USB with that. (Although usually the Mac is NOT hooked up to it directly.) I started with a Linux workstation. Sadly, I’ve unregistered that copy of LightBurn. I may need to re-register it to connect and get settings from the Shapeoko so I can save them for transferring to my Macs. There are a number of reasons I think I just have the wrong settings. (Speed and inability to cut too deeply are two of those reasons.)
Adding air assist helps soooo much with it cutting better. Try to avoid running at 100% it significantly reduces the diodes life. There is a great free test file for light burn you should use on different materials that will allow you to dial in your power and speed settings for each material. I’ll link the Youtube video where I found it when I get home. It’s a very handy file to run that saves you a lot of trial and error. https://pages.makeorbreakshop.com/laser-test-file/
The light burn test file I was talking about will save you a lot of time
I use a piece of plywood and put screws (pointed side up) in it to form a grid. It protects the waste board and elevates the piece you’re working on to help dissipate the heat. Works really good on mirror or very thin stock.