I have a 24x24 piece of the heavy but cheapest plywood from home depot. I think this is considered hardwood, but not sure.
I have a design I want to cut, just a simple bit and tool tray. Eventually I’ll make a fancy one but I’m new to all this.
Can someone take a look at this c2d file and let me know if I have everything correct? I know I can cut this and have no issues, my goal here is to learn something I might be missing.
Like faster speeds and feeds or if I am doing something improperly. I want to squash any bad habits I might pick up doing this all on my own and I figured a few experience eyes could find typical errors.
I don’t need it fixed or anything, just info to help me get better at this.
Eric,
I am not a pro with CNC, I just make mistakes and try to learn from them. Others will disagree with me and they are probably more correct than I am. Plywood, by structure, is an interesting material to mill. Every cut into two or more layers is both a rip and a crosscut milling with interfering adhesive. I mill a lot of plywood. I set my depth of cut for 0.10 inches. For each bit I set my feed rate for about 90% of what the default is for that bit and then I watch and listen to the milling process. Carbide Motion allows you to slow or speed up the feed rate. If the router or spindle is excessively burdened, I can slow the feed rate down. It it is running easily, I can increase it, but usually don’t.
End mills are going to act differently. If you accept (example values) 40 inches per minute with a depth of cut of 0.10 inches per pass and use the same #6 speed setting on your router, the fastest, you may get a great cut with an up cut end mill, a fair cut with a straight cut mill, and a lousy cut with a down cut, swap bits and cut qualities as you like, they are all different.
And, since the actually plywood is the key, oak, luan, pine, CDX, etc. hard answers are tough to provide. However, watch out for plywoods where the adhesive gunks up the bit. Bits need to be clean and undamaged. Plywood is a tough cut and bits burn fairly easily in it due to its construction.
I use Vectric and Carbide Create and prefer to keep my measurements off the top of the material. With that said, make sure you overhang the probe block when you are supposed to and it is placed on top of the material when it is supposed to be. I love the graphics in Carbide Motion for this. I try to place the probe block in the same location each time - consistency.
The design looks great. I like the “finger grab areas.” If you wanted design comments, I think I would join the two straight cut finger indents on the right two straight pockets together. Should finger indent pockets be slightly deeper than the tool pocket? Hmmm.
Good luck and let us know how it turns out.
Rex
Unfortunately I have no idea what this machine is supposed to sound like and with what materials. It sure does always sound like it’s begging for mercy, but being new to this, that might be default. I have used all CC “Nomad” bits and stock settings for everything I have cut so far. I broke a bit, but I think that was my fault with the collet not being tight enough when I had a bent wrench (the included one).
Aluminum, pine and MDF all seem great (enough), it’s the plywood that gave me pause and for the reasons you stated. I don’t want to break any more bits and even though I am still in the 30 day policy I’d rather not have to use it anymore than I have to. I am not really worried about the 1/4th but the bit I broke was a 1/8 and there’s one in this project so… If I break this one I have to wait to cut stuff and who wants to wait for that
So should I just run with it as is or increase DOC and just lower the feed rate a bit?
>With that said, make sure you overhang the probe block when you are supposed to and it is placed on top of the material when it is supposed to be.
Do you mean just use the probe properly? I have the BitZero and it’s worked perfectly so far.
I had a quick look, as you said the file should run just fine but here are a few notes:
for depth per pass, you can generally push it up to 50% of the endmill diameter on a Shapeoko. Which is consistent with @RTWD’s advice of 0.1" per pass when using a 1/4" endmill.
60ipm at 18.000RPM using a 3-flute endmill like the #201 grants a chipload of 0.001", which is just fine. Do not slow down the feedrate below that value, this would end up reducing the chipload down to “the danger zone” which is when the endmill starts rubbing rather than cutting, and that’s a recipe for tool breakage (and burning wood/a dull endmill too).
I don’t cut a lot of plywood, but @LiamN shared good insights in this thread, that should give you ideas about the influence of the various types of endmills for the job.
Ha, you caught me taking a shortcut in my response
I was just reacting to the part where you mentioned:
as a warning for you to not lower it “too much”, and it came out as "don’t lower it “at all” which was extreme.
60ipm with those other settings grants a chipload of 0.0011" (which I rounded to 0.001", when 0.001" indeed corresponds to 54ipm). 54ipm will work just fine. I would say the chipload danger zone starts below 0.0005", so below ~30ipm in this case. And even then I could get some heat by telling you 0.0005" is a minimum, it depends on a number of things, how sharp your cutter is etc…so I tend to want to stay in the comfort zone of 0.001" or more.
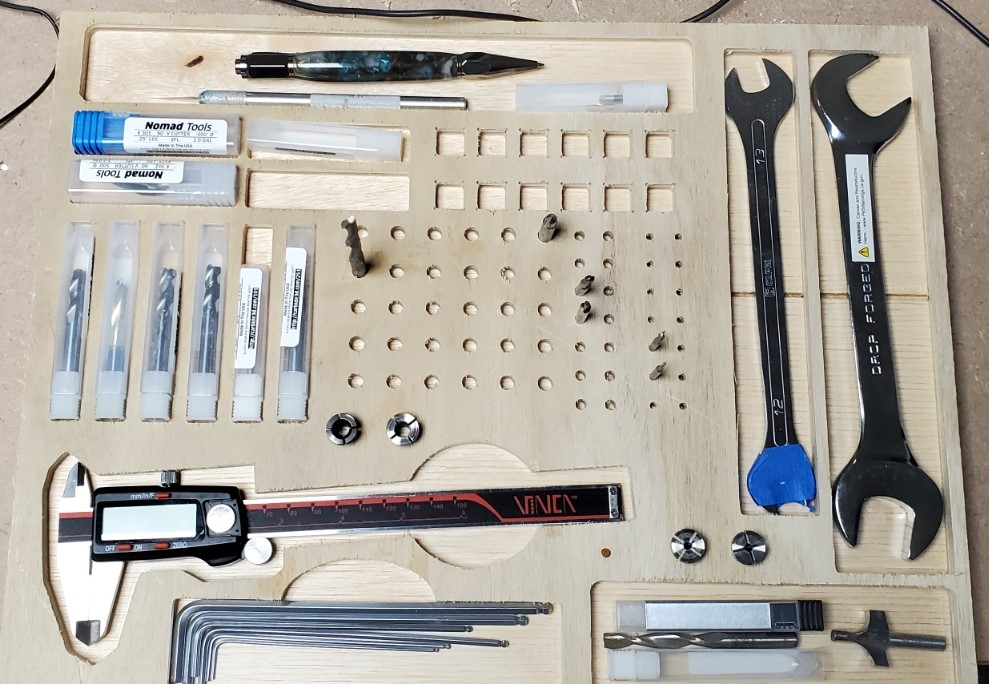
Came out great and with the adjustments (from the sheet), in about half the original calculated time for the pockets. It even sounded better than previous cuts (although first time with plywood)
I ended up going with 201
3 flute endmill
.25 dia endmill
.001 target chip load
24000 rpm
.125 WOC
.10 DOC
144ipm
Very little fuzz to clean up, what’s in the picture is what I got.
I’ll make something fancy someday in the near future, I am still doing “test it out” kinda stuff.
It looks great and no matter how you modify the design in the future, within three days of use you will be desiring another change. Always seems to happen to me that way. For example, the first mod I made to mine was to attach handles so I could move it easily. The second was feet so it would not be so sensitive to irregular surfaces.
Thanks for the photo,
Rex