Baltic birch Plywood

Oh, yes, I’d also be surprised if it’s dull after just 20 hours, I abused my original Carbide Nomad 201 for longer than that in birch ply and even some MDF, I’ve put the cheap Yonico 21315-SC through even more and they’ve lost their initial sharp but the surface is only a bit hairy.

Is there any heat marking or wood deposit goo on the bit?

How deep / fast are you contour cutting through that ply?

Checking some of my contour (not adaptive clearing) cuts with full engagement across the whole bit, run with my router spindle on the standard Z I was using;
15-18k RPM
3mm depth of cut per pass
1500 mm / min cutting feedrate
I was also doing a 3mm stepover so I was cutting a slot 6.35 + 3mm = 9.35mm wide so I had lots of room for chips to come out.

That roughing pass left 0.5mm stock so I could come back with a finishing pass which was full depth and taking 0.2mm, 0.2mm and finally 0.1mm off the edge to get to the actual cut line.

I found that was an OK early balance between cut speed and nasty vibration as I’d still not got all my V wheels, belts, etc. as tight and sorted as they could be.

HTH

3 Likes

No, the bit looks clean. I usually just go with the recommended feeds and speeds.

Hum. I’m gonna have to try that roughing pass/finishing pass technique. That may be my best solution until I investigate an compression or down cut bit. I’m trying to do it all in one bit at one time, but it seems I may have to apply some clearing/finishing techniques.

4 Likes

I’m still fairly new to this so there is still a lot of learning to do on my end. But I’m thankful this forum is here and there are so many willing teachers and helpers. thanks.

1 Like

Folks here have been really helpful to me.

BTW,

Don’t be afraid to use the feed rate override in Carbide Motion and slow down cuts that are sounding like there’s vibration or unhappy, it’s a really quick way to find out if you could be going slower or faster.

4 Likes

Ran across this YouTube. Worth a look.

6 Likes

Take a look at the endmill with at least 3x magnification, you may be surprised. You can’t tell much naked eye except really grievous damage.

2 Likes

I can’t tell. So you are saying the upcut Endmill is damaged:dull?

Saying you can’t really tell how sharp an endmill is, or if it’s chipped with your naked eye. That said, this is pretty typical behaviour of an upcut endmill on ply. I think this is why compression mills exist.

3 Likes

I was referring to the video. But then again I was looking at it without my glasses. As far as my personal emdmill, it’s fairly new, but I’ll give it a good look. And yes, I think I’ll invest in a compression bit for ply. Thanks.

As Mike says a close up look is invaluable for many things, have a look on Amazon or eBay for loupe

Alternatively, if you don’t have a magnifier to hand, a phone camera can be handy, take the pic under some strong light and then zoom in, here’s a shiny new and my slightly beaten up old 201;

Looking closely at the 201 there are brown deposits just behind the cutting edge up to the normal cutting depth I use in wood and I can also see (on the left top) that the cutting edge is rounded over and no longer sharp in those last 6mm or so.

I don’t know what others (Mike?) think about whether this bit is due for retirement but what I generally do is use my older bits for the heavy cutting roughing passes and then reserve my new sharp bits for the finishing passes to keep those sharper longer.

edit - for my compression cutter bit I definitely don’t use it for the roughing passes, I leave enough stock with a regular shallow angle bit at whatever cut depth I can make work in the material and then come back, full depth, with the compression cutter. There doesn’t seem to be much point in blunting just the 6mm on the end of a compression cutter doing roughing out to me.

(for inspecting cutters I say get a 20$ USB “endoscope” (…) on Amazon and get up close and personal:
https://shapeokoenthusiasts.gitbook.io/shapeoko-cnc-a-to-z/maintenance#tool-wear)

1 Like

Oh man! Here is my 201 (using camera phone)

Those are good pictures, I went and looked at my abused 201 under a better magnifier and saw the primary and secondary bevels you pointed out in your ebook. Here’s a somewhat poor picture using a cheapo USB camera thing, the primary bevel is still there but somewhat scarred and battered, if this was a plane blade it would definitely be off to meet the waterstone in that condition.


3 Likes

Here’s what the glue in Baltic Birch can do to an Aluminum cutting HSS endmill (Amana HSS1645).

6 Likes

Woah! That glue is some bad stuff.

@gmack What’d you use to take that picture?

This might help:

Just an “old” digital camera (with a “macro” mode for close ups).

4 Likes

Does that need to be applied to the threads before assembly like Loctite Blue?

So,

I went and found some offcuts of furniture grade 18mm Baltic Birch Ply and did some experiments with some blunt cutters, sharp cutter and a compression cutter.

The TLDR is that, if you use sensible feed rates, a good toolpath strategy and are prepared to do a little manual finishing, you can get away with surprisingly blunt upcut cutters.

I found the fastest way to tell if the cutter was still sharp was to carefully and gently run my thumb across (not along) the cutting edge near the top of the flute and then again in the wear zone near the tip of the bit, they feel very distinctly different on a used blunt cutter.

Cutters

These are the cutters I used

  1. The used, abused and fairly blunt Carbide 201 3 flute upcut with the close up pics in the previous post, not saying anything about the Carbide cutter here, just it’s age and how much wear I’ve put on it going through a lot of MDF and birch ply
  2. A used, abused and almost as blunt Yonico 2 flute upcut (cheap cutter, surprisingly good)
  3. A new, sharp Yonico 3 flute low helix upcut
  4. A new, sharp Yonico 3 flute compression cutter, 6mm upcut, remainder downcut

Toolpaths

I drew out a couple of shapes similar to those being cut by David for a test in the offcuts I had, the cutting strategy was to first rough out the bulk of the material in 6mm depth passes at 1500mm / min feedrate and 20,000 RPM, the shape with an adaptive clearing strategy and the circle with a full engagement contour cut, both of these were set to 1mm of axial stock to leave;

Those cuts are not fast or particularly heavy engagement, the idea is to test finish quality not MRR.

I then came back with finishing passes, 4 stepovers of 0.2mm each at full depth to bring the walls to final dimension;

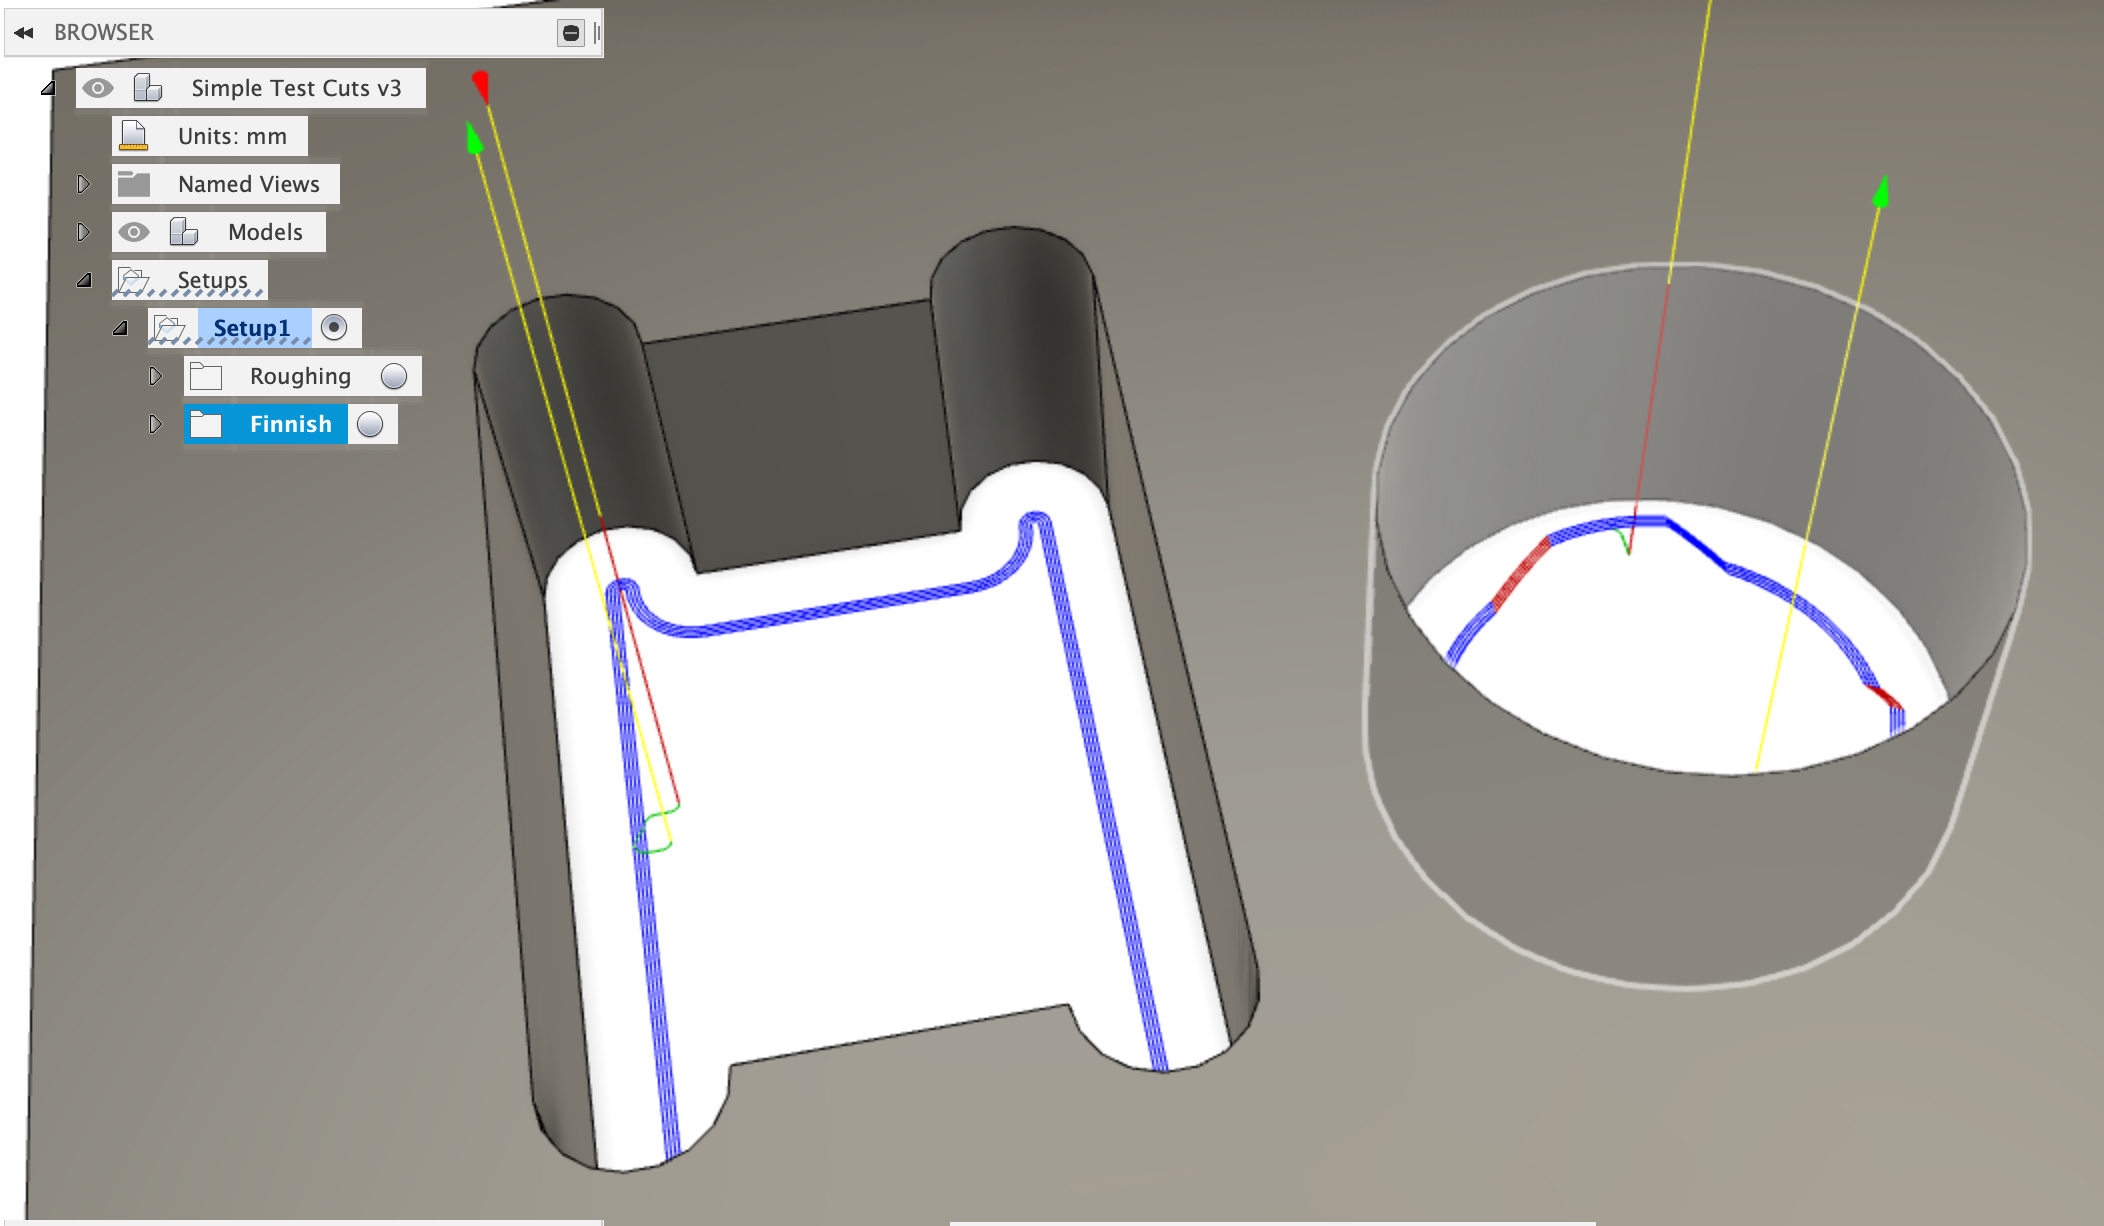
This allowed the full depth of the cutter to engage, including the still sharp parts of the used blunt cutters and provided a good opportunity for the finishing passes to clean up the hairies from the roughing cuts.
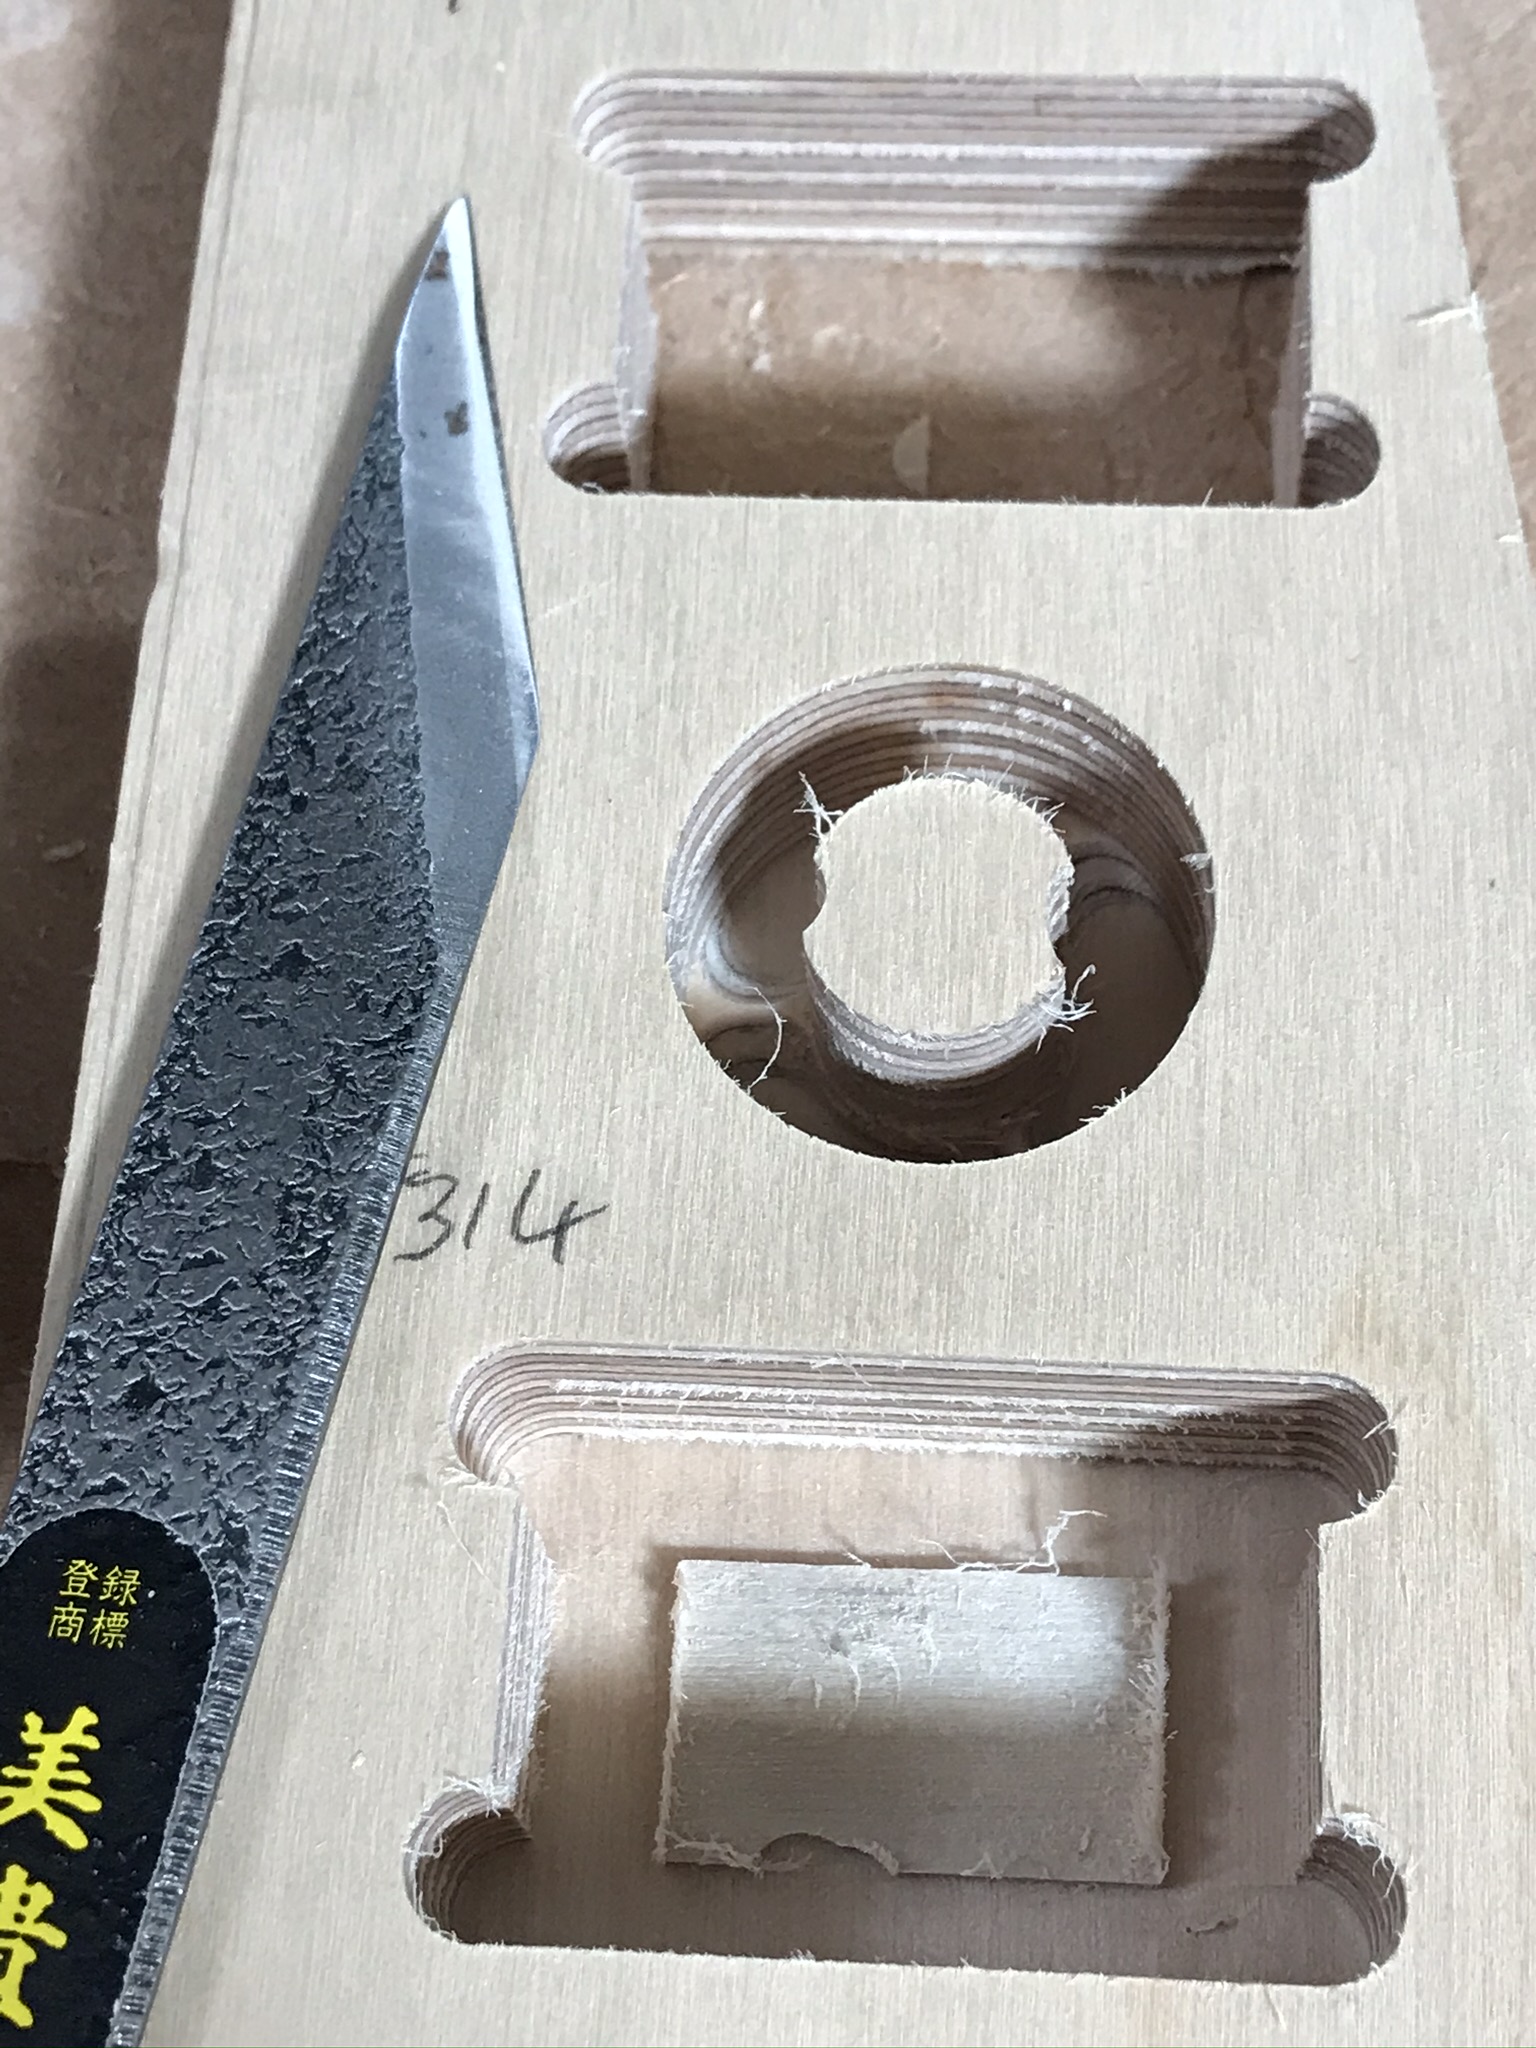
Blunt Carbide 201

The first test cutter is the blunt Carbide 201, here’s the results of the roughing pass;

As expected, it’s a mess, there was no substantial chatter or vibration, the XXL used has an HDZ and 2.2kW spindle, new belts and is reasonably tight. The hairies are along the grain of the top veneer as expected.

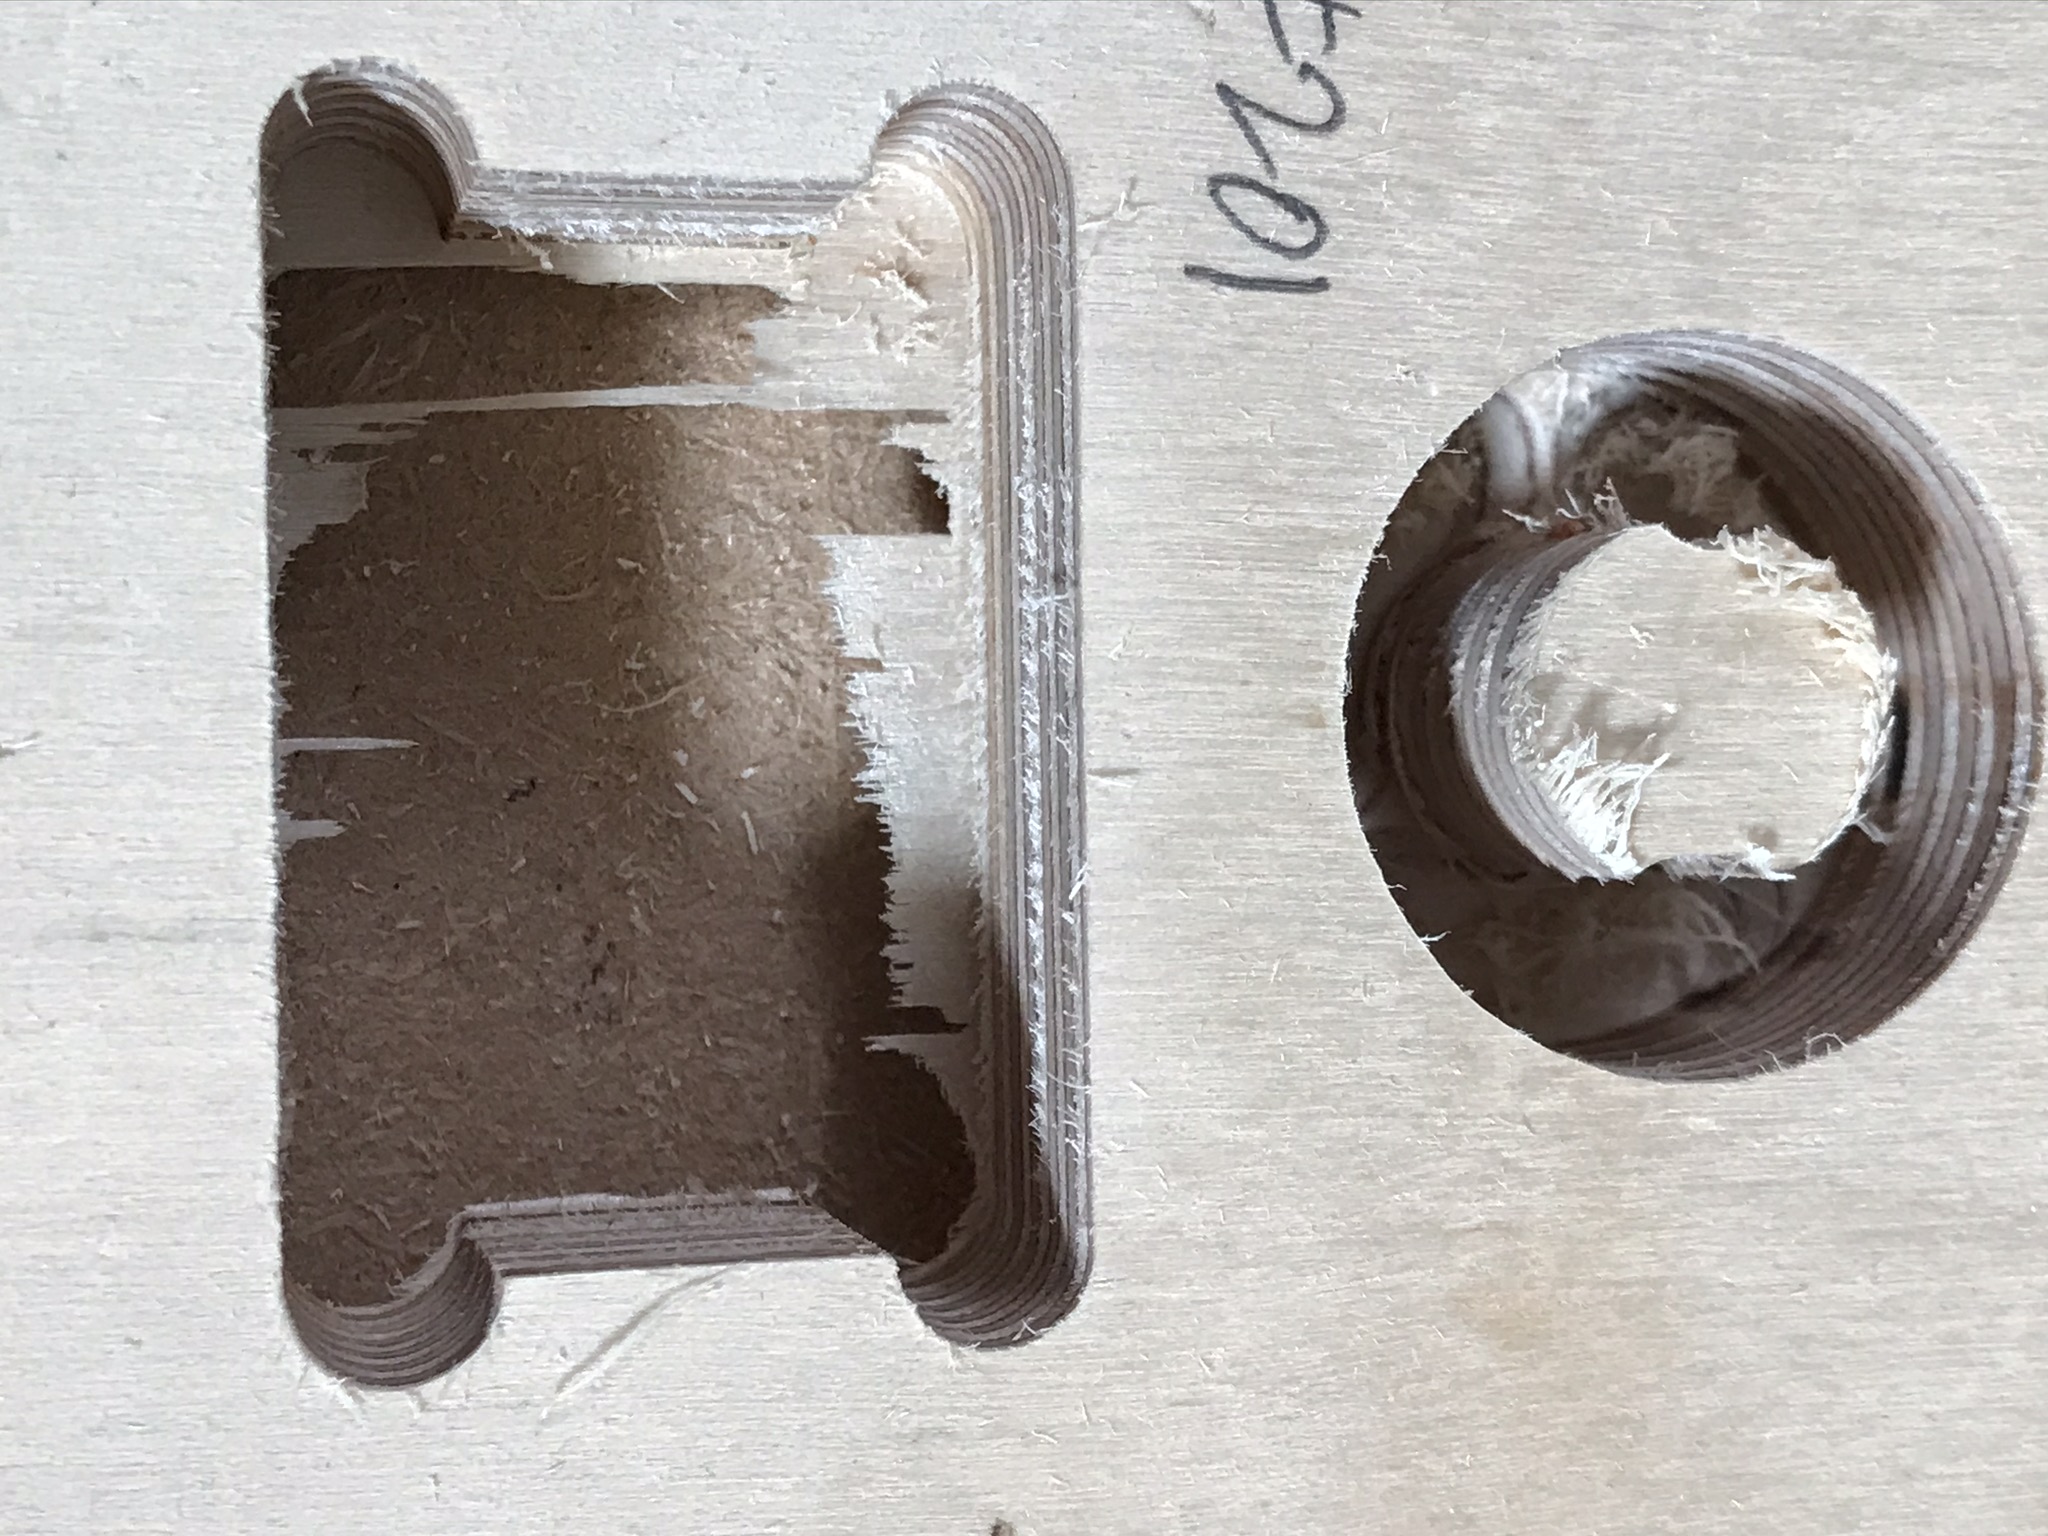
The results of the finishing pass are below;

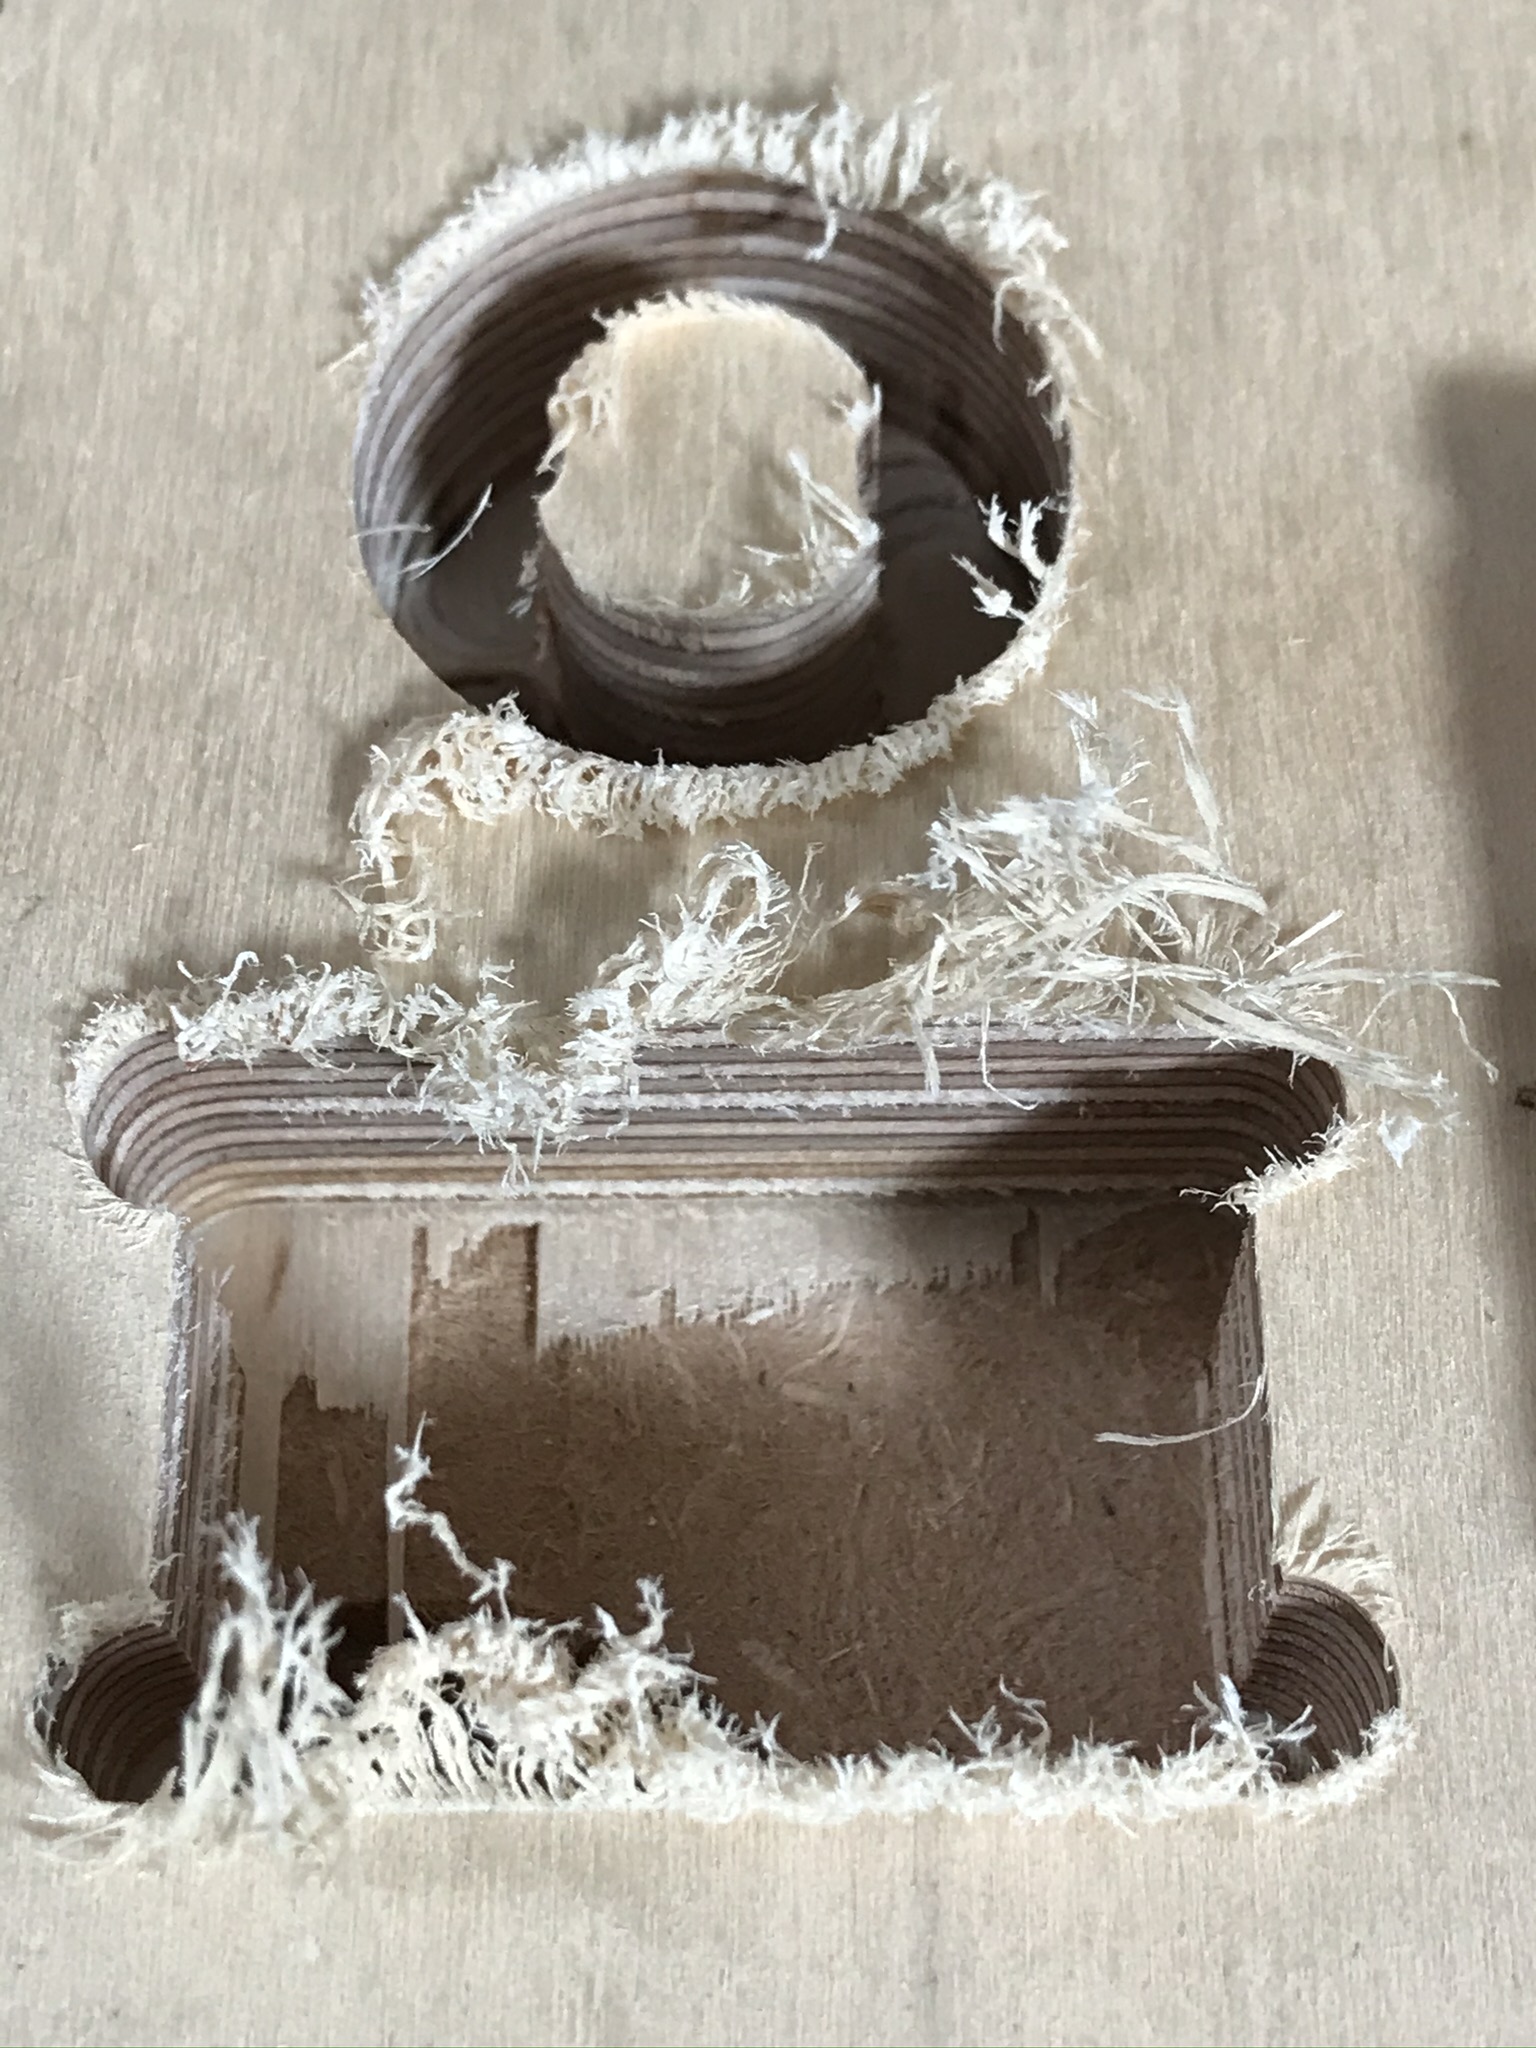
That was disappointing, the hairies have been thinned out, especially at the base, but even taking another 1mm off the walls in full depth finishing using the sharp parts of the cutter didn’t get rid of the fluff.
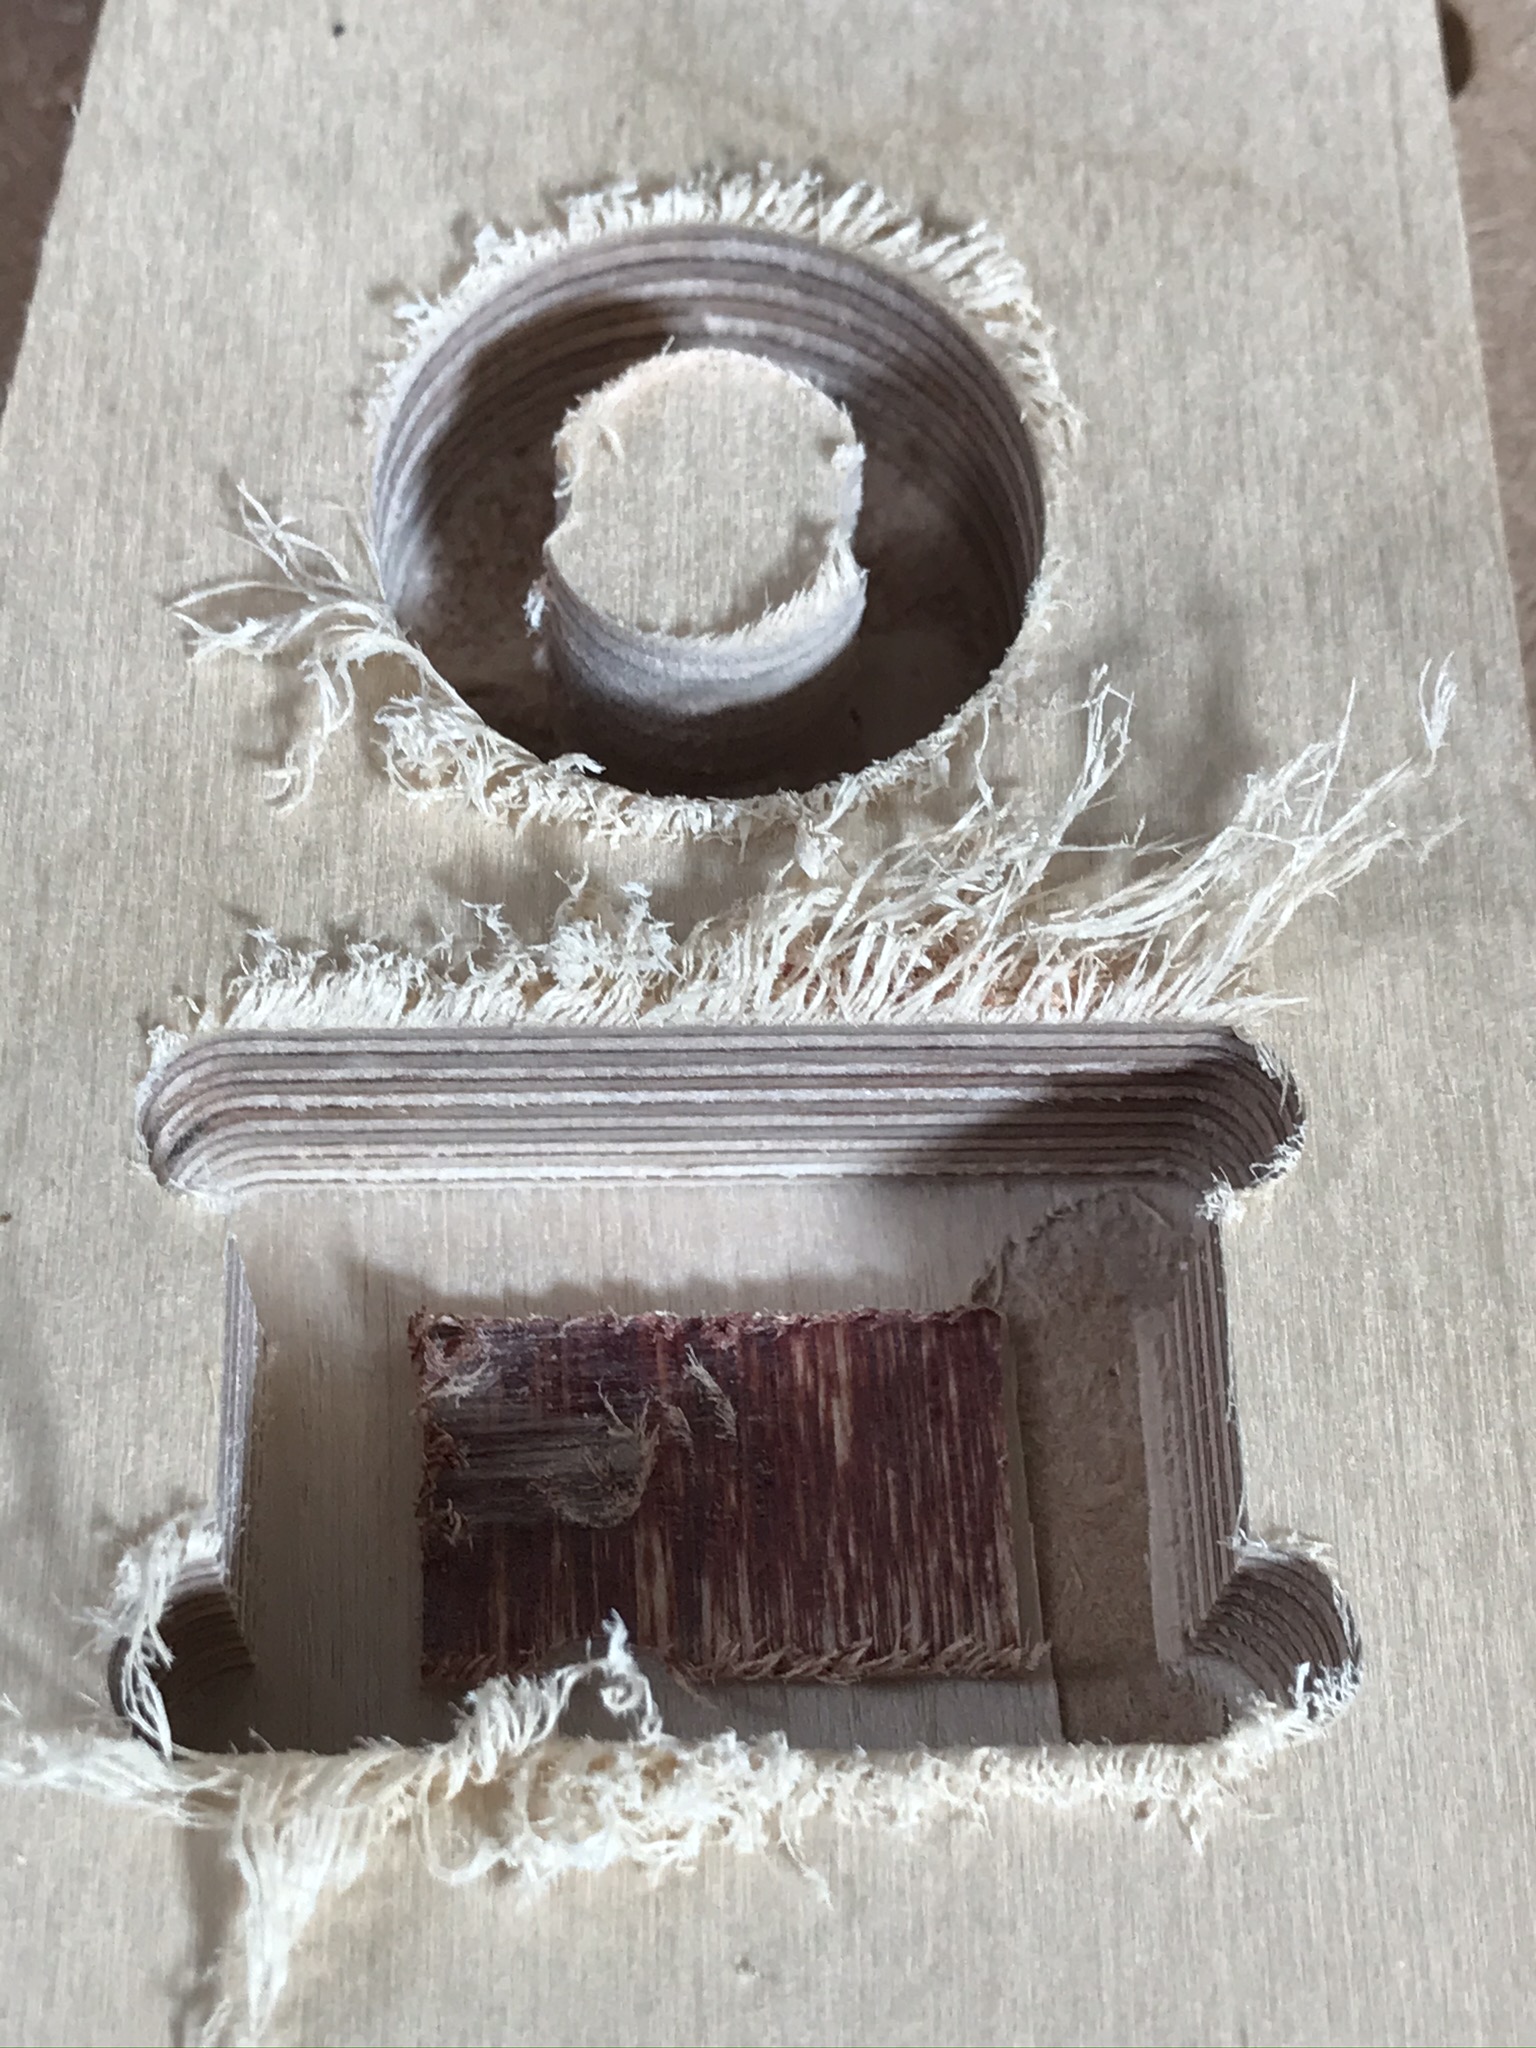
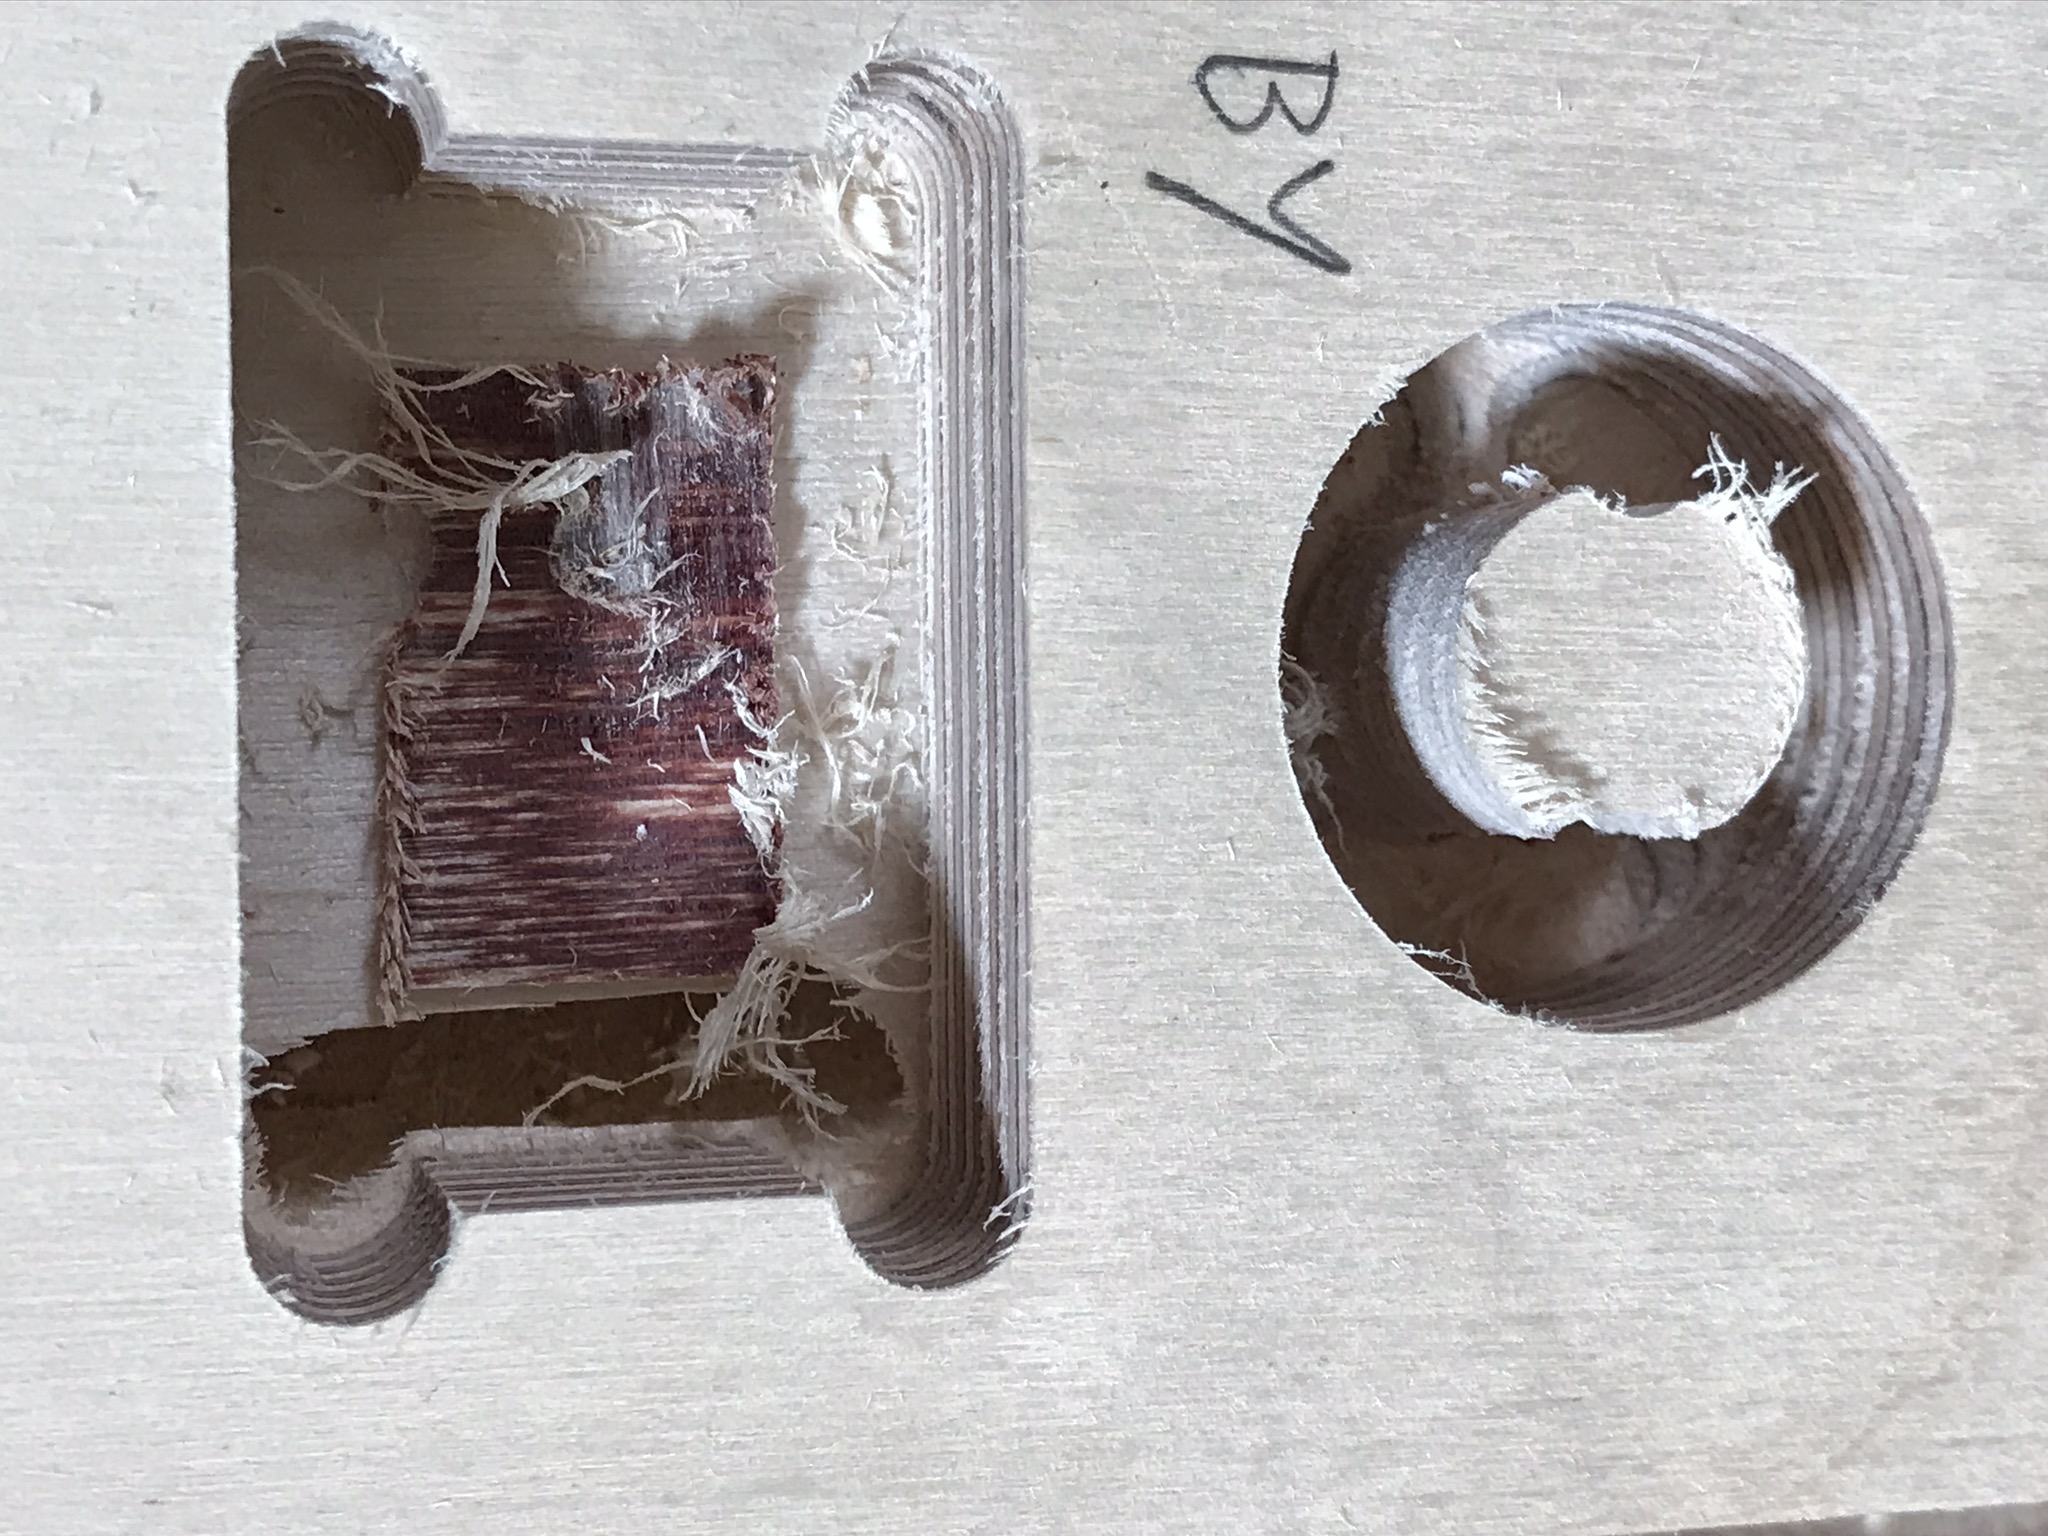
Blunt Yonico

Next up is the blunt Yonico upcut, below is the result of the finishing pass, not much different to the blunt Carbide and any difference is likely attributable to wear;
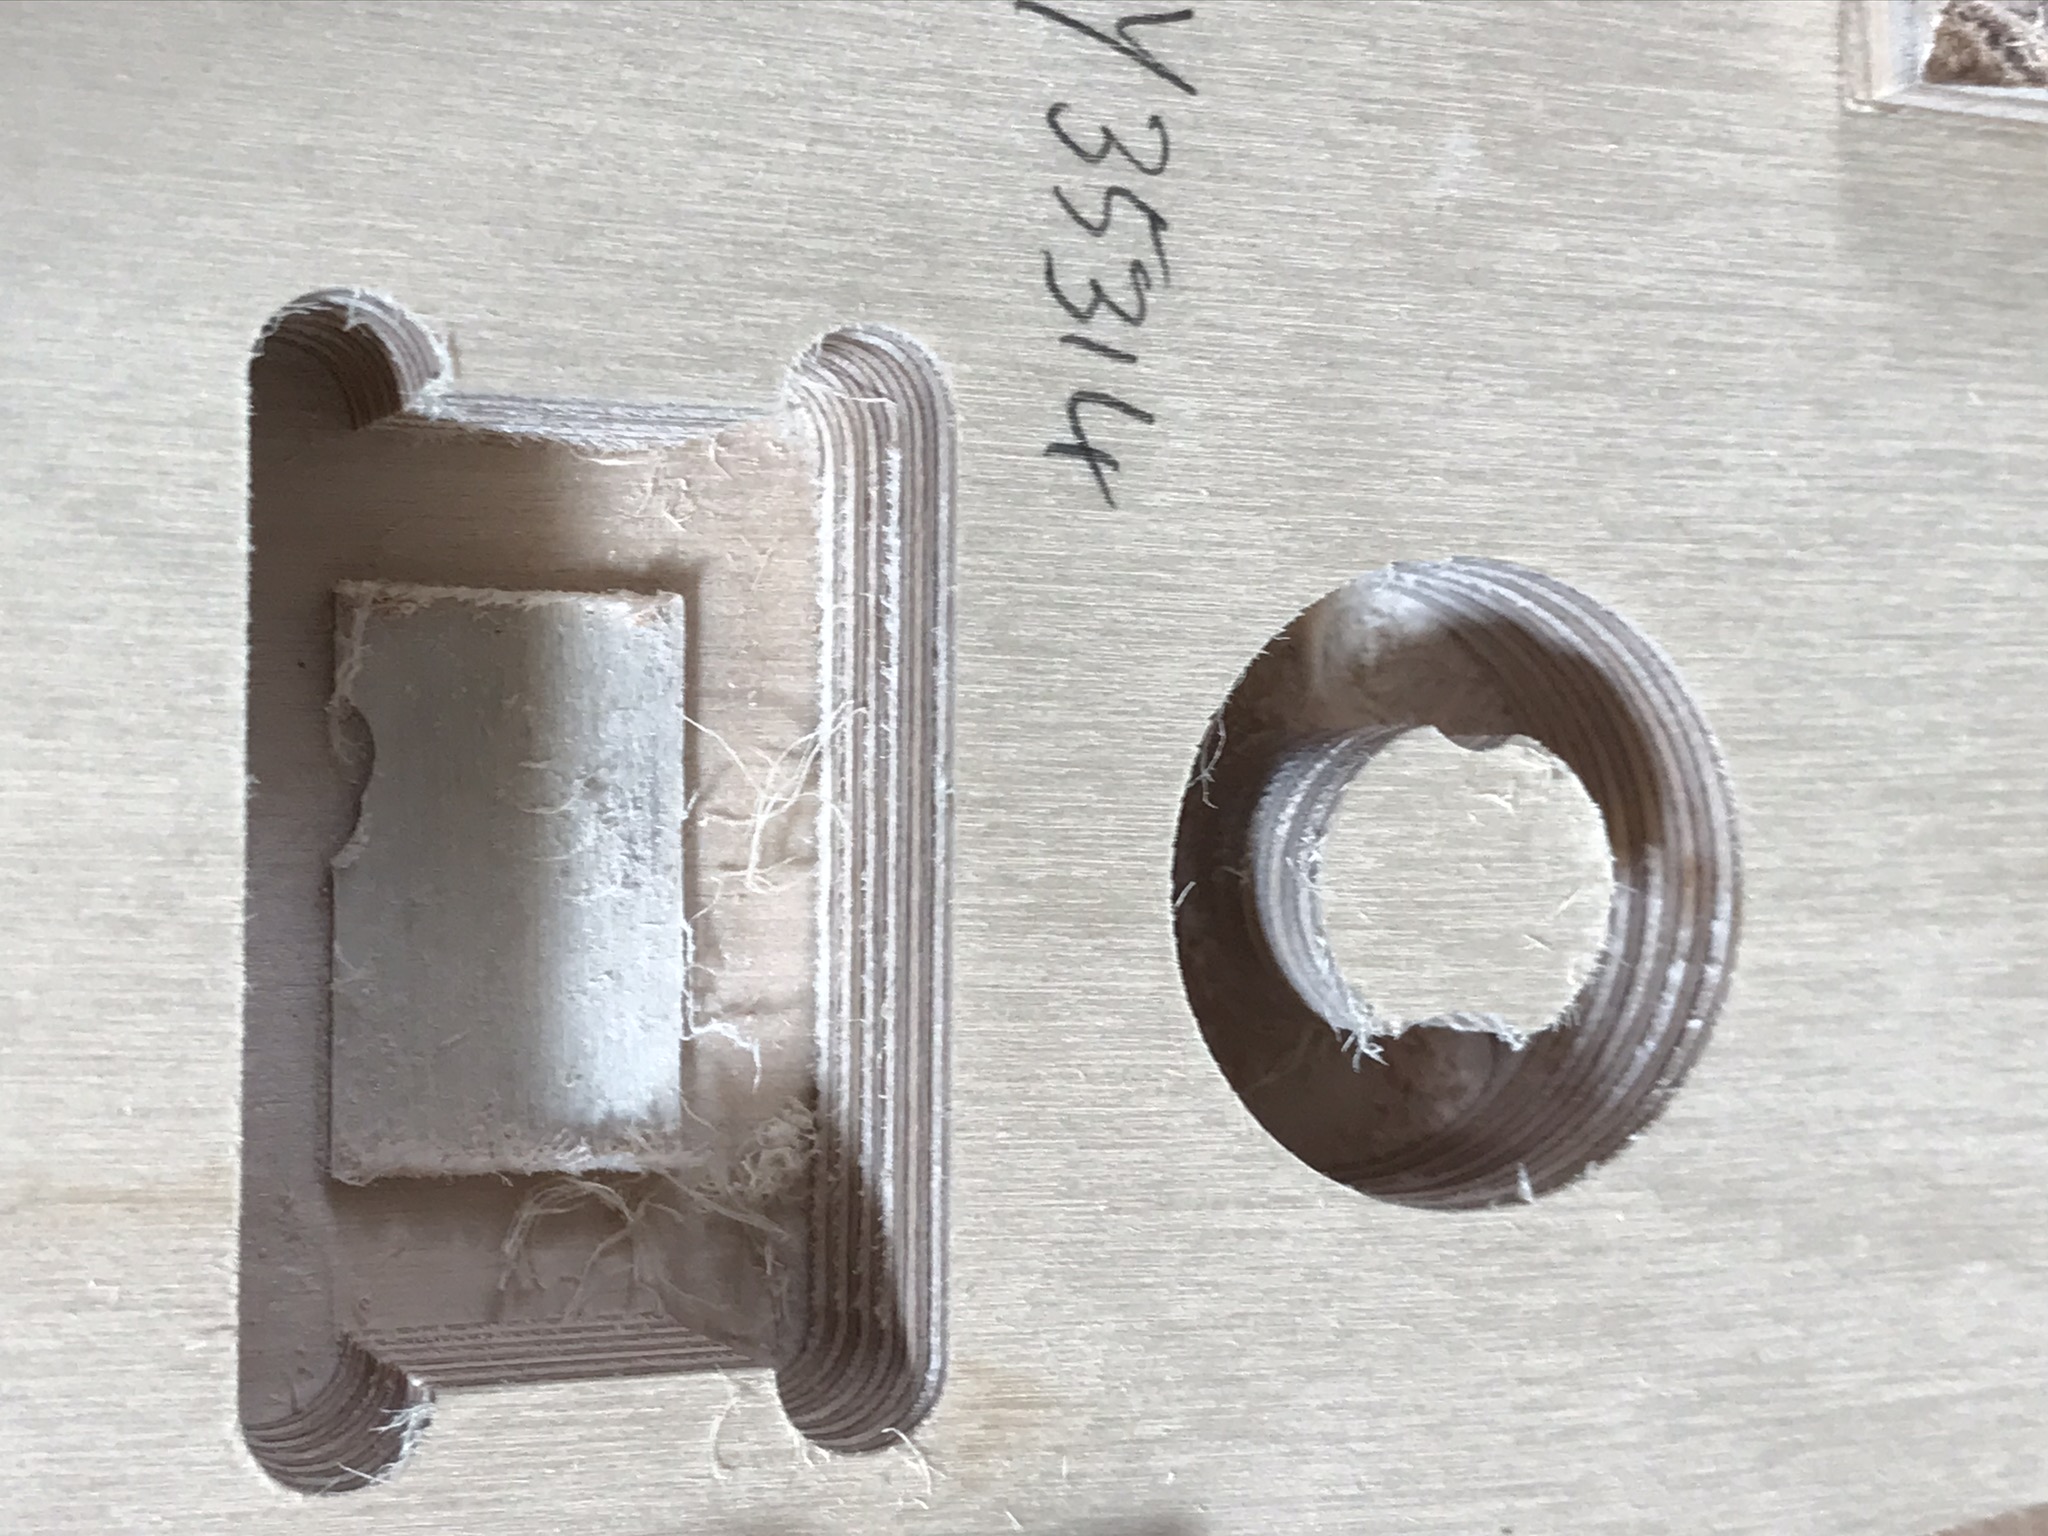
Sharp Yonico

Next, the new, sharp, low helix upcut Yonico, this I expected to do better both because it was sharp and also because it was lower helix so more shearing and less pullup on the material;
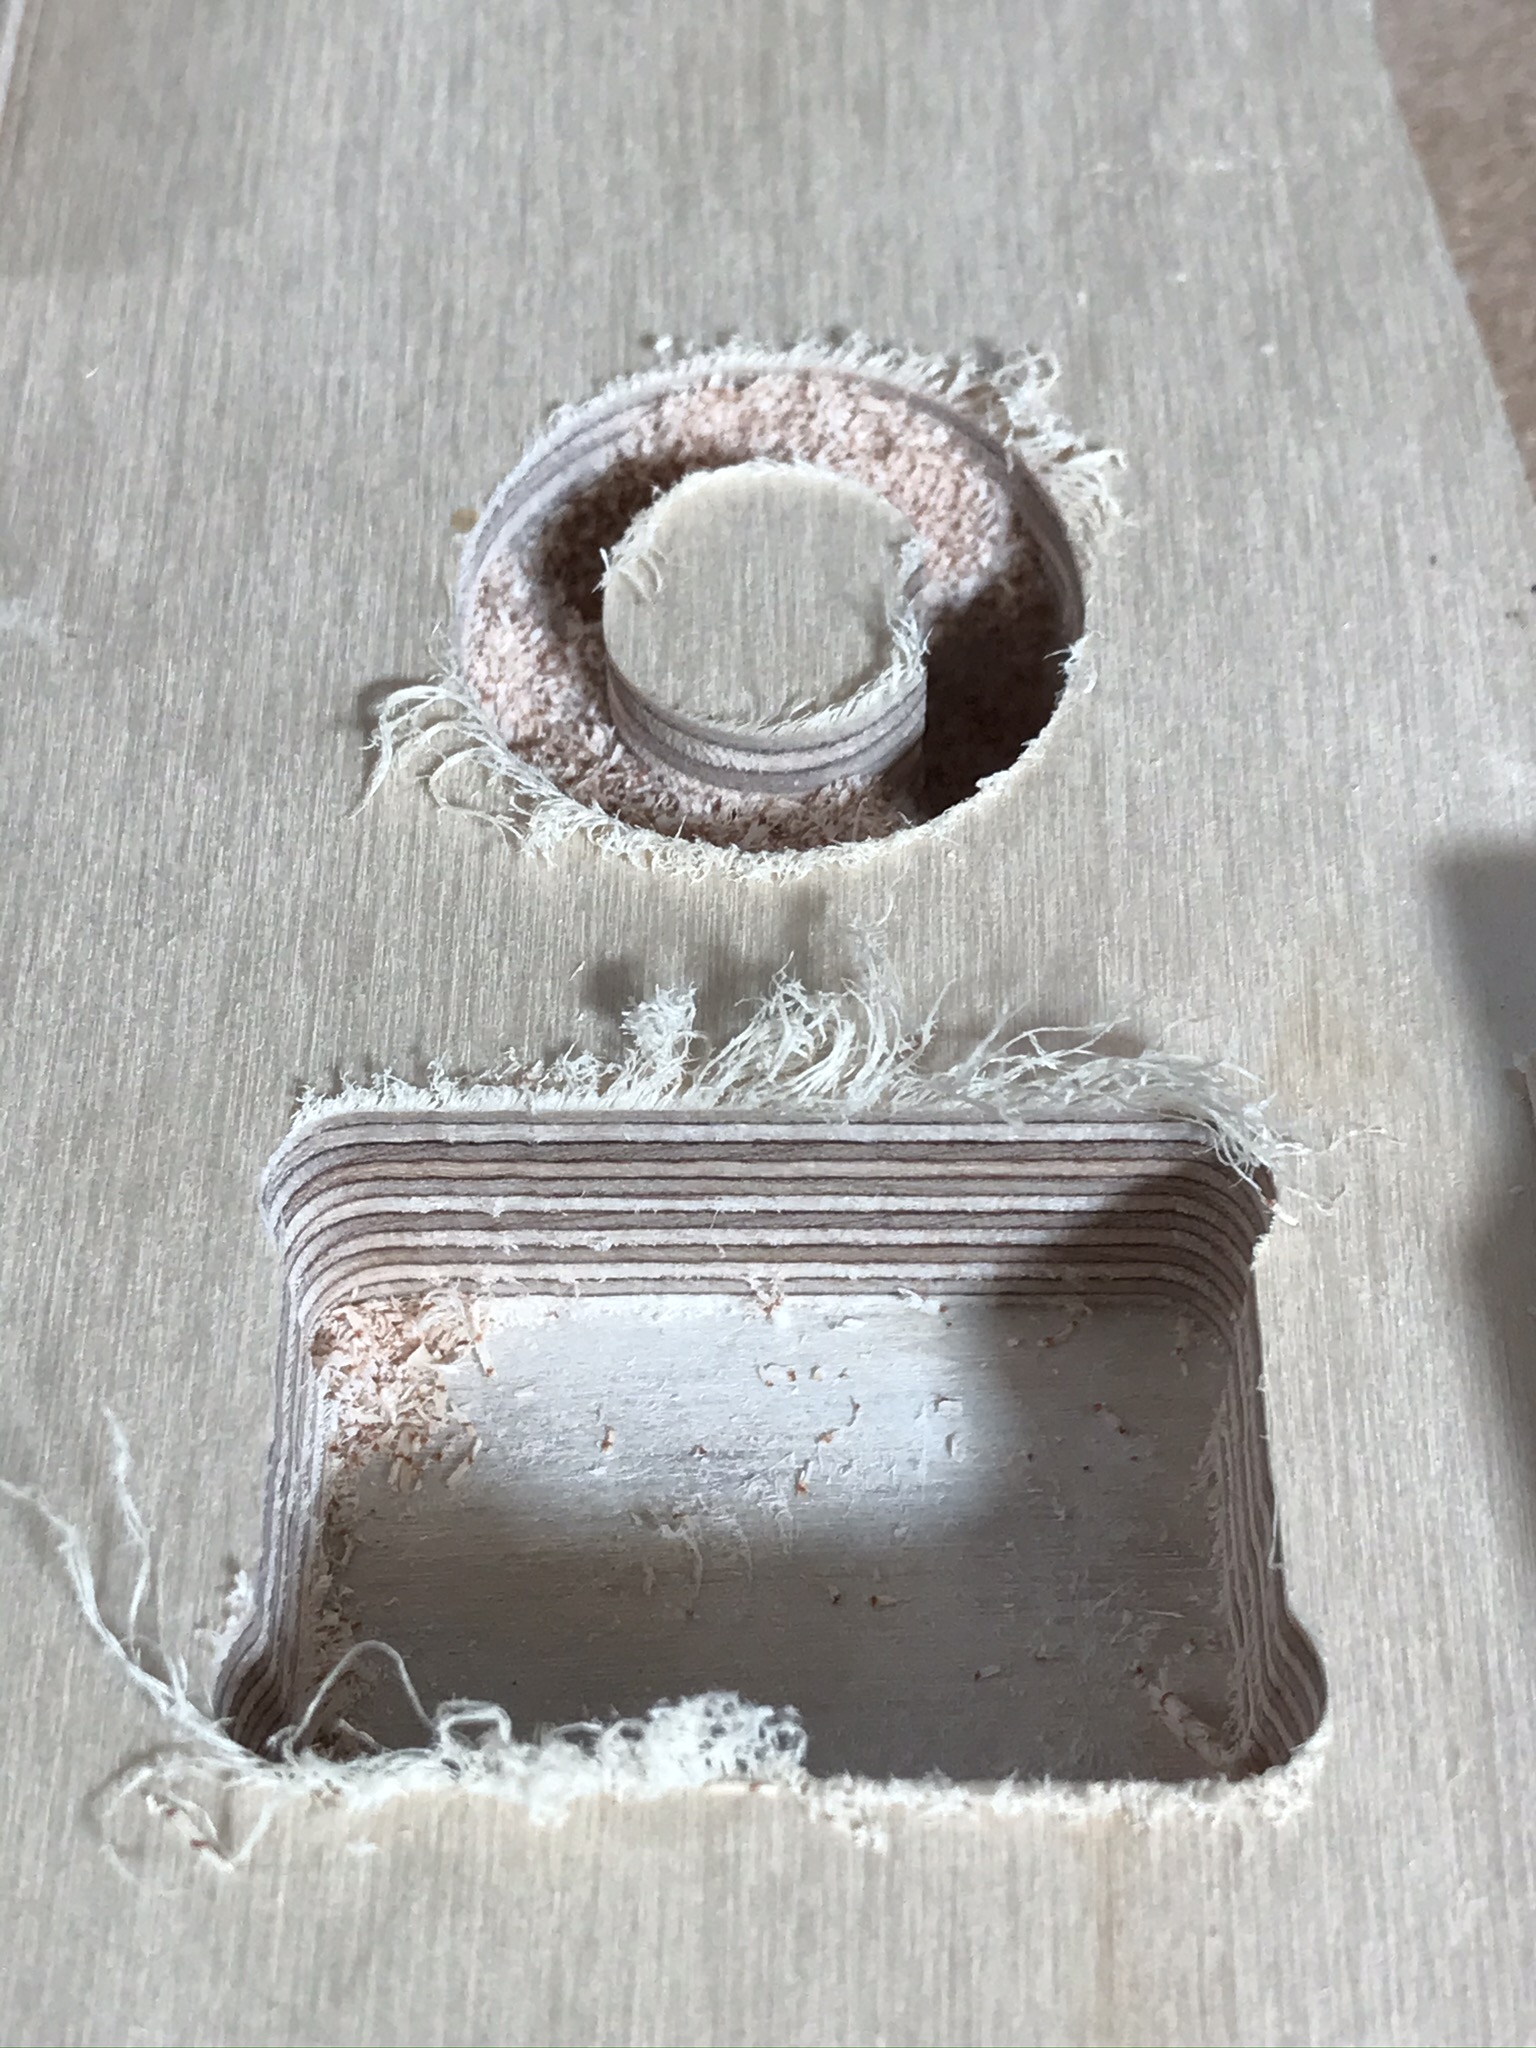
Compression Cutter

Finally, the compression cutter, the roughing passes were done with the sharp Yonico low helix and then the full depth finishing passes were run with the compression cutter (I even remembered to re-probe the Z);

That’s a lot closer to the finish I was hoping for.

But Wait!

Last thing, I went back and took the flat side of my marking knife to all the pieces to trim off the hairy bits;

And the results are;

Blunt Carbide 201 Trimmed;

Blunt Yonico Trimmed;

Sharp Yonico Trimmed;

Summary

Which all suggests to me that with a sensible roughing / finishing toolpath at a sensible feedrate and a little careful finishing you can get away with upcut cutters and even quite blunt upcut cutters.

The compression cutter undeniably leaves a better finish straight off the machine and needs less work afterwards, but you have to use it in quite deep passes, preferably at full depth as a finishing cutter. I’ll be using this cutter for finishing on pieces that I’m not sending the chamfer cutter round from now on I think.

After a little sanding I’m really not sure I could tell which cut was which without the labels.

This doesn’t mean you can get away with cutting with an old cutter blunter than Brie, there must be a tipping point where the cutter is doing so much damage to the top and bottom veneer that it’s not recoverable.

There are also plenty of other ways to get an ugly cut, workpiece vibration, excessive depth of cut or feedrate, loose V wheels or belts, etc.

HTH

7 Likes