Shapeoko 3 all set up and such, but I have been wanting to be more conversant with Carbide Create before I fired it up. I’m as frustrated as an 8th grade boy at a school dance. I have having a bitch of a time with depth of cuts (and i’m keeping things simple). I just want to just score my wood… so I am clearly missing something. i thought one bit was going to plunge straight through the centre of the earth!
I’m frustrated because I have spent lots of time trying to learn BEFORE doing, and I must be repeating something stupid and plumb missing it.
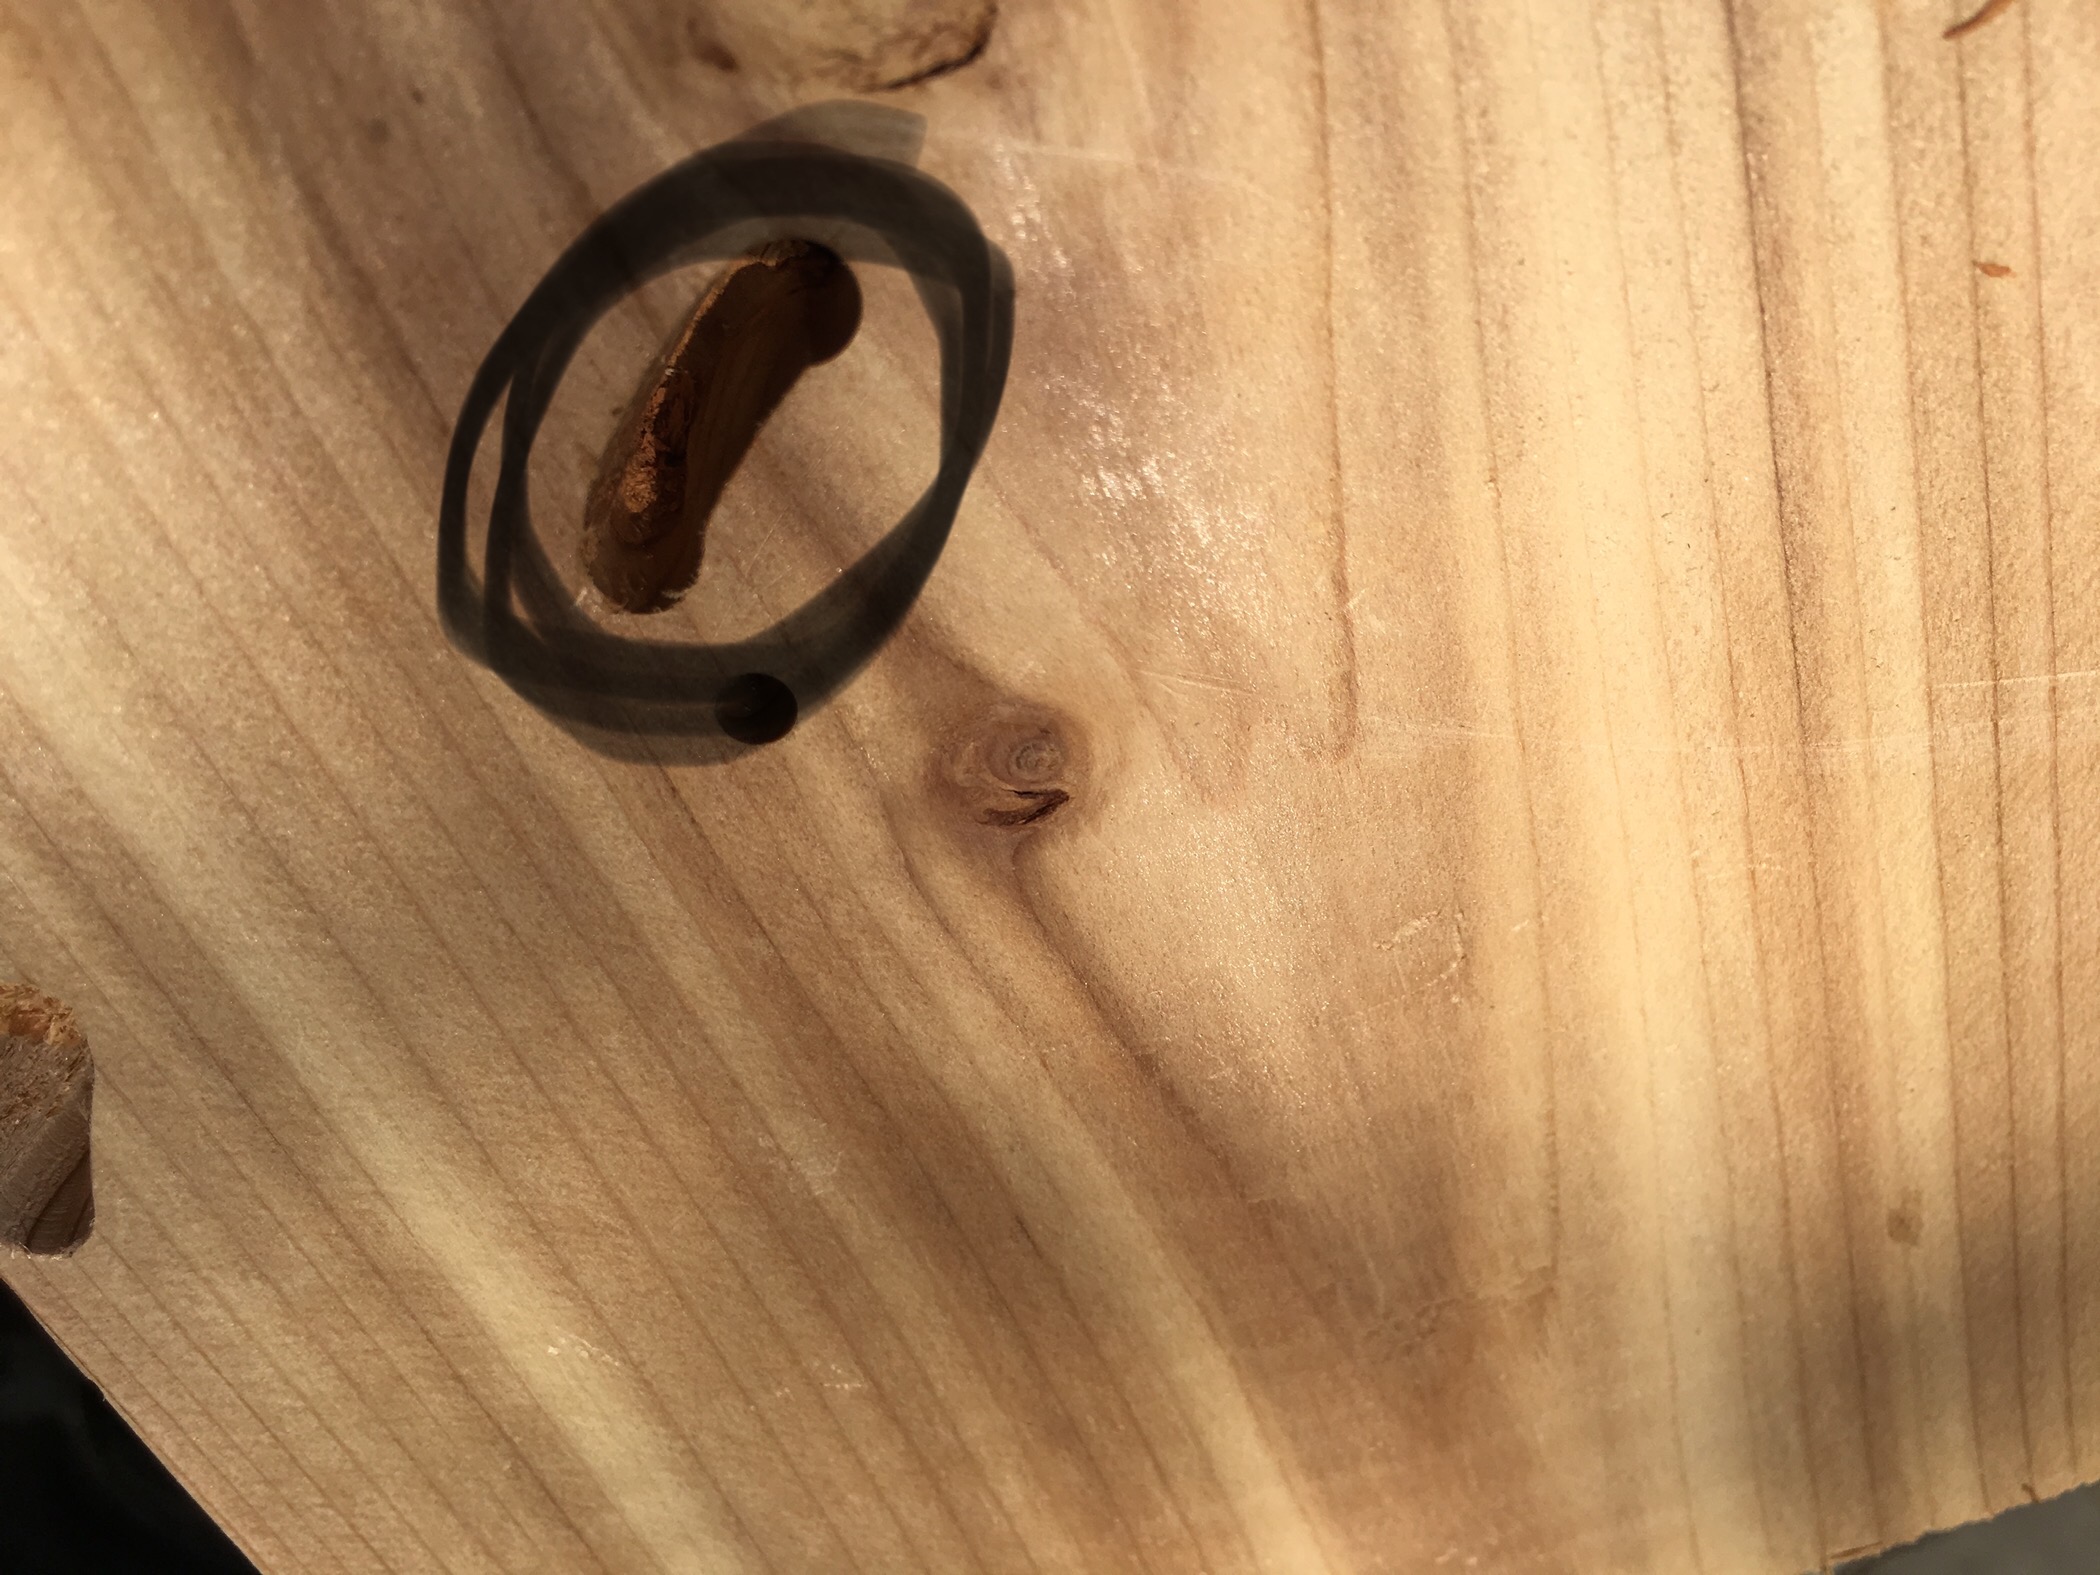
2mm cut. zeroed out the x, y and z… fired it up and BOOM.
I apologize in advance for this rookie request but holy hannah… even I’m smarter than this (uh, I thought!).
Congratulations on the assembly and setup!
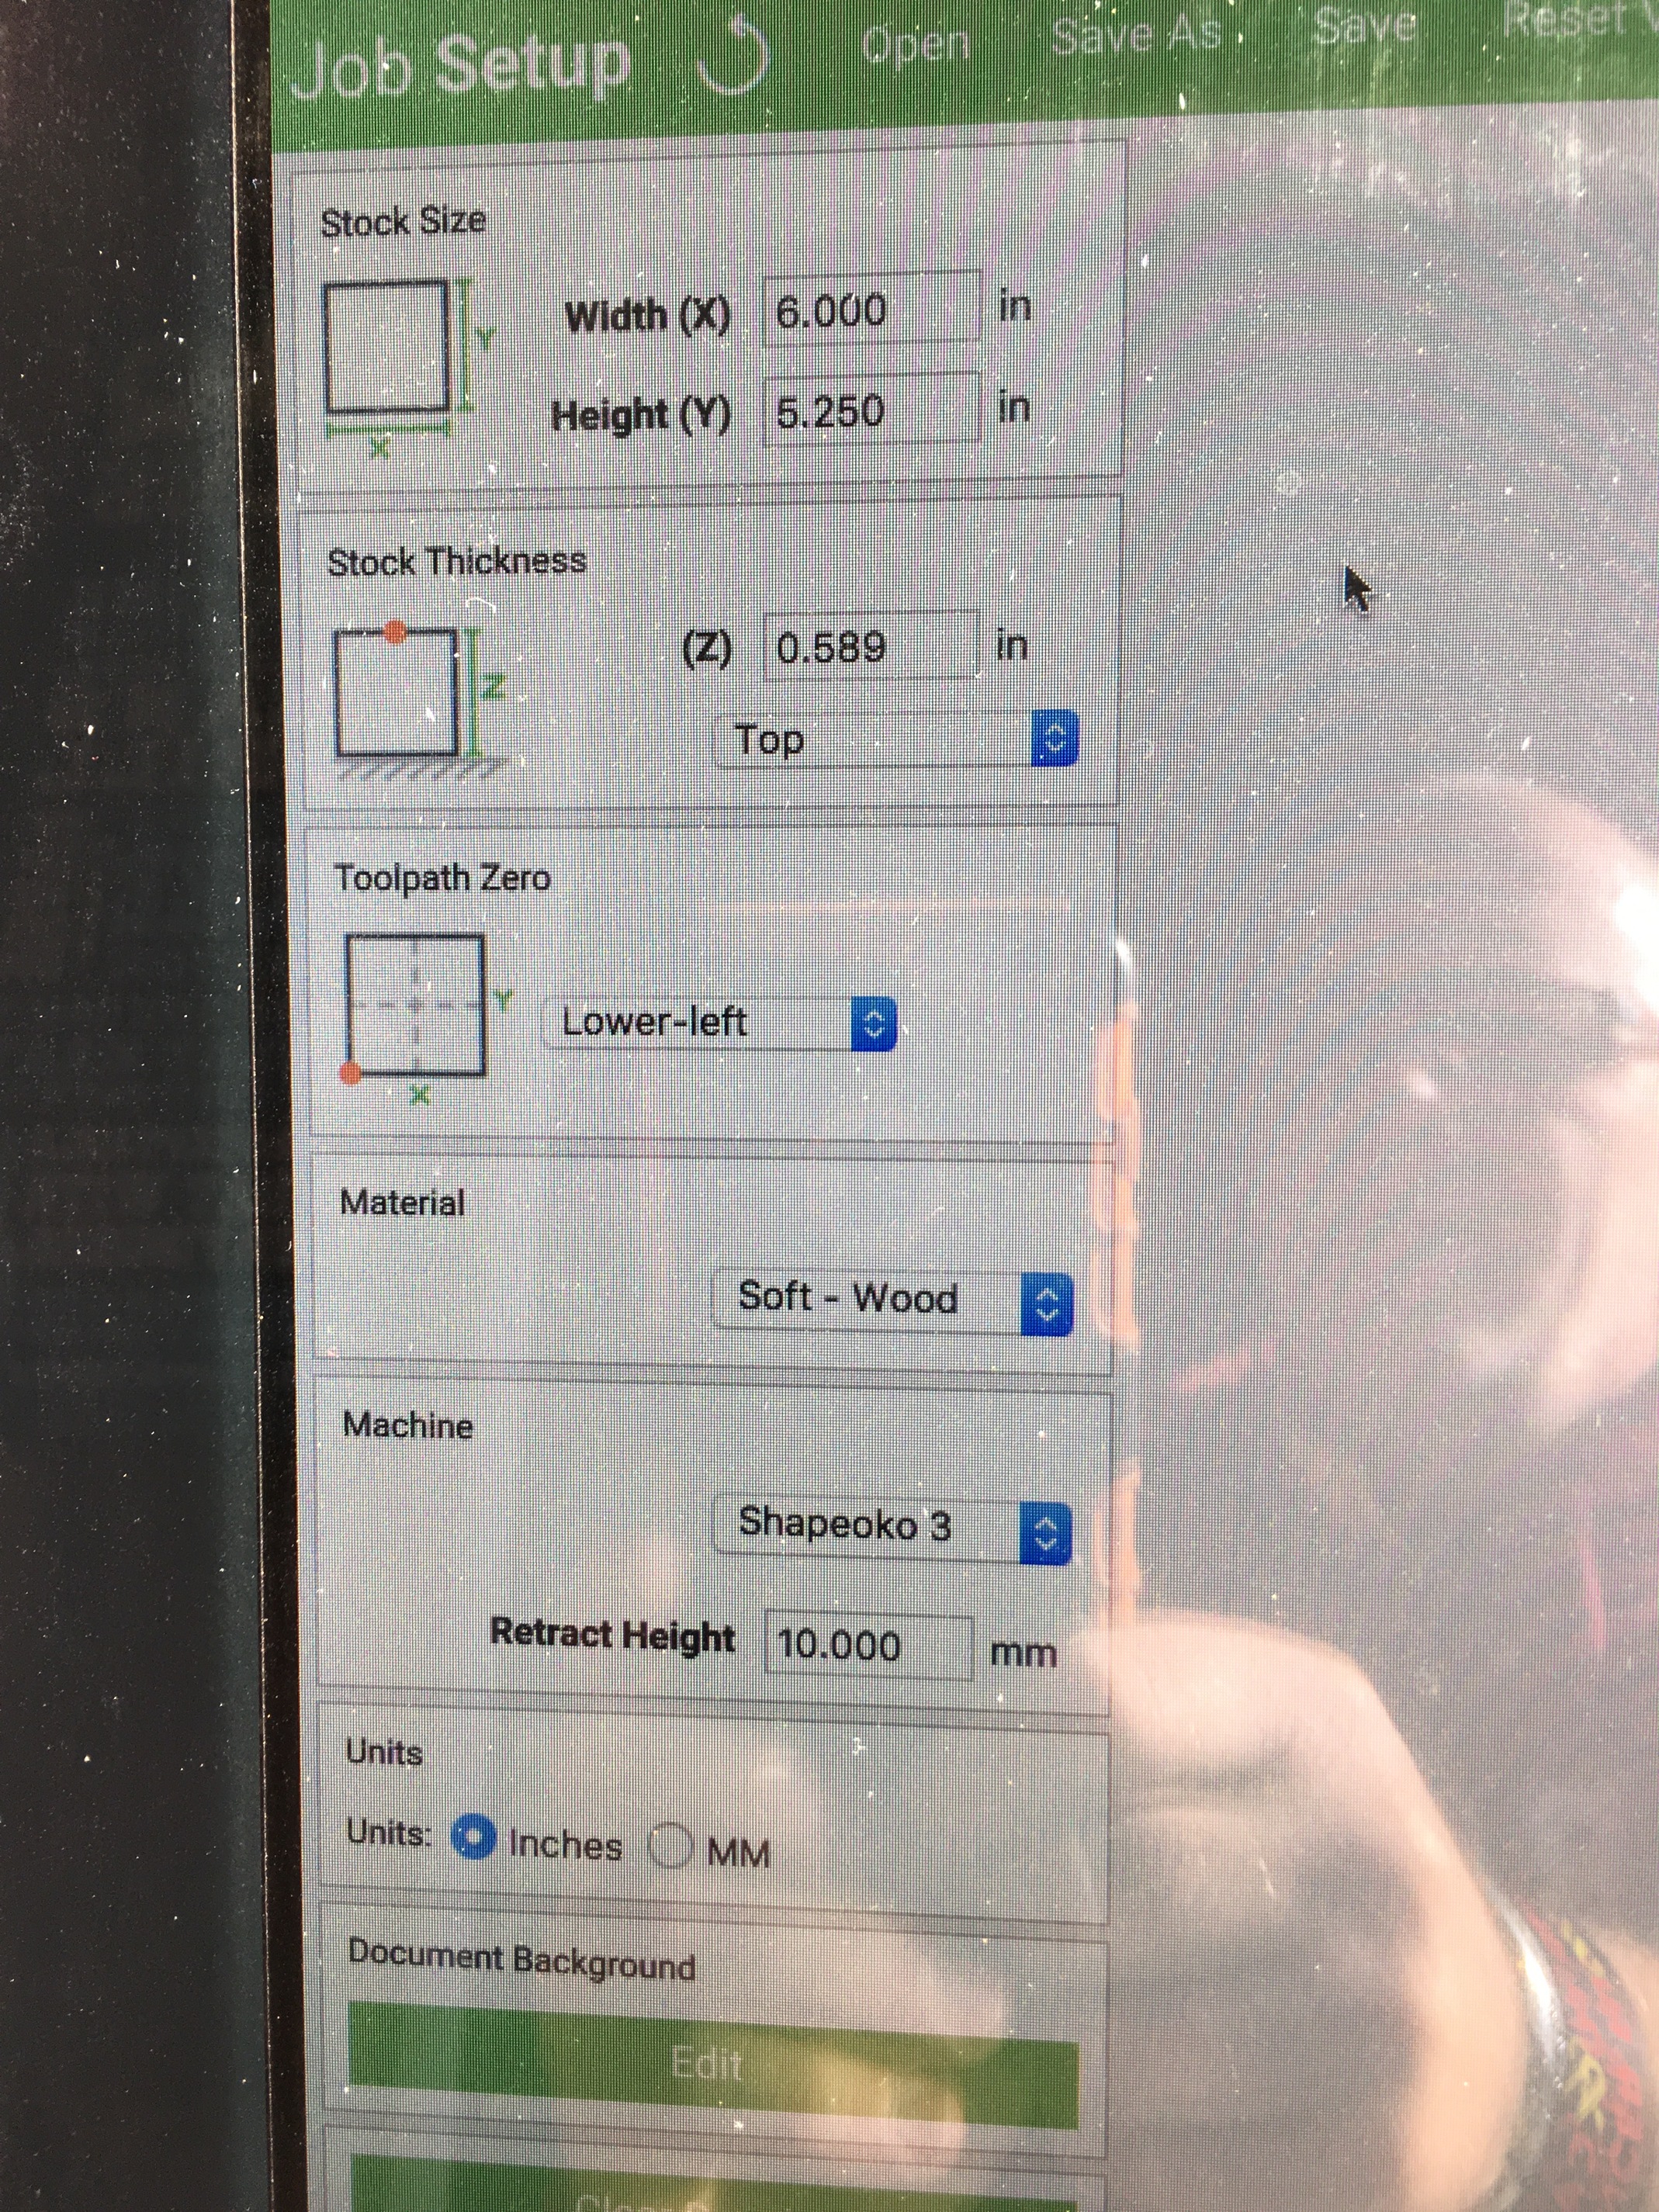
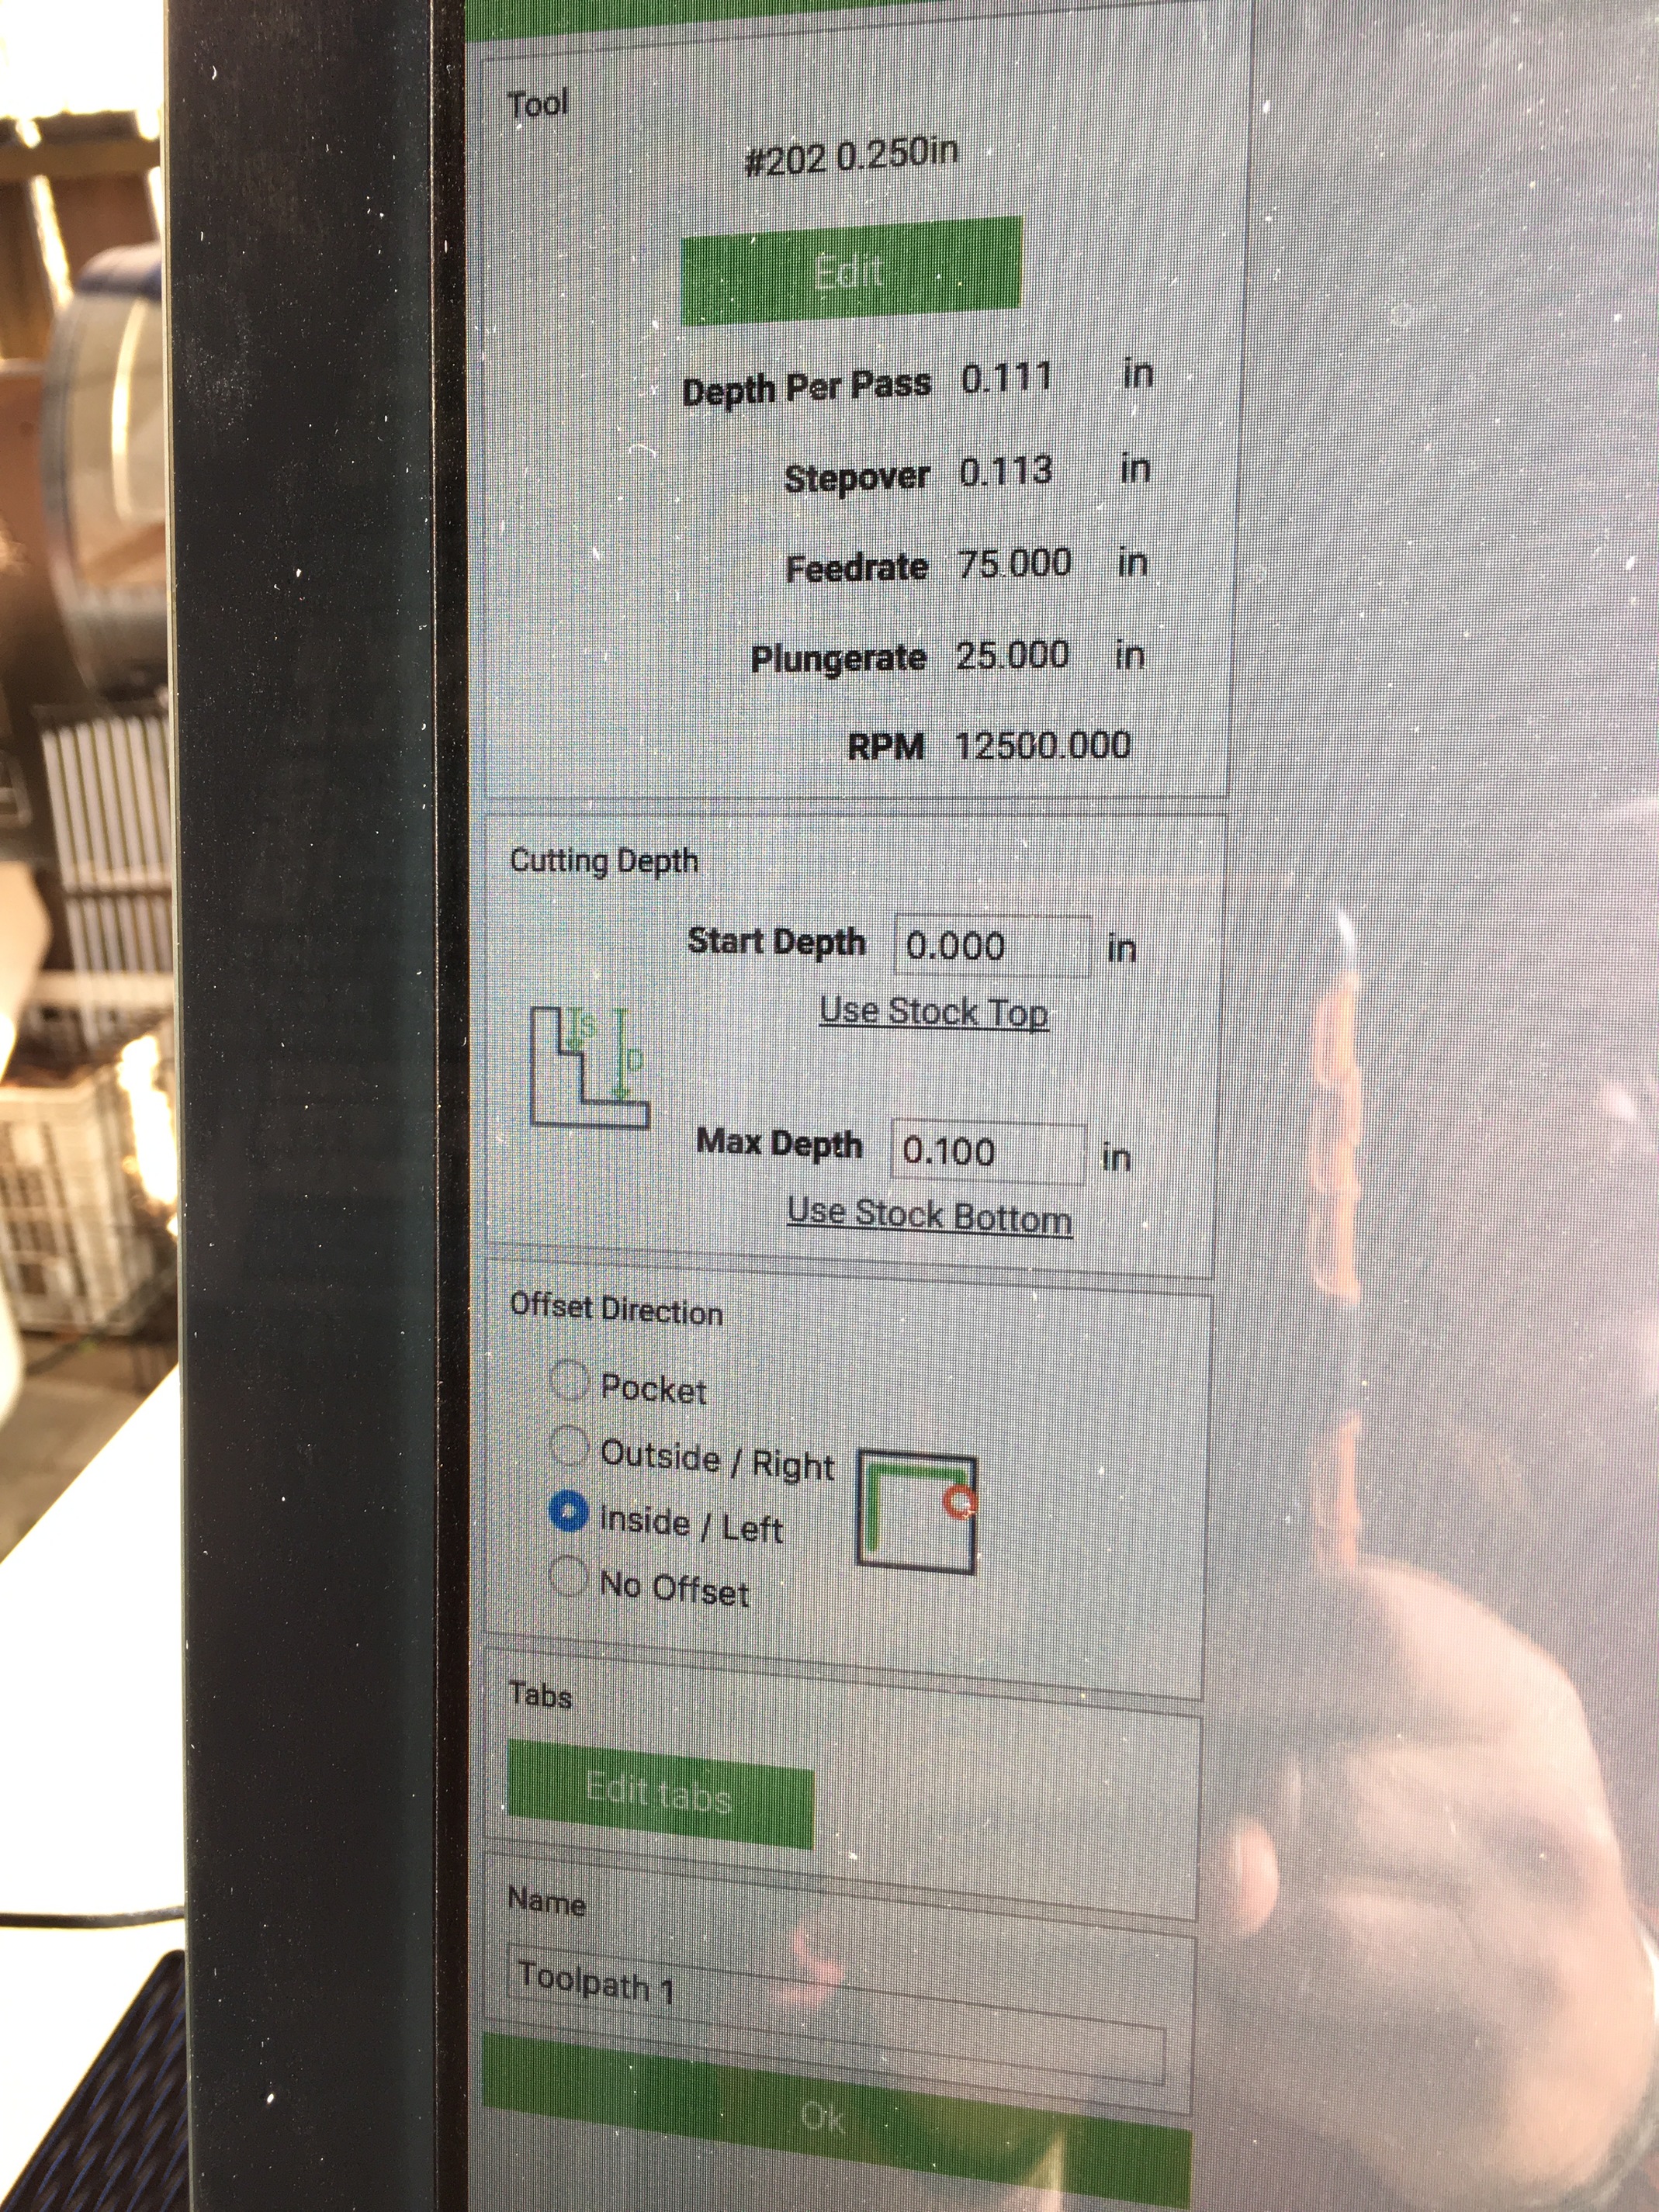
For Carbide Create there are a couple of numbers/settings which you need to keep in mind:
- under Job Setup (gear icon):
- Stock thickness — measure the stock and set this to match
- Z origin: Top (the surface of the stock) or Bottom (the surface of the wasteboard the stock is placed on)
- Toolpath | Cutting Depth:
- Start Depth — this is where it will begin cutting — only change from zero (stock top) when previous cuts have cleared material away
- Max Depth — this is where the cut will stop
- Toolpath | Tool | Edit
- Depth per pass — this is how deeply the machine will cut with each pass, moving down by this increment until it reaches the bottom
We have a basic page on terminology which may help: https://wiki.shapeoko.com/index.php/Glossary
I’d recommend working through at least a couple of the tutorials: https://docs.carbide3d.com/tutorials/#shapeoko-tutorials and to esp. read through: https://docs.carbide3d.com/tutorials/tutorial-homing/
If you get stuck on a file or project, post it here or send it in to support@carbide3d.com and we’ll do our best to help.
1 Like
Hard to tell what the problem is. Maybe you can post your Carbide Create file here for review.
1 Like
Don’t get too frustrated! There’s definitely a learning curve both before and after you get the machine set up. I had similar problems the first couple of days. I thought the Shapeoko was trying to dig a hole to China. I took some more time to make test cuts, and especially learn exactly how Z positioning worked in CM before I made my first semi successful cuts. I’m still no expert, but keep trying and I think you’ll be really satisfied with the results you can get.
2 Likes
A little off topic but glad I read this. I looked at what you were suggesting and saw these instructions:
When that part of the job finishes and you are ready to do a tool change you can power off the machine — you can even disconnect from Carbide Motion by closing the program.
- Change the bit in your tool (let’s say it’s a 1/8″ ball nose)
- Power on your machine and re-connect with Carbide Motion
- Run the homing cycle ($h)
- Jog to your offset (X−380, Y−380)
- Zero your X and Y axis (with the “zero” buttons)
- Zero your Z-axis by touching off the material
- Run the rest of your job
I’ve been blowing right past step #5 but CM still uses the same X and Y settings. Actually, I have a fence setup and every time I run a job CM jogs me back to those same X and Y coordinates when I tell it to return. I’d rather be safe than sorry though. I will not skip step #5. It’s simple enough to click the X and Y zero buttons.
1 Like

The frustration continues. Thankfully it is sunny and I am sitting near my smoker as some magical pork belly is turning into bacon… mmmm… bacon. I digress…
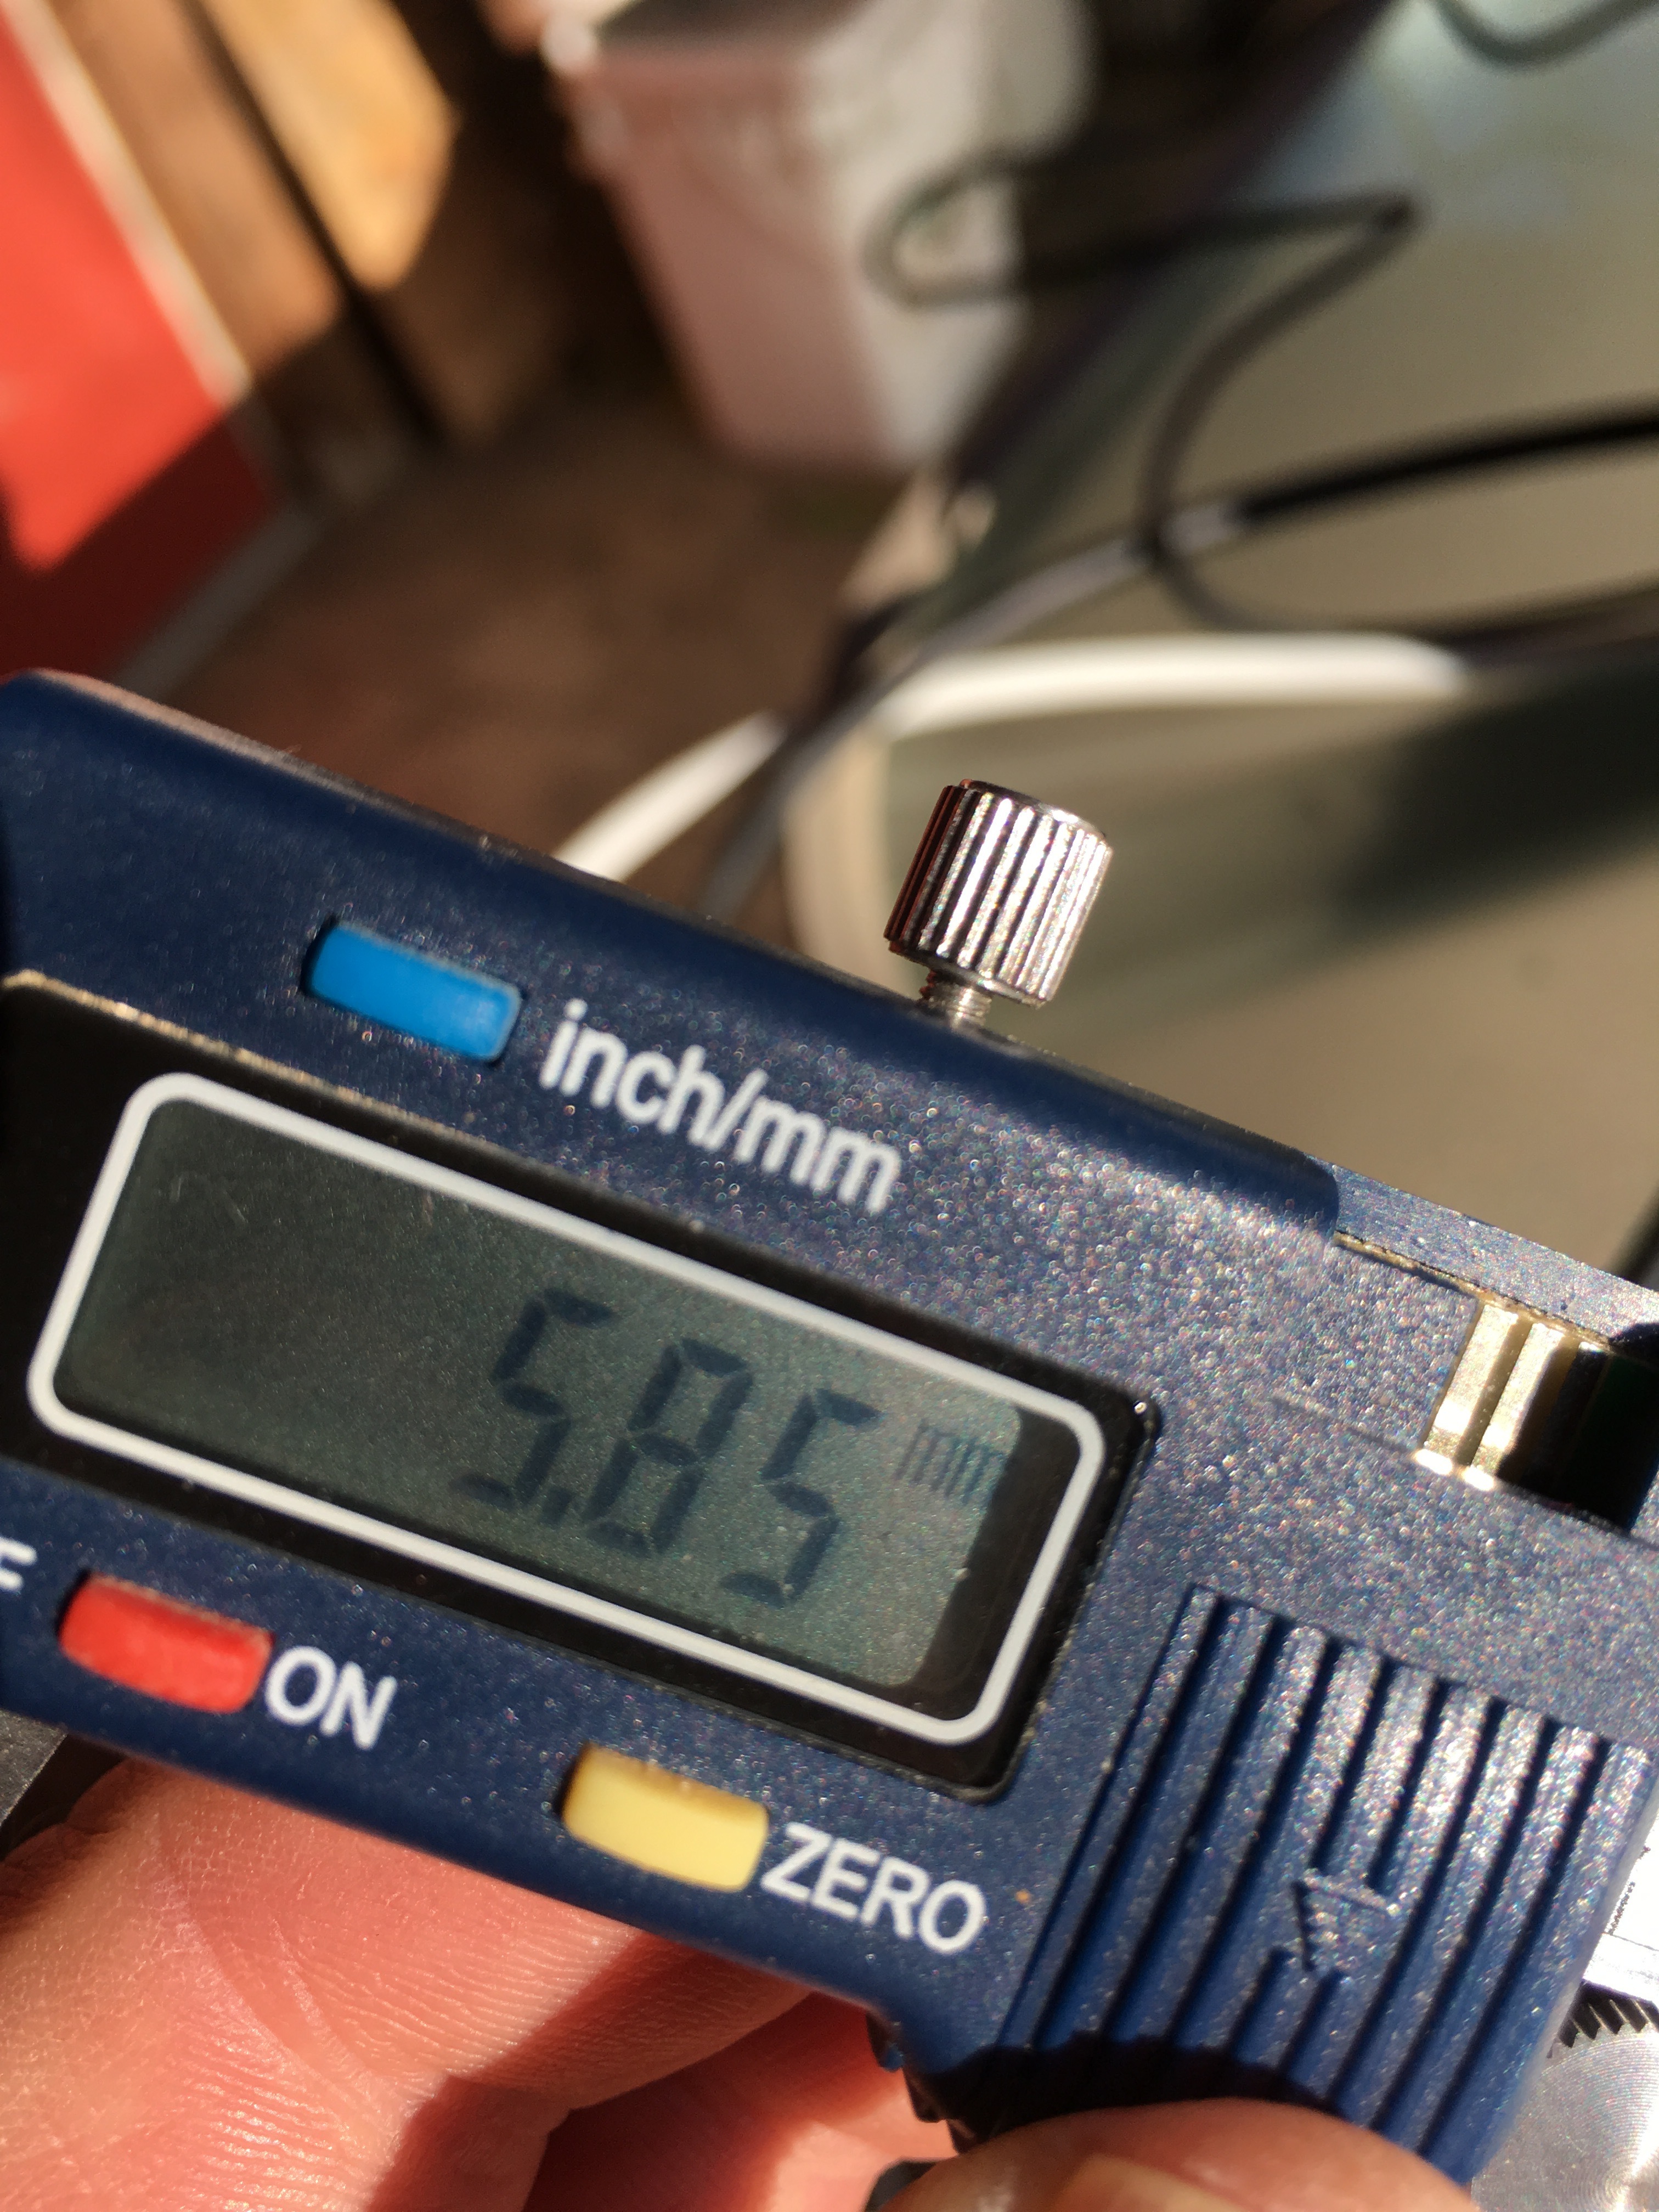
5.85mm is the depth of the cut. I had been ever-so hopeful of much less
Thank goodness my bacon is turning out.
Scott
Recommend Myers workshop videos. A bit on the long end but do a good job covering most everything. I think he recently posted a link to number 4 in the series.
1 Like
OK so according to your settings in CC your depth of cut should be .1in so it translates into 2.54mm so you are getting a bit more than twice the depth.
While this may not have anything to do with your DOC, your cut settings may be a bit aggressive to start. Reduce your depth of pass to .9 and cut your plunge rate in half.
Have you checked your Z installation and ensure your belt is routed properly and that the tension is good? From the info above, the depth does not look like a CC setting issue.
Another good source of CC with Shapeoko videos have been produced by John Clark on YouTube. He has a number of easy projects you can follow along. This way you can check your results with the settings provided.
2 Likes
@Heykid41 How are you setting your Z zero?
Also, do you have enough clearance for your retract height? Basically, is the router smashing into the top of the Z before it plunge to start the carve?
4 Likes
I had that happen when trying to cut a clock from the free Vectric plan of the month (whatever it’s called). The Z setting was.8 or something…I guess because the designer used something other than an XXL? Anyway, my machine went all gangsta on me. Slammed the Z carriage against the top and commenced to dig the most perfect 3" circle into my freshly made wasteboard! It cut all the way down to one of the T-Nuts. Fortunately I was able to stop it before it cut all the way down to the factory wasteboard. Phew!!
Thanks for your helpful suggestions, gang. I’m going to try again this afternoon. I’m mystified but it’s GOING to all come together… eventually.
I think (I DO!) it’s back to the beginning… there is stuff like plunge rate that I apparently need to do some book-learning on… stay tuned.
Speaking from experience… As is swearing a lot at the machine I find that 99% of the time the error is because of me and not it. It has taken me months to get to a level now where I am able to understand when something goes wrong what the cause was, so my best advice for you is the same that someone else on this forum said to me. Your not a real cncer until you either try and drill to the earth’s core or launch an item off the SO3 into low orbit  relax, enjoy. And most importantly learn to laugh at the problems you and your SO3 will get into. If your based in the UK I don’t mind having a chat with you share files run tests to help you out. To be honest don’t mind outside UK just need to work out time zones etc
Chin up you will nail it!!!
Jon
2 Likes
Thanks, lad. I’m in Canada and today, it’s bloody cold so not even thinking about playing. I appreciate your advice and concur… this is me screwing up… the pissy part is the why part. It will come together for sure. I’m just going to hunker down with my cold, wet pooches (post walking) beside me and start to dig into this further.
Sigh.
What wood is that and bit you are using., do you have the #201 endmill? If you do I will create a test file for you to try and see if you get the same problem, then we will soon get your confidence and machine up and running 
I’ve kept away from this discussion, but I will suggest that EVERYONE that uses a CNC machine learn enough G-code to read the basic information from an automatically generated program, and check the program EVERY time.
Key are:
What are the units? [G20/G21]
What is the spindle speed? [S command]
What is the feed rate (cutting rate)? [F command]
Positioning commands {X, Y, and Z]
Spindle start and stop, and any other relevant machine commands: [ the M commands]
Note the max and min for all of these.
Also be sure that when zeroing you are zeroing to the proper surface and that (if there is not automatic tool length measurement) the tool is not adjusted after setting. Really. Not that I have ever messed that up…
Oh ya… wear safety glasses, and maybe add a face shield if the machine doesn’t have a shield. It really sucks having your cornea sewn back on (trust me… it REALLY sucks)
2 Likes
I too am guilty of PEBKAS
Problem Exists Between Keyboard And Seat
2 Likes
I have had Z axis issues that drove me insane that turned out to be issues with drive train from the Stepper Motor to the wood.
Namely, belt tightness, tightness of the set screws on belt gear on the stepper motor shaft, tightness of the bit in the router–I think WillAdams has a pretty thorough 5-part list of all the things you need to check when the Z axis goes wonky. I was about ready to give up until I figured out it was the set screws on the belt gear.
I get it… and relying on something automatically created can lead to Problems… but THIS… crazymaking.
Even a test program so kindly sent tried to cut through the earth’s core.
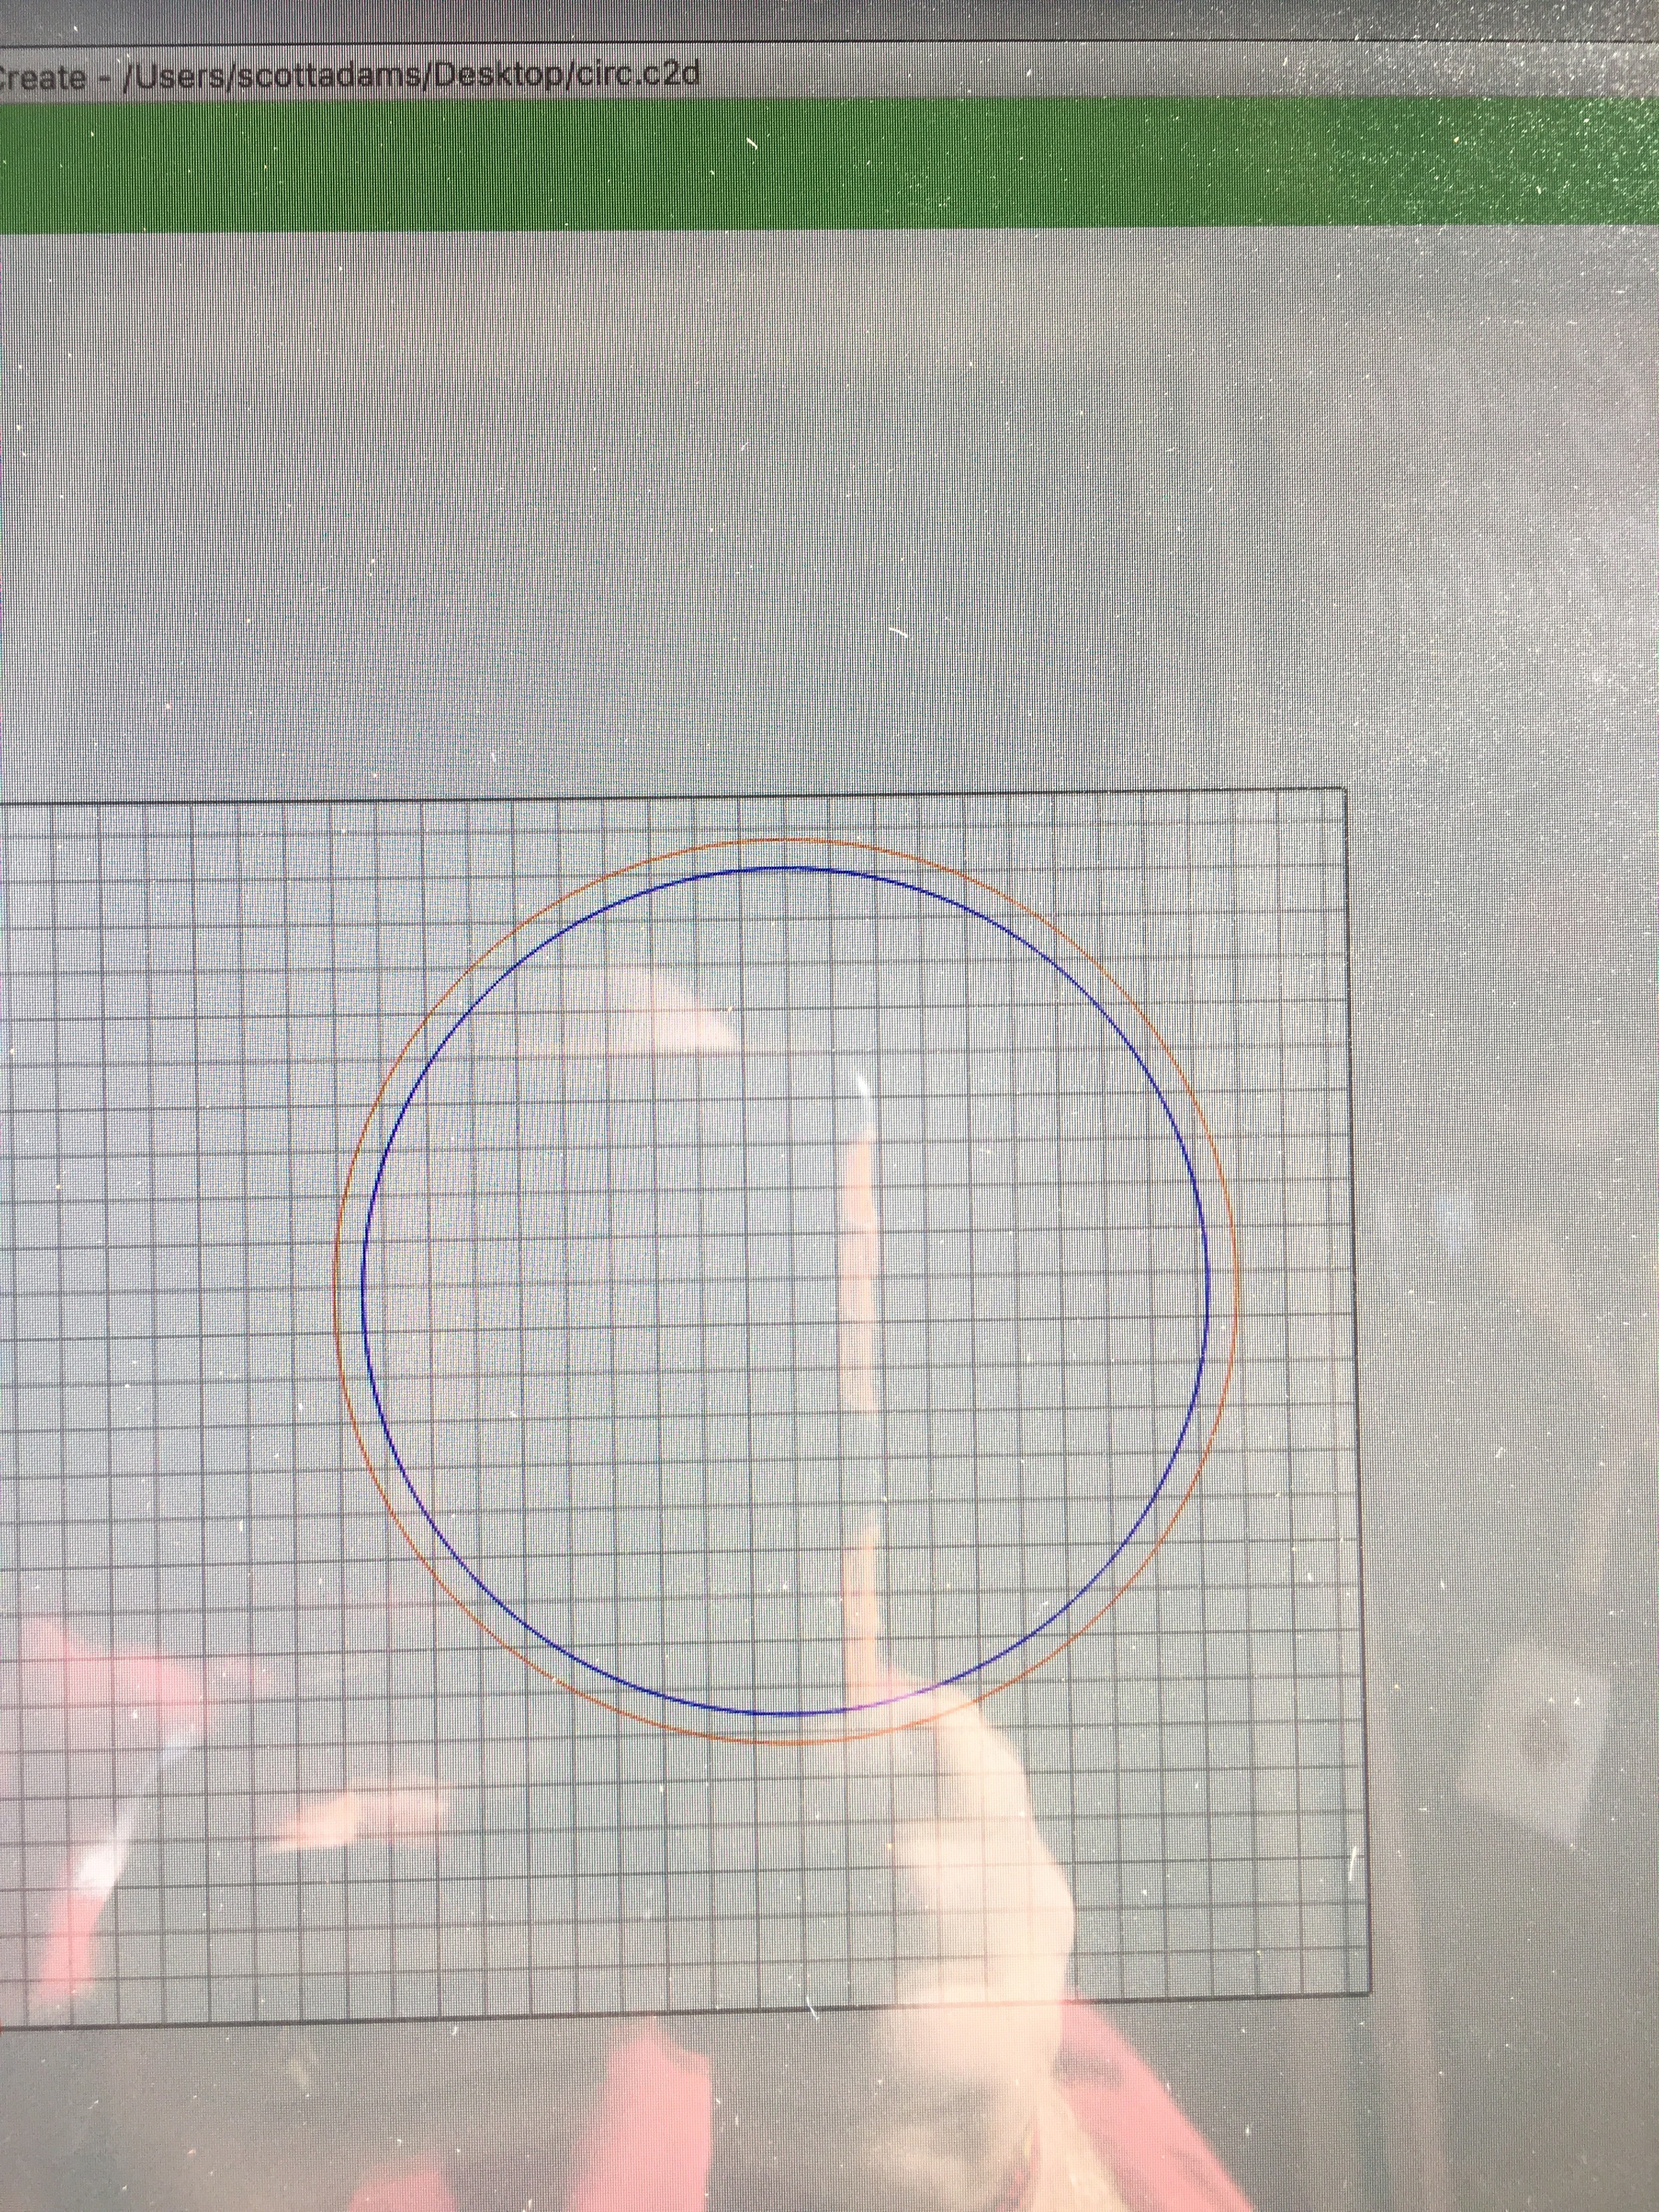
I again, went to the beginning with a simple vector (circle)… the mock up looked exactly as I hoped… and when enerything was set… again… diving like a Portuguese soccer player.
Tomorrow… tomorrow I’ll get it right.
Ran some tests today after receiving some excellent help from Sherpa. I feel like Dr. Frankenstein… “it lives!” I monkeyed around with a v-bit with some good results… not great, but I was using shitty wood I had hanging around… and LOVIN’ IT! I don’t profess to know much, but I know I like playing with this machine!
3 Likes
ok so in order for others to learn from your experiences, what was the problem with your setup? It may prevent other newbies from doing the same thing.
1 Like