I’ve been doing research on curing acrylic on my shapeoko and I’m curious what suggestions you may have. What bit should I get if I’m wanting to cut all the way through 1/4 inch acrylic. What speeds and feeds so that I dont melt the acrylic. Thanks!
Here’s the standard SO3 speeds and feeds sheet for the 1/4” bit that C3D sells:
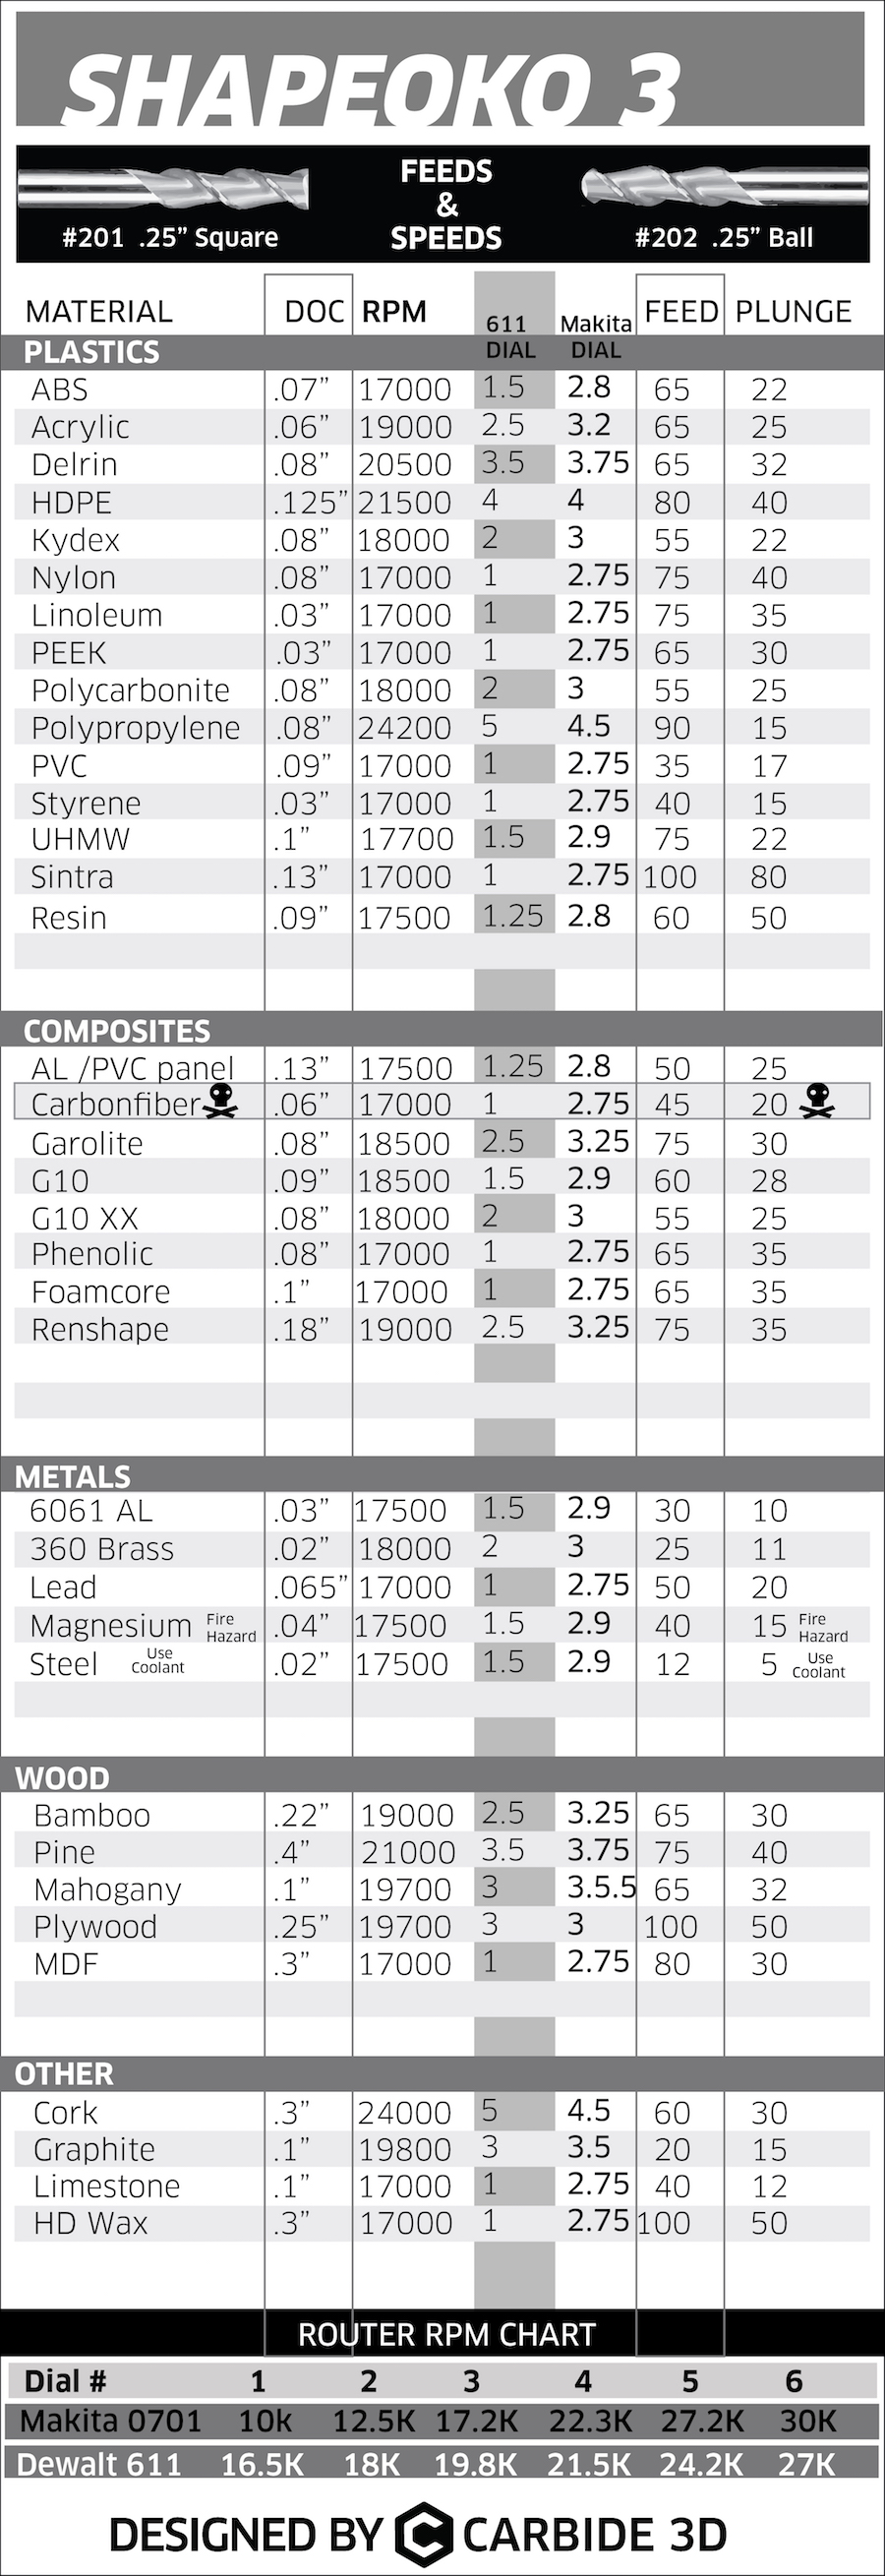
I’ve used these and they work. I’m sure there are better endmills and more aggressive f/s, but this is somewhere to start. I did a bit with a smaller 1/16” endmill, but I messed with it a lot to get right (broke a few end mills too).
Dan
In addition, you may be interested in that section of the ebook, which derives from those chipload guidelines for plastics.
Recipe for success in plastics as far as I am concerned = a sharp (fresh/new) single flute cutter (for optimal chip evacuation), and feeding fast (to avoid melting). The specifics depend on the size of the endmill you will be using.
If you can get your hands on a 1/4" single flute cutter, I would use something like:
- 18.000RPM
- target chipload of 0.002" => feedrate of 36ipm
- plunge fast : 20 to 25 ipm (if you don’t plunge fast enough, you are likely to get stringy melted plastic wrapping around your endmill upon plunging)
- depth per pass around 0.1" to 0.125" (40% to 50% of the endmill diameter)
You can also check the recommended feeds and speeds in the latest version of Carbide Create for Acrylic, e.g. for a #201 cutter (3-flute 1/4" endmill) they recommend: 70ipm at 10.000RPM (that’s a chipload of 0.0023"), and a more conservative depth per pass of 0.045".
5 Likes
Also see:
esp.
Nomad 883 Pro:

Shapeoko:

2 Likes
melting is your biggest issue indeed… few basic things I learned along the way
- single flute cutter, I used on “O” cutter which worked ok (https://smile.amazon.com/gp/product/B001J9K5XI is what I used)
- router to lowest speed setting
- pretty high IPM for what you’re used to (better to reduce depth and go faster, than deeper and slower)
- clean out chips with a vacuum/dust collector aggressively. while cutting, bad idea to have chips still there from a previous pass… they either block newer chips from evacuating or just melt themselves onto your endmill
- in your CAM tool, set your retract height a bit larger than you’re used to; this is a bit of extra time that lets things cool down just a bit more
if you can, rather than a single outside contour cut, make a pocket roughly 2x the diameter of the cutter (if you cut close to the edge of the material, just go to the edge). Takes a bit longer obviously but this helps with getting the chips away easier… a narrow channel just the size of the cutter is not friendly to this and the cutter “rubs” on both sides creating more heat
4 Likes
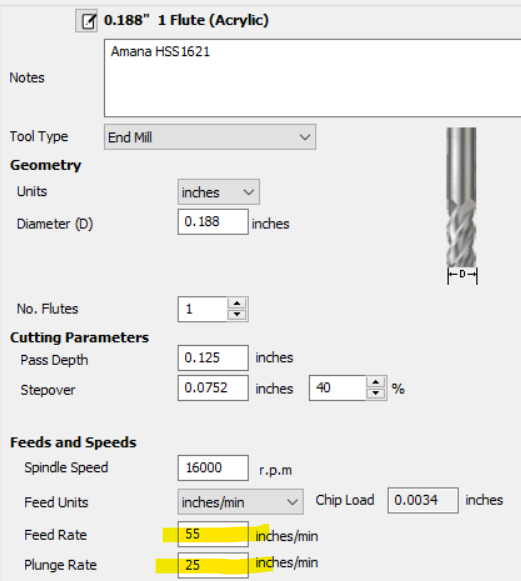
I cut tons of acrylic. I hold it with tape & sometimes tabs. I almost exclusively use an Amana HSS1621 bit (HSS, 3/16" cut, single flute). I cut at 55IPM - 1/8" thick & under in one pass, 3/16" and 1/4" in two passes. I use the lowest speed setting on the Dewalt router (at work & can’t remember what that is). Any decent dust collector will work well to clear the chips (I use the Suckit).
If I can answer any specific questions, let me know & I will…
(corrected above… I cut acrylic at 55IPM, not 38IPM.)
6 Likes
Amana O flute bits are the only way to go… If you can afford it go for the Spektra, they stay sharp even when the monkey making the tool path is dull…
4 Likes
Do you recommend a certain endmill? I’ve heard o flutes are good but i’m clueless. thanks for all if this info!
Ok Perfect! I’m going to go look at that now! Is there one that’s better than the other?
I’m just seeing your response, thanks so much! Ok so what’s the benefit to a single flute over using an O flute?I’ve gotten some recommendations for both. so 55 IPM and then what about the other settings in Carbide? Plungerate, RPM?
do i need to mess with any of those? sorry for all of the questions, i’m a bit nervous to try it but excited
Thank you so much! i’m going to give this a try! If i’m cutting 1/4 " cast acrylic with that bit what would be your recommended speeds and feeds to enter into carbide?
Lowest rpm on your router
Pretty low plunge rate… like 10ipm
More importantly pretty low depth per pass at high federate like 55
You could for example look at the Amana packs in the Carbide3D store, they have this for example:
Single-flute and “O-flute” are the same thing, and they are great for cutting plastics because a) they provide excellent chip evacuation, so less chances of clogging up the flutes and melting stuff, and b) due to their having only one flute, they allow to use relatively low RPMs while not having to use a very very large feedrate that the machine.
For feeds and speeds and plungerate, you already have values recommended in this thread, but in any case when you don’t know where to start, your best best is to just follow Carbide Create’s recommendation. Install the latest version and you will get recommendations for a number of material/endmill combinations, for example for acrylic:
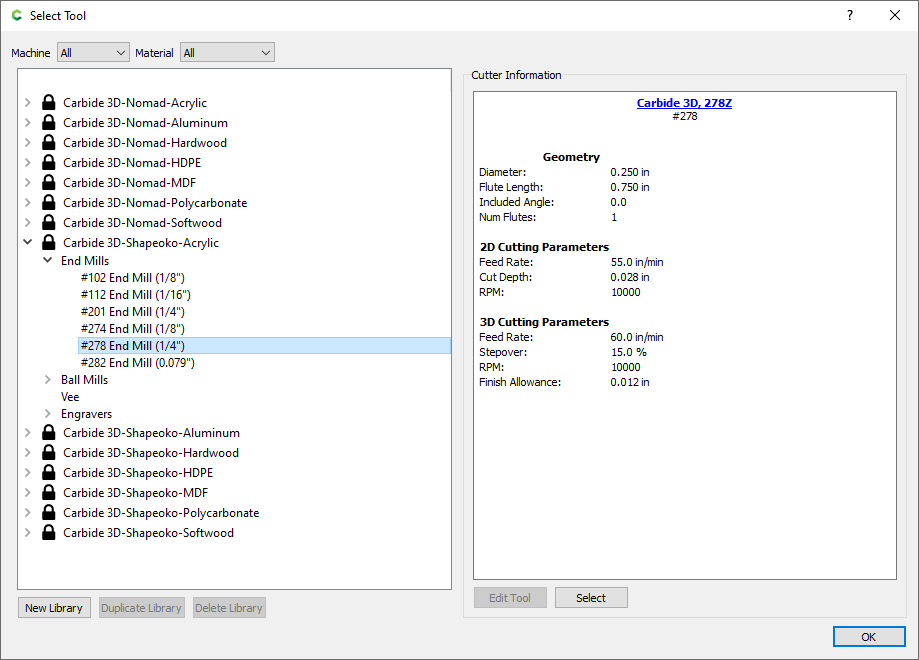
Note that if you have a Carbide Compact router, the min speed is around 11.000RPM, so you would need to adjust feedrate accordingly (in the example above, if feedrate is recommended at 55ipm for 10.000RPM, the required feedrate at 11.000RPM would be 11.000/10.000 x 55 = 60.5ipm). Same if you have a Dewalt router, its min speed is around 16500RPM, so you would pick 16.500/10.000 x 55 = 90.75ipm?
From my experience plunging “too slow” in plastics can result in a few strings of plastic wrapping around the endmill, which can then be a problem later during the cut. If you get those (hard to miss), you may want to try and plunging faster (so that the material has no time to heat up and melt while plunging)
2 Likes
If I were you, rather than buying a bit ‘kit’ to start with, buy 2 or 3 of these inexpensive bits & get comfortable using the machine:
https://www.toolstoday.com/v-13807-hss1621.html
Note again that this is the bit that I cut all of my acrylic with.
My settings are below. I plunge at 25IPM. I cut cast & extruded acrylic and polycarbonate at these settings. No two setups are exactly the same but I feel pretty confident that these will work for you out of the gate.
3 Likes
Really? 16,000 rpm? Perhaps you missed specifying that?
I have marked all of your informed posts. +1
totally. I did waaay too slow originally and had major issues
This is the design I made at the time:

The C2D file I used for the cutout is here: catplate acrylic cutout.c2d (37.9 KB)
If I would have to cut this again, the F&S in that c2d file are FAR too slow, and bordering the melting point all the time, and I’d really increase them. I would also use a pocketing operation instead of a straight cut for the cutout operation, to help chip evacuation
1 Like
Yes to 16000 RPM. That’s the lowest the Dewalt router will cut at and it cuts well.
After trial and error I ended up with a base chip load setting in my F360 Acrylic Tool Library of .002 with a .25 Single Flute. LMT Onsrud is generally the supplier product manufactures will suggest. I have the cutters from Carbide too, they all work fine. At 18k rpm, this agrees with Juliens 36ipm suggestion. This is my base, and while running the program, I typically feed override in the positive. I am currently running a Makita, and while I have access to 10-11k rpm, I like to run 18k(#3) or faster.
As far as plunge and depth of cut - This depends on your CAM software. If you’re using Carbide Create like I was when I first started figuring things out, you will be limited. Julien is likely suggesting a faster plunge based on (I believe) his use of Fusion360. Fusion will allow for Ramping and Helical entries. Carbide will stab the mill straight down into the rigid material, and it will also do so at exactly the same position… over and over. The solution in Carbide Create is to reduce DOC as you reduce plunge feed rate. This allows the cutter to slowly smash its way in, while also reducing the time your cutter is focusing heat on that particular point. At least, that’s my inexperienced guess/solution. Problem, this is, in my current opinion, where chip clearing issues seem to creep in for most people. The “chips” are more like heavy dust at these shallows DOC’s. The deeper I can get my cutter into the acrylic, the less issues I have with chip clearing. I use vacuum extraction, and have recently added air blast. The latter to use when testing some shallow doc operations.
I primarily fabricate in acrylic. I am happy to share whatever I know, but my CNC/CAM knowledge is pretty limited.
2 Likes
Actually, I first noticed this back when using CC only: I was using (too) conservative plungerates, and sometimes had a few strings of plastic accumulating up the endmill shaft, and ended up noticing that they formed during the (slow) plunge: heat accumulates under the tip of the endmill, plastic is near-melting, and these strings happen. I then increased my plunge rate, and never had those again. YMMV, this was just my experimental finding.
Totally agree that chip clearing is key in any case, so yay to 0-flute cutters (and a good dust shoe or air blast)
2 Likes
This topic was automatically closed after 30 days. New replies are no longer allowed.