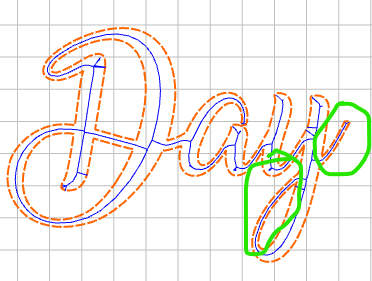
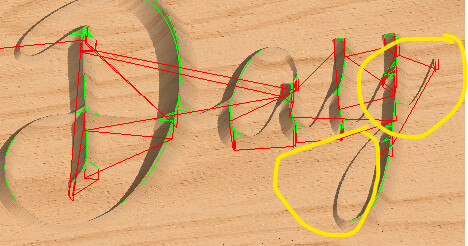
Hello all, I am new to this community and eagerly trying to learn how to use my CNC. I have coma cross a situation on two occasions now that I don’t understand. I am using VCarve to carve small letters. When I assign the toolpath with a 90 or 60 degree bit, I can see that Carbide Create will carve the letters. However, when I start the simulation, the toolpath does not exist where the letters are very thin. I will include images below. My assumption is that the carving area is to thin for the bit, but I would think it would work with vee bits. Any advice is appreciated.
Looks like the path is being cut — just the endmill isn’t punging very deeply.
Try a more acute V endmill — if your stock is thin you may need to use an Advanced V carving toolpath.
Hi Will, I suspected the plunge of the bit but I don’t know how to control that. I set the max depth from 1/8 to 1/4 of an inch but it made no difference. I get the same results form both the 90 and the 60 V bits. My stock is .075.
For a V carving, how deep the tool will cut is determined by the width of a given section and the angle of the V tool.
If the design can’t be changed, use a more acute V endmill.
If you’re talking about the green toolpath display, sometimes it gets buried in the stock.
Uncheck “Show Simulation” and see if it’s there. The simulation is showing the material cut in those areas.
1 Like
I changed this to a 30 degree v bit and I am now seeing the cuts in the simulation as expected. I guess I a will have to learn/understand the ratio of what the bit can cut and how small and detailed the image. Thanks for your help.
Some old notes on this:
- Number of Passes — Size guidelines for adding a radius at the tip (may vary based on bit angle and material):
-
<10mm — one pass
-
10–20mm — ~0.5mm
-
20–35mm — ~0.75mm
-
>35mm — 1mm radius
-
The tradeoff is feature size vs. feature depth — an acute angle allows one to cut a smaller, finer feature w/ more depth, while a more obtuse angle allows one to cut a larger area w/ a single pass and while having a single bottom, as opposed to a ragged set of scallops.
- Recommended bit angle for a given text size:
- <1" 45–60°
- 1–2" 60°
- 2–4" 60–90°
- 4–6" 90°
- 6–10" 90 to 120°
- >than 10" 120° or greater
- Recommended bit angle for a given text size:
-
Material guidelines:
- hardest timber available
- use conservative plunge and feedrates even when doing more than one pass
- avoid overlapping V-cuts — tends to cause splintering at the top edge, leave a ~0.5–1mm gap at the top
- use a cutter w/ centered/symmetrical geometry
-
Formula for calculating the effective diameter of a V-bit at a given depth in Excel this is:
=TAN(RADIANS(B3)) * B4 * 2
-
Where B3 is the angle in degrees and B4 is the depth in inches
Site to calculate offsets/depths: Angular Size Calculator [22]
Excellent image noting width considerations:
3 Likes
Simple Vcarve tool paths cut down the center of an object and plunges until both sides of the object are cut. With 90/60 degree vee bits and small objects you might not get very deep before the bit is touching both sides of the object. When doing a simple vcarve always use bottom of material as maximum depth. If you limit depth on a simple vcarve the carve will have funny patterns.
Try ad advanced vcarve if you need to limit depth. As you found out a steeper vee bit will cut deeper on a simple vcarve but during advanced vcarve a regular end mill goes down to the specified depth and then the vee bit just goes around the perimeter.
I use my 15 degree vee bit for almost everything. I seldom use a 90/60 anymore unless the carving is quite big. Like a 5" letter or number but for a .5" letter/number I use the 15 degree vee bit. The finer the line the steeper the vee bit has to be to get any carving in material.
One caution about simple vcarving and thin material. Using the bottom of material as maximum cutting depth can go all the way through. So be sure to check the simulation and if you see white at the bottom you are plunging through your material. In that case use advanced vcarve to keep from punching through your thin material.
1 Like
This all makes sense. I appreciate and thank for sharing your knowledge.
This topic was automatically closed 30 days after the last reply. New replies are no longer allowed.