@PaulAlfaro That is odd. On the previous version, I was losing .06-.15mm each time I ran the macro. I’ve run the new one a couple dozen times, with the same tool and tool changes, and if there are inconsistencies they’re too small for me to measure.
@neilferreri yeah I’m hoping it was just late and I was doing something wrong.
I’'ll try again this evening.
Nomad repeatability testing
@PaulAlfaro I’m in no way doubting your results. I had some unexplained results with the previous version where you seemed to be getting solid accuracy. There’s nothing in the macros, gcode-wise, that would explain the differences. My last resort is guessing that it has something to do with the way grbl reports and/or the interaction between grbl and cncjs.
I know for testing it’s convenient, but what do you think about it going back to work zero (safe Z) rather than previous location?
I’m up for testing anything if it pushes this forward.
I just realized I should also see how the probe accuracy performs in Carbide Motion as well.
Since I have everything still setup it wouldn’t hurt.
I have ran @neilferreri macro several times and I’m getting between 0.03-0.09 inconsistencies with and without changing tools. I think some of my deviation stems from backlash, right?. I tried zeroing and then homing (without running macro) and sometimes I get slight inconsistencies. This (to me) proves that there is something mechanical happening. I use a 1-2-3 block until I can fit it under the endmill and it slightly touches the surface.
Is this the newest macro in the zip file?
Assuming millimeters?
Better, worse, or the same as Carbide Motion?
Yes. Latest macro you posted. Yes, millimeters. Did not test CM this time. Last time I did, with another macro (can’t remember which) it was the same.
OK OK OK
The last macro you posted @neilferreri “Precision Tool Change Macro” was repeating within 0.0005"/0.01mm per my setup on CNCjs.
I repeated without a tool change and the dial barely fluttered (would need a higher resolution). With a tool change I was seeing at worst a full tick (0.0005"/0.01mm).
I’m not sure what changed between today and yesterday in regards to the tool changes, but it seems to be working great currently. I’m strongly thinking the hardwares at fault in the inconsistencies at a precision scale.
I also tested Carbide Motion probe and it was seeing the same amount of resolution. I did find it funny that in inches you can only go down to 0.001" (0.025mm) increments whereas in metric you can go down to 0.01mm (0.0003").
Tests for Carbide Create was on my decent spec Windows laptop and CNCjs was on the Raspberry Pi 3 B+. Repeated each test at least 3 separate times to ensure it wasn’t a fluke
One consideration is the machine can only hold full and 1/8th step positions — the variation might be caused by how closely the metal rod and its spring are aligning with the nearest position — it is possible that at certain temperatures this is more/less repeatable.
The numbers you’re getting exactly match the specified mechanical resolution:
Mechanical Resolution .0005 in
(from: https://carbide3d.com/nomad/specs/ )
and are better than the expected repeatability/accuracy
I too have pulled in Neil’s “Precision Tool Change Macro” from the latest revision and can verify that it works perfectly. I removed the first M0 as it’s intended to give the operator a chance to attach probe hardware to the spindle and/or work, and updated the probe location to the Nomad’s tool length probe coordinates. No other elaboration was necessary.
I ran a two-sided job last night with four tool changes, and there were no consistency issues. Thank you for the exceptional work, Neil!
@koolatron
Did you get a chance to try the version I posted here?
It should simplify jobs with multiple tool changes. Basically, it has you probe your initial tool and then any new tools compare off the initial. Just make sure you’re running CNCjs 1.9.18 or newer.
"Automatic" Tool Length Offset
Will do tonight. This looks great!
Bonus points if you make a video!
OK, I gave the single-probe macros a shot tonight. They work great as well. I also shot some video which I’ll clean up and put on youtube perhaps this weekend with some commentary.
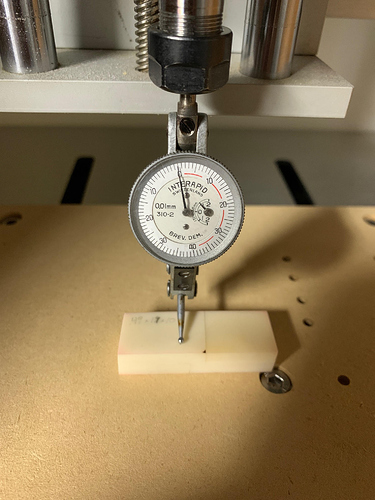
To test this, I mounted a 0.01mm dial test indicator in the collet, zeroed the indicator on a convenient piece of flat-enough stock, then ran the initial tool macro. Then I returned to work zero to verify that the indicator and work hadn’t moved. Following that I ran the new tool macro and did the same thing. No change to the indicator reading.
I have a 0.002mm indicator that I can test this with too, but since the darn thing is fairly fiddly I decided I’d start with the 0.01mm.
Here’s the indicator at work zero after running the tool change macro. Feels repeatable enough for me.
This topic was automatically closed 30 days after the last reply. New replies are no longer allowed.
