Shapeoko Pro Bit Setter Issue

I totally agree. Simple mistakes but they sometimes take hours to find the issue. Including back and forth with the support team. Thank goodness for everyone posting their issues here. That’s a big help.

1 Like

I’m having same problem, could you post more detail on what you did to fix it?

There’s a little tab on the connector so that you can only plug it in one way. I just filed off the little tab and reversed the connector and plugged it back in the opposite way. This is the connector behind the bitsetter plate. Or you could cut the outside wires and reverse them. The middle one is fine

Look at this picture. The blue and black wires should match up on both sides of the connector

c22105d810476c5e410c32741717a34a305d6560_2_375x500

My wire harness came wired wrong. With the two outer wires swapped on one end. Plus 2/3 of the wires didn’t have conductivity from one end to the other.
My bitsetter still isn’t working right with the cable fixed. Signal only outputs 0-0.6V.

Failure shows up the same as above where probing cycle fails.

Open up carbide motion.
Click on connect to cutter
Click on settings
Click on machine
Maually push the bit setter button
On the bottom of the screen where it says “No Active Pins”
It should change to Probe when you press the button
If it doesnt go to Options and make sure bit setter is enabled

Again, its pretty sad that folks are still having wiring issues over a year since this machine first came out. Obvously there is no quality control process in place for testing cables.

Once you confirm the bit setter button is working. You will have to configure the bit setter. Here is the procedure.

Bitsetter Instructions.pdf (344.6 KB)

I’ve built 1000’s of cables in my career, and I’ve never built one that I didn’t check for proper wiring, opens and shorts. I built simple test boxes to quickly QC multi-wire cables. It just makes sense.

Not on the typical proximity switches.

2 Likes

Sorry you’re going through this - I had this same problem on my pro xxl.
I contacted support and they rushed me out a replacement bitsetter snd extension cable, no charge of course. Replaced and all good. Reccomend contacting them if you haven’t already.

3 Likes

Hi, I just finished solving this exact problem with the help of this forum. In summary, the black and blue wires from the bit setter are reversed in the (molex - little black plug) - see picture attached in baricl post above.

I couldn’t remove them to correct it at the plug, so I switched the blue and black wires in the plug at the control board. See picture of the stock or normal:
image

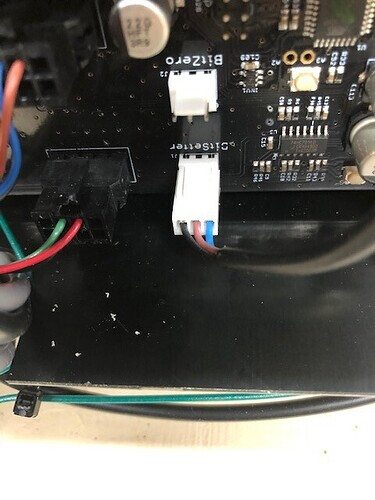
Mine now reads from left to right blue, brown, black. The pins are easy to remove from the white plug by pressing a small screw driver on each shinny part on the back of the plug.

After I did this, the red light on the bit setter was off (before I fixed this it was on all the time) and the bit setting feature works like a charm.

Original post with more details:

There are some other options you can try including reversing the bit setter plug (requires a bit of modification as the plug is directional).

Good luck!

1 Like

hello all, i had the same issue and just turned the plugs around to get me going. they sent me new cables really fast.

1 Like

The bit setter is red at all times but I am having the same issue as above. When pressed it will go green.

BitSetter or BitZero? Please post a photo of the unit in question.

Hey Will. The bit setter function was not working in regards to going down onto the setter (z axis). What I noticed and figured out is that the bit zero was also plugged in and red (the magnet was touching the plate). Once I moved the magnet away from the bit zero the bit setter would work. I assume the signals were crossing.

One of the first times I used my machine I set the position with the bitzero, put that down, and let it do its bitsetter cycle, and it failed because I did the same thing…left the little magnet touching the probe. I think it looks for the same signal or something when it does a bitzero cycle or a bitsetter cycle.

1 Like

The BitSetter and BitZero are interconnected. They both use the probe function. So as many before have found out the magnet on the BitZero can cause problems if it is not secured where it is not grounded. The newer BitZero’s have a magnet. The older BitZero v1 had a clip that a lot of people replaced with a magnet (me included.

The first step in troubleshooting the BitZero and/or BitSetter is to check the magnet/clip to see if it is grounded. Being grounded makes the probe cycles fail.

Since you have a CNC machine make a pocket for the BitZero to sit in and a place to secure the magnet.

1 Like

I have the same issue, my connector is wired exactly the same, my machine worked great for a month then I couldn’t make anything work. It would drive itself into the bit setter, sometimes miss it all togeather, would start a job and it would go off and just bore itself into the project, lots of expensive scrap, many calls to 3d and they admitted they have issuies and the guy I talked with said he don’t use it on his machine and told me to disable mine, I did, set my Z manual, no more issues. I know, have this nice feature , cost money, and don’t use it.
I have a 3d pro XXL.
Good Luck

When used correctly, the BitSetter should work to the precision/accuracy of the switches and the steps/mm of the Z-axis — this should be more accurate than the thickness of a sheet of paper, and more consistent than doing it by hand:

Anyone who has difficulty with the BitSetter should send us:

  • .c2d file
  • step-by-step notes on how you are securing your stock, setting zero relative to it, and managing all tool changes
  • a photo showing an attempt at cutting still in place on the machine

and we will do our best to review things and work out what went wrong and how to handle things.

Folks have been using BitSetters since we first launched the Nomad, and it’s pretty much the favorite accessory for everyone in the company (save for when doing production batch jobs w/ a single tool when folks disable it).

1 Like