So trying to make money I attempted a production run with 6 of the same medallions that I copied and pasted after getting that first one right. For some reason all of them came out with a large error to the point I can’t sell them.
Not a huge loss but I am not sure why this happened? Can anyone suggest where to start troubleshooting this?
I realize this has a lot of ways to have this go wrong. Here is a pic of the finished product
I have the surface of the table as my z axis
I have a surface planer 3hp and I use a depth stop to get the same .37” each time but I did notice just now that the stock measurements is .38 from the blank from the pendants in question. Is that enough difference to cause this?
Also I had set my glue gap to .1” in hopes to not squeeze the glue from the inlay to the sides of the pendant. The two pieces inlay and pocket have no visible space between them.
If you’re going to scrap these anyways, I would try sanding/surfacing another 0.010" off the top to get it back to your planned 0.37" & see if that helps.
My inclination would be to see if the inlay parts bottomed out and to remove them and then see if removing more at the top of the inlay would help them fit.
did you make the inlay design in carbide create? if so there’s likely an optimization I can suggest to get a better fit (and I have some sw tools to analyze the existing fit) – better fit leads to cleaner and more reproducibly clean results
It appears the pockets in the brown substrate were not cut deeply enough such that the white material was “bottoming out” before a good fit was achieved.
I had about .01 different measurements on the thickness across the project. Though I think it’s possible to change the layout on the medallion so I can clamp the middle as well as both ends.
Also I’m not sure but, what would cause there to be no space in the bottom of my cut ?
The pic above shows no glue gap in the bottom of the cut? But in my file that is posted above which is the same file that cut the 6 medallion has a glue gap that I set to .07.
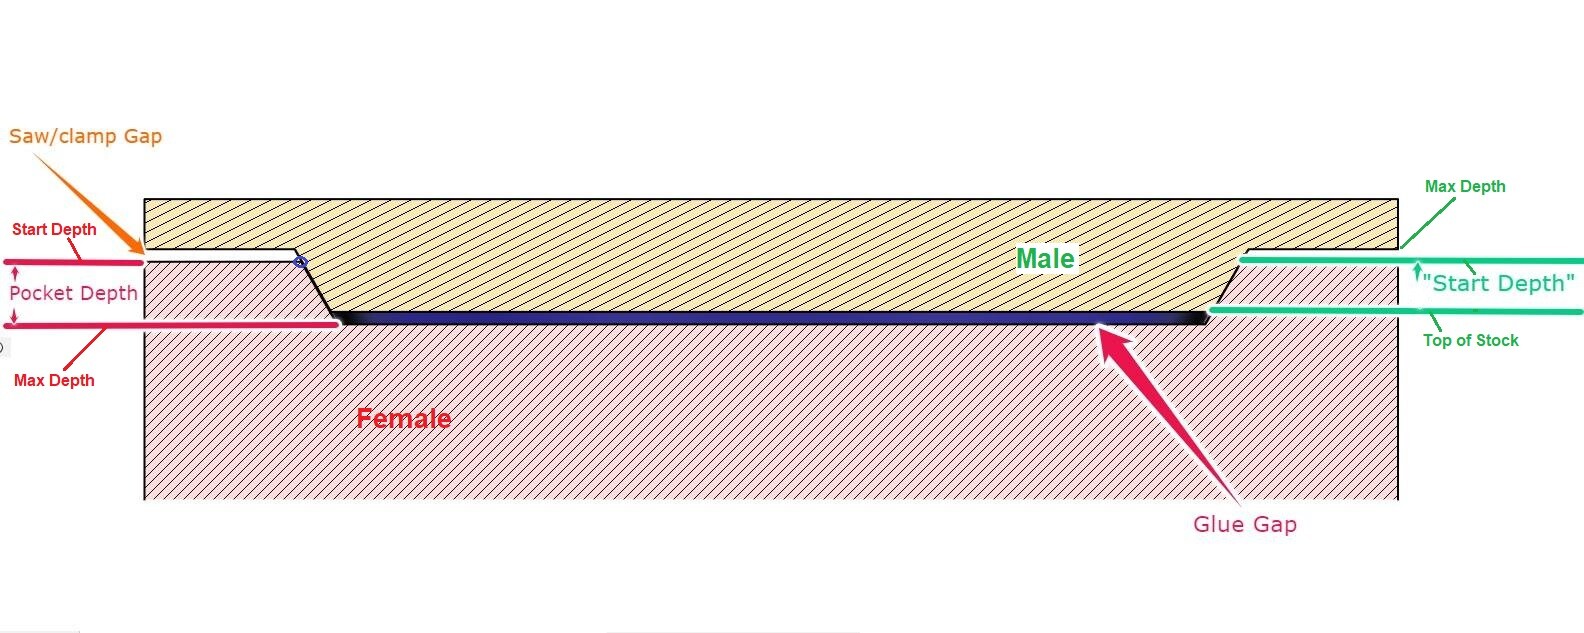
So the pocket is 0.100 deep, and the inlay is 0.100 deep with a 0.070 glue gap programmed.
And your inlay is bottoming out and still leaving a gap on the sides.
This tells us there is some kind of slop or runout, or the stock you cut the inlay from was thicker than planned. Did you measure the depth of the pocket, and the height of the inlay after cutting?
First suggestion is to surface the top of the stock with the machine to be sure you are working from the correct Z height.
If that doesn’t work, try a 0.100 glue gap, or turn off inlay mode altogether.
Update, I remade one pendant from the file with 6 and it came out perfect so I will rerun the production run but I’m going to add space to clamp the middle. Thanks again I do think the stock thickness Was the issue and possibly bad clamp.
One think bothers me. I thought setting the glue gap to .1 would also make the gap between the inlay and pocket .1 On the surface
So far I can’t get a good size gap there or one that I can see at all? Can you make a gap there to stop squeezing the glue to get on the sides of each medallion?
The “Glue Gap” in the inlay mode in CC is actually the “Saw Gap” on top. It’s on the bottom when the male part is flipped over for cutting. But yes, you could add the same amount to the max depth & glue gap to increase the gap on the top. With a 10° sides, you are going to get some wood compression when you clamp the inlay into the pocket. So try a test with a max depth of 0.150, and a glue gap of 0.100 & then adjust from there. Ideally you want a 0.010 - 0.020 glue gap, and a slightly larger saw gap.