SO3: Assembling the XXL (will update as the saga unfolds)

4/13/2016 I received my Shapeoko3 XXL today. I’ll keep this thread updated as I get further along.

I’ll preface this post by saying I’m a Nomad883 owner and other than some logistical issues I had a great experience there. I like that machine other than the very underpowered spindle. It lets me do things I couldn’t do before with 3D printing or a manual kneemill.

My first impresions of the Shapeoko3 XXL assembly process are mixed but I’m not that frustrated because startups like C3D have a rough life. They don’t have the resources or experience to control everything as well as more established companies. They do offer products that do a lot for not a lot of so its worth dealing with some growing pains. I don’t get perfect service from well established companies either so I’m not complaining.

Its a heavy box! It looked to be in good condition. I think the shipping info said 150 lbs or so. This thing is beefy compared to the previous versions.

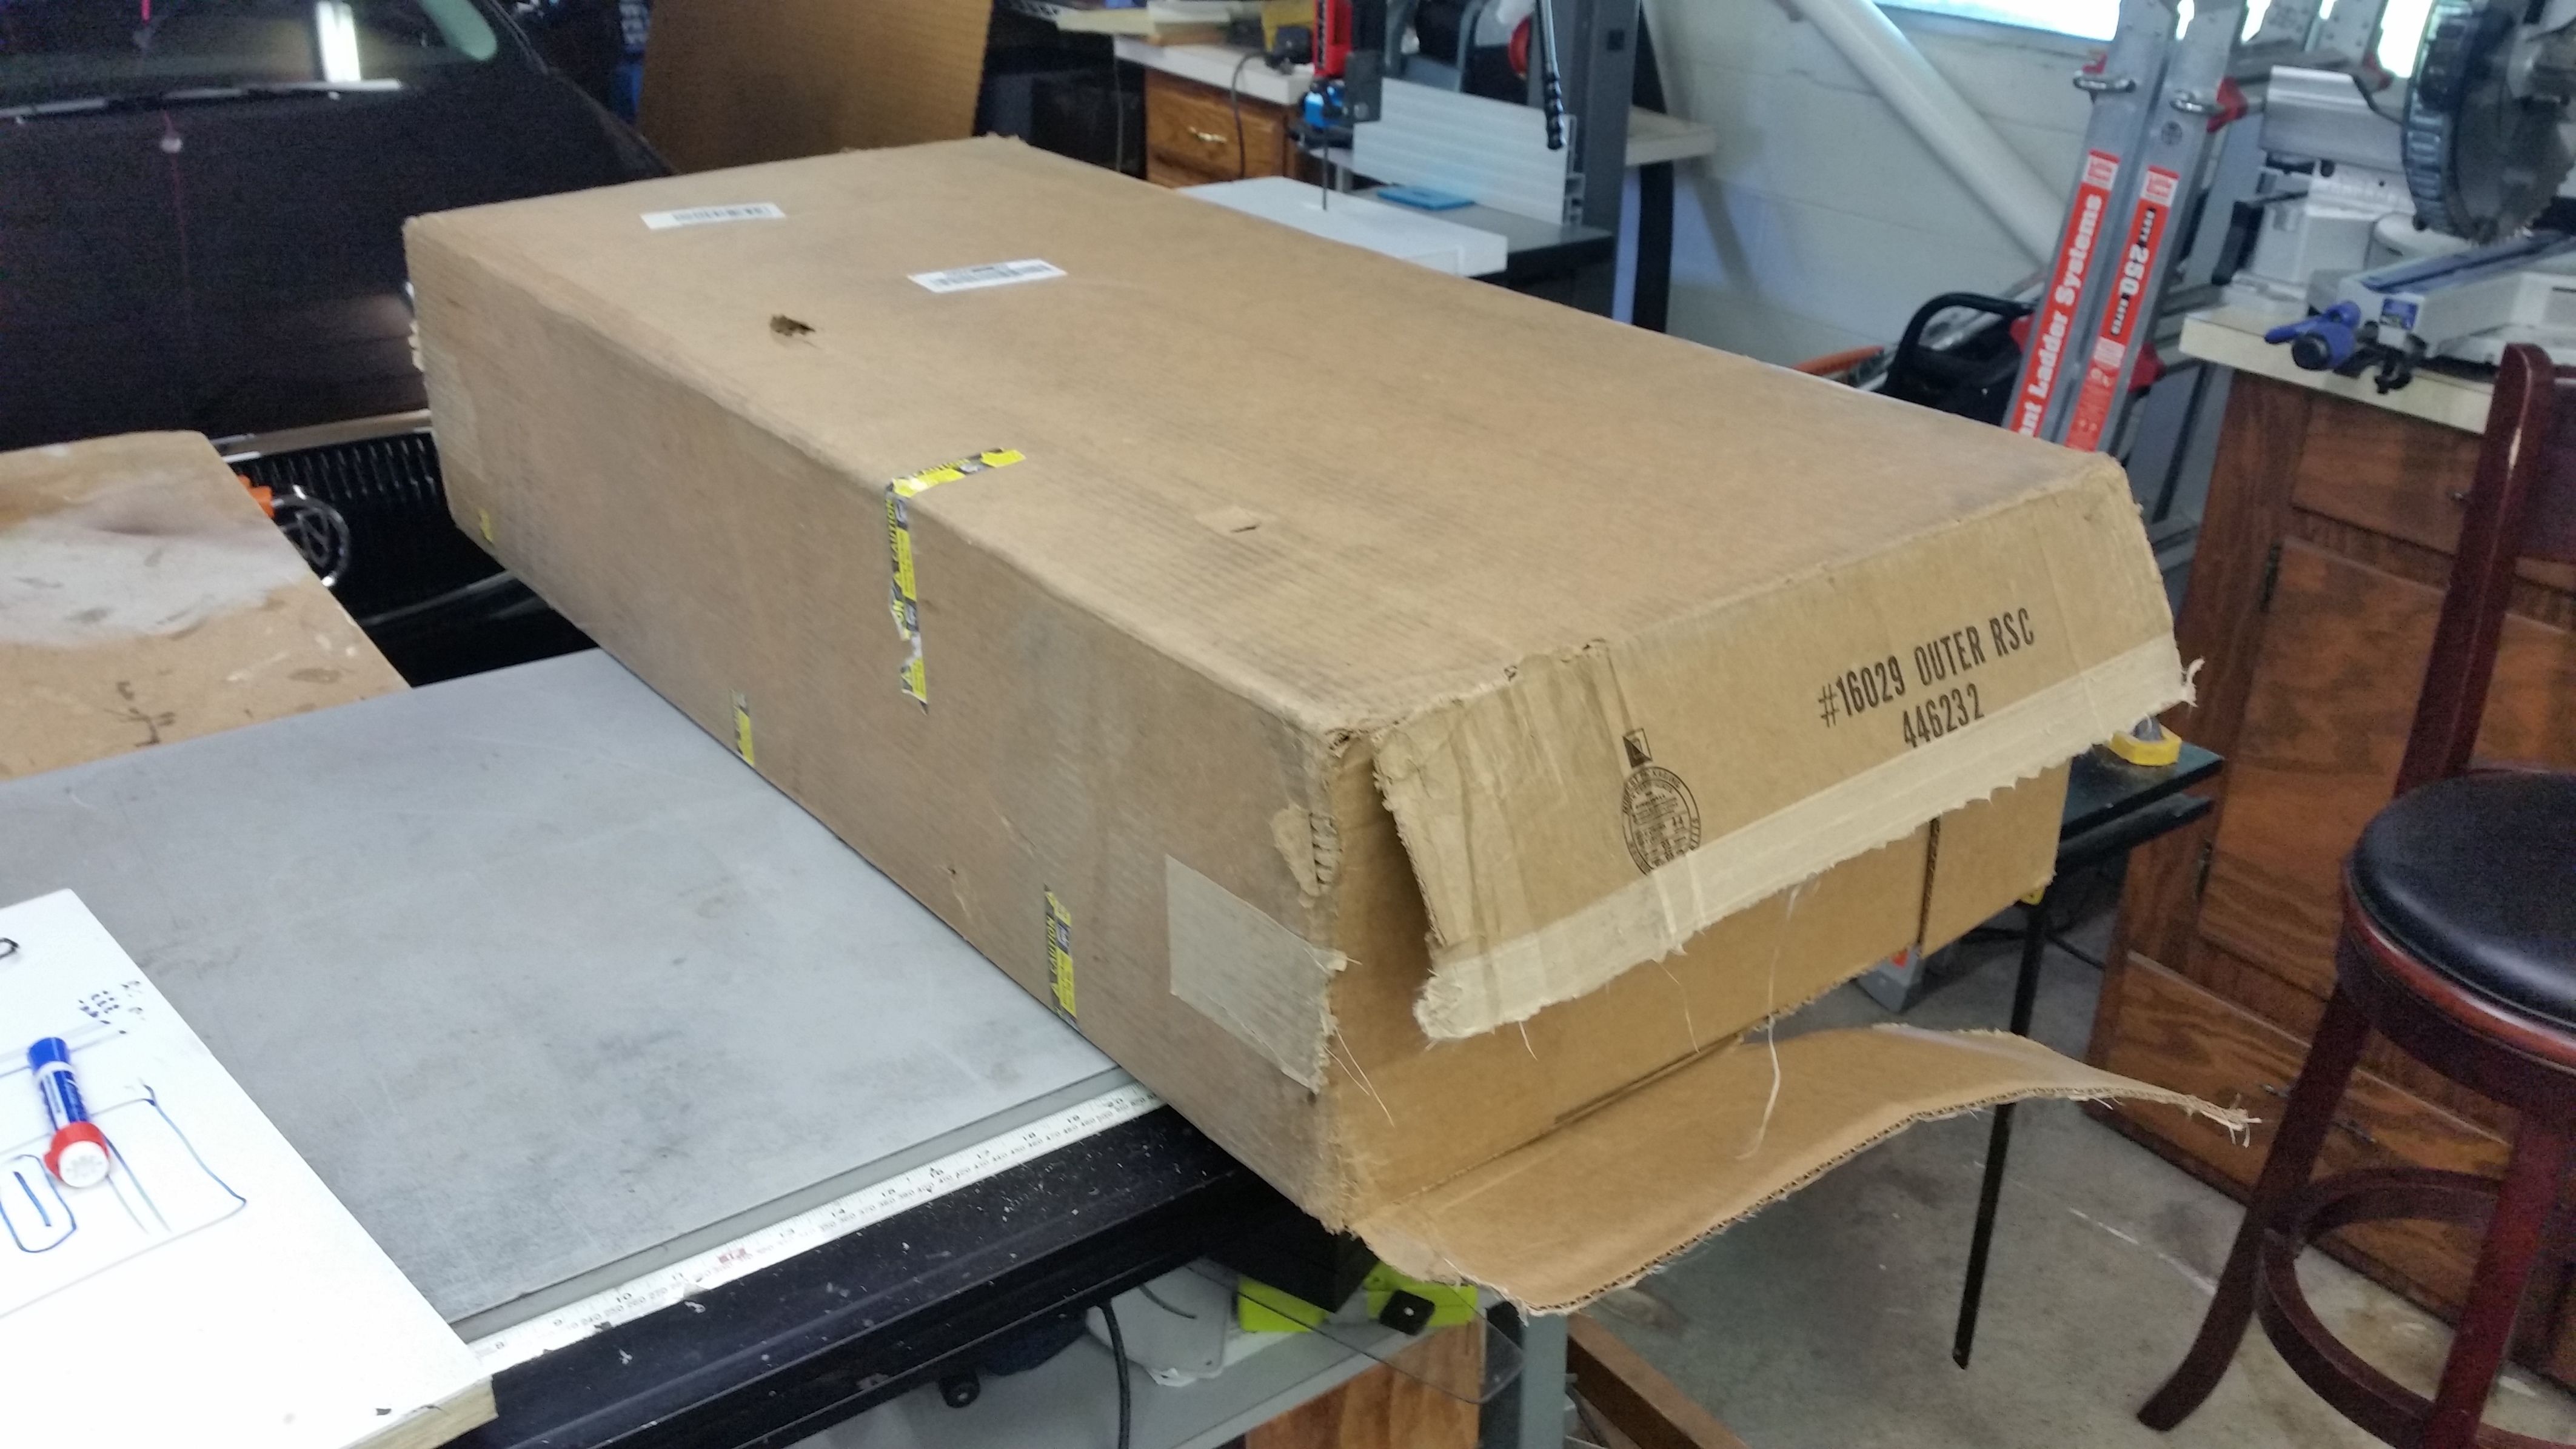
I started unboxing at 3pm

There were no instructions, parts lists or even a reference to where to find assembly instructions. That’s disappointing but we like to figure things out so I didn’t really care. There’s not that much assembly left to do anyway.

The unboxing…


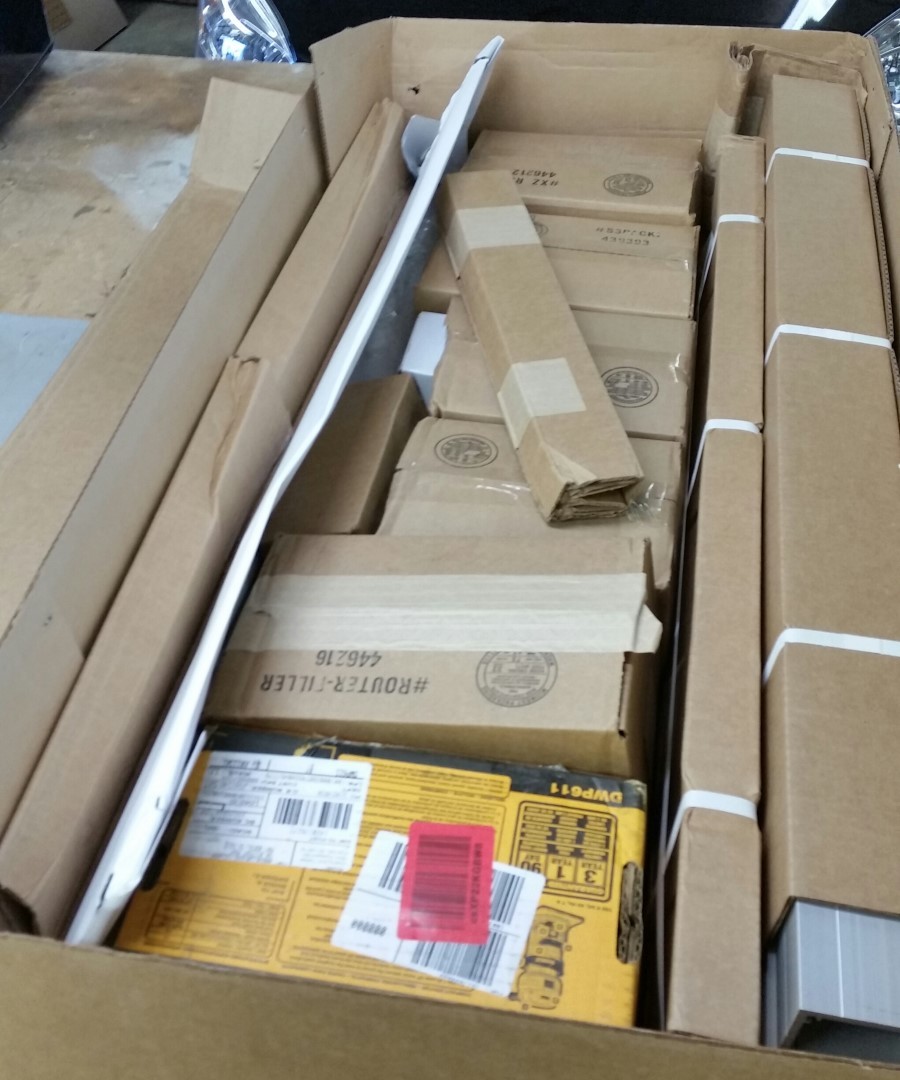
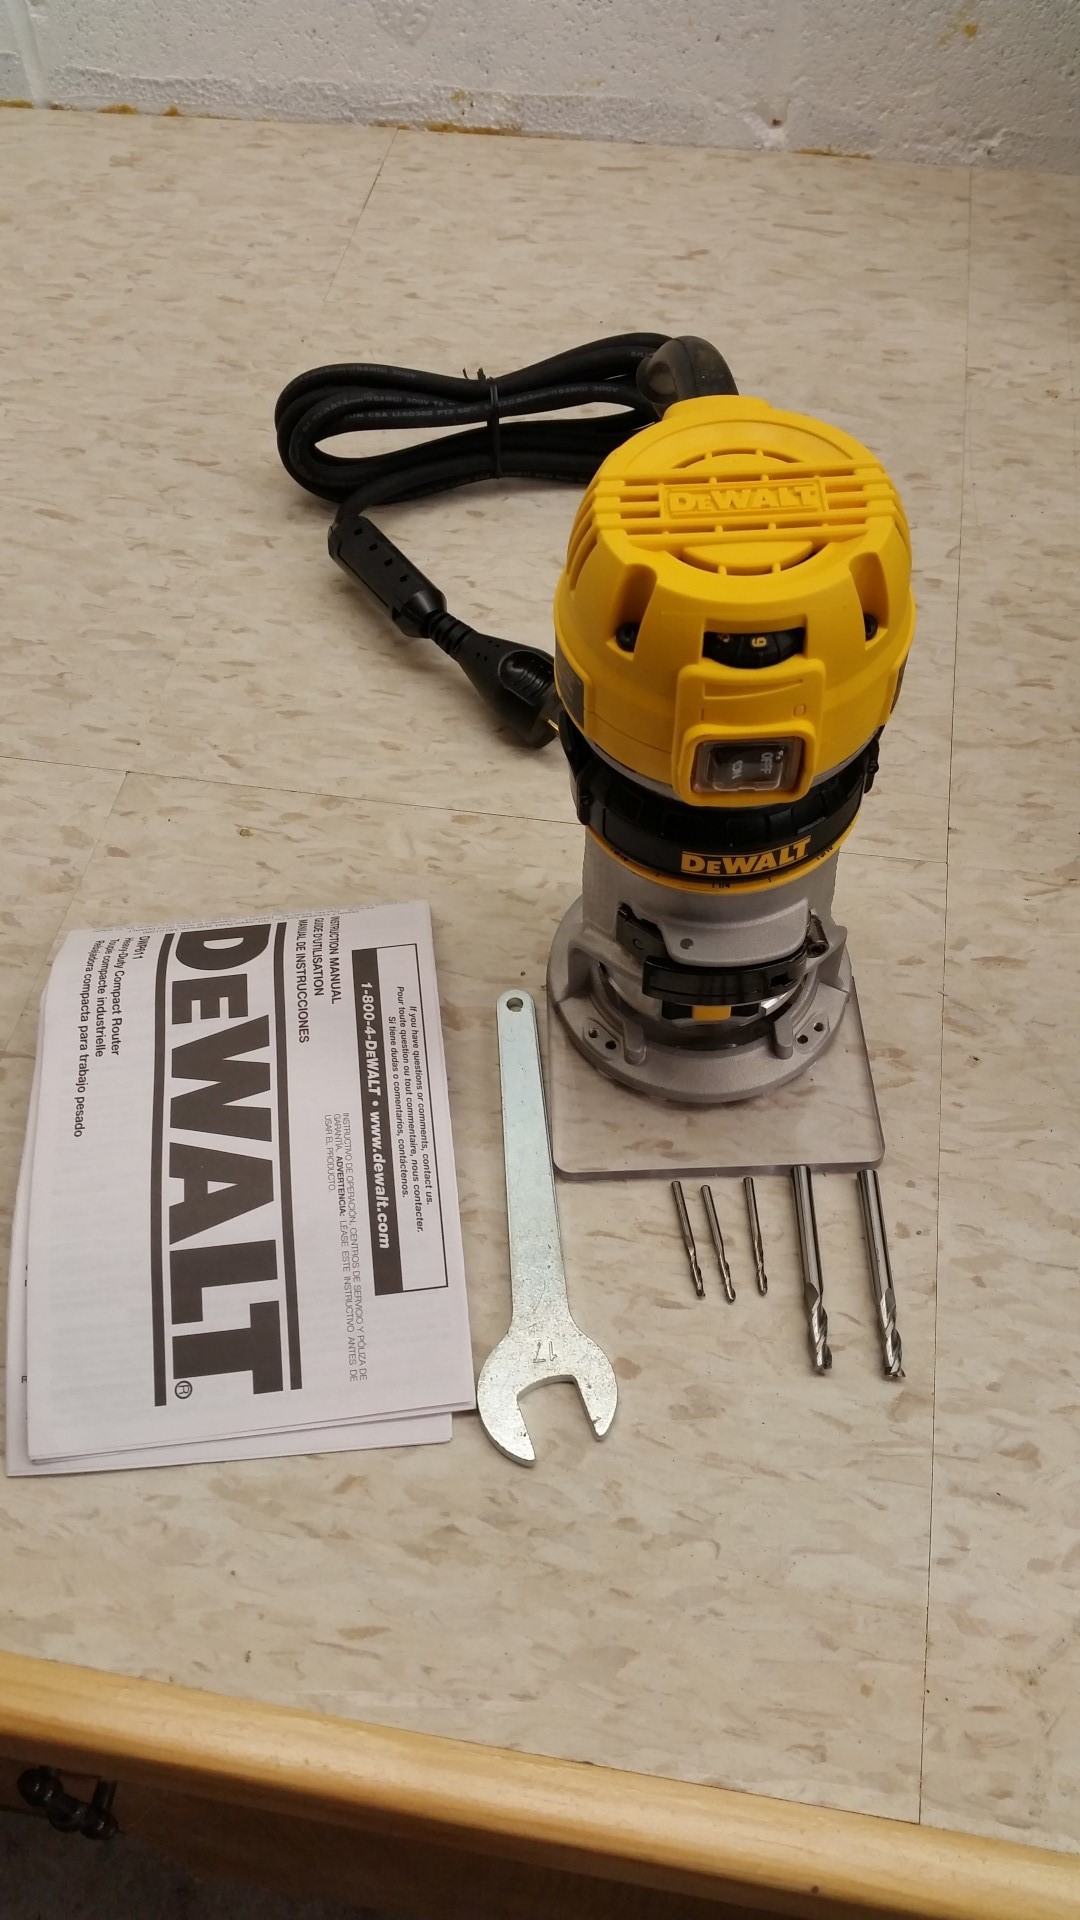
I was pleasantly surprised to see 5 carbide router bits included with the DeWalt router…

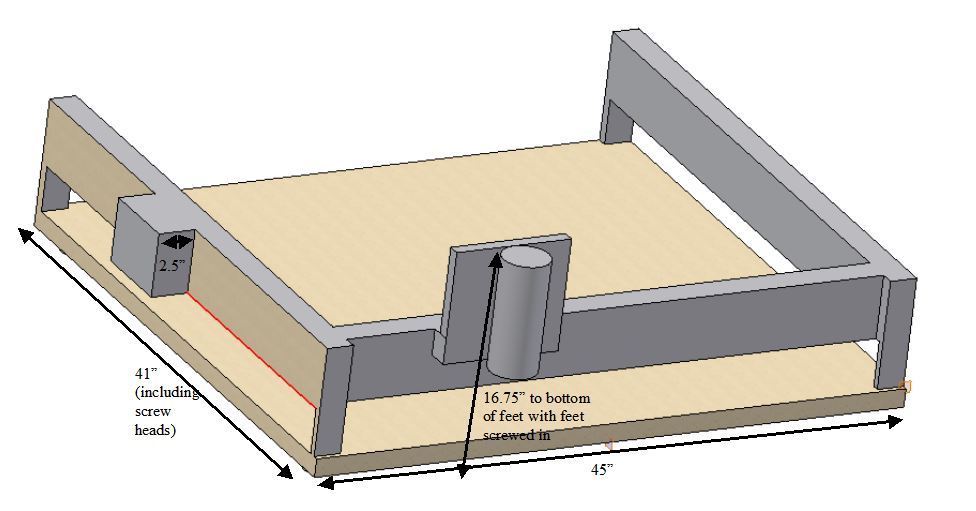
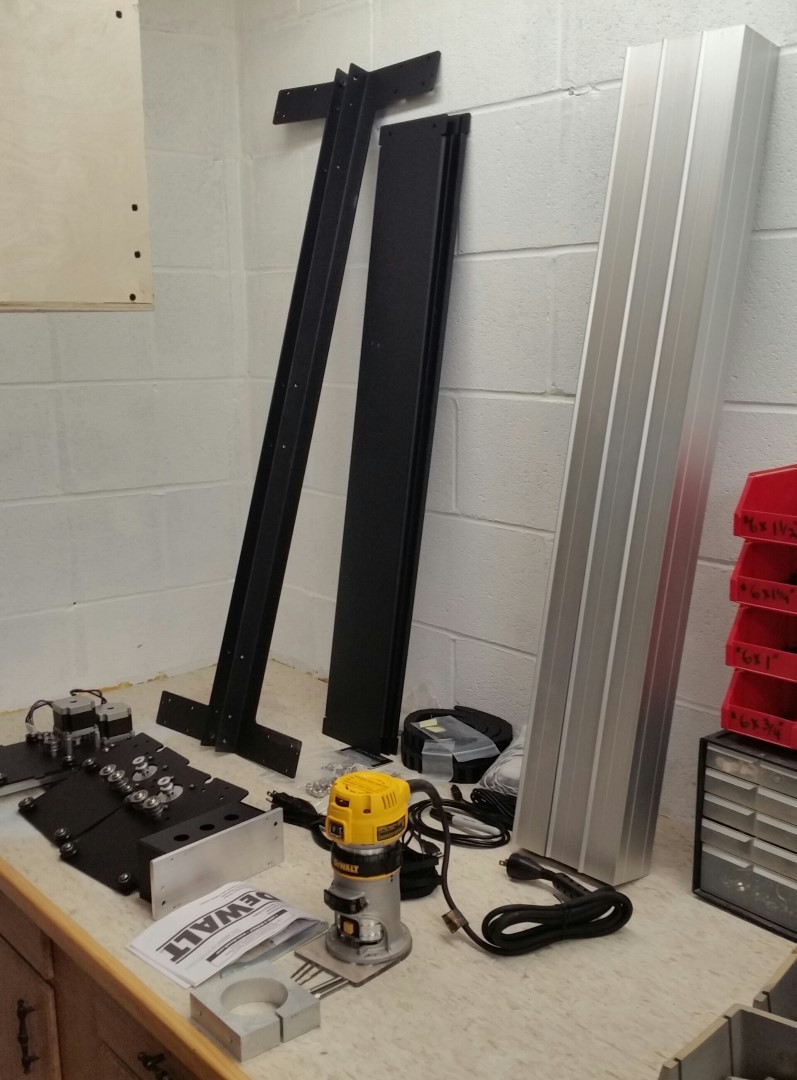
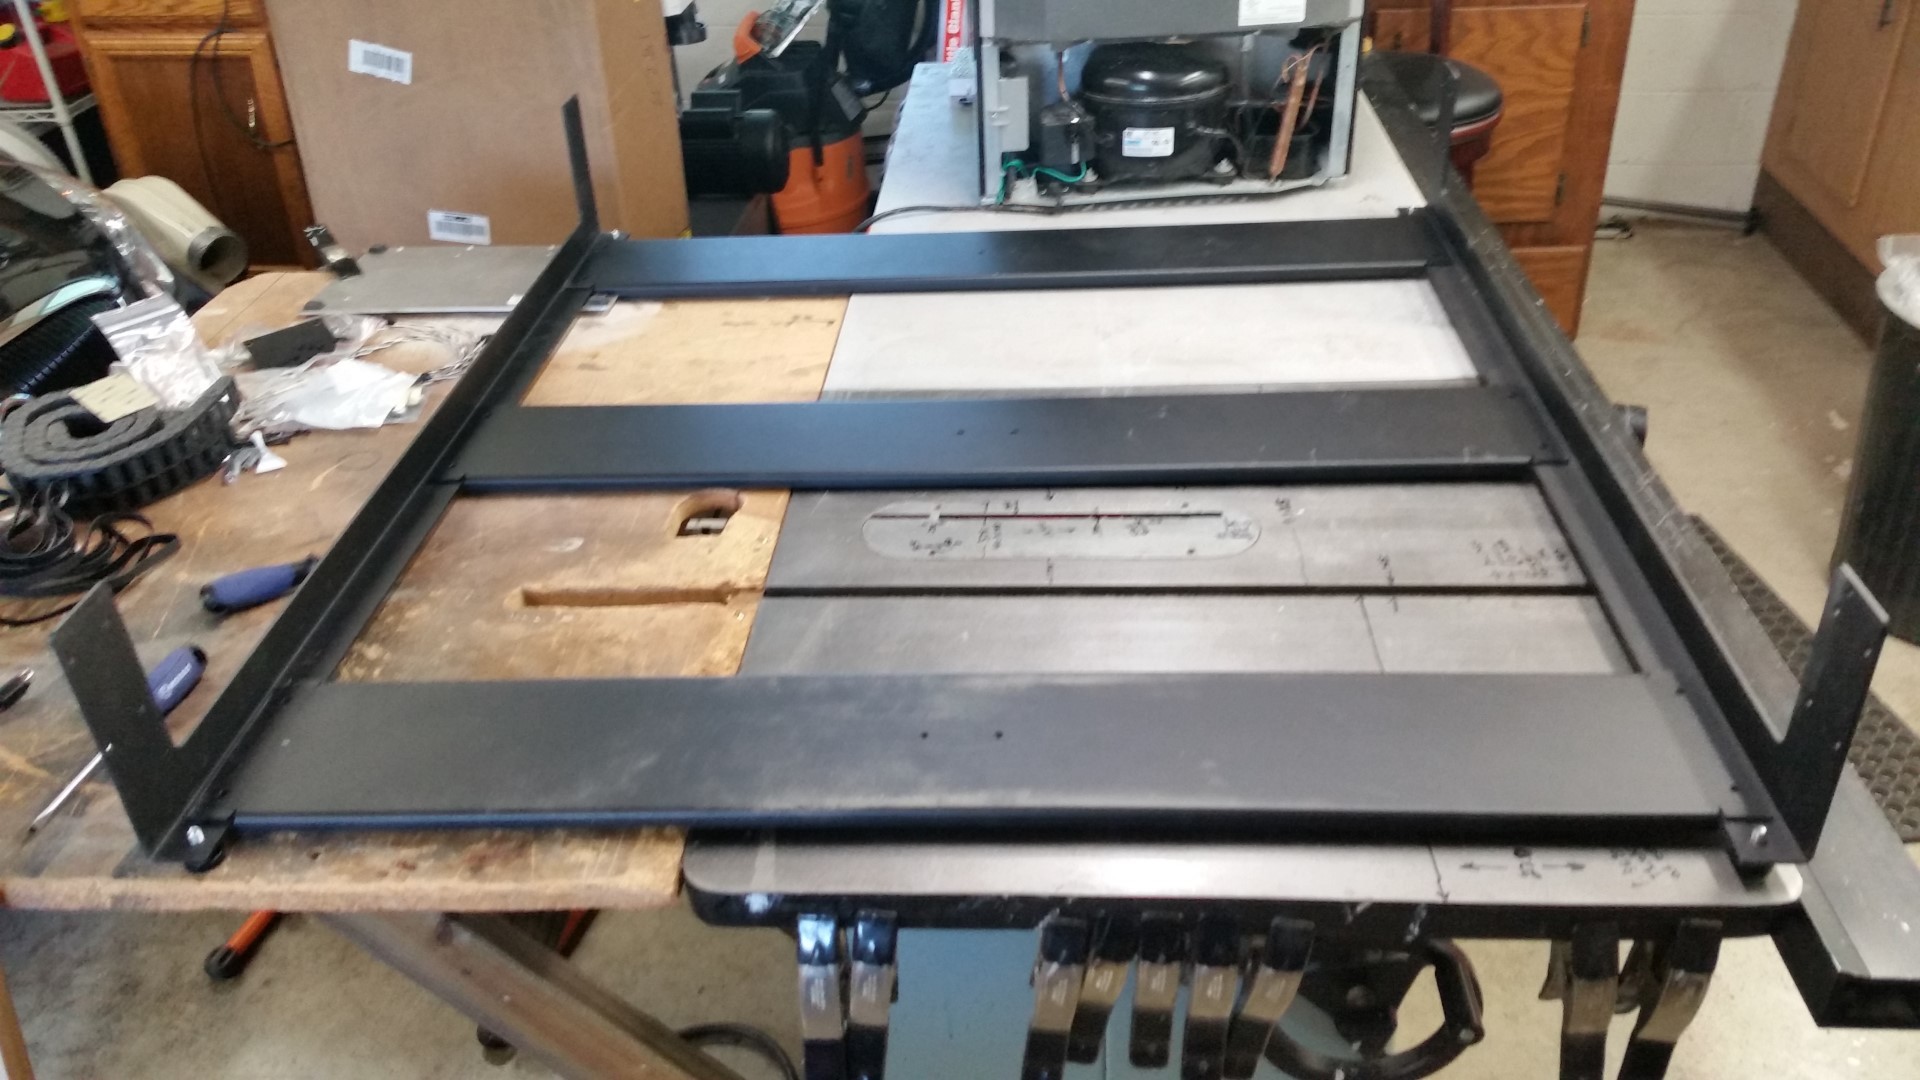
I laid out the base frame. Its pretty beefy sheet metal for this level of machine. The bulk of the weight is in these 5 pieces. Nice powder coating and the PEMSERTs are a great design feature.

The carriages are all pre assembled so I just installed them onto the rails. All three rails are the same extrusion and the same length except the X-axis rail has two threaded holes to mount the control card box. Two of my rails had the two holes so that probably means someone else got a kit with three rails with no holes.

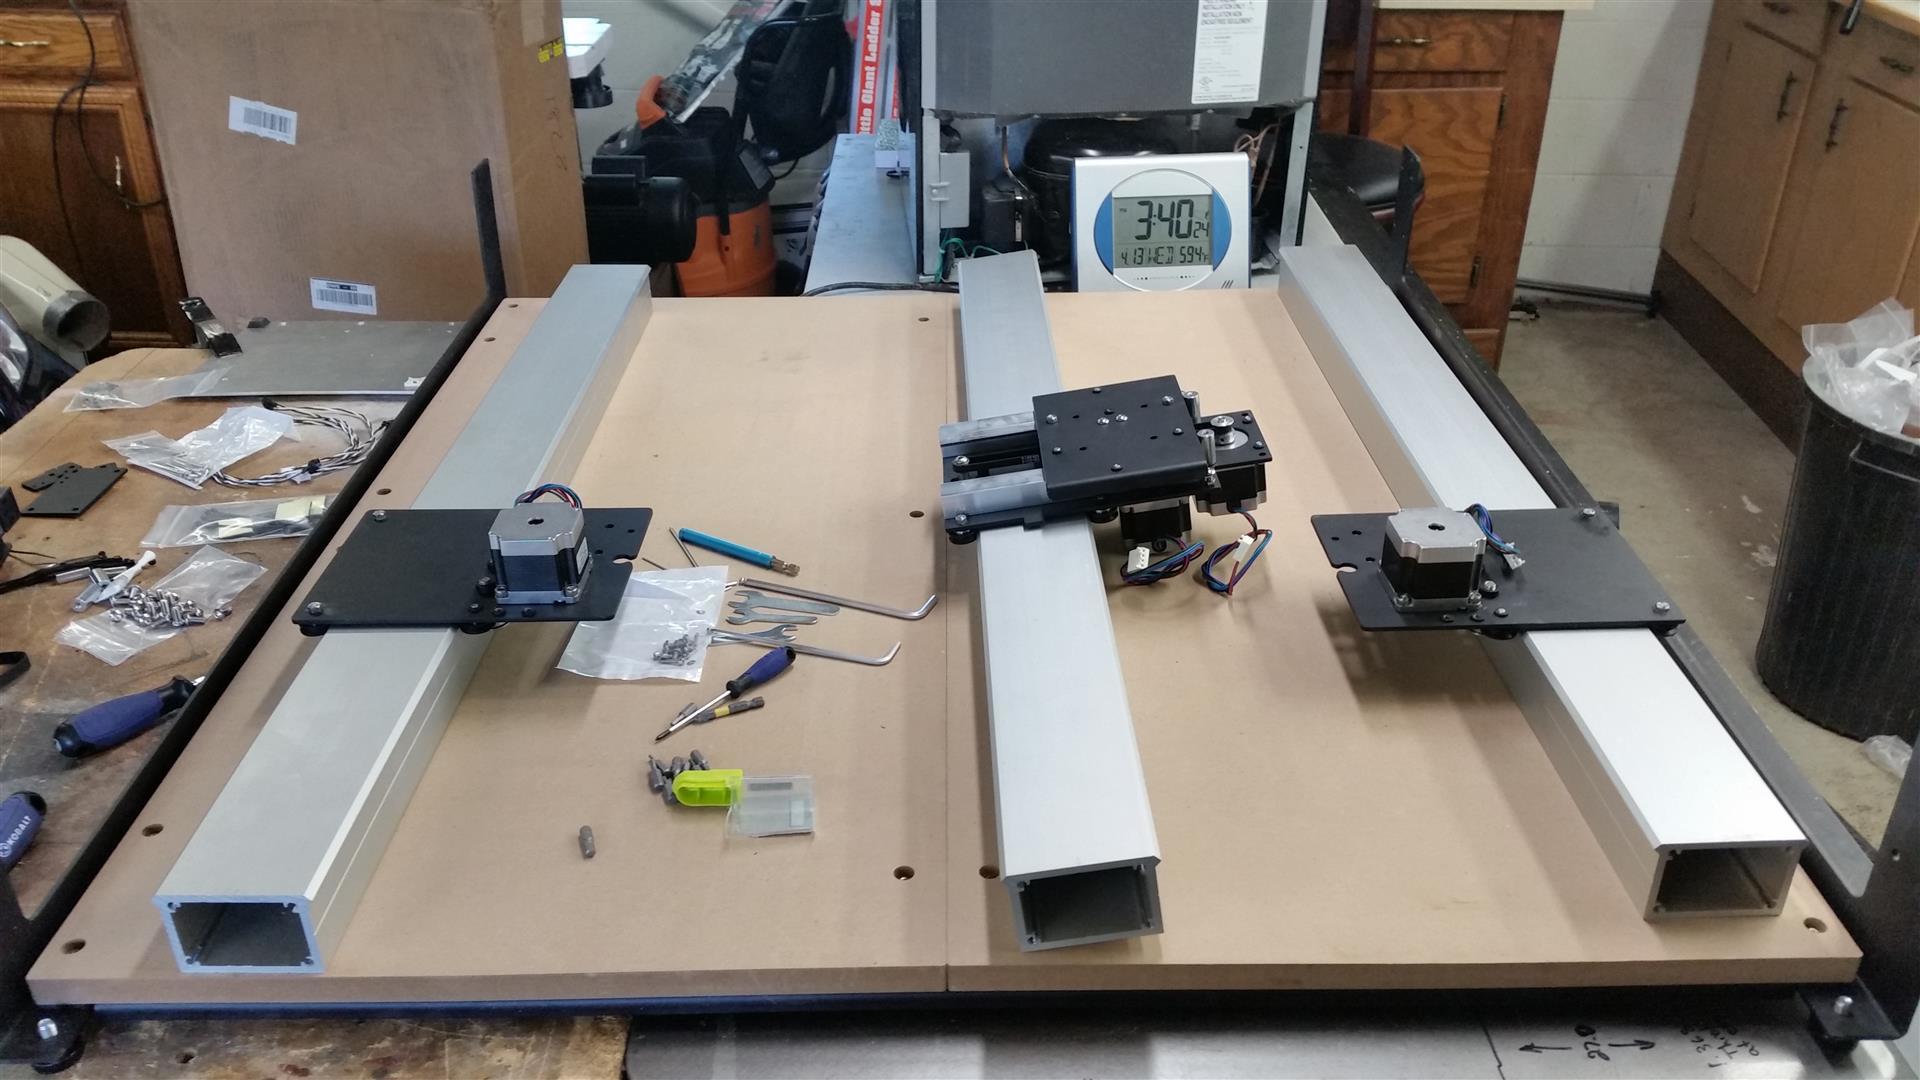
The carriages were not adjusted properly. One was too tight and the other two were too loose. I tried one carriage on all three rails and it fit differently on each rail so the dimensional accuracy of the rails isn’t as tight as I would expect for CNC equipment. I don’t know how straight they are but I’ll check that later.

Of course, I put the first carriage on backwards. I pulled up a picture of a Shapeoko3 to figure that out :wink: I called Carbide3D to see if there were any instructions available and they said to go to the Shapeoko webpage to find them. I just had my phone in the shop. I tried downloading a .PDF that said instructions but I don’t know where it disappeared to so I just used my superpowers of deduction to figure out where the few remaining parts had to go…

So far so good…

Now, I start scratching my head because the leads on the XY and Z steppers are too short to allow full movement and I didn’t get any cable extensions. I called Carbide3D and Apollo said “email Shapeoko” to let them know what you are missing". At that point I was wondering why I didn’t just buy the kit from Shapeoko. I asked if I could talk to someone at Shapeoko to discuss the problem. Apparently that’s not possible. When I persisted Apollo said he would email them to ask them to ship me cable extensions but he couldn’t provide any confirmation that they were going to do anything. He said I “might” get a confirmation email tomorrow.

At this point I realize there are more holes left than there are screws. I figure I can find whatever screws I need and even make brackets if they are missing but its kind of tough when there’s no assembly instructions. I don’t like that Carbide doesn’t have control of the process either.

However, I purposely didn’t plan on having anything depending on this machine. I know C3D employees are probably not loving life right now and probably won’t be for a little while to come with this kind of poor quality control. I’m not upset though. Its part of the price you pay for getting a machine from a startup and not paying the huge markups that more expensive machines have. I feel like its a fair trade so you just have to prepare yourself. I like these guys and will probably keep buying from them. This is a very good machine for the relatively low price tag.

So, right now I’m dead in the water with no assurance that Shapeoko will send me what I need anytime soon. I’m pretty sure there are several other pieces of hardware missing but I don’t know which ones because I don’t have a parts list and no one has offered to send me one.

I’ll keep you posted as this progresses…

Email support@carbide3d.com and they should get you squared away.

Assembly instructions are at: http://carbide3d.com/files/so3manual.pdf and videos at: http://www.shapeoko.com/wiki/index.php/Shapeoko_3_Assembly_Videos

Some notes / comments on assembly at: http://www.shapeoko.com/wiki/index.php/Shapeoko_3

@edwardrford commented on the shipping update thread that the rail with 2 threaded holes is actually meant to be on the Y axis, so that the control box can be mounted on one side rather than to the X axis. Just thought I’d point that out. Thanks for outlining your experience so far…makes the wait a little more bearable (just a little, though).

Apollo told me it was supposed to be on the x axis. I’m not sure. There are two cable tracks but no hardware or holes to secure them.

Thanks Will! I wish C3D would have offered to email me those links while I was on the phone with them.

In my XXL Unboxing thread, Edward replied that the extrusion (marked with the X) with the threaded holes is meant to be used for one of the Y axis rails. He indicated the X is used internally to make it easier to identify the ones that have the additional machining.

As for the documentation links and videos, these are all for the original SO3 and, while better than nothing at all, do not address any of the changes made in these new kits, do not have the new BOM, do not reflect any fastener changes, do not reflect any of the new cable routing/extension notions, and certainly would be misleading with respect to the electronics placement…as at least one person has already done with their XXL.

At a minimum, we need an accurate BOM to compare what we receive…this way we can compile a list of all the missing/incorrect elements that need to be shipped out before assembly can be begun/completed. Then at least the exploded diagrams of the NEW pieces/assemblies and the fasteners involved. Ideally, a full-on “final assembly” guide akin to the version for the Original SO3 as was linked previously.

I just saw your thread. Thanks for the info.

Nice machine but it’s hard to imagine not having packing list check offs and two signatures to verify as part of the shipping work flow. I’ve learned to not sweat this stuff but a lot of their headaches stem from poor QA fundamentals. I feel sorry for these guys so I’m not complaining.

I like the changes they made to beef up and simplify the design. The preassembled carriages are great also.

This is all a bit strange to me. There is no “Shapeoko” company. Shapeoko is a product of Carbide 3D. @edwardrford was an individual with an idea, did a crowdfunding project, and ended up with the original Shapeoko. Edward was absorbed into Inventables and ultimately designed and released the Shapeoko 2 as part of that company. Edward joined Carbide 3D and designed and released the Shapeoko 3 as a product OF Carbide 3D with all the associated financial, support, and administrative resources that come with being folded into a combined entity.

The comments quoted are odd in that there seems to be finger pointing between California and Illinois… and California sounds like they have nothing to do with Edward and the Shapeoko product. I’m not CLAIMING that this is so, but the language provided by Tony seems to indicate something odd. Hopefully there isn’t trouble in paradise… or the Shapeoko 4 might be under the ShopBot banner… j/k :wink:

Anyway, some clarification of how the support structure is to be used would be nice. I thought support@carbide3d.com would get me quick answers and parts for my SO3 Original, my SO3 XXL, and my forthcoming Nomad 883 Pro. I’m heavily invested in Carbide 3D, so I really would like to be comfortable they are still heavily invested in me (and all of us).

Let’s not start rumors here.

Apollo happens to pick up the phone 95% of the time and if there’s something we don’t know in CA, we usually ask the customer to email support so we can assign a ticket to Edward or one of the people in the shop in IL.

We don’t take info over the phone because it’s too easy to write something down wrong, or lose the paper. I suspect “Email Shapeoko” was intended to come out as “Email Support”. No finger pointing, just the wrong synapse firing off after a day of phone calls in between the other work to be done.

For what it’s worth, @edwardrford has the @Tshulthise email ticket assigned to him so I’d expect him to deal with it in the morning.

Future Shapeokos will always be a Carbide 3D product- they’re one and the same now…

Thanks for the clarification, Rob. I didn’t intend to start rumors. Apollo didn’t give any impression that he was “finger pointing”.

With different locations, other companies selling the Shapeooo and the ability to talk to someone at C3D but not Shapeoko support it’s a little confusing. Until you posted this, from hours of browsing, I thought Shapeoko was a separate company and C3D was just licensing the technology.

Anyway, that’s off topic. It’s just a problem when the person answering the phone appears to have no power to resolve the problem directly and can’t transfer calls to someone who can close the loop. Eventually that probably needs to change.

No worries since I was prepared to be the guinea pig with one of the first shipments. Let me know if you need any photos or feedback. I’ll be glad to help anyway I can.

4/14/16 update. …Edward has been very communicative and overnighted the parts they had in stock. The limit switch extensions won’t be available until next week.

I went ahead and fabricated my own limit switch brackets and cable track brackets. There will be almost no cables visible when I’m finished. I’ll upload pictures Saturday.

By the way. … definitely mount the control box on the y axis rail. That means fewer cables have to move with the gantry, including power and USB!

I’ll install the motor extension cables when they come tomorrow and also lengthen the limit switch cables and it should be ready to fire up. I also want to build a table for it so I’m going to be busy.

Thanks to the guys at C3D for doing their best to get parts to me as soon as possible and for being very communicative. I really appreciate that. I know they have very full plates right now.

Thanks for letting us know, Tony. I wish I’d received some responses from @edwardrford or Carbide support. As I mentioned previously, I got an initial response from Edward on my support ticket (which basically summarized and pointed to my XXL Unboxing thread). I was asked to provide him with my specific needs and between that point and overnight (after my XXL Unofficial BOM thread in the wee hours of the morning), I sent at least 2-3 more updates (with new findings) to Edward and support with no further communication reciprocity from their end.

However, this afternoon I DID get a FedEx shipping/tracking notice from the shop in Illinois that simply states “Extensions.” So, I don’t know if this just contains the stepper motor extensions or if it includes the other items I indicated were missing in both my emails and my XXL Unofficial BOM thread. From Tony’s update above (I think it is supposed to be “4/14/16 update”), it sounds like there will be no limit switch cabling fix until next week sometime, but what about the mounting fasteners to attach the electronics to the Y extrusion, the brackets/fasteners to attach the cable chains to ???, and the fasteners needed to attach the Dewalt spindle MOUNT to the Z-Axis plate? Were those shipped as well? I guess I’ll find out tomorrow…

It would be nice to have somebody dedicated (even if its just one aspect of their job) to monitoring these forums and providing remedies or at least notifying the right person and getting a response. I totally understand that these guys are underwater at the moment, but somebody needs to be on top of these customer-facing issues and providing at least the perception of responsiveness. As long as there is some transparency and indication of awareness and confirmation of problems brought forward, I think folks will be far more patient and understanding. :slight_smile:

1 Like

Also, as a separate but related issue, where are we at on the official BOM and some sort of drawings/instructions or high-resolution photos of a COMPLETE machine? It was mentioned they would be released by last night, but I haven’t been able to find them in either the forums, the Carbide 3D documentation page, or anywhere else. We have already passed an additional full 24 hours from that self-imposed deadline…I think I originally saw something that all this would be ready by 4/4, but now that kits are arriving it is increasingly imperative. Lack of complete parts and lack of detailed instructions are going to potentially cause folks to mangle their builds (possibly stripping out threads in key parts or worse) forcing more support problems and costs for Carbide 3D.

Thanks for keeping at it!!!

@CraigTheFabricator just to close the loop on this, I sent you an email last night (this morning?) to get some of these issues addressed. Should be in your mailbox from ‘support’.

Give me a shout if you have any questions.

-Edward

4/15/16 update…

I received the motor extension cables today. I did NOT get the control box mounting screws or the router bracket mounting screws. I guess I’ll go to the hardware store and buy those myself.

I extended the limit switch cables and mounted them myself.
I also mounted the cable tracks with hardware I made myself.

I should be able to get this thing fired up tomorrow. I put the limit switches in the z-up, y-forward and x-left (facing the router) I hope that is where the firmware expects them to be. If anyone knows, let me know if this is correct and, if not, if there’s an easy way to adjust this in Carbide Motion or the firmware.

Thx

I believe the default behavior is to home to the back-right…i think you can invert the various homing directions, but i don’t know the values off-hand. I think the FAQ section of the Carbide site has the complete list of GRBL values and their function. If you try to home as you’ve installed things, it will likely crash your machine.

The Z-up is fine. :slight_smile:

Changing the homing orientation is a compile time option: https://github.com/grbl/grbl/wiki/Configuring-Grbl-v0.9

I’d strongly urge sticking to the default.

If direction of travel isn’t correct, see http://www.shapeoko.com/wiki/index.php/Grbl#Grbl0.9

Thanks for the info.

I’ll relocate the two switches. That will be less trouble and less risky.

My box arrived Friday. Want to build a stand for it before I unbox and assemble. Can you give me a footprint measurement?

Those numbers are very close. You can get by with less plywood (nothing over 48" wide) if you mount the control box outside of the enclosure. I’m not sure if that is possible with the cable lengths that come with the machine. I had to extend my limit switch cables myself so they are long enough. The motor extension cables had one to two feet too much so I’m not sure what happened there. I’m getting ready to start on my enclosure after supper tonight.