Tips on making this wall light?

@Julien Staining wood is fine. Nothing wrong with it. There is a time and place for it. There are a couple of issues that you need to consider:

  1. The pattern and grain of the wood describes its species. Even if you stain it - or ebonize it - the wood is still Oak, or whatever you choose to use - and it looks like it - even to an untrained eye. Ebony is desirable because there is a quality to its grain and pattern that makes it Ebony. Oak is Oak…and always feels like Oak no matter what color you make it. Same is true for Cocabolo, Wenge, Cherry, Mahogany. They all have a feel that’s unique to the species. As a general rule, pick the wood you use based on its pattern and hardness first. What feel are you looking for?

  2. (and the answer to your question above) Wood stain penetrates based on the porosity of the species and its preparation (sanding, glue size, etc.). You cannot safely project without preparing some samples of exactly the same wood, prepared exactly the same way.

  3. Due to #2, if the piece is ever damaged or needs to be re-sanded for any reason, it will also need to be re-stained and matched. Not always an easy task.

My opinion: Think of the cost of the piece in terms of its longevity. If you’re going to have this piece for more than a few years, invest in it. Either use Ebony or use Cocobolo, Wenge, or some other tight-grained, nicely patterned wood. In the long run - when you’re looking at the piece 10 years from now - or handing it down to your children’s children, you’ll be happy you did.

5 Likes

Stains and dyes are surface finishes. They typically don’t penetrate very deeply. The penetration depth is similar to the epoxy or paint “bleed” that we try to avoid in many of our projects. So, milling a stained piece would expose the original color of the wood.

I was motivated to head out to the garage to create an example to share. It started with a cut-off that had been stained and milled. I grabbed it with some pliers, hit it quickly with 120, and hit it hard with 120. You can see that the penetration was not very deep.

I prefer most woods for their natural grain and color, but, as GJM said, stain has its place in the shop. Get some stain and do some test run/sample pieces to get a feel for it.

1 Like

@GJM and @Sawdust thank you for the insights and test.

  • cost of material is not the issue here, I would happily overspend in this specific case (happy wife, happy life!) but procuring cocobolo or wenge is the hard part, at least in the dimensions I’m after (~14" x 12" x 1/4")
  • Since staining won’t reach all the way inside the material, if I were to use that technique in this project, I could mill the wood, stain it and then pour the epoxy, but then of course I couldn’t face it /sand it. And if I milled, poured the epoxy, sanded, and THEN stained the whole piece, I’m not sure what the effect would be on the epoxy?

For now I’m curious what kind of finish quality I can hope to get from Richlite (interesting video from the NYCCNC folks about milling Richlite here)

Correct. You would have to glue up the size you want and then mill it.

1 Like

The fact that I did not even consider glueing up pieces of wood is evidence that I’m still a long way from “Julien woodworks” :slight_smile:
Thanks for the friendly reminder.

In other news, Richlite machines beautifully and both the 1/8" and 1mm endmills survived the first test cut. Now running the real deal.

roughing pass using 2D adaptive clearing with a 1/8" downcut at full depth (6mm), 1 mm optimal load, 18000RPM, 45ipm

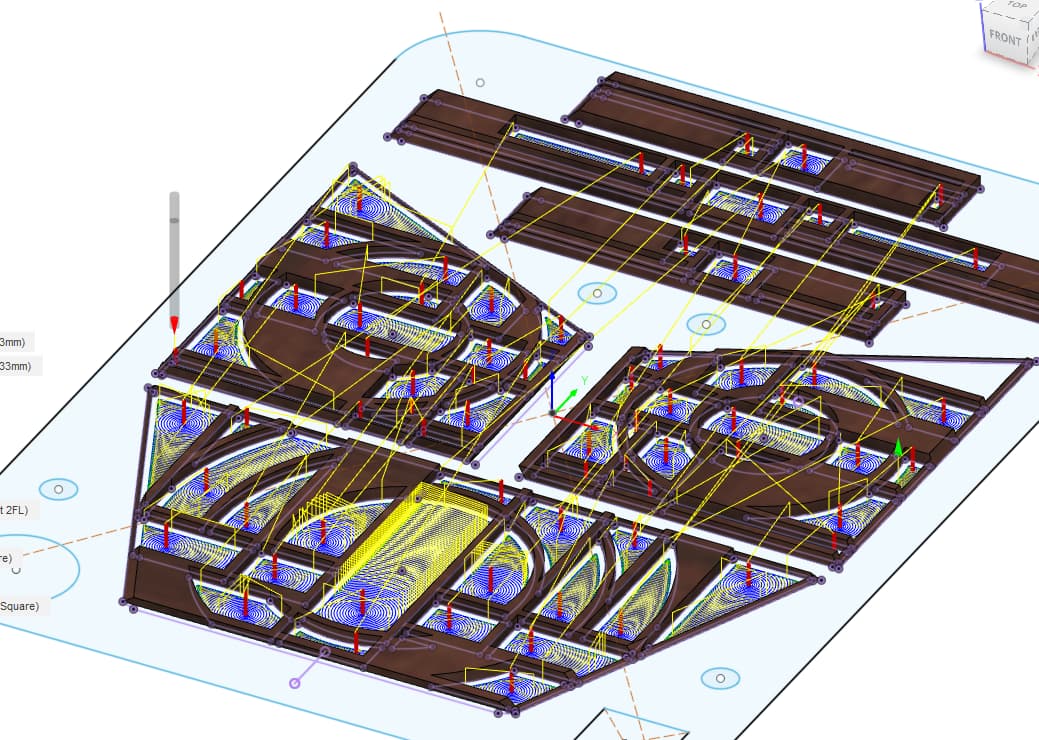
Straight from the machine:

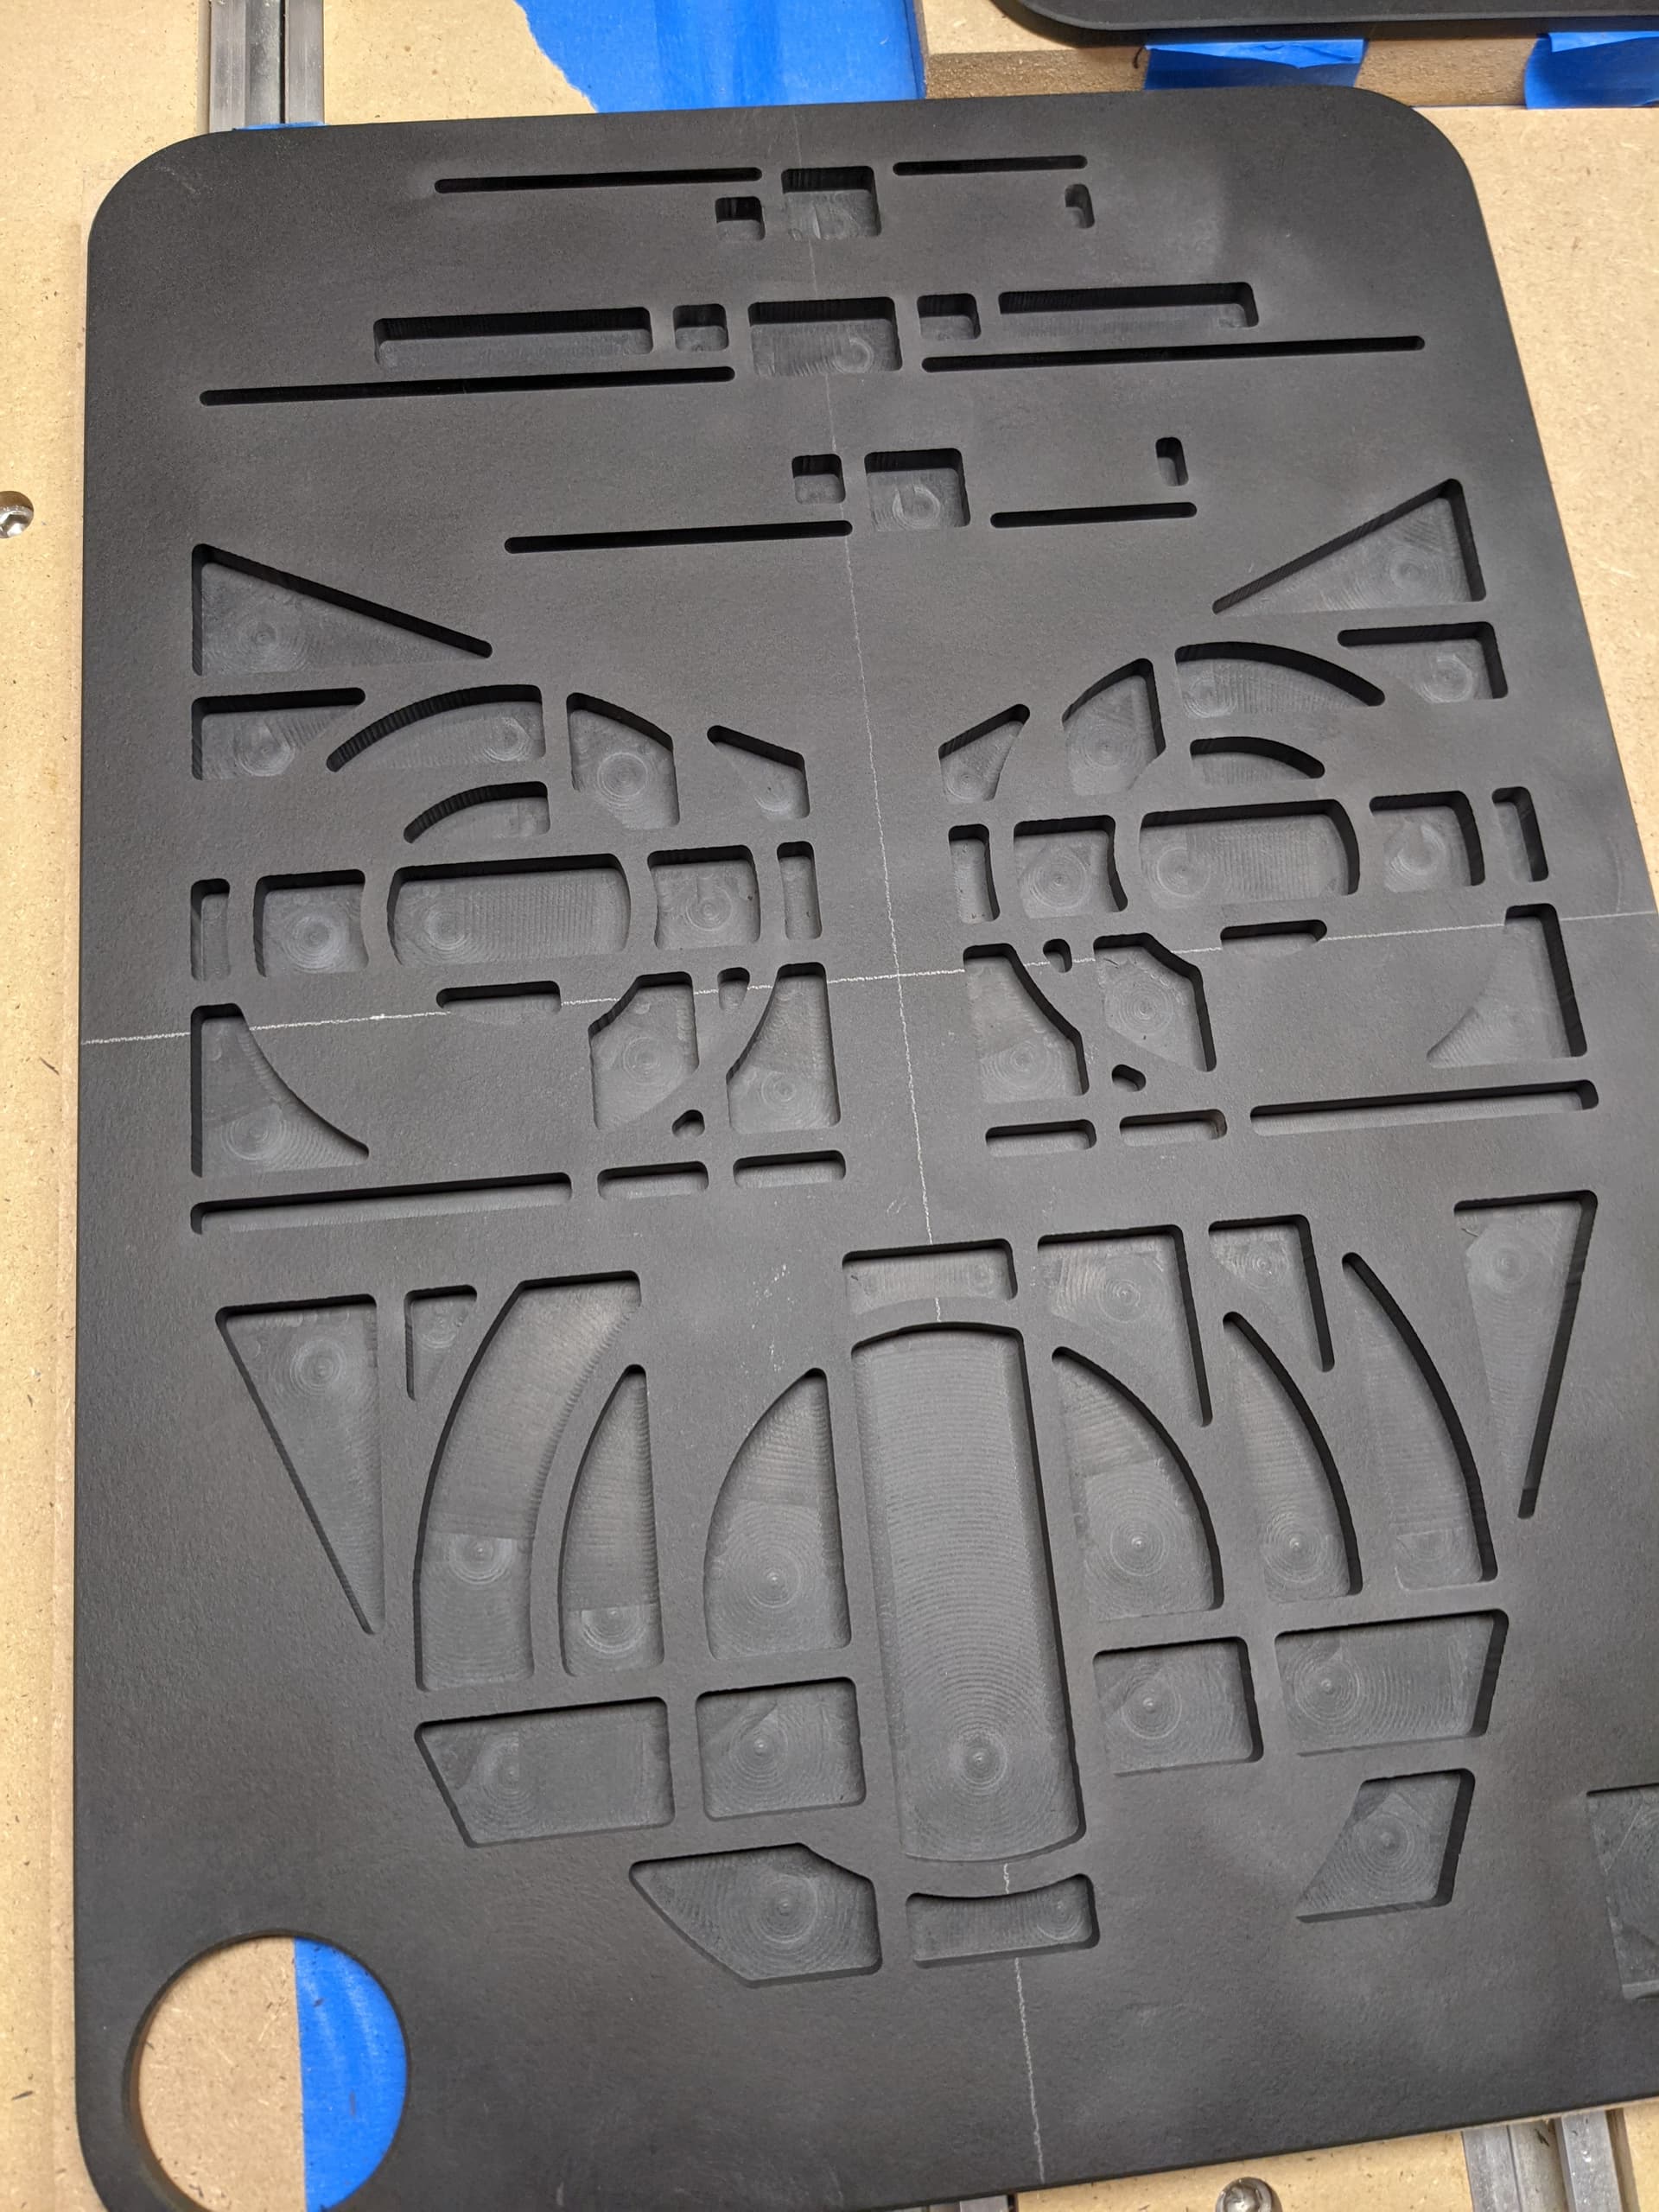
I may just have found my new favorite material !

8 Likes

Curious- How much was it for those three boards?

Pricy…the equivalent of $34 each.

1 Like

Something to consider. Epoxies tend to yellow, including the “clear” UV stabilized variants. White pigments can show case this, and in some cases exacerbate it.

1 Like

Mmh. Good point. The lamp will have a yellow-ish tint to it anyway, so hopefully that will not be too much of a problem. From your experience does the yellowing happen also indoors ?

1 Like

I think those lamp styles always had some discoloration over time, on the glass, from the heat of the light bulb. I’m sure @Julien is deliberately choosing epoxy so that it simulates the aging of an incandescent bulb with his LED. Yeah, that’s it. BRILLIANT!

3 Likes

Yes, it is probably inevitable. But the rate at which this happens can vary considerably. Proximity to natural light, types of artificial light, temperature, humidity ect.

For types of work I do, assumed UV exposure, I typically require customer pieces be finished with a paint system. But I have a great many personal items I’ve built over the years that do not have a paint system finish. Some have amber’d to greater extents than others, some imperceptibly so.

3 Likes

The amber and yellow colors are in the color palette of a lot of art deco objects. Most Art Deco objects are in the warmer palette and not in the cooler color ranges. So even if your object turns slight amber/yellow it would not be out of place on an art deco object.

4 Likes

Hi Julian,
Out of curiosity I made a rough small version of one of your lights. I cut the 60 degree angle on the table saw so it’s a bit rough there. Sawing also cut into the first panels a bit so I just cut them out. The maximum height down the centre line of my model is 260mm (10 inches).
It would not be hard to make this. The only part that might be tricky is mounting the light bulb and holder, but I thought they could be mounted to the wall and the machined part could act as a cover. I won’t do it for myself as I don’t have any wall lights for one thing and my apartment is more mid century anyway.
However this has sent me down what could be a rabbit hole, of square wooden bedside box lamps with cutouts for epoxy inserts. I’m thinking possibly cloud cutouts…or fish…
With Led lamps heat is no longer a problem.
John

6 Likes

@OldDude somehow I failed to answer that sorry. Pretty cool prototype !

I blame @AndyC for sending us all down that rabbit hole :slight_smile:

In other news, progress on the lamp is slow (because it takes forever for the epoxy to fully harden at garage temperature, but my strategy to “fail fast” worked, in the sense that I did a large number of mistakes in the CAM and on the machine that I learned from.

  • the good news: I have feeds and speeds tuned so that the roughing pass with a 1/8" downcut works great, and the finish passes at full depth with my 1mm endmill in Richlite…work. That’s after breaking two of them in 10 minutes, but the third time was the charm, the third 1mm endmill went from several hours of finishing passes without a problem.
  • the “opportunities to do better next time”:
    • the parts are close to 5mm in thickness, the stock is 6.5mm, and I left 0.5mm under each part for the flip surfacing toolpaths. But 0.5mm remaining richlite, plus subtle variations in the material, was such that a few pocket bottoms got away (note to self, thin richlite is brittle)
    • there is a fine line between pouring enough epoxy in a pocket such as to get a nice “positive bump”, not pouring enough and getting a negative meniscus, and pouring too much and it overflows into the neighbour pocket that was supposed to receive a different epoxy color.
    • the major face palm: I did not think things through in terms of the flip job. After surfacing the first side (lower left panel), I’m left with surfaced areas of three different thicknesses (per the model dimensions), and very little of the original stock surface left for workholding when I’ll flip all this. Assuming I can separate it from the wasteboard without breaking everything. :man_facepalming: I’ll forge ahead regardless.

I’ll run the flip toolpaths for the lower left panel before I proceed with the other two.

8 Likes

Glad to be of service :wink:

1 Like

For the areas that have broken through, could you place a thin plexiglass or similar beneath when you pour? This would contain the resin and release very easily once set - then your surfacing could carry on as planned… For the varying thicknesses after your first surfacing, perhaps shims beneath any vulnerable areas will be necessary. If the RichLite ‘bounces’ it will upset your cut…

1 Like

My plan was to brush a layer of clear epoxy at the bottom of those pockets, to see the underlying MDF, and then pour the actual epoxy color. I have 0.5mm margin on the other side to surface anyway. BUT I’m not quite sure I’ll be able to separate the piece from the MDF wasteboard after epoxy hardened at the bottom of those pockets.

Or I could say as you mention, remove the piece as it stands now, and re-install it on a piece of glass. But how do you hold it onto the glass then ?

Hold it with resin - a fine coat on the face-down side. I would choose plexiglass over glass as the workpiece has to flex slightly to release from glass, whereas with plexiglass it can be the part to flex

And later the glass/acrylic can be detached easily enough ? I should go and re-read some of your threads…

1 Like