I am purchasing the shapeoko soon to do some specific tasks for sculptural work. I will have 10,000’s of like pieces to cut. I will be cutting 3cm2 squares from timber spindles with the bench saw and I plan to have a template on the CNC which i can secure a couple of hundred pieces onto at a time to finish each piece.
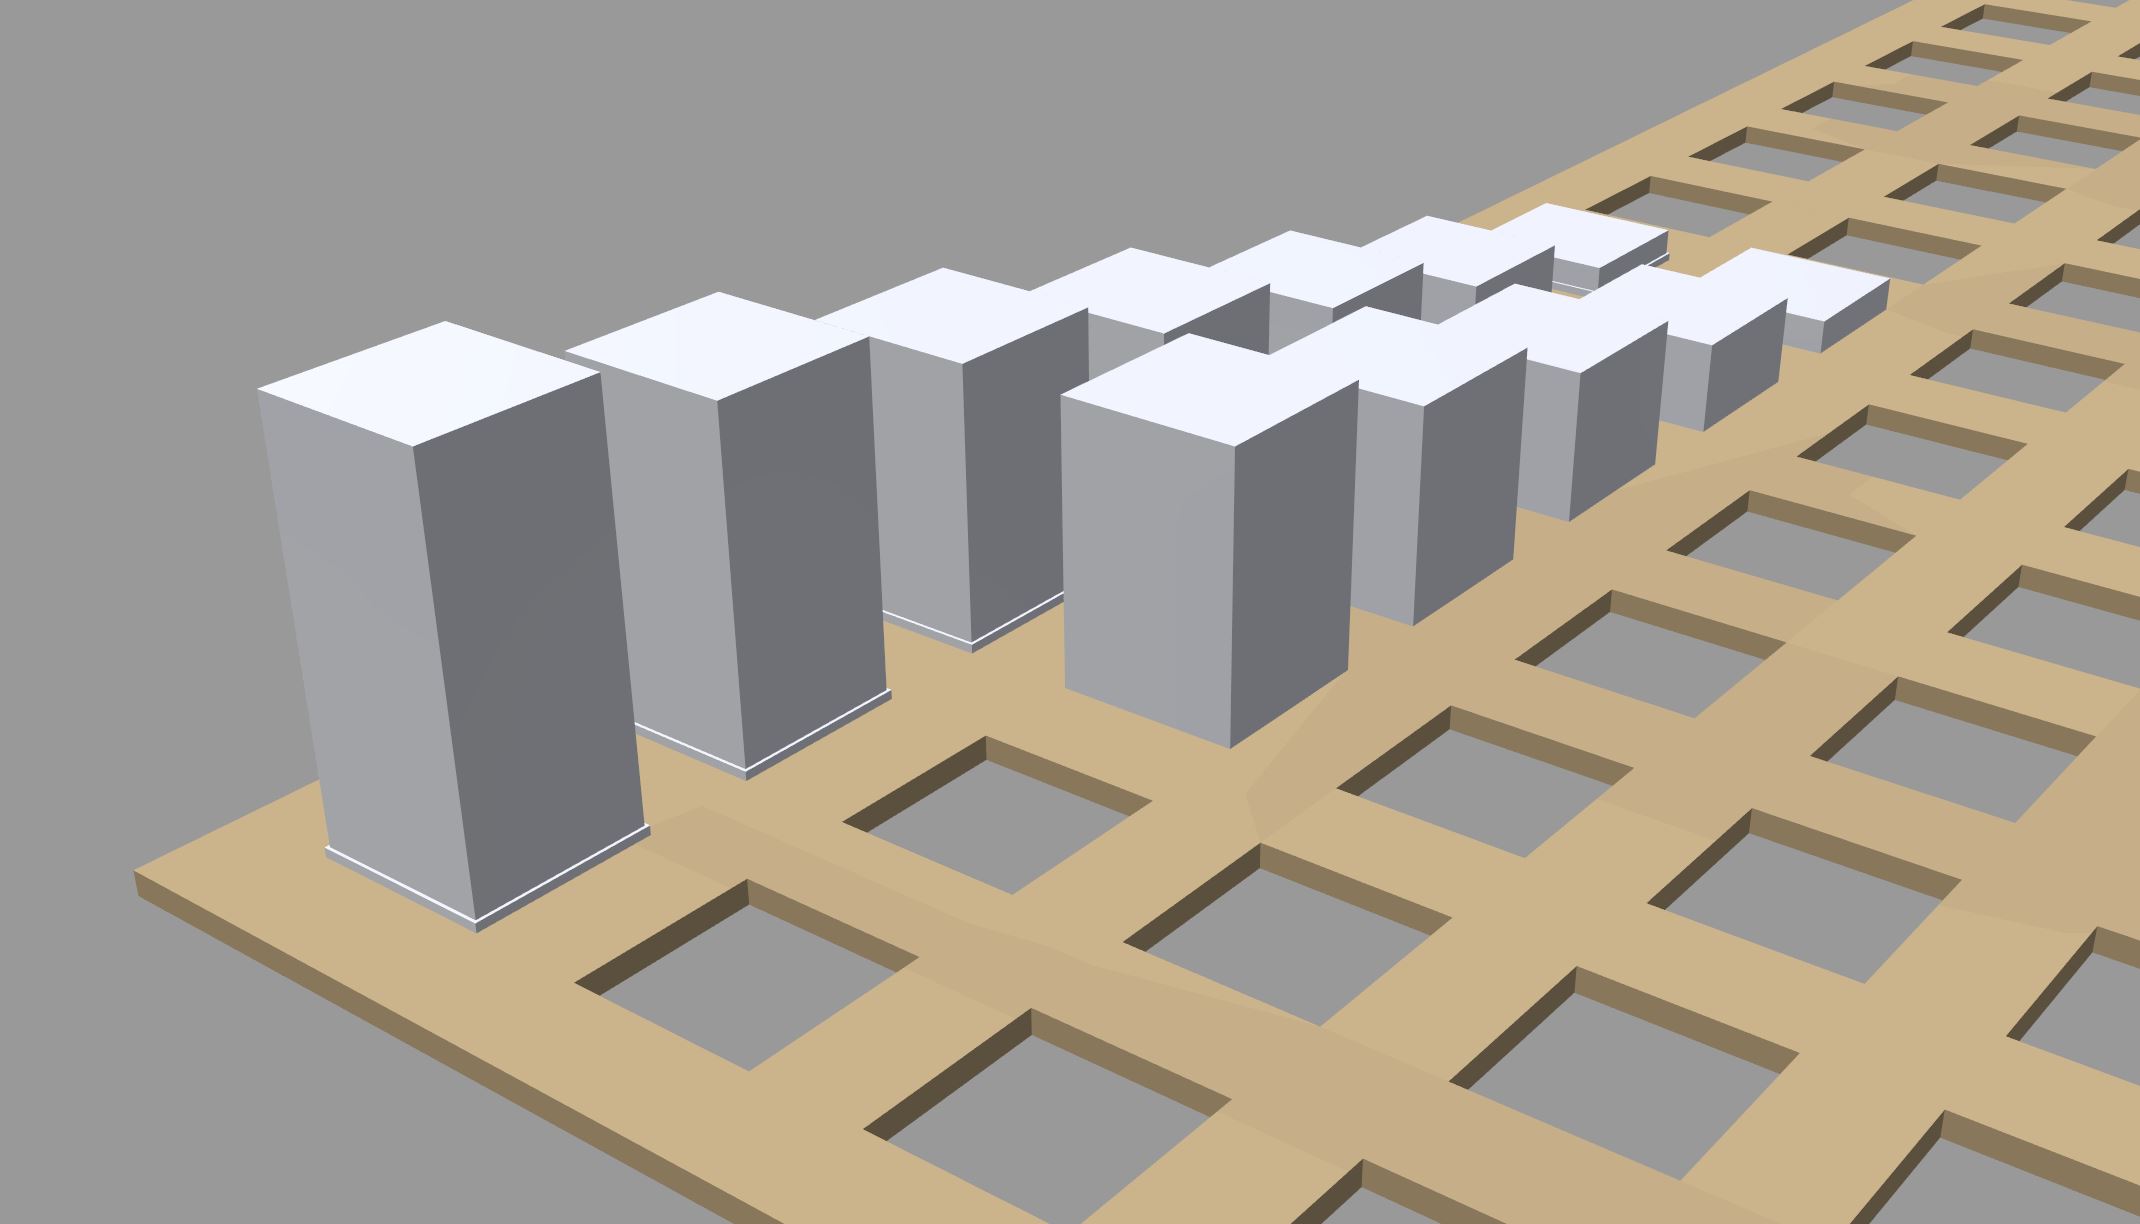
The image shows the cut I need the CNC to achieve on each timber piece. It’s 0.5mm all round the cube. This will allow me to place the pieces hard up against each other on the finished work of art and have this design gap built in.
Is it possible to achieve this type of cut around the perimeter of the work piece?
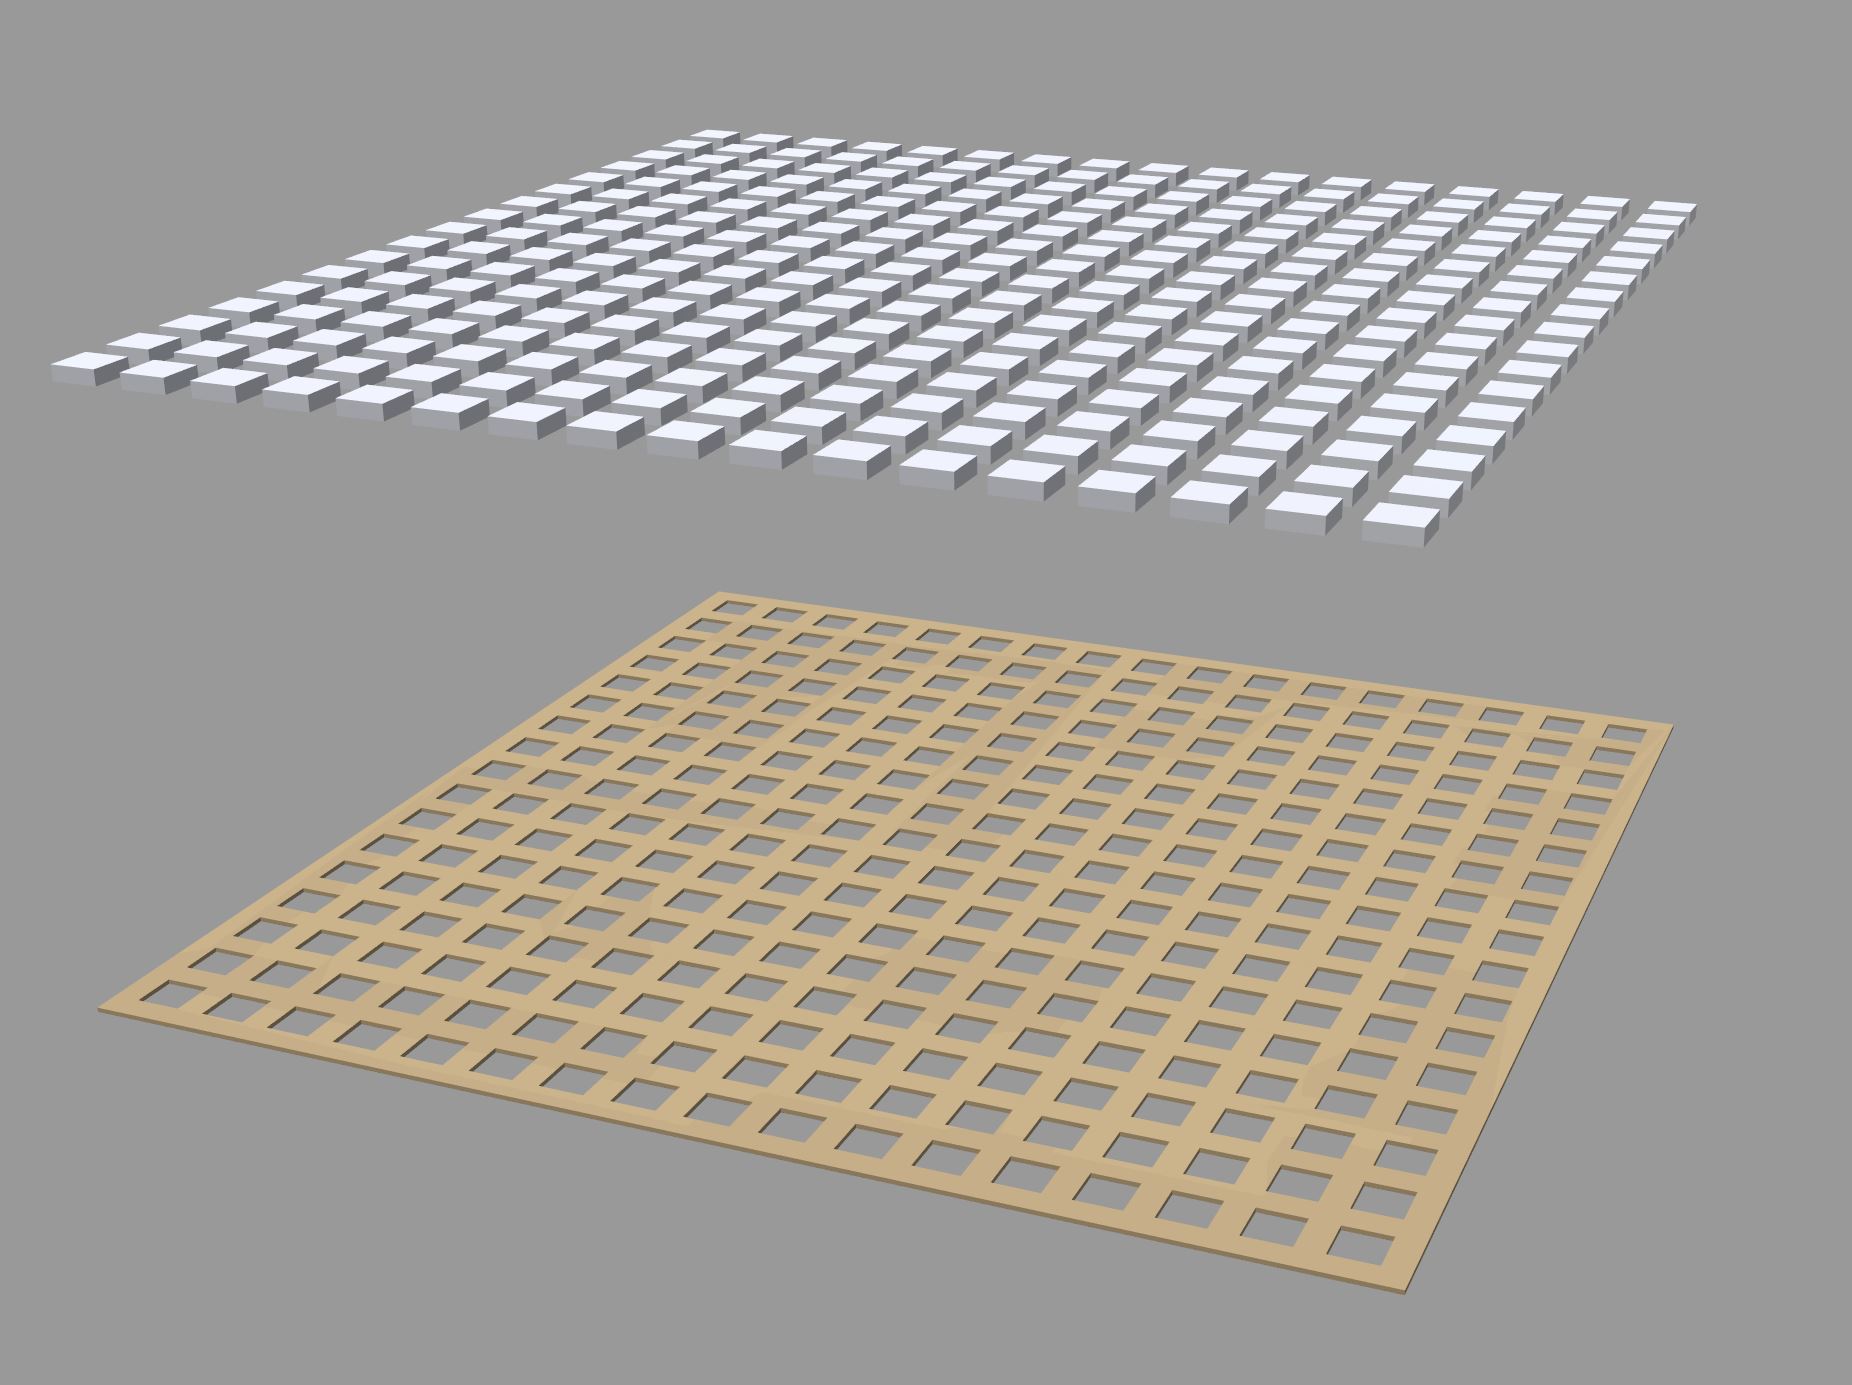
The dimensions above are shown in centimetres. This is the template i will plan to use on the CNC bed to position the pieces. The template will be 4mm thick as the router depth on the 1cm thick piece is 5mm.
I think if i purchase the XXL i can fit 17 rows x 17 rows in a template to position the pieces, so 289 per pass. Once complete, each piece would be turned 180deg. to router a hole for doweling to the finished base during assembly.
1cm or 10mm would be the minimum thickness i need to cut. The depths of these squares wil range fom 10mm up to 70mm.
I found it helpful to pocket all the way around, and to have tabs, but depending on the size of the stock and your workholding that may not be needful for your case.
Start w/ one, then double until you get to 16 then do a full row (or column) and iterate?
Here’s a side by side of the before and after router to achieve the 0.5mm perimeter step at various heights - up to three inches. The cubes are just over an inch square.
I thinking due to the volume i can have the single template piece held down an insert the 289 work pieces in a single go and perform the pass. would sticky tape under each one be enough? The template position guide will be like 4mm.
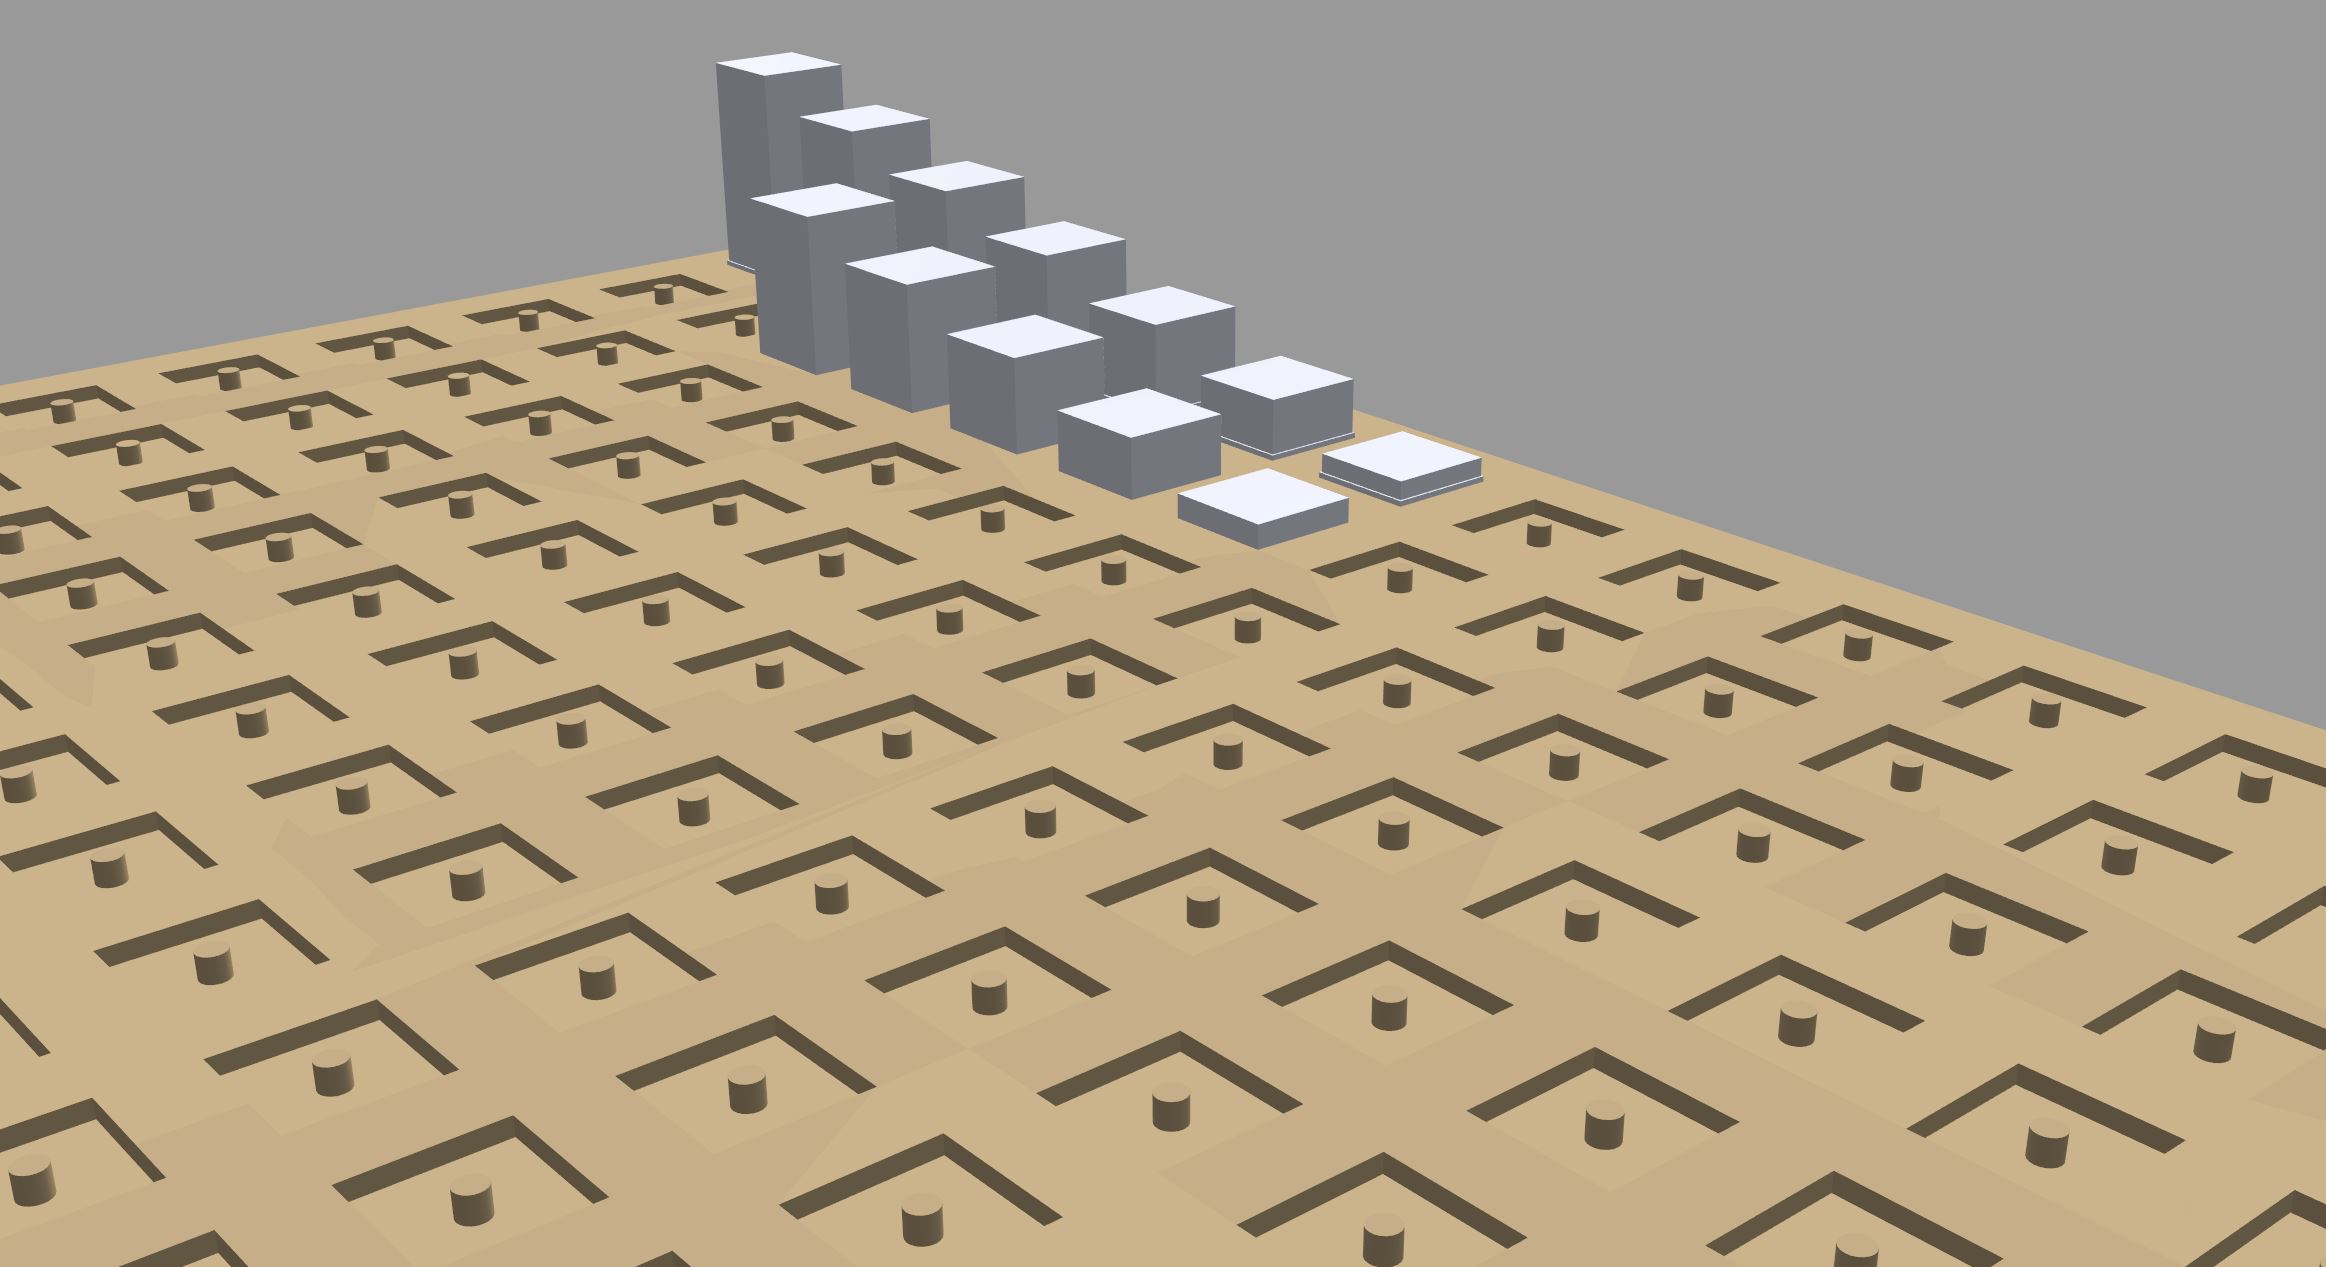
For the tall pieces it probably isn’t suitable. I could drill hole with the drill press first? and have this template on the CNC with dowels all ready in place, so i just place my cubes over the dowel within the template to hold for this rebate/step cut on CNC.
Maybe something like this, if the fit of the timber cubes into the template and dowel is quite snug, along with tape+glue, would this be enough to hold down the 289 work pieces? This template ‘jig’ would be clamped down on the CNC bed
I’m with @CrookedWoodTex on this one, unless this is a one-off thing you will probably suffer death by boredom if you end up having to hold 289 pieces manually, whatever the method (tape & glue or double-sided tape). Is there a specific reason why you wouldn’t want to mill all the pieces from a large piece of stock, rather than making the cubes on a band saw ?
Can you mill sets of cube of equal heights in one go, then cut other sets of different heights ?
Holding a 70mm tall piece and shaving off 0.5mm around its perimeter is going to be very (very) difficult.You would need an endmill with 70mm length of cut, which is very unusual, and then you would probably have to take very light passes to not knock off the piece from its support jig or not). If on the other hand you start from 70mm stock and just carve rows and columns spaced as appropriate, the cut will proceed one depth per pass at a time, and the lateral forces on the piece will be more manageable. Still need to find a looooong endmill though.
This seems like a job for more traditional carpentry tools. A planer, tablesaw and chop saw with jigs and stops will do this job much faster than a CNC in my mind. Like @Julien says, a 70mm depth of cut with this type of workholding is asking a lot. Is there a reason this needs to be done on a CNC?
Having a fixture for 289 separate pieces really seems like a recipe for disaster (or at least wasted time).
Could you perhaps share a model/drawing of the intended final result? Is it just a 1" cube with 0.5mm taken off each of the walls?
Is the material some kind of exotic architectural wood or it just bog standard?
I second the others’ recommendations to try to just put down a whole slab of raw stock at once and mill it directly but if that isn’t possible (you mentioned cutting the cubes from spindles), I’d figure out what the biggest piece of raw material you can work with is and go from there.
Thanks for the input guys and taking the time to look through it. It’s appreciated legends.
As a one off piece, using single stock material is the way to go. As the pieces will be used in sculpture work then brief wouldn’t be met by making from a single stock material. There are many designs so looking for a process to suit all and reduce waste. I guess the deeper the areas to cut through there would be a lot of waste.
Each piece will require a light sand, prime and finished in either acrylic, spray, metallic or clear coat…will depend on what the design of the work requires…so ultimately there needs to be individual pieces to allow for changing finishes on the wood depending on the design.
Cutting from a single stock will then make the piece look like it’s cut from single stock. Using individual pieces means I can conceal a core and maintain the gaps between the squares to the very edge. Size of the gap is quite critical as to appear as a uniform piece but not quite. How it was made / assembled needs to be hidden and not obvious as to focus on what the work is about and the finished aesthetic.
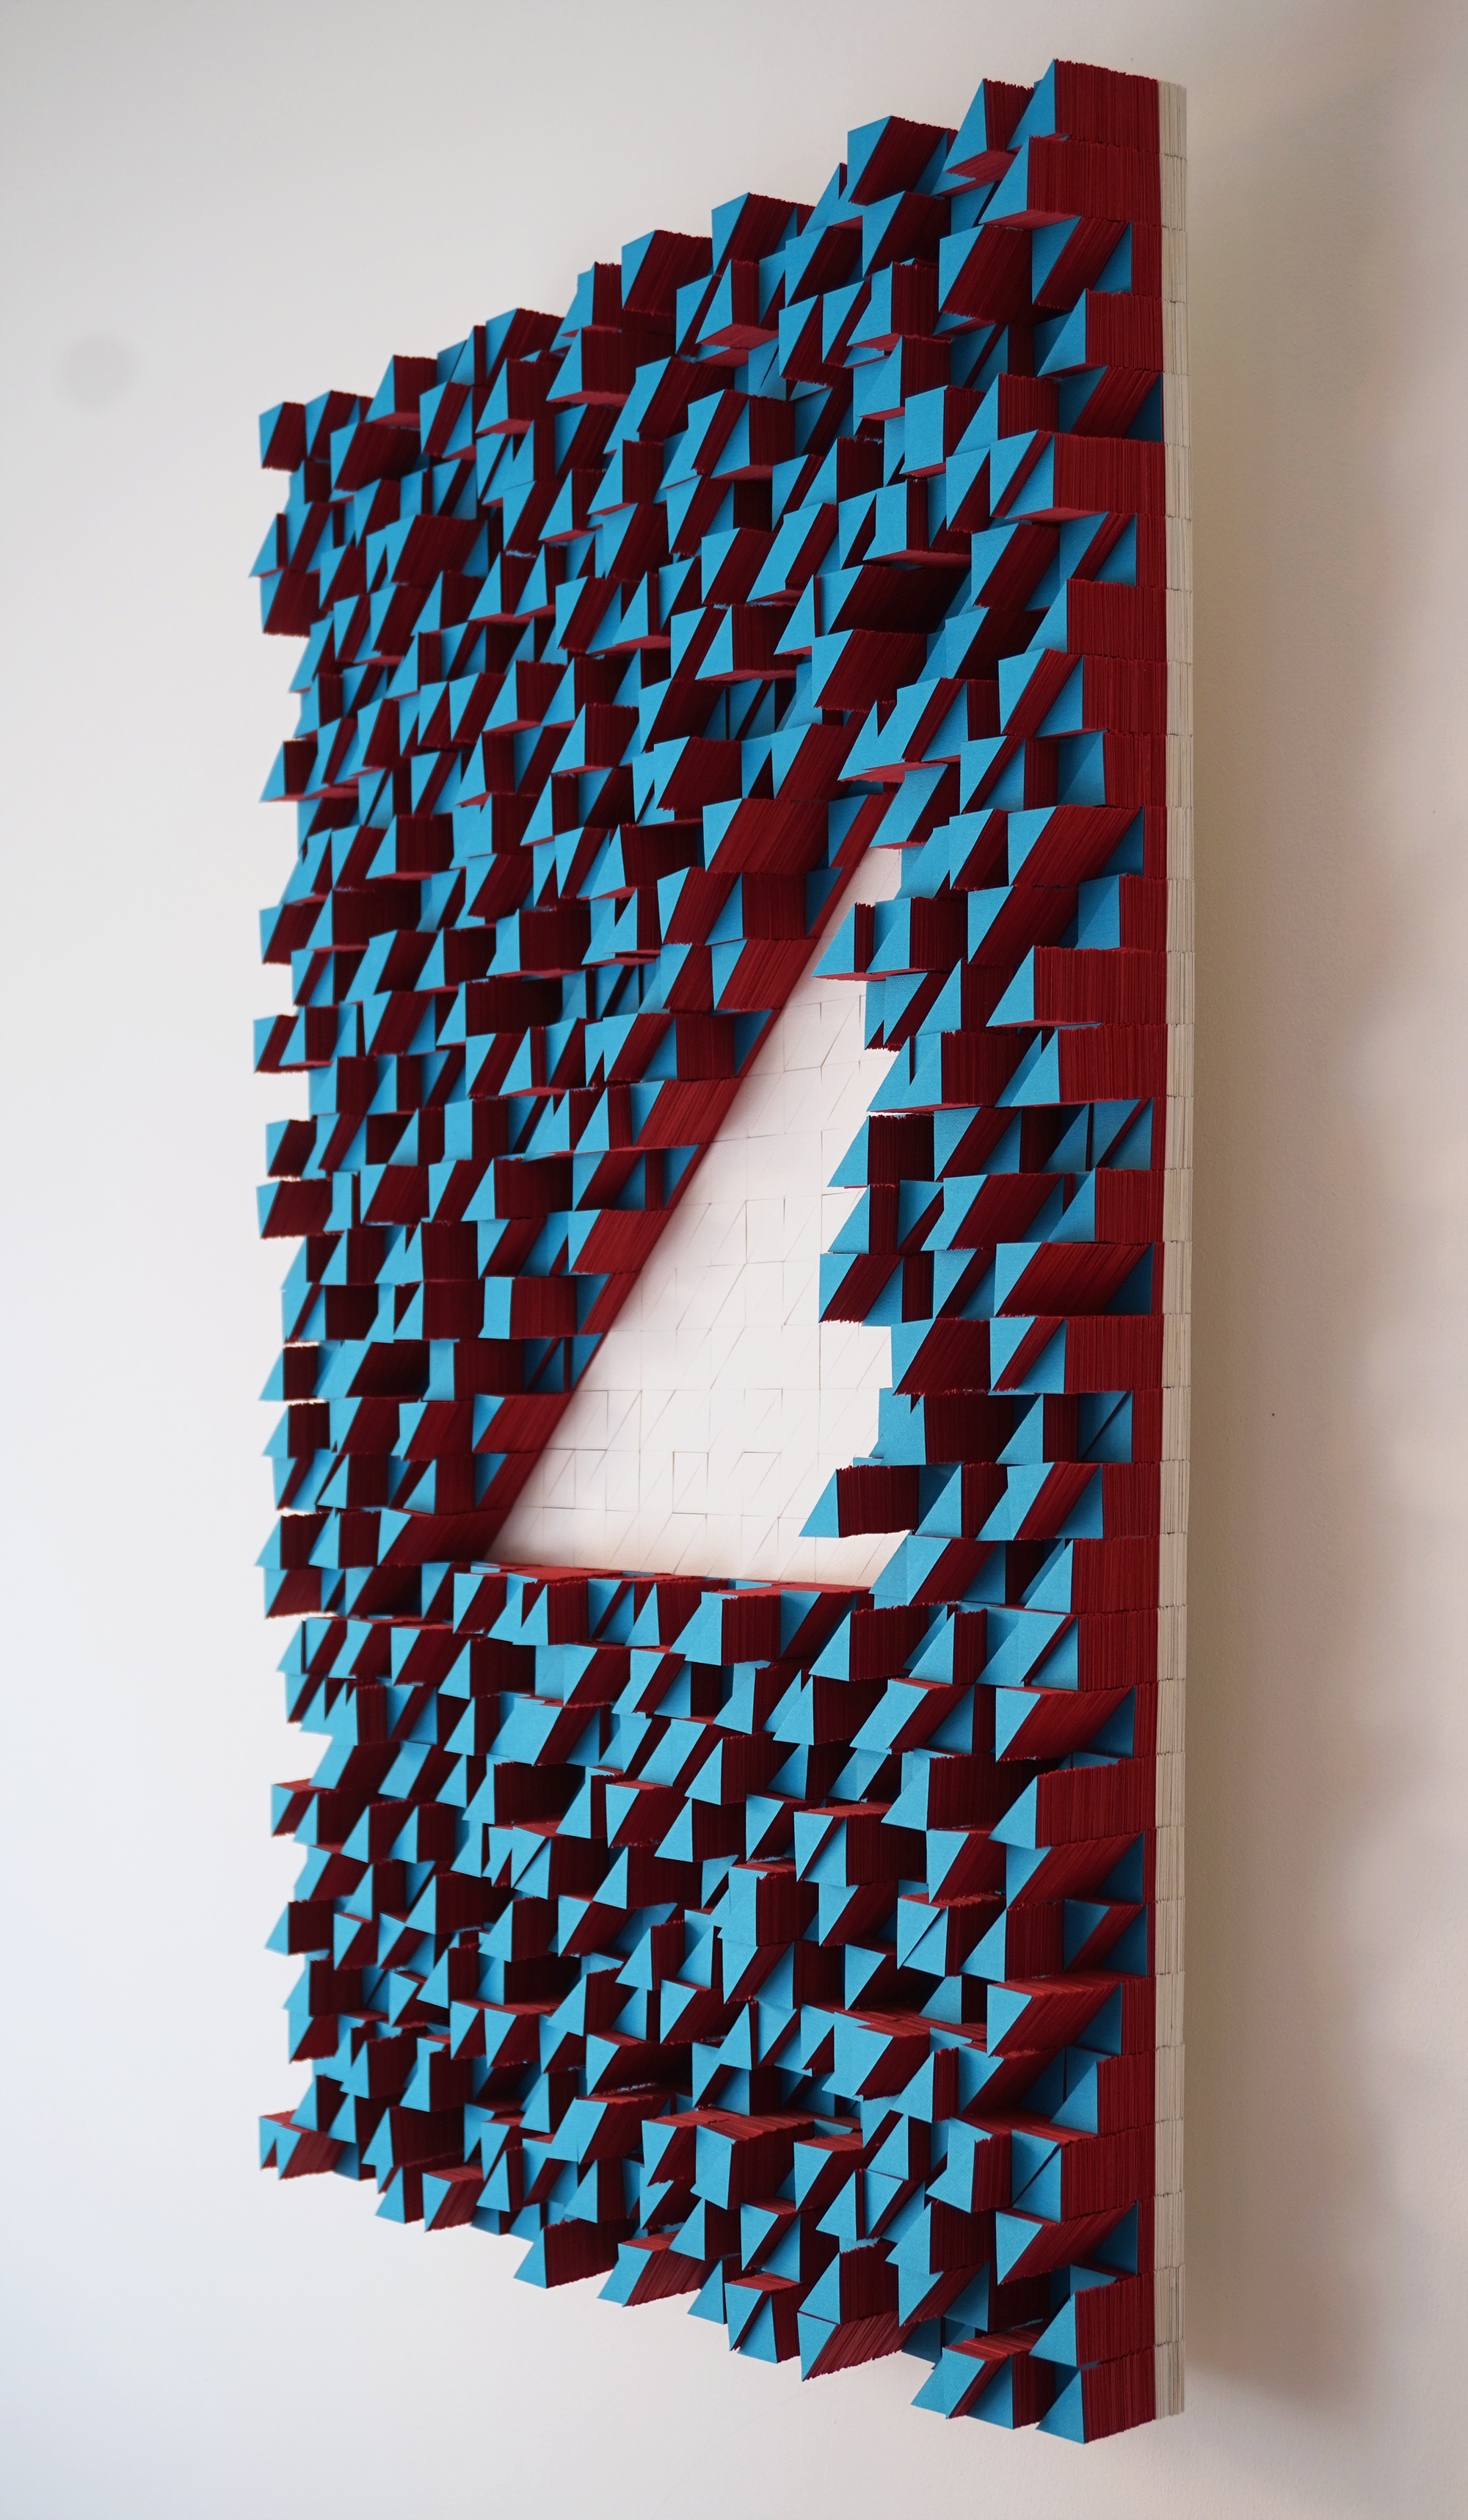
Here’s a paper sculpture I made by hand. Took 1000 hours of work in spare time.
This is made from 70000 individual pieces. Whatever process I decide on here will ultimately be more efficient than this, I just need it to be practical (within context of this) and accurate.
I am leaning towards carpentry side and jigs also. I could achieve the tolerances through iterating the process and jigs until its right. Each work will only require between 500-1000 cubes pieces.
There is a possibility of just having to bench saw, using mitre guide, to run off the cubes from planed all round stock length, drill hole with press and dowel to the core base (outsourced) and square them off in two directions as I go with glueing.
I was thinking with CNC I could design in the gap to achieve the 1mm so all I had to do was dowel and glue so the gap and squaring takes care of itself. I can reduce the max height of a cube down to 50mm. Holding down the many work pieces onto CNC bed is a tough one. Each piece will have a hole drilled anyway, so was thinking I can utilise this also for ‘slotting’ then into the template. Would be 17 strips of double sided tape and with tight fit in the template dowel could be enough to hold?
Trial and error with carpentry equipment may be the way to go.
I think you’re misunderstanding us when we talk about using a large slab of stock. What we’re saying isn’t “don’t bother making separate cubes, just make make a pre-assembled work in one piece”, what we’re saying is instead of cutting hundreds of cubes and then putting them in the fixture, put one big piece of stock on the bed and then turn it into cubes with your extra relief added.
i.e. the process you’re talking about is:
Cut hundreds of cubes elsewhere
Fix cubes to the CNC fixture one by one
Run the job
Remove the cubes
What we’re talking about is:
Grab one great big slab of wood
Attach one great big slab of wood to the bed
The CNC adds the reliefs
The CNC cuts out the cubes
Remove the cubes
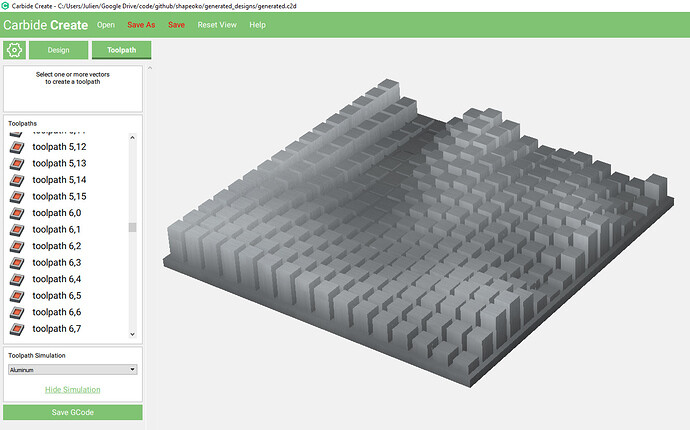
For example you can bolt down one big slab of wood and then use a 4mm endmill to cut a grid as deep as your wall relief needs to go, then use a 3mm endmill to cut all the cubes out. You’ve then got your cubes with 0.5mm reliefs in a single job with a single tool change and all you had to do by hand was bolt down your stock to the bed.
Either way you have a stack of separate cubes at the end. You can throw them in a bucket and jumble them up if you want to make sure they don’t look like they were cut from one piece.
And if you need a few different types of wood for example, you can do better than making a fixture with hundreds of slots, you can just put say 3 smaller slabs of different kinds of wood on the bed instead of one big one.
Good man. I did completely, apologies. I was just looking at that screen shot :). This is good. More waste too I imagine. 4mm in both directions every 30mm. Would require plenty of tabs? to keep in place once milled down to almost freeing an individual cube. Or you reckon the cubes would hold down on a bed of tape after it frees from the main stock?. I know you can take thickness of tape into account so it remains intact.
I like the process of milling the relief, changing bit then to compete the cut. Jumbling up not an issue most cases the pieces will be coated.
I was working construction at the time so it took like 18 months to complete. It sits 30mm off the wall.
Max stack height in the paper one there is 50mm. 18 layers of 270gsm paper per 10mm including the acid free permanent double sided tape. There are 13.5 batches of 1-90 layer stacks assorted over the surface. 69,898 to be exact, this include the white edge, the short stacks on reverse side and the 30mm hanging assembly.
Haha, I tested with with 540gsm, just over 1mm thick. I was using a guillotine and Xacto knife with steel rule. The thickness of the card essentially was too heavy for these tools in volume and didn’t quite give the right effect and once cut it began to split. Cutting that thickness of card kinda mashed/weakened the edge too so it was striking the balance. Couldn’t afford laser cutting at the time and it was a prototype piece I just tipped away at.


 legends.